2012 MERCEDES-BENZ SLS AMG COUPE tire type
[x] Cancel search: tire typePage 18 of 288

Trunk lidDisplay message ............................ 183
Opening/closing ........................73, 74
Trunk load (maximum)
see Technical data
Turn signals
Display message ............................ 174
Switching on/off .............................. 96
Type identification plate
see Vehicle identification plate
U
Unlocking Emergency unlocking .......................71
From inside the vehicle (central
unlocking button) ............................. 70
Upshift indicator ............................... 126
V
Vanity mirror (in sun visor) .............. 203
Vehicle Correct use ...................................... 22
Data acquisition ............................... 23
Display message ............................ 183
Equipment ....................................... 18
Individual settings ..........................157
Limited Warranty ............................. 22
Loading .......................................... 259
Locking (in an emergency) ...............72
Locking (SmartKey) .......................... 64
Lowering ........................................ 240
Maintenance .................................... 19
Parking for a long period ................ 131
Raising ........................................... 237
Reporting problems .........................22
Towing away .................................. 244
Transporting .................................. 246
Unlocking (in an emergency) ...........71
Unlocking (SmartKey) ................64, 69
Vehicle battery
see Battery (vehicle)
Vehicle data
see Technical data
Vehicle dimensions
see Technical data
Vehicle emergency locking ................ 72
Vehicle identification number
see VIN
Vehicle identification plate .............. 277
Vehicle tool kit .................................. 232
Vehicle weights see Technical data
Video (DVD) ........................................ 155
VIN ...................................................... 277
W
Warning and indicator lamps ABS ................................................ 192
Brakes ................................... 190, 192
Cruise control ................................ 137
Engine diagnostics .........................194
ESP ®
.............................................. 192
Fuel tank ........................................ 195
Overview .......................................... 28
PASSENGER AIR BAG OFF
indicator lamp .................................. 42
Reserve fuel ................................... 195
Seat belt ........................................ 191
SPORT handling mode ...................193
SRS ................................................ 193
Tire pressure monitor ....................196
Warranty ............................................ 277
Washer fluid Display message ............................ 184
see Windshield washer system
Weight
see Technical data
Wheel bolt tightening torque ........... 240
Wheel chock ...................................... 236
Wheels Changing a wheel .......................... 236
Checking ........................................ 251
Cleaning ......................................... 225
Important safety notes ..................250
Interchanging/changing ................271
Mounting a wheel .......................... 239
Removing a wheel ..........................239
Storing ........................................... 272
Tightening torque ........................... 240
Wheel size/tire size .......................272
Windows
Cleaning ......................................... 226
see Side windows
16Index
Page 130 of 288
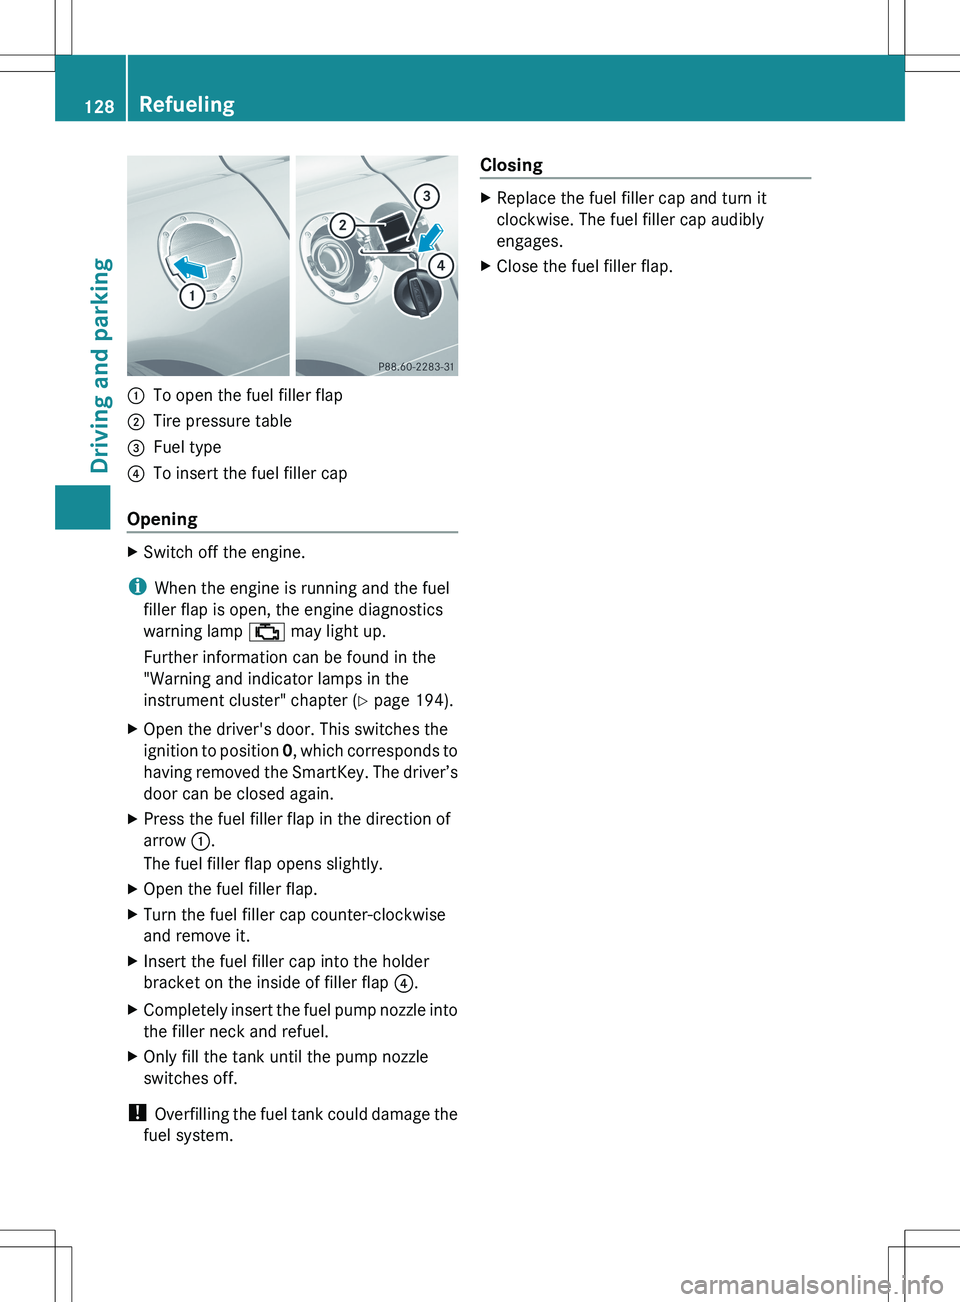
:To open the fuel filler flap;Tire pressure table=Fuel type?To insert the fuel filler cap
Opening
XSwitch off the engine.
iWhen the engine is running and the fuel
filler flap is open, the engine diagnostics
warning lamp ; may light up.
Further information can be found in the
"Warning and indicator lamps in the
instrument cluster" chapter ( Y page 194).
XOpen the driver's door. This switches the
ignition to position 0, which corresponds to
having removed the SmartKey. The driver’s
door can be closed again.XPress the fuel filler flap in the direction of
arrow :.
The fuel filler flap opens slightly.XOpen the fuel filler flap.XTurn the fuel filler cap counter-clockwise
and remove it.XInsert the fuel filler cap into the holder
bracket on the inside of filler flap ?.XCompletely insert the fuel pump nozzle into
the filler neck and refuel.XOnly fill the tank until the pump nozzle
switches off.
! Overfilling the fuel tank could damage the
fuel system.
ClosingXReplace the fuel filler cap and turn it
clockwise. The fuel filler cap audibly
engages.XClose the fuel filler flap.128RefuelingDriving and parking
Page 138 of 288
Summer tires
Observe the notes in the "Winter operation"
section ( Y page 252).
Slippery road surfaces
GWARNING
The outside temperature indicator is not
designed to serve as an ice-warning device
and is therefore unsuitable for that purpose.
Indicated temperatures just above the
freezing point do not guarantee that the road
surface is free of ice. The road may still be icy,
especially in wooded areas or on bridges.
GWARNING
On slippery road surfaces, never downshift in
order to obtain braking action. This could
result in drive wheel slip and reduced vehicle
control. Your vehicle's ABS will not prevent
this type of loss of control.
Drive particularly carefully on slippery road
surfaces. Avoid sudden acceleration, steering
and braking maneuvers. Do not use cruise
control.
If the vehicle threatens to skid or cannot be
stopped when moving at low speed:
XShift the transmission to position N.
i
For more information on driving with
snow chains, see ( Y page 252).
GWARNING
Make sure that you do not endanger other
road users when you apply the brakes.
Driving systems
Cruise control
Important safety notes
Cruise control maintains a constant road
speed for you. It brakes automatically in order
to avoid exceeding the set speed. On long and
steep downhill gradients, especially if the
vehicle is laden, you must select shift range
1 , 2 or 3 in good time. By doing so, you will
make use of the braking effect of the engine,
which relieves the load on the brake system
and prevents the brakes from overheating
and wearing too quickly.
Use cruise control only if road and traffic
conditions make it appropriate to maintain a
steady speed for a prolonged period. You can
set any road speed above 20 mph
(30 km/h).GWARNING
The cruise control is a convenience system
designed to assist the driver during vehicle
operation. The driver is and must always
remain responsible for the vehicle's speed
and for safe brake operation.
Only use the cruise control if the road, traffic,
and weather conditions make it advisable to
travel at a constant speed.
R The use of the cruise control can be
dangerous on winding roads or in heavy
traffic because conditions do not allow safe
driving at a constant speed.
R The use of the cruise control can be
dangerous on slippery roads. Rapid
changes in tire traction can result in wheel
spin and loss of control.
R Deactivate the cruise control when driving
in fog.
The "Resume" function should only be
operated if the driver is fully aware of the
previously set speed and wishes to resume
this particular preset speed.
GWARNING
The cruise control brakes automatically so
that the set speed is not exceeded.
136Driving systemsDriving and parking
Page 252 of 288
Useful information
i This Operator's Manual describes all
models and all standard and optional
equipment of your vehicle available at the
time of publication of the Operator's
Manual. Country-specific differences are
possible. Please note that your vehicle may
not be equipped with all features
described. This also applies to safety-
related systems and functions.
i Please read the information on qualified
specialist workshops ( Y page 21).
Important safety notes
Consult an authorized Mercedes-Benz Center
if you require information on approved and
recommended tires and wheels for summer
and winter operation. Advice on purchasing
and caring for tires is also available there.
GWARNING
Replace rims or tires with the same
designation, manufacturer and type as shown
on the original part. For further information
contact an authorized Mercedes-Benz Center.
If incorrectly sized rims and tires are
mounted, the wheel brakes or suspension
components can be damaged. Also, the
operating clearance of the wheels and the
tires may no longer be correct.
GWARNING
Worn, old tires can cause accidents. If the tire
tread is worn to minimum tread depth, or if
the tires have sustained damage, replace
them.
When replacing rims, only use genuine
Mercedes-Benz wheel bolts specified for the
particular rim type. Failure to do so can result
in the bolts loosening and possibly an
accident.
Retreaded tires are not tested or
recommended by Mercedes-Benz, since
previous damage cannot always be
recognized on retreads. The operating safety
of the vehicle cannot be assured when such
tires are used.GWARNING
If you feel a sudden significant vibration or
ride disturbance, or you suspect that possible
damage to your vehicle has occurred, you
should turn on the hazard warning flashers,
carefully slow down, and drive with caution to
an area which is a safe distance from the road.
Inspect the tires and the vehicle underbody
for possible damage. If the vehicle appears
unsafe, have the vehicle towed to the nearest
authorized Mercedes-Benz Center or tire
dealer for repairs.
GWARNING
Do not drive with a flat tire. A flat tire affects
the ability to steer or brake the vehicle. You
might lose control of the vehicle. Continued
driving with a flat tire or driving at high speed
with a flat tire will cause excessive heat build-
up and possibly a fire.
i Further information about tires and
wheels can be obtained from any
authorized Mercedes-Benz Center.
Operation
Notes on driving
R If the vehicle is heavily laden, check the tire
pressures and correct them if necessary.
R When parking your vehicle, make sure that
the tires do not get deformed by the curb
or other obstacles. If it is necessary to drive
over curbs, speed humps or similar
elevations, try to do so slowly and at an
obtuse angle. Otherwise, the tires,
particularly the sidewalls, can get
damaged.
250OperationTires and wheels
Page 253 of 288
Notes on regularly inspecting wheels
and tiresGWARNING
Regularly check the tires for damage.
Damaged tires can cause tire inflation
pressure loss. As a result, you could lose
control of your vehicle.
Worn, old tires can cause accidents. If the tire
tread is worn to minimum tread depth, or if
the tires have sustained damage, replace
them.
R Regularly check the wheels and tires of
your vehicle for damage (e.g. cuts,
punctures, tears, bulges on tires and
deformation or cracks or severe corrosion
on wheels) at least once a month, as well
as after driving off-road or on rough roads.
Damaged wheels can cause a loss of tire
pressure.
R Regularly check the tire tread depth and
the condition of the tread across the whole
width of the tire (Y page 251). If necessary,
turn the front wheels to full lock in order to
inspect the inner side of the tire surface.
R All wheels must have a valve cap to protect
the valve against dirt and moisture. Do not
mount anything onto the valve (such as tire
pressure monitoring systems) other than
the standard valve cap or other valve caps
approved by Mercedes-Benz for your
vehicle.
R Regularly check the pressure of all the tires
including the emergency spare wheel or the
spare wheel, particularly prior to long trips,
and correct the pressure as necessary
( Y page 253).
Tire tread
GWARNING
Although the applicable federal motor vehicle
safety laws consider a tire to be worn when
the tread wear indicators (TWI) become
visible at approximately 1
/ 16 in (1.6 mm), we
recommend that you do not allow your tires
to wear down to that level. As tread depth
approaches 1
/ 8 in (3 mm), the adhesion
properties on a wet road are sharply reduced.
Depending upon the weather and/or road
surface (conditions), the tire traction varies
widely.
Do not use tires that are excessively worn as
the tire traction on wet road surfaces
decreases significantly when the tread depth
is less than ⅛ inch (3 mm).
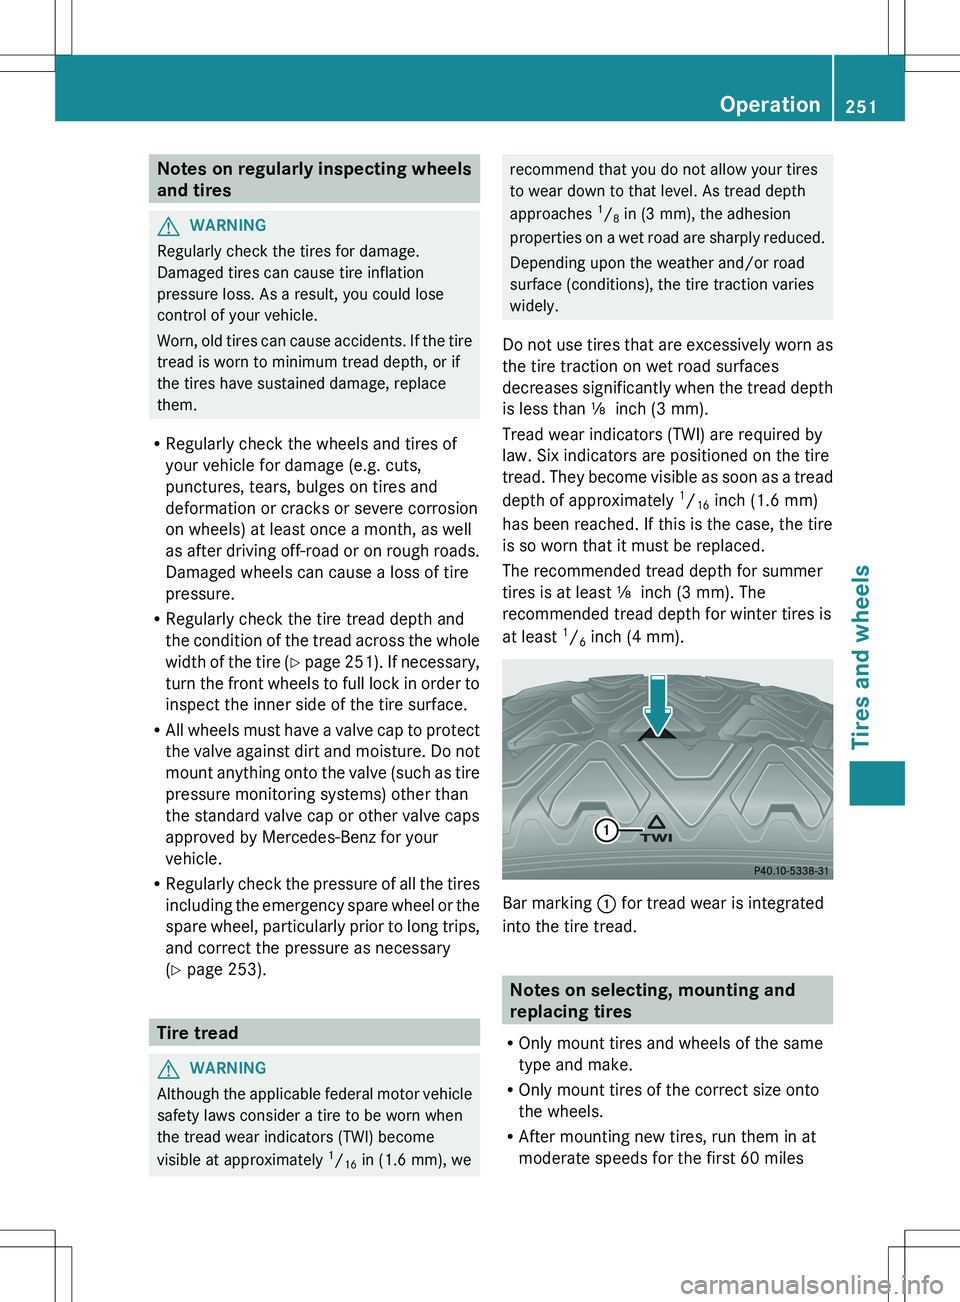
Tread wear indicators (TWI) are required by
law. Six indicators are positioned on the tire
tread. They become visible as soon as a tread
depth of approximately 1
/ 16 inch (1.6 mm)
has been reached. If this is the case, the tire
is so worn that it must be replaced.
The recommended tread depth for summer
tires is at least ⅛ inch (3 mm). The
recommended tread depth for winter tires is
at least 1
/ 6 inch (4 mm).
Bar marking
: for tread wear is integrated
into the tire tread.
Notes on selecting, mounting and
replacing tires
R Only mount tires and wheels of the same
type and make.
R Only mount tires of the correct size onto
the wheels.
R After mounting new tires, run them in at
moderate speeds for the first 60 miles
Operation251Tires and wheelsZ
Page 254 of 288
(100 km) as they only reach their full
performance after this distance.
R Do not use tires that are excessively worn
as the tire traction on wet road surfaces
decreases significantly when the tread
depth is less than 1
/ 8 inch (3 mm).
R Replace the tires after six years at the
latest, regardless of wear. This also applies
to the spare wheel/emergency spare
wheel.
The service life of tires depends on the
following factors amongst other things:
R driving style
R tire pressure
R mileage
Winter operation
General notes
Have your vehicle winterproofed at a qualified
specialist workshop at the onset of winter.
Observe the notes in the "Changing a wheel"
section ( Y page 271).
Driving with summer tires
At temperatures below 45 ‡ (+7 †), the
elasticity of summer tires and therefore also
the traction and braking capability are
reduced considerably — equip your vehicle
with M+S tires. Using summer tires at very
cold temperatures could cause tears to form,
thereby damaging the tires permanently.
Mercedes-Benz cannot accept responsibility
for this type of damage.
Snow chains
! There is not enough space for snow
chains on some wheel sizes. Observe the
information under "Tires and wheels" in the
"Technical Data" section to avoid damage
to the vehicle or the wheels.
For safety reasons, Mercedes-Benz
recommends that you only use snow chains
that have been specially approved for your
vehicle by Mercedes-Benz, or are of a
corresponding standard of quality.
R local regulations may restrict the use of
snow chains. Observe the appropriate
regulations if you wish to mount snow
chains.
R only use snow chains when driving on roads
completely covered by snow. Remove the
snow chains as soon as possible when you
come to a road that is not snow-covered.
R Do not exceed the maximum permissible
speed of 30 mph (50 km/h).
R you may not mount snow chains to all
wheel-tire combinations; see the
information under "Wheels and tires" in the
"Technical data" section.
R snow chains must not be mounted on
emergency spare wheels.
R mount snow chains only in pairs and only
on the rear wheels. Observe the
manufacturer's installation instructions.
! If snow chains are mounted on the front
wheels, the snow chains could grind
against the bodywork or components of the
chassis. This could result in damage to the
vehicle or the tires.
i You may wish to deactivate
ESP ®
(Y page 56) when pulling away with
snow chains mounted. This way you can
allow the wheels to spin in a controlled
manner, achieving an increased driving
force (cutting action).
M+S tires
GWARNING
M+S tires with a tread depth of less than 1
/ 6
inch (4 mm) must be replaced. They are no
longer suitable for winter operation.
252Winter operationTires and wheels
Page 255 of 288
GWARNING
If you mount the spare wheel when driving
with M+S tires, bear in mind that driving
stability will be impaired due to unstable
cornering characteristics caused by the
different tire characteristics. Adapt your style
of driving accordingly.
Have the spare wheel replaced by a normal
wheel with an M+S tire at the nearest
Mercedes-Benz Center.
At temperatures below 45 ‡(+7 †), use
winter tires or all-season tires. Both types of
tire are identified by the M+S marking.
Only winter tires bearing the i snowflake
symbol in addition to the M+S marking
provide the best possible grip in wintry road
conditions. Only these tires will allow driving
safety systems such as ABS and ESP ®
to
function optimally in winter, as these tires
have been designed specifically for driving on
snow.
Use M+S tires of the same make and tread on
all wheels to maintain safe handling
characteristics.
Always observe the maximum permissible
speed specified for the M+S tires you have
mounted.
When you have installed the M+S tires:
XCheck the tire pressures ( Y page 253).XRestart the tire pressure monitor
( Y page 259).
Tire pressure
Tire pressure specifications
GWARNING
Follow recommended tire inflation pressures.
Do not underinflate tires. Underinflated tires
wear excessively and/or unevenly, adversely
affect handling and fuel economy, and are
more likely to fail from being overheated.
Do not overinflate tires. Overinflated tires can
adversely affect handling and ride comfort,
wear unevenly, increase stopping distance,
and result in sudden deflation (blowout)
because they are more likely to become
punctured or damaged by road debris,
potholes etc.
Do not overload the tires by exceeding the
specified load limit as indicated on the Tire
and Loading Information placard on the
driver's door B-pillar. Overloading the tires
can overheat them, possibly causing a
blowout. Overloading the tires can also result
in handling or steering problems, or brake
failure.
You will find a table of recommended tire
pressures on the Tire and Loading
Information placard on the B-pillar on the
driver's side ( Y page 259). You will find a
table of tire pressures for various operating
conditions on the inside of your vehicle's fuel
filler flap.
To test tire pressure, use a suitable pressure
gauge. The outer appearance of a tire does
not permit any reliable conclusion about the
tire pressure. On vehicles equipped with the
electronic tire pressure monitoring system,
the tire pressure can be checked using the
on-board computer.GWARNING
Should the tire pressure drop repeatedly:
R check the tire for foreign bodies.
R check whether the wheel is losing air or the
valve is leaking.
R make sure that only a valve cap approved
by Mercedes-Benz is installed on the tire
valve.
Tire pressures that are too low have a
negative effect on vehicle safety, which could
lead you to cause an accident.
Only correct tire pressures when the tires are
cold. The tires are cold when the vehicle has
been parked for at least three hours or driven
for less than 1 mile (1.6 km). The tire
temperature changes depending on the
outside temperature, the vehicle speed and
Tire pressure253Tires and wheelsZ
Page 268 of 288
pressure, to be used only temporarily in an
emergency.
Tire width: tire width : shows the nominal
tire width in millimeters.
Nominal aspect ratio: aspect ratio ; is the
ratio between the tire height and tire width
and is shown as a percentage. The aspect
ratio is calculated by dividing the tire width by
the tire height.
Tire code: tire code = specifies the tire type.
"R" represents radial tires; "D" represents
diagonal tires; "B" represents diagonal radial
tires.
Optionally, tires with a maximum speed of
over 149 mph (240 km/h) may have "ZR" in
the size description depending on the
manufacturer (e.g. 245/40 ZR 18).
Rim diameter: rim diameter ? is the
diameter of the bead seat, not the diameter
of the rim flange. The rim diameter is
specified in inches (in).
Load bearing index: load bearing index A
is a numerical code which specifies the
maximum load-bearing capacity of a tire.GWARNING
The tire load rating must always be at least
half of the GAWR of your vehicle. Otherwise,
sudden tire failure may be the result which
could cause an accident and/or serious injury
to you or others.
Always replace rims and tires with rims and
tires having the same specifications
(designation, manufacturer and type) as
shown on the original part.
GWARNING
Do not overload the tires by exceeding the
specified load limit as indicated on the Tire
and Loading Information placard on the
driver's door B-pillar. Overloading the tires
can overheat them, possibly causing a
blowout. Overloading the tires can also result
in handling or steering problems, or brake
failure.
Example:
The load bearing index 91 is equivalent to a
maximum load of 1356 lbs (615 kg) that the
tire can carry. For further information on the
maximum tire load in kilograms and pounds,
see ( Y page 263).
For further information on the load bearing
index, see Load index ( Y page 267).
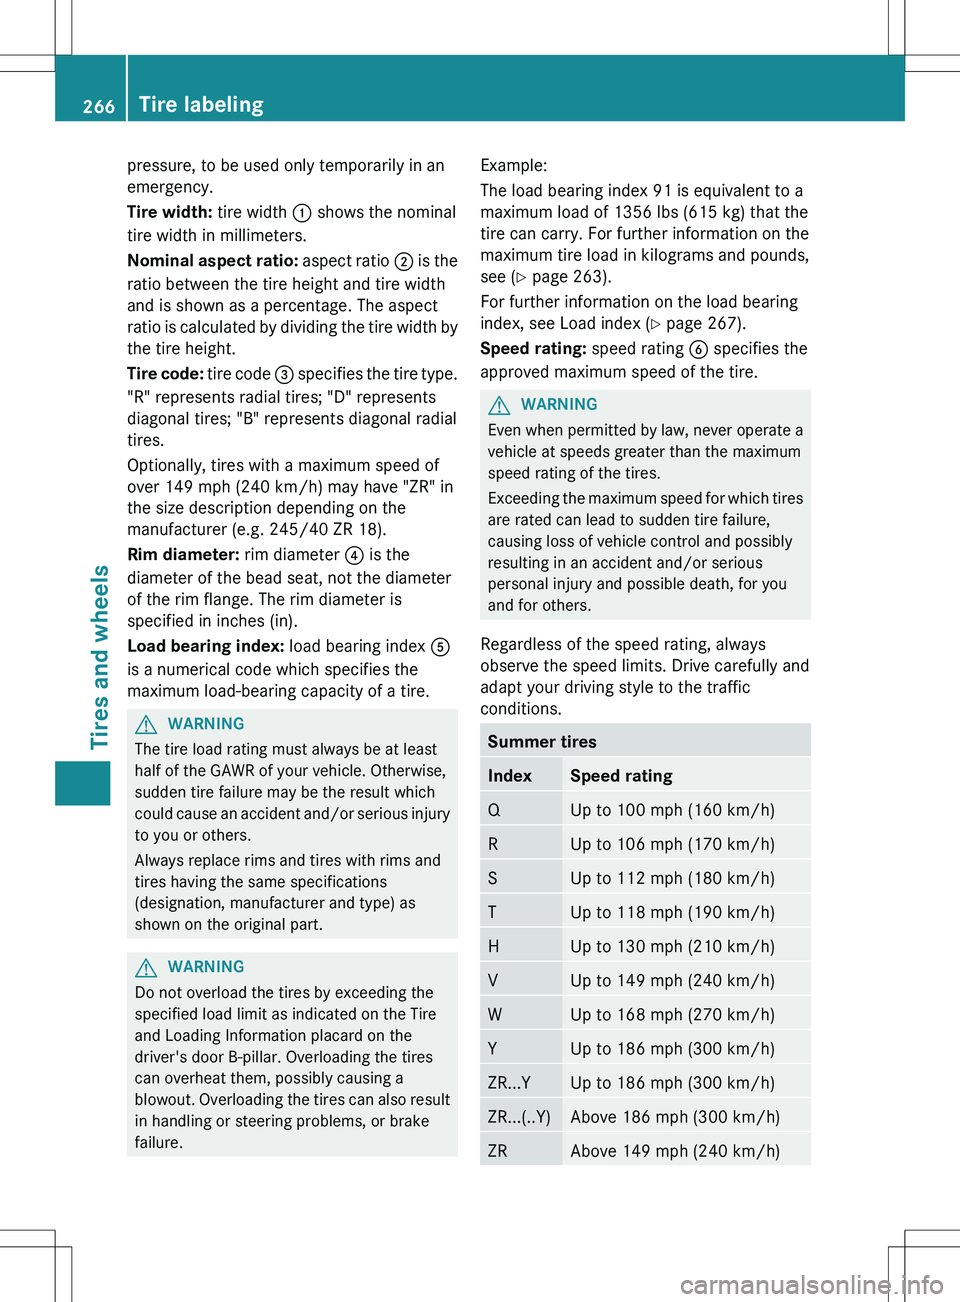
Speed rating: speed rating B specifies the
approved maximum speed of the tire.GWARNING
Even when permitted by law, never operate a
vehicle at speeds greater than the maximum
speed rating of the tires.
Exceeding the maximum speed for which tires
are rated can lead to sudden tire failure,
causing loss of vehicle control and possibly
resulting in an accident and/or serious
personal injury and possible death, for you
and for others.
Regardless of the speed rating, always
observe the speed limits. Drive carefully and
adapt your driving style to the traffic
conditions.
Summer tiresIndexSpeed ratingQUp to 100 mph (160 km/h)RUp to 106 mph (170 km/h)SUp to 112 mph (180 km/h)TUp to 118 mph (190 km/h)HUp to 130 mph (210 km/h)VUp to 149 mph (240 km/h)WUp to 168 mph (270 km/h)YUp to 186 mph (300 km/h)ZR...YUp to 186 mph (300 km/h)ZR...(..Y)Above 186 mph (300 km/h)ZRAbove 149 mph (240 km/h)266Tire labelingTires and wheels