2012 MERCEDES-BENZ SLS AMG COUPE run flat
[x] Cancel search: run flatPage 10 of 288

Emergency releaseDriver's door .................................... 71
Trunk ............................................... 75
Vehicle ............................................. 71
Emergency Tensioning Devices
Function ........................................... 50
Safety guidelines ............................. 37
Emissions control
Service and warranty information ....18
Engine
Display message ............................ 176
Engine number ............................... 278
Irregular running ............................ 118
Starting .......................................... 116
Starting problems ..........................118
Starting the engine with the key ....116
Starting with the KEYLESS-GO
start function ................................. 116
Switching off .................................. 130
Engine diagnostics warning lamp .... 194
Engine electronics Problem (malfunction) ...................118
Engine oil
Adding ........................................... 220
Additives ........................................ 282
Checking the oil level ..................... 219
Display
message ................................ 178, 179
Filling capacity ............................... 280
Notes about oil grades ................... 282
Notes on oil level/consumption ....219
Temperature (on-board computer) . 160
Temperature gauge ........................ 148
Viscosity ........................................ 282
E-SELECT lever ................................... 119
ESP ®
(Electronic Stability
Program) Deactivating/activating ...................57
Display message ............................ 170
Function/notes ................................ 56
Important safety information ...........56
Warning lamp ................................. 192
ETS (Electronic Traction System) ....... 56
Exhaust check ................................... 133
Exhaust tail pipe (cleaning
instructions) ...................................... 228Exterior lighting
see Lights
Exterior mirrors
Adjusting ......................................... 89
Dipping (automatic) .........................90
Folding in/out (automatically) .........90
Folding in/out (electrically) .............90
Folding in when locking (on-board
computer) ...................................... 160
Out of position (troubleshooting) .....90
Setting ............................................. 90
Storing settings (memory
function) .......................................... 91
Storing the parking position ............. 91
F
Filler cap see Fuel filler flap
First-aid kit ......................................... 232
Flat tire Changing a wheel/mounting the
spare wheel ................................... 236
Preparing the vehicle .....................233
Raising the vehicle .........................237
TIREFIT kit ...................................... 233
Floormat ............................................. 216
Front windshield see Windshield
Fuel
Additives ........................................ 281
Consumption statistics ..................152
Displaying the range ......................152
Driving tips .................................... 132
Fuel gauge ....................................... 27
Important safety notes ..................280
Premium-grade unleaded gasoline . 281
Problem (malfunction) ...................129
Refueling ........................................ 127
Specifications ................................ 281
Tank content/reserve fuel .............280
Fuel filler flap, opening/closing ....... 127
Fuel filter (display message) ............ 180
Fuel level Calling up the range (on-board
computer) ...................................... 152
8Index
Page 17 of 288
Display message ............................ 181
Distribution of the vehicle
occupants (definition) ....................271
DOT, Tire Identification Number
(TIN) ............................................... 268
DOT (Department of
Transportation) (definition) ............268
GAWR (Gross Axle Weight Rating)
(definition) ..................................... 269
GVW (Gross Vehicle Weight)
(definition) ..................................... 269
GVWR (Gross Vehicle Weight
Rating) (definition) .........................269
Important safety notes ..................250
Increased vehicle weight due to
optional equipment (definition) ......269
Kilopascal (kPa) (definition) ...........270
Labeling (overview) ........................265
Load bearing index (definition) ......271
Load index ..................................... 267
Load index (definition) ...................270
Maximum loaded vehicle weight
(definition) ..................................... 269
Maximum load on a tire
(definition) ..................................... 270
Maximum permissible tire
pressure (definition) ....................... 270
Maximum tire load .........................263
Maximum tire load (definition) .......270
Optional equipment weight
(definition) ..................................... 271
PSI (pounds per square inch)
(definition) ..................................... 270
Replacing ....................................... 271
Service life ..................................... 251
Sidewall (definition) .......................270
Speed rating (definition) ................269
Storing ........................................... 272
Structure and characteristics
(definition) ..................................... 268
Technical data ............................... 274
Temperature .................................. 264
TIN (Tire Identification Number)
(definition) ..................................... 271
Tire bead (definition) ......................270
Tire pressure (definition) ................270
Tire pressures (recommended) ......269
Tire size (data) ............................... 272Tire size designation, load-bearing
capacity, speed rating .................... 265
Tire tread ....................................... 251
Tire tread (definition) .....................270
Total load limit (definition) .............271
Traction ......................................... 264
Traction (definition) .......................271
Tread wear ..................................... 264
Uniform Tire Quality Grading
Standards ...................................... 263
Uniform Tire Quality Grading
Standards (definition) ....................269
Unladen weight (definition) ............270
Wear indicator (definition) .............271
Wheel rim (definition) ....................269
see Flat tire
Top Tether ............................................ 53
Tow-away alarm .................................. 60
Towing Important safety guidelines ...........244
Installing the towing eye ................245
Removing the towing eye ...............246
With the rear axle raised ................246
Towing away
With both axles on the ground .......246
Transmission
Driving tips .................................... 122
Selector lever ................................ 119
Shift range ..................................... 125
Transmission position display ......... 121
Transmission positions .................... 121
Transporting the vehicle .................. 246
Trim pieces (cleaning instructions) . 229
Trip computer (on-board
computer) .......................................... 152
Trip meter see Trip odometer
Trip odometer
Calling up ....................................... 152
Resetting (on-board computer) ......152
Trunk
Emergency release ..........................75
Important safety guidelines .............73
Locking separately ...........................74
Opening (automatically from
inside) .............................................. 74Index15
Page 134 of 288
XVisit a qualified specialist workshop and
seek advice.
Driving tips
General driving tips
Important safety notes
GWARNING
Please do not forget that your primary
responsibility is to drive the vehicle. A driver's
attention to the road must always be his/her
primary focus when driving. For your safety
and the safety of others, we recommend that
you pull over to a safe location and stop
before placing or taking a telephone call.
If you choose to use the telephone 9
while
driving, please use the hands-free device and
only use the telephone when road, weather
and traffic conditions permit. Some
jurisdictions prohibit the driver from using a
mobile telephone while driving a vehicle.
Only operate the COMAND 9
(Cockpit
Management and Data System) if road,
weather and traffic conditions permit.
Otherwise, you may not be able to observe
traffic conditions and could endanger yourself
and others.
Bear in mind that at a speed of just 30 mph
(approximately 50 km/h), your vehicle is
covering a distance of 44 feet (approximately
14 m) every second.
Drive sensibly – save fuel
Observe the following tips to save fuel:
XThe tires should always be inflated to the
recommended tire pressure.XRemove unnecessary loads.XWarm up the engine at low engine speeds.XAvoid frequent acceleration or braking.XHave all maintenance work carried out
according to the service intervals listed inthe Maintenance Booklet or the service
interval display.
Fuel consumption also increases when
driving in cold weather, in stop-and-go traffic
and in mountainous terrain.
Drinking and driving
GWARNING
Drinking and driving and/or taking drugs and
driving are very dangerous combinations.
Even a small amount of alcohol or drugs can
affect your reflexes, perceptions and
judgment.
The possibility of a serious or even fatal
accident are greatly increased when you drink
or take drugs and drive.
Do not drink or take drugs and drive or allow
anyone to drive who has been drinking or
taking drugs.
Pedals
GWARNING
Make sure absolutely no objects are
obstructing the pedals' range of movement.
Keep the driver's footwell clear of all
obstacles. If there are any floormats or
carpets in the footwell, make sure that the
pedals still have sufficient clearance.
During sudden driving or braking maneuvers,
the objects could get caught between the
pedals. You could then no longer brake or
accelerate. This could lead to accidents and
injury.
Rolling with the engine switched off
GWARNING
There is no power assistance for the steering
and the brake when the engine is not running.
Steering and braking requires significantly
more effort and you could lose control of the
vehicle and cause an accident as a result.
9 Observe all legal requirements.132Driving tipsDriving and parking
Page 235 of 288
XRemove the jack from the left-hand
stowage space in the trunk to allow the
stowage compartment to be opened.XTurn fastener ; in the direction of the
arrow.XOpen stowage compartment :.XRemove the TIREFIT kit, wheel chock,
alignment bolt and gloves.
Flat tire
Preparing the vehicle
Your vehicle is equipped with a TIREFIT kit.
XStop the vehicle on solid, non-slippery and
level ground, as far away as possible from
traffic.XSwitch on the hazard warning lamps.XApply the electric parking brake manually
( Y page 130).XBring the front wheels into the straight-
ahead position.XShift the transmission to P using the button
on the center console.XSwitch off the engine.XRemove the SmartKey from the ignition
lock.XAll occupants must get out of the vehicle.
Make sure that they are not endangered as
they do so.XMake sure that no one is near the danger
area while a wheel is being changed.
Anyone who is not directly assisting in the
wheel change should, for example, stand
behind the barrier.XGet out of the vehicle. Pay attention to
traffic conditions when doing so.XClose the driver's door.TIREFIT kit
Using the TIREFIT kitGWARNING
TIREFIT is a limited repair device. TIREFIT
cannot be used for cuts or punctures larger
than approximately 0.16 in (4 mm) and tire
damage caused by driving with extremely low
tire inflation pressure, or on a flat tire, or a
damaged wheel.
Do not drive the vehicle under such
circumstances.
Contact the nearest authorized Mercedes-
Benz Center for assistance or call Roadside
Assistance.
GWARNING
Take care not to allow the contents of TIREFIT
to come in contact with hair, eyes or clothing.
TIREFIT is harmful if inhaled, swallowed or
absorbed through the skin - causes skin, eye
and respiratory irritation.
Any contact with eyes or skin should be
flushed immediately with plenty of water.
If clothing comes in contact with TIREFIT,
change clothing as soon as possible.
In case of allergic reaction or rash, consult a
physician immediately.
GWARNING
Keep TIREFIT away from children. If
swallowed, rinse mouth immediately with
plenty of water and drink plenty of water.
Do not induce vomiting.
Consult a doctor immediately.
Keep away from open flame or heat source.
You can use the TIREFIT kit to seal small
punctures, particularly those in the tire tread.
You can use TIREFIT at outside temperatures
down to -40 †.
Flat tire233Breakdown assistanceZ
Page 236 of 288
XDo not remove any foreign objects which
have penetrated the tire, e.g. screws or
nails.XTake the TIREFIT kit out of the trunk
( Y page 232).XOpen the TIREFIT kit and remove "max.
80 km/h" sticker D.XAffix sticker D within the driver's field of
vision.
i If TIREFIT leaks out, allow it to dry. It can
then be removed like a layer of film.
If you get TIREFIT on your clothing, have it
cleaned as soon as possible with
perchloroethylene.
Comply with the manufacturer's safety
instructions on the tire inflation compressor
label and on the tire sealant bottle.
i You will also find operating instructions
= in the lid of the TIREFIT kit.
XPull the cable and filler hose E out of the
housing.XUnscrew flanged cap A.XUnscrew the cap from tire sealant
bottle :. Make sure that the aluminum
film is not damaged when doing so.XScrew tire sealant bottle : clockwise
tightly onto flange seal F.
This pierces the aluminum film.XRemove the cap from the valve on the faulty
tire.XMake sure that pressure release screw C
is closed.XRemove the dust protection cap from filler
hose E.XScrew the end of filler hose E onto tire
valve G.XMake sure that on/off switch ; on the tire
inflation compressor is set to 0.XInsert connector ? into the 12 V cigarette
lighter socket ( Y page 203).XSelect key position 2 with the Start/Stop
button ( Y page 115).
i
The battery discharges during tire
inflation compressor usage. For this
234Flat tireBreakdown assistance
Page 237 of 288
reason, you should start the engine unless
you are inflating the tire in an enclosed
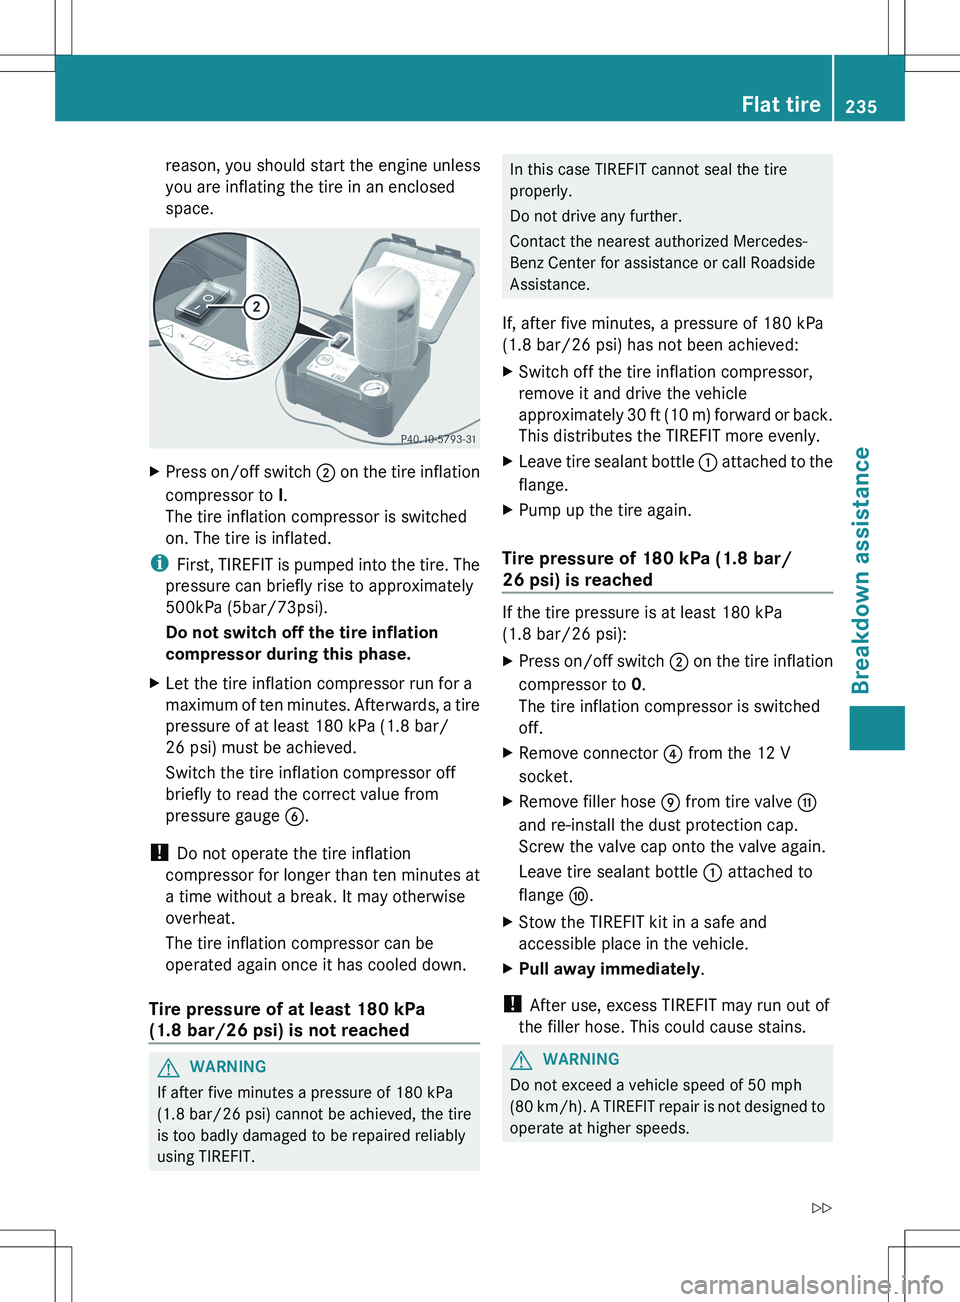
space.XPress on/off switch ; on the tire inflation
compressor to I.
The tire inflation compressor is switched
on. The tire is inflated.
i First, TIREFIT is pumped into the tire. The
pressure can briefly rise to approximately
500kPa (5bar/73psi).
Do not switch off the tire inflation
compressor during this phase.
XLet the tire inflation compressor run for a
maximum of ten minutes. Afterwards, a tire
pressure of at least 180 kPa (1.8 bar/
26 psi) must be achieved.
Switch the tire inflation compressor off
briefly to read the correct value from
pressure gauge B.
!
Do not operate the tire inflation
compressor for longer than ten minutes at
a time without a break. It may otherwise
overheat.
The tire inflation compressor can be
operated again once it has cooled down.
Tire pressure of at least 180 kPa
(1.8 bar/26 psi) is not reached
GWARNING
If after five minutes a pressure of 180 kPa
(1.8 bar/26 psi) cannot be achieved, the tire
is too badly damaged to be repaired reliably
using TIREFIT.
In this case TIREFIT cannot seal the tire
properly.
Do not drive any further.
Contact the nearest authorized Mercedes-
Benz Center for assistance or call Roadside
Assistance.
If, after five minutes, a pressure of 180 kPa
(1.8 bar/26 psi) has not been achieved:XSwitch off the tire inflation compressor,
remove it and drive the vehicle
approximately 30 ft (10 m) forward or back.
This distributes the TIREFIT more evenly.XLeave tire sealant bottle : attached to the
flange.XPump up the tire again.
Tire pressure of 180 kPa (1.8 bar/
26 psi) is reached
If the tire pressure is at least 180 kPa
(1.8 bar/26 psi):
XPress on/off switch ; on the tire inflation
compressor to 0.
The tire inflation compressor is switched
off.XRemove connector ? from the 12 V
socket.XRemove filler hose E from tire valve G
and re-install the dust protection cap.
Screw the valve cap onto the valve again.
Leave tire sealant bottle : attached to
flange F.XStow the TIREFIT kit in a safe and
accessible place in the vehicle.XPull away immediately .
!
After use, excess TIREFIT may run out of
the filler hose. This could cause stains.
GWARNING
Do not exceed a vehicle speed of 50 mph
(80 km/h ). A TIREFIT repair is not designed to
operate at higher speeds.
Flat tire235Breakdown assistanceZ
Page 238 of 288
The sticker must be attached on the
instrument cluster where it will be easily seen
by the driver.
Vehicle handling characteristics of a TIREFIT
repaired tire may change. Adapt your driving
accordingly.XStop after driving for approximately ten
minutes and check the tire pressure with
the tire inflation compressor.
i On tires that are equipped with a tire
pressure sensor (tire pressure monitor),
the use of sealant can lead to error
messages and incorrect displays.
Therefore, use pressure gauge B in the
TIREFIT kit to check and correct the tire
pressure.
GWARNING
If tire inflation pressure has fallen below
130 kPa (1.3 bar/26 psi) do not continue to
drive the vehicle.
Park your vehicle safely away from the
roadway and contact the nearest authorized
Mercedes-Benz Center or Roadside
Assistance.
Have the damaged tire replaced.
XCorrect the tire pressure if it is at least
130 kPa (1.3 bar/20 psi) (for the required
values see the Tire and Loading Information
placard on the driver's side B-pillar or the
tire pressure table inside the fuel filler flap).
To increase the tire pressure: switch on
the tire inflation compressor.
To reduce the tire pressure: open release
screw C.
!
The manufacturer does not guarantee
that all tire damage can be repaired using
the TIREFIT kit, particularly in the case of
cuts and punctures with a diameter of more
than four millimeters or on the sidewall. The
manufacturer is not responsible for
damage caused by inappropriate use of the
TIREFIT kit.
XDrive to the nearest workshop and have the
tire changed there.XHave the tire sealant bottle replaced as
soon as possible at a qualified specialist
workshop, e.g. at an authorized Mercedes-
Benz Center.HEnvironmental note
Have the used tire sealant bottle disposed of
professionally, e.g. at an authorized
Mercedes-Benz Center.
XHave the TIREFIT kit replaced every four
years at a qualified specialist workshop,
e.g. an authorized Mercedes-Benz Center.
Changing a wheel and mounting the
spare wheel
Preparing the vehicle
XPrepare the vehicle as described
( Y page 233).XBring the wheels into the straight-ahead
position.XTake the following objects from the left-
hand stowage compartment and the left-
hand stowage space in the trunk:
R the lug wrench
R the folding wheel chock
R the jack
R the alignment boltXSecure the vehicle to prevent it from rolling
away.
Securing the vehicle to prevent it from
rolling away
GWARNING
Only jack up the vehicle on level ground or on
slight inclines/declines. The vehicle could
otherwise fall off the jack and injure you or
others.
236Flat tireBreakdown assistance
Page 253 of 288
Notes on regularly inspecting wheels
and tiresGWARNING
Regularly check the tires for damage.
Damaged tires can cause tire inflation
pressure loss. As a result, you could lose
control of your vehicle.
Worn, old tires can cause accidents. If the tire
tread is worn to minimum tread depth, or if
the tires have sustained damage, replace
them.
R Regularly check the wheels and tires of
your vehicle for damage (e.g. cuts,
punctures, tears, bulges on tires and
deformation or cracks or severe corrosion
on wheels) at least once a month, as well
as after driving off-road or on rough roads.
Damaged wheels can cause a loss of tire
pressure.
R Regularly check the tire tread depth and
the condition of the tread across the whole
width of the tire (Y page 251). If necessary,
turn the front wheels to full lock in order to
inspect the inner side of the tire surface.
R All wheels must have a valve cap to protect
the valve against dirt and moisture. Do not
mount anything onto the valve (such as tire
pressure monitoring systems) other than
the standard valve cap or other valve caps
approved by Mercedes-Benz for your
vehicle.
R Regularly check the pressure of all the tires
including the emergency spare wheel or the
spare wheel, particularly prior to long trips,
and correct the pressure as necessary
( Y page 253).
Tire tread
GWARNING
Although the applicable federal motor vehicle
safety laws consider a tire to be worn when
the tread wear indicators (TWI) become
visible at approximately 1
/ 16 in (1.6 mm), we
recommend that you do not allow your tires
to wear down to that level. As tread depth
approaches 1
/ 8 in (3 mm), the adhesion
properties on a wet road are sharply reduced.
Depending upon the weather and/or road
surface (conditions), the tire traction varies
widely.
Do not use tires that are excessively worn as
the tire traction on wet road surfaces
decreases significantly when the tread depth
is less than ⅛ inch (3 mm).
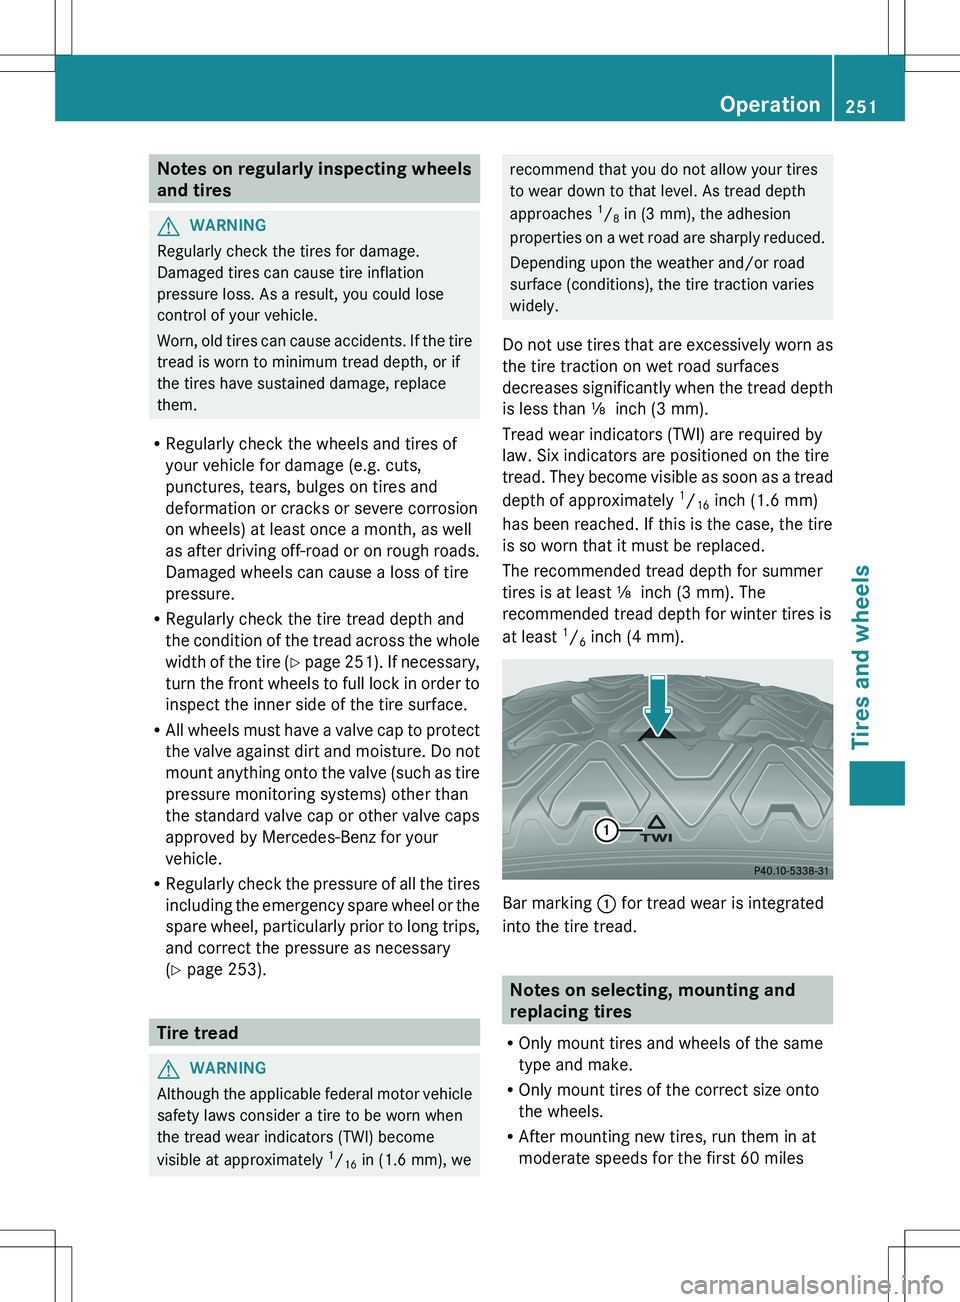
Tread wear indicators (TWI) are required by
law. Six indicators are positioned on the tire
tread. They become visible as soon as a tread
depth of approximately 1
/ 16 inch (1.6 mm)
has been reached. If this is the case, the tire
is so worn that it must be replaced.
The recommended tread depth for summer
tires is at least ⅛ inch (3 mm). The
recommended tread depth for winter tires is
at least 1
/ 6 inch (4 mm).
Bar marking
: for tread wear is integrated
into the tire tread.
Notes on selecting, mounting and
replacing tires
R Only mount tires and wheels of the same
type and make.
R Only mount tires of the correct size onto
the wheels.
R After mounting new tires, run them in at
moderate speeds for the first 60 miles
Operation251Tires and wheelsZ