2012 MERCEDES-BENZ SLK ROADSTER headlamp
[x] Cancel search: headlampPage 110 of 321
eye protection and gloves when you are
changing them. Overview of bulb replacement
–bulbs
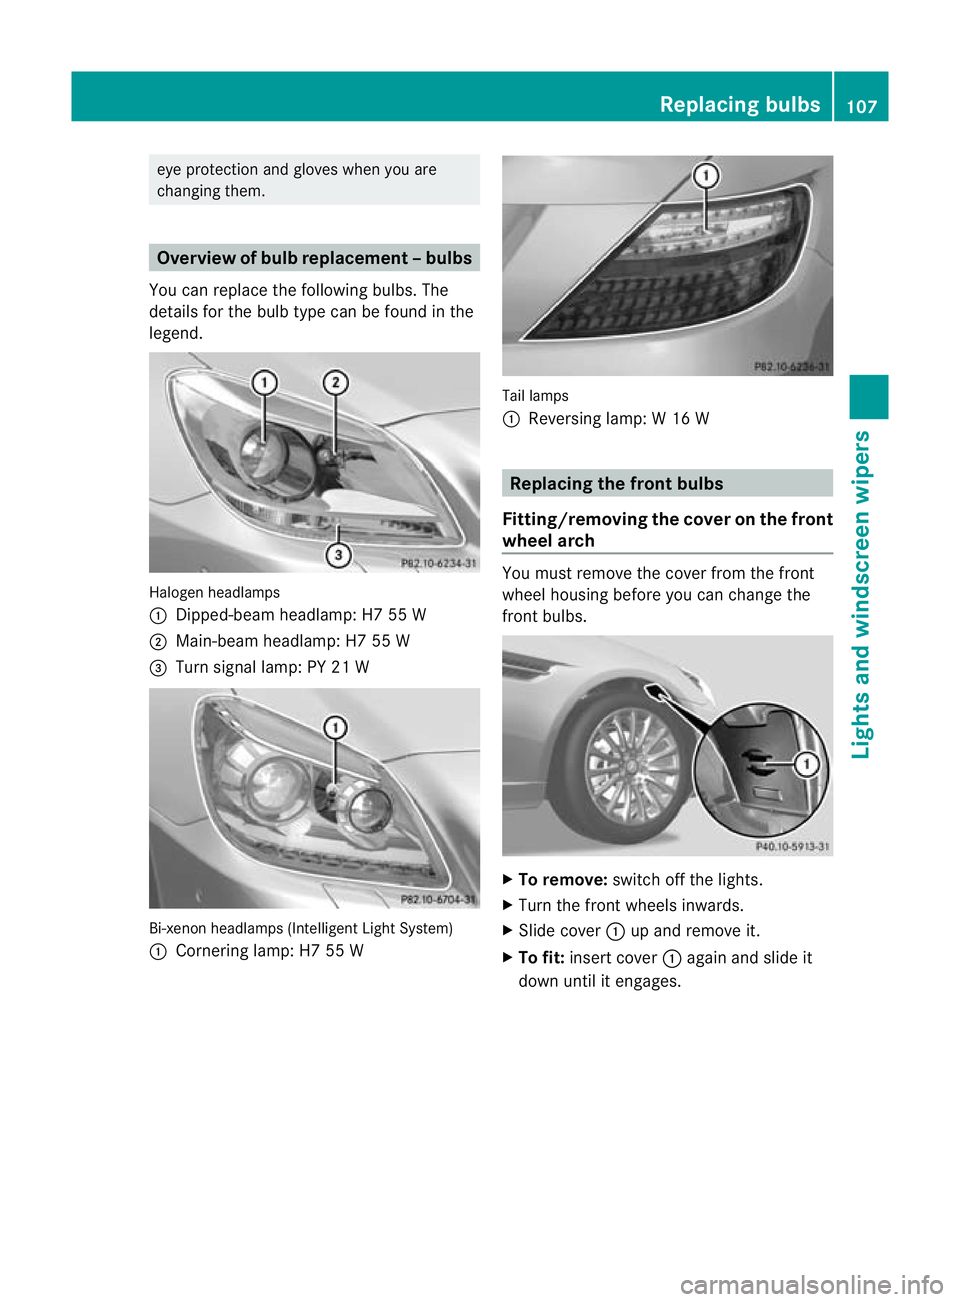
You can replace the following bulbs. The
details for the bulb type can be found in the
legend. Halogen headlamps
:
Dipped-bea mheadlamp: H7 55 W
; Main-beam headlamp: H7 55 W
= Turn signal lamp: PY 21 W Bi-xenon headlamps (Intelligent Light System)
: Cornering lamp: H7 55 W Tail lamps
:
Reversing lamp: W 16 W Replacing the front bulbs
Fitting/removing the cover on the front
wheel arch You must remove the cover from the front
wheel housing before you can change the
fron
tbulbs. X
To remove: switch off the lights.
X Turn the fron twheels inwards.
X Slide cover :up and remove it.
X To fit: insert cover :again and slide it
down until it engages. Replacing bulbs
107Lights and windscreen wipers Z
Page 111 of 321
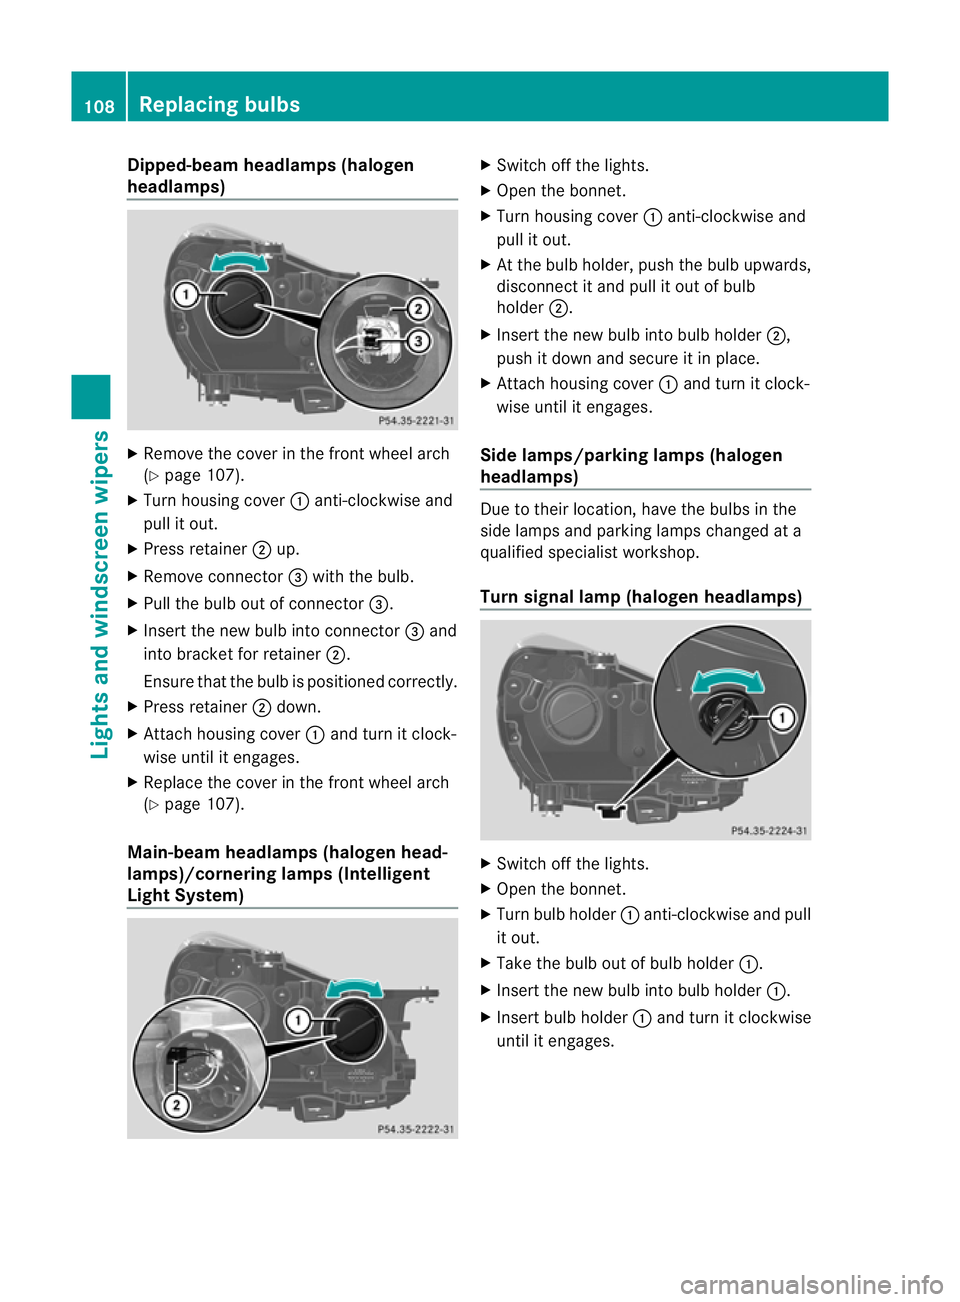
Dipped-beam headlamps (halogen
headlamps)
X
Remove the cover in the front wheel arch
(Y page 107).
X Tur nhousing cover :anti-clockwise and
pull it out.
X Press retainer ;up.
X Remove connector =with the bulb.
X Pull the bulb out of connector =.
X Insert the new bulb into connector =and
into bracket for retainer ;.
Ensure that the bulb is positioned correctly.
X Press retainer ;down.
X Attach housing cover :and turn it clock-
wise until it engages.
X Replace the cover in the front wheel arch
(Y page 107).
Main-beam headlamps (halogen head-
lamps)/cornering lamps (Intelligent
Light System) X
Switch off the lights.
X Open the bonnet.
X Turn housing cover :anti-clockwise and
pull it out.
X At the bulb holder, push the bulb upwards,
disconnect it and pull it out of bulb
holder ;.
X Insert the new bulb into bulb holder ;,
push it down and secure it in place.
X Attach housing cover :and turn it clock-
wise until it engages.
Side lamps/parking lamps( halogen
headlamps) Due to their location, have the bulbs in the
side lamps and parking lamps changed at a
qualified specialist workshop.
Turn signal lamp (halogen headlamps) X
Switch off the lights.
X Open the bonnet.
X Turn bulb holder :anti-clockwise and pull
it out.
X Take the bulb out of bulb holder :.
X Insert the new bulb into bulb holder :.
X Insert bulb holder :and turn it clockwise
until it engages. 108
Replacing bulbsLights and windscreen wipers
Page 194 of 321
X
Press the abutton to confirm.
X Press the :or9 button to select the
Display unit Speed-/odometer func-
tion.
You will see the selected setting: km or
miles .
X Press the abutton to save the setting.
Switching the additional speedometer
on/off
Only vehicles with manual transmission have
this function.
i Vehicles for the United Kingdom: this
function is not available.
The Dig. speedom [mph]: function allows
you to choose whether the status area in the
multifunction display always shows the speed
in mph instead of the outside temperature.
X Press the =or; button on the steer-
ing wheel to select the Settings menu.
X Press the :or9 button to select the
Inst. cluster submenu.
X Press the abutton to confirm.
X Press :or9 to select the Dig. speedo [mph]: function.
You will see the selected setting: on or
off .
X Press the abutton to save the setting.
Selecting the permanent display function
Only vehicles with automatic transmission
have this function.
i Vehicles for the United Kingdom: this
function is not available.
The Permanent display: function allows
you to choose whether the multifunction dis-
play always shows the outside temperature
or the speed in mph.
X Press the =or; button on the steer-
ing wheel to select the Settings menu.
X Press the :or9 button to select the
Inst. cluster submenu.
X Press the abutton to confirm. X
Press :or9 to select the Perma‐ nent display function.
You will see the selected setting: outside temperature or
Dig. speedom [mph] .
X Press the abutton to save the setting.
Lights Switching the daytime driving lights on/
off
If you have activated the
Daytime driving lights: function and the light switch is in the
à position, the daytime driving lights are
automatically switched on when the engine is
running. Depending on light conditions, the
side lamps and the dipped-beam headlamps
will additionally light up.
X Switch off the engine.
X Press the =or; button on the steer-
ing wheel to select the Settings menu.
X Press the :or9 button to select the
Light submenu.
X Press the abutton to confirm.
X Press the :or9 button to select the
Daytime driving lights function.
You will see the selected setting: on or
off .
X Press the abutton to save the setting.
Switching the Intelligent Light System
on/off
If you activate the Intell. Light Sys‐ tem: function, you activat
ethe following
functions:
R motorway mode
R active light function
R cornering light function
R extended range foglamps
X Press the =or; button on the steer-
ing wheel to select the Settings menu.
X Press the :or9 button to select the
Light submenu.
X Press the abutton to confirm. Menus and submenus
191On-board computer and displays Z
Page 195 of 321
X
Press the :or9 button to select the
Intell. Light System: function.
You will see the selected setting: on or
off .
X Press the abutton to save the setting.
If you set the dipped-beam headlamps for
driving on the right/left (Y page 192), the
multifunction display shows the Intell.Light System: System inoperative
Inactive for left-side traffic or
Intell. Light System: System inoper‐
ative Inactive for right-side traf‐
fic display message instead of the
Intell.Light System function in the
Light sub-
menu.
Setting the dipped-beam headlamps for
driving on the left/right
This function is only available on vehicles with
the Intelligent Light System.
You can use this function to switch between
symmetrical beam and asymmetrical dipped
beam (Y page 100).
If you set the dipped-beam headlamps for
driving on the right/left, then motorway
mode and the extended range foglamps are
not available.
X Press the =or; button on the steer-
ing wheel to select the Settings menu.
X Press the :or9 button to select the
Light submenu.
X Press the abutton to confirm.
X Press :or9 to select the Dipped beams Setting for function.
You will see the selected setting: Right-side traffic or
Left-side traffic .
X Press the abutton to save the setting.
When you change the setting, conversion
does not take place until the next time the
vehicle is stationary.
You can also have the dipped-beam head-
lamps set for driving on the right or left at a
qualified specialist workshop. Setting the brightness of the ambient
lighting
X
Press the =or; button on the steer-
ing wheel to select the Settings menu.
X Press the :or9 button to select the
Light submenu.
X Press the abutton to confirm.
X Press the :or9 button to select
Ambient light .
You will see the selected setting.
X Press the abutton to confirm.
X Press the :or9 button to adjust the
brightness to any level from Off to
Level 5 (bright).
X Press the aor% button to save the
setting.
Activating/deactivating the surround
lighting and exterior lighting delayed
switch-off
If you have activated the Surround light‐ ing function and the light switch is set to
Ã, the following functions are activated
when it is dark:
R Surround lighting: the exterior lighting
remains lit for 40 secondsafter unlocking
with the key. The exterior lighting switches
off when you open the driver's door.
R Exterior lighting delayed switch-off: the
exterior lighting remains lit for 60seconds
after the engine is switched off. If you close
all the doors, the exterior lighting goes off
after 15 seconds.
If you activate the Surround lighting: function, the following light up depending on
the vehicle's equipment:
R
side lamps
R foglamps
R dipped-beam headlamps
R daytime driving lights
X Press the =or; button on the steer-
ing wheel to select the Settings menu.
X Press the :or9 button to select the
Light submenu.192
Menus and submenusOn-board computer and displays
Page 255 of 321
X
Slowly turn cap ;half a turn anti-clock-
wise to allow excess pressure to escape.
X Turn cap ;further anti-clockwise and
remove it.
If the coolant is at the level of marker bar
= in the fille rneck when cold, there is
enough coolant in coolant expansion
tank :.
If the coolant level is approximately
1.5 cm above marker bar =in the filler
neckw hen warm, there is enough coolant
in coolant expansion tank :.
X If necessary, top up with coolant that has
been tested and approved by Mercedes-
Benz.
X Replace cap ;and turn it clockwise as far
as it will go.
For further information on coolant, see
(Y page 308).
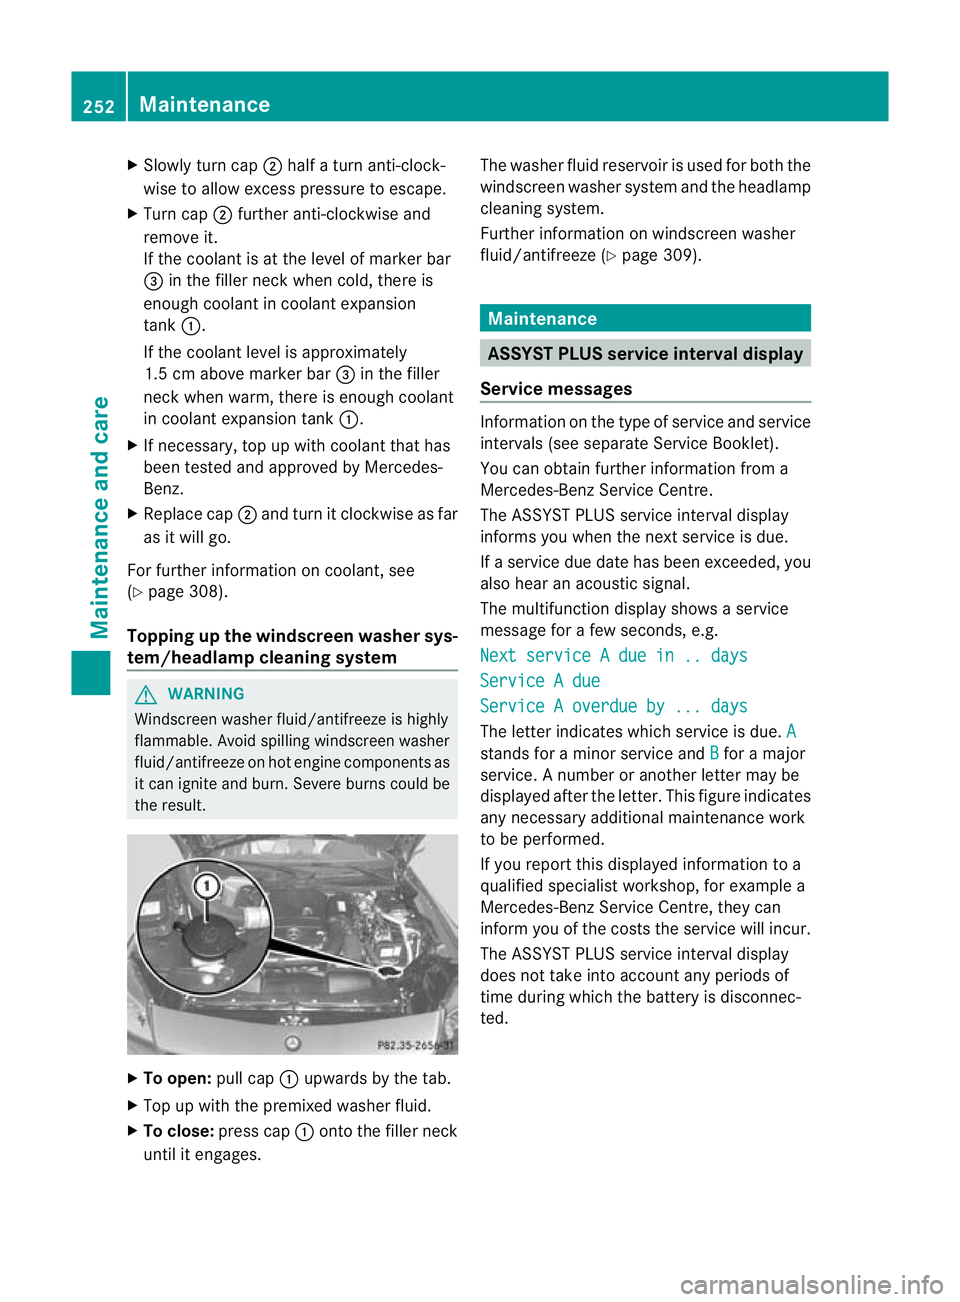
Topping up the windscreen washer sys-
tem/headlampc leaning systemG
WARNING
Windscreen washer fluid/antifreeze is highly
flammable. Avoid spilling windscreen washer
fluid/antifreeze on hot engine components as
it can ignite and burn. Severe burns could be
the result. X
To open: pull cap:upwards by the tab.
X Top up with the premixed washer fluid.
X To close: press cap :onto the filler neck
until it engages. The washer fluid reservoir is used for both the
windscreen washer syste mand the headlamp
cleaning system.
Further informatio nonwindscreen washer
fluid/antifreeze (Y page 309). Maintenance
ASSYST PLUS service interval display
Service messages Information on the type of service and service
intervals (see separate Service Booklet).
You can obtain further information from a
Mercedes-Benz Service Centre.
The ASSYST PLUS service interval display
informs you when the nex tservice is due.
If a service due date has been exceeded, you
also hear an acoustic signal.
The multifunction display shows a service
message for a few seconds, e.g.
Next service A due in .. days Service A due
Service A overdue by ... days
The letter indicates which service is due.
A stands for a minor service and
B for a major
service. A number or another letter may be
displayed after the letter. This figure indicates
any necessary additional maintenance work
to be performed.
If you report this displayed information to a
qualified specialist workshop, for example a
Mercedes-Benz Service Centre, they can
infor myou of the costs the service will incur.
The ASSYST PLUS service interval display
does not take into account any periods of
time during which the battery is disconnec-
ted. 252
MaintenanceMaintenance and care
Page 312 of 321
15 years or after 250,000 kilometres at the
latest.
The coolant is a mixture of water and anti-
freeze/corrosion inhibitor. It performs the
following tasks:
R anti-corrosion protection
R antifreeze protection
R raising the boiling point
If antifreeze/corrosion inhibitor is present in
the correct concentration, the boiling point of
the coolant during operatio nwill be around
130 †.
The antifreeze/corrosio ninhibitor concentra-
tio nint he engine cooling system should:
R be at least 50%. This will protect the engine
cooling system against freezing down to
around -37 †.
R not exceed 55% (antifreeze protection
down to -45 †). Otherwise, heat will not be
dissipated as effectively.
If the vehicle has lost coolant, top it up with
equal amounts of water and antifreeze/cor-
rosion inhibitor. Mercedes-Ben zrecom-
mends an antifreeze/corrosion inhibitor con-
centrate in accordance with MB Specifica-
tions for Service Products 310.1.
The coolant is checked with every mainte-
nance interval at a qualified specialist work-
shop.
i When the vehicle is first delivered, it is fil-
led with a coolant mixture that ensures
adequate antifreeze and corrosion protec-
tion. Washer fluid
G
WARNING
Windscreen washer fluid/antifreeze is highly
flammable. Avoid spilling windscreen washer
fluid/antifreeze on hot engine components as
it can ignite and burn. Severe burns could be
the result. !
Only use washer fluid that is suitable for
plastic lamp lenses, e.g. MB SummerFit or
MB WinterFit .Unsuitabl ewasher fluid
could damage the plastic lenses of the
headlamps.
! Do no tuse distilled or de-ionised water in
the washer fluid reservoir. Otherwise, the
level sensor may be damaged.
! Only the washer fluids SummerFit and
WinterFit can be mixed. Otherwise, the
spraying nozzles could become blocked.
At temperatures above freezing:
X Fill the washer fluid reservoir with a mixture
of water and washer fluid, e.g. MB Sum-
merFit.
X Mix 1 part MB SummerFit to 100 parts
water.
At temperatures below freezing:
X Fill the washer fluid reservoir with a mixture
of water and washer fluid, e.g. MB Winter-
Fit. Adapt the mixing ratio to the outside
temperatures.
X Down to Ò10 †: mix 1 part MB WinterFit to
2 parts water.
X Down to Ò20 †: mix 1 part MB WinterFit to
1 part water.
X Down to Ò29 †: mix 2 parts MB WinterFit
to 1 part water.
i Add washer fluid concentrate, e.g. MB
SummerFit or MB WinterFit, to the washer
fluid all year round. Service products and capacities
309Technical data Z