2012 MERCEDES-BENZ SLK-CLASS ROADSTER engine
[x] Cancel search: enginePage 88 of 336
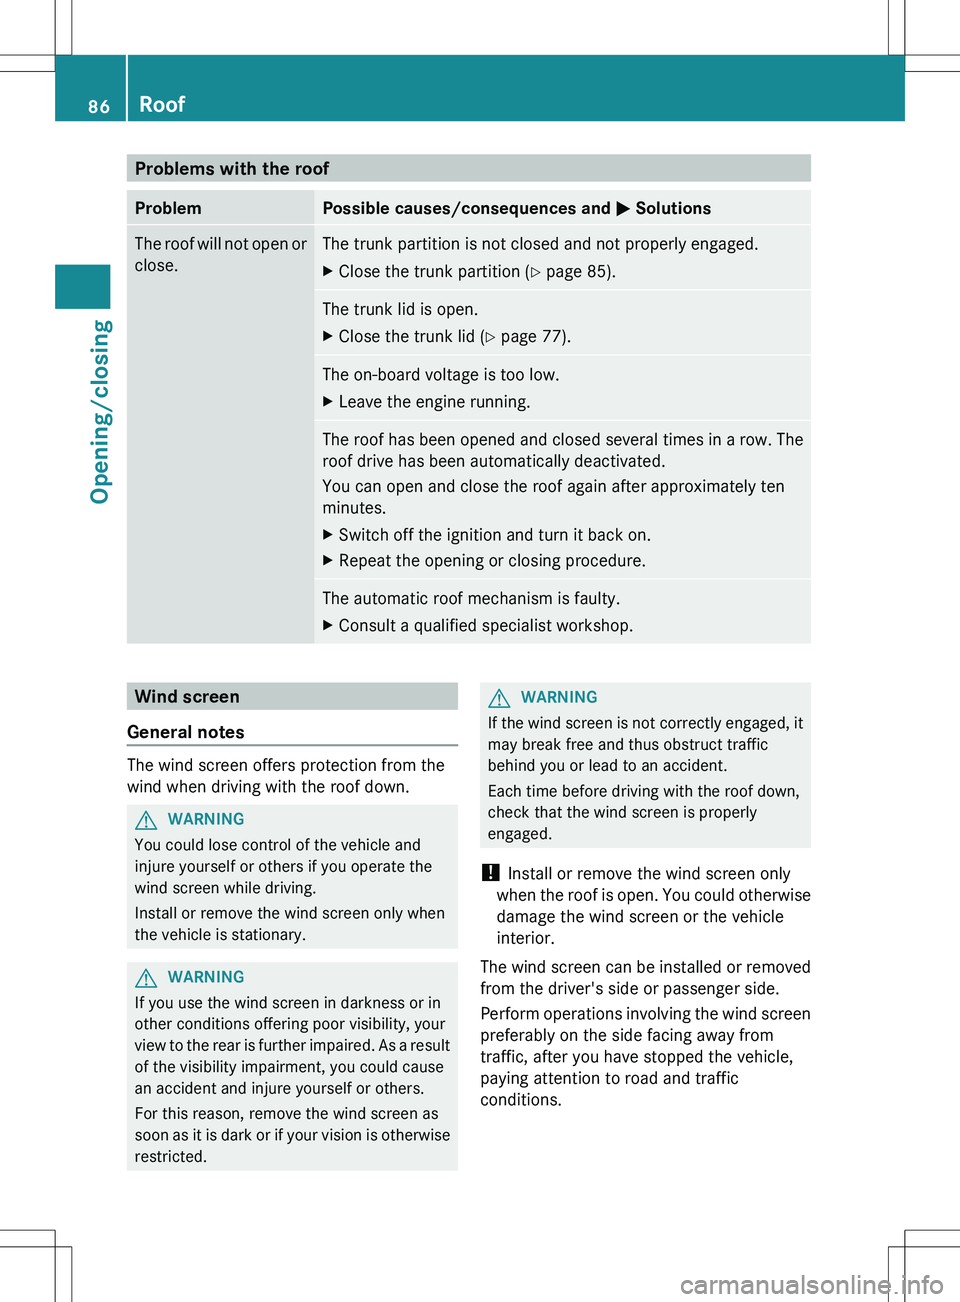
Problems with the roofProblemPossible causes/consequences and M SolutionsThe roof will not open or
close.The trunk partition is not closed and not properly engaged.XClose the trunk partition ( Y page 85).The trunk lid is open.XClose the trunk lid ( Y page 77).The on-board voltage is too low.XLeave the engine running.The roof has been opened and closed several times in a row. The
roof drive has been automatically deactivated.
You can open and close the roof again after approximately ten
minutes.XSwitch off the ignition and turn it back on.XRepeat the opening or closing procedure.The automatic roof mechanism is faulty.XConsult a qualified specialist workshop.Wind screen
General notes
The wind screen offers protection from the
wind when driving with the roof down.
GWARNING
You could lose control of the vehicle and
injure yourself or others if you operate the
wind screen while driving.
Install or remove the wind screen only when
the vehicle is stationary.
GWARNING
If you use the wind screen in darkness or in
other conditions offering poor visibility, your
view to the rear is further impaired. As a result
of the visibility impairment, you could cause
an accident and injure yourself or others.
For this reason, remove the wind screen as
soon as it is dark or if your vision is otherwise
restricted.
GWARNING
If the wind screen is not correctly engaged, it
may break free and thus obstruct traffic
behind you or lead to an accident.
Each time before driving with the roof down,
check that the wind screen is properly
engaged.
! Install or remove the wind screen only
when the roof is open. You could otherwise
damage the wind screen or the vehicle
interior.
The wind screen can be installed or removed
from the driver's side or passenger side.
Perform operations involving the wind screen
preferably on the side facing away from
traffic, after you have stopped the vehicle,
paying attention to road and traffic
conditions.
86RoofOpening/closing
Page 91 of 336
Risk of electric shock
The electrical components of MAGIC SKY
CONTROL are protected by a covering behind
the overhead control panel.
The MAGIC SKY CONTROL control unit is
marked with a yellow warning sticker that
warns you of high voltage. The high-voltage
cables are orange in color.
GDANGER
The MAGIC SKY CONTROL electrical system
works at high voltage.
If the cover behind the overhead control unit
is damaged or is removed, electrical
components of MAGIC SKY CONTROL are
exposed. These may be live. If you touch these
components, you may get an electric shock
and could be seriously or even fatally injured.
For this reason, never remove the cover
behind the overhead control unit. Never touch
parts of the electrical system (control unit,
cables or cable connections).
Have all work on MAGIC SKY CONTROL
carried out at a qualified specialist workshop.
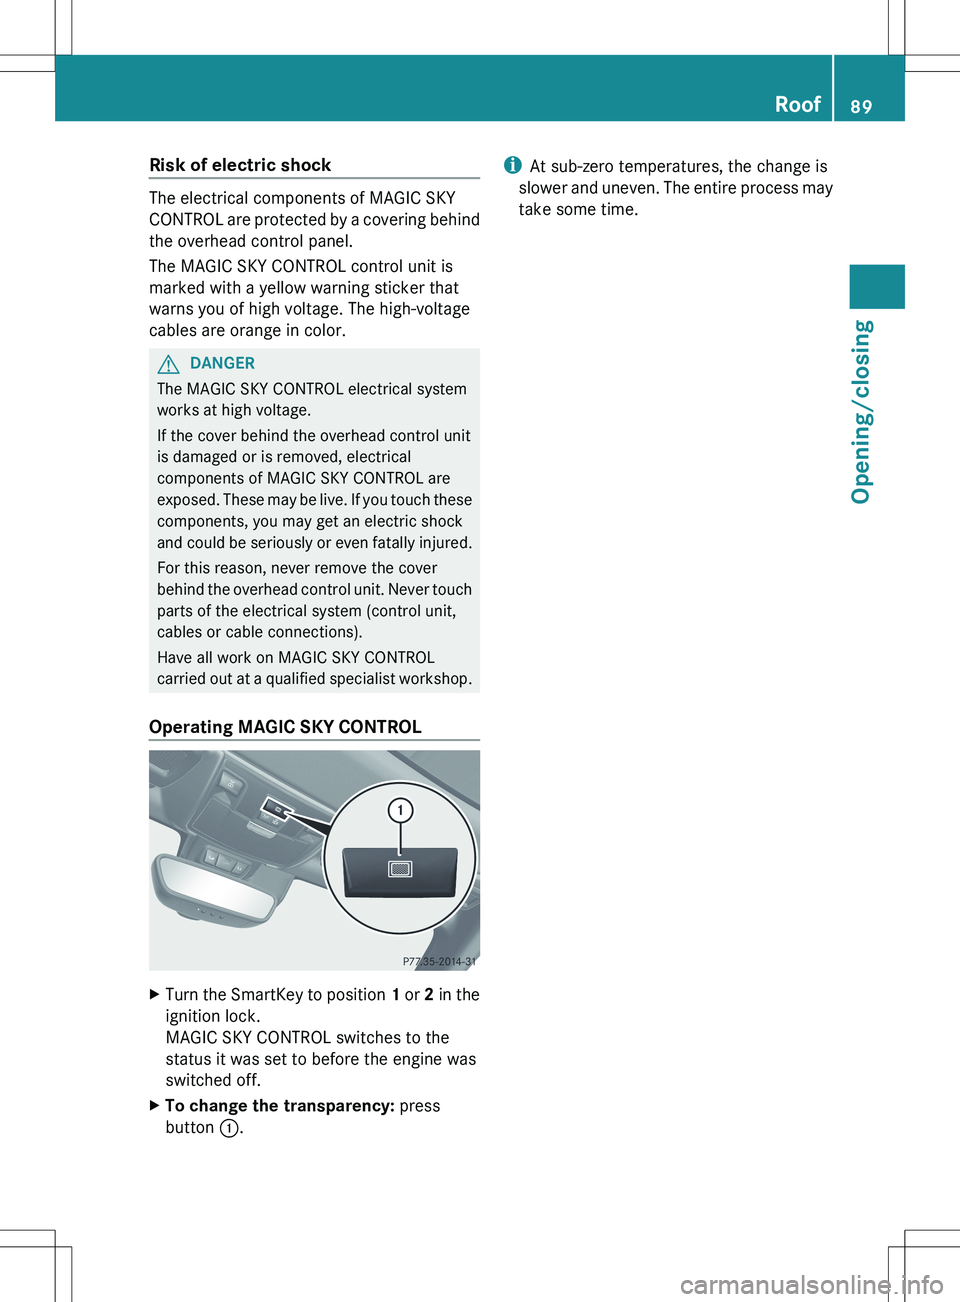
Operating MAGIC SKY CONTROL
XTurn the SmartKey to position 1 or 2 in the
ignition lock.
MAGIC SKY CONTROL switches to the
status it was set to before the engine was
switched off.XTo change the transparency: press
button :.i
At sub-zero temperatures, the change is
slower and uneven. The entire process may
take some time.Roof89Opening/closingZ
Page 107 of 336
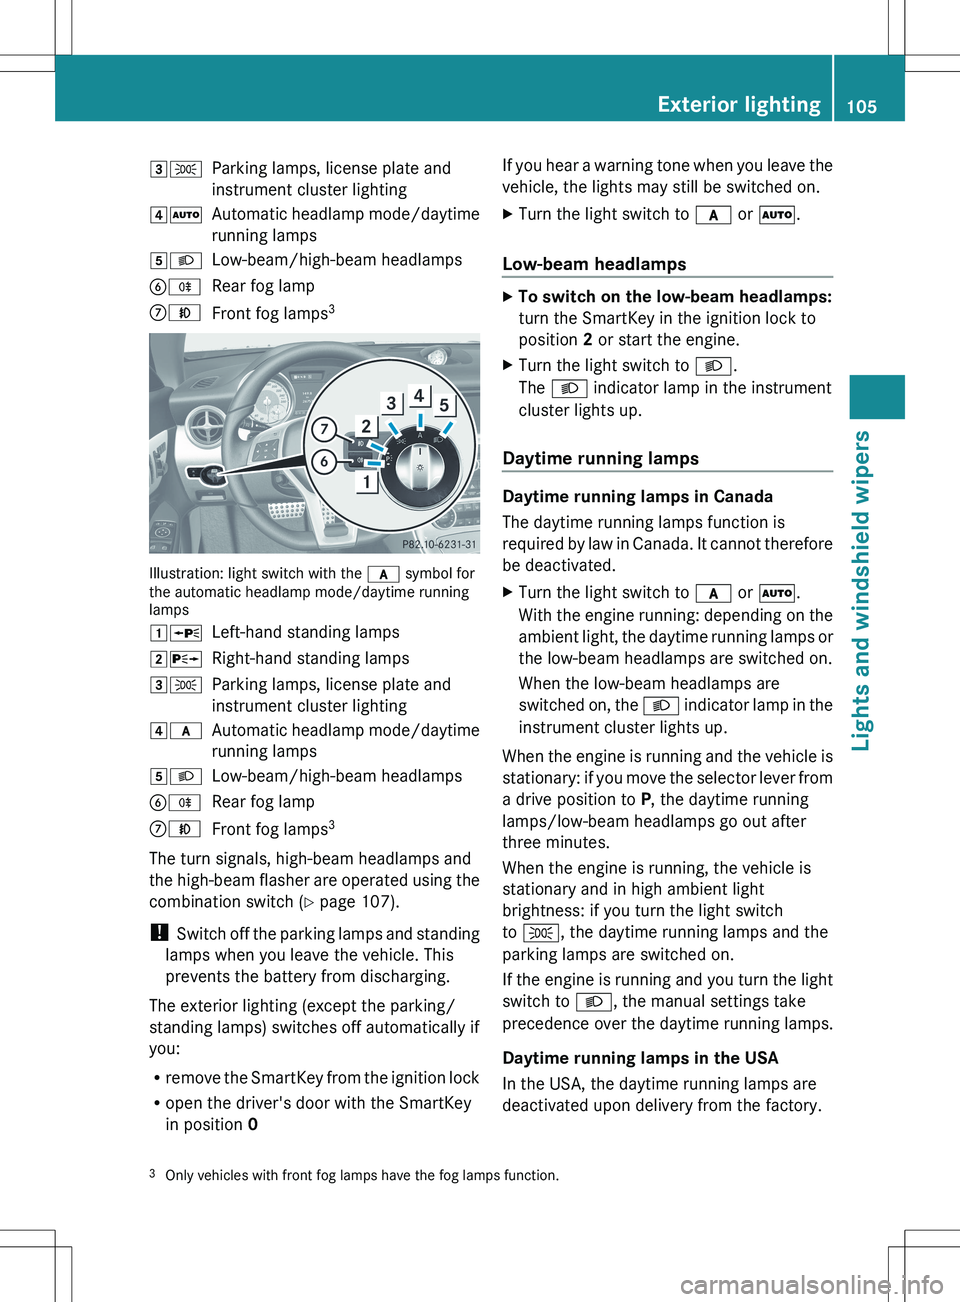
3TParking lamps, license plate and
instrument cluster lighting4 ÃAutomatic headlamp mode/daytime
running lamps5 LLow-beam/high-beam headlampsBRRear fog lampCNFront fog lamps 3
Illustration: light switch with the
c symbol for
the automatic headlamp mode/daytime running
lamps
1 WLeft-hand standing lamps2XRight-hand standing lamps3TParking lamps, license plate and
instrument cluster lighting4 cAutomatic headlamp mode/daytime
running lamps5 LLow-beam/high-beam headlampsBRRear fog lampCNFront fog lamps 3
The turn signals, high-beam headlamps and
the high-beam flasher are operated using the
combination switch ( Y page 107).
! Switch off the parking lamps and standing
lamps when you leave the vehicle. This
prevents the battery from discharging.
The exterior lighting (except the parking/
standing lamps) switches off automatically if
you:
R remove the SmartKey from the ignition lock
R open the driver's door with the SmartKey
in position 0
If you hear a warning tone when you leave the
vehicle, the lights may still be switched on.XTurn the light switch to c or à .
Low-beam headlamps
XTo switch on the low-beam headlamps:
turn the SmartKey in the ignition lock to
position 2 or start the engine.XTurn the light switch to L.
The L indicator lamp in the instrument
cluster lights up.
Daytime running lamps
Daytime running lamps in Canada
The daytime running lamps function is
required by law in Canada. It cannot therefore
be deactivated.
XTurn the light switch to c or à .
With the engine running: depending on the
ambient light, the daytime running lamps or
the low-beam headlamps are switched on.
When the low-beam headlamps are
switched on, the L indicator lamp in the
instrument cluster lights up.
When the engine is running and the vehicle is
stationary: if you move the selector lever from
a drive position to P, the daytime running
lamps/low-beam headlamps go out after
three minutes.
When the engine is running, the vehicle is
stationary and in high ambient light
brightness: if you turn the light switch
to T , the daytime running lamps and the
parking lamps are switched on.
If the engine is running and you turn the light
switch to L, the manual settings take
precedence over the daytime running lamps.
Daytime running lamps in the USA
In the USA, the daytime running lamps are
deactivated upon delivery from the factory.
3 Only vehicles with front fog lamps have the fog lamps function.Exterior lighting105Lights and windshield wipers
Page 108 of 336
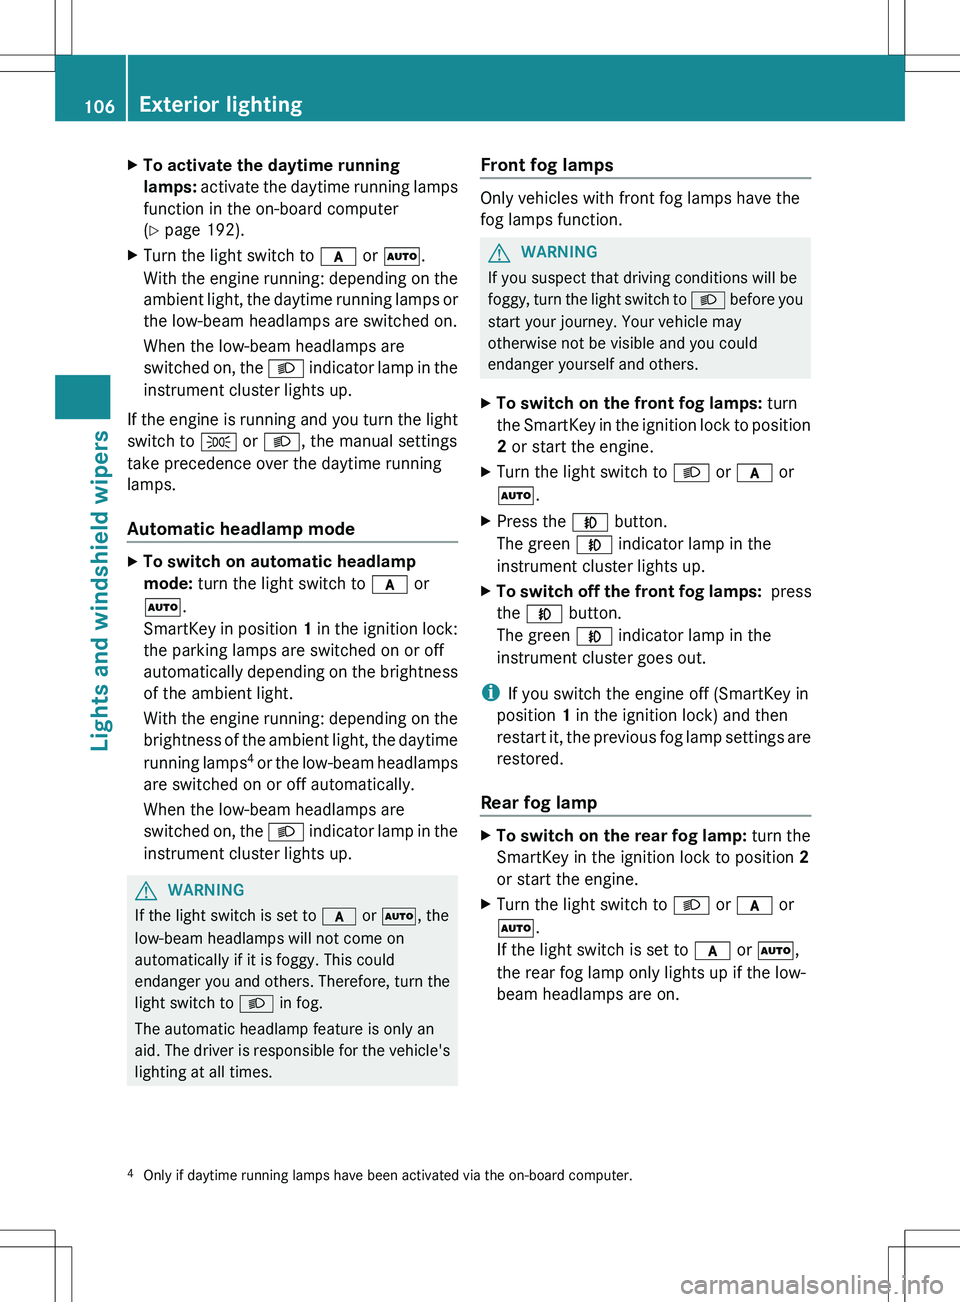
XTo activate the daytime running
lamps: activate the daytime running lamps
function in the on-board computer
( Y page 192).XTurn the light switch to c or à .
With the engine running: depending on the
ambient light, the daytime running lamps or
the low-beam headlamps are switched on.
When the low-beam headlamps are
switched on, the L indicator lamp in the
instrument cluster lights up.
If the engine is running and you turn the light
switch to T or L , the manual settings
take precedence over the daytime running
lamps.
Automatic headlamp mode
XTo switch on automatic headlamp
mode: turn the light switch to c or
à .
SmartKey in position 1 in the ignition lock:
the parking lamps are switched on or off
automatically depending on the brightness
of the ambient light.
With the engine running: depending on the
brightness of the ambient light, the daytime
running lamps 4
or the low-beam headlamps
are switched on or off automatically.
When the low-beam headlamps are
switched on, the L indicator lamp in the
instrument cluster lights up.GWARNING
If the light switch is set to c or à , the
low-beam headlamps will not come on
automatically if it is foggy. This could
endanger you and others. Therefore, turn the
light switch to L in fog.
The automatic headlamp feature is only an
aid. The driver is responsible for the vehicle's
lighting at all times.
Front fog lamps
Only vehicles with front fog lamps have the
fog lamps function.
GWARNING
If you suspect that driving conditions will be
foggy, turn the light switch to L before you
start your journey. Your vehicle may
otherwise not be visible and you could
endanger yourself and others.
XTo switch on the front fog lamps: turn
the SmartKey in the ignition lock to position
2 or start the engine.XTurn the light switch to L or c or
à .XPress the N button.
The green N indicator lamp in the
instrument cluster lights up.XTo switch off the front fog lamps: press
the N button.
The green N indicator lamp in the
instrument cluster goes out.
i If you switch the engine off (SmartKey in
position 1 in the ignition lock) and then
restart it, the previous fog lamp settings are
restored.
Rear fog lamp
XTo switch on the rear fog lamp: turn the
SmartKey in the ignition lock to position 2
or start the engine.XTurn the light switch to L or c or
à .
If the light switch is set to c or à ,
the rear fog lamp only lights up if the low-
beam headlamps are on.4 Only if daytime running lamps have been activated via the on-board computer.106Exterior lightingLights and windshield wipers
Page 109 of 336
XPress the R button.
The yellow R indicator lamp in the
instrument cluster lights up.XTo switch off the rear fog lamp: press the
R button.
The yellow R indicator lamp in the
instrument cluster goes out.
i If you switch the engine off (SmartKey in
position 1 in the ignition lock) and then
restart it, the previous rear fog lamp
settings are restored.
Headlamp cleaning system
If the "Wipe with washer fluid" function is
operated five times ( Y page 113) while the
lights are on and the engine is running, the
headlamps are cleaned automatically. When
you switch off the ignition, the automatic
headlamp cleaning system is reset and
counting is resumed from 0.
Combination switch
Turn signals
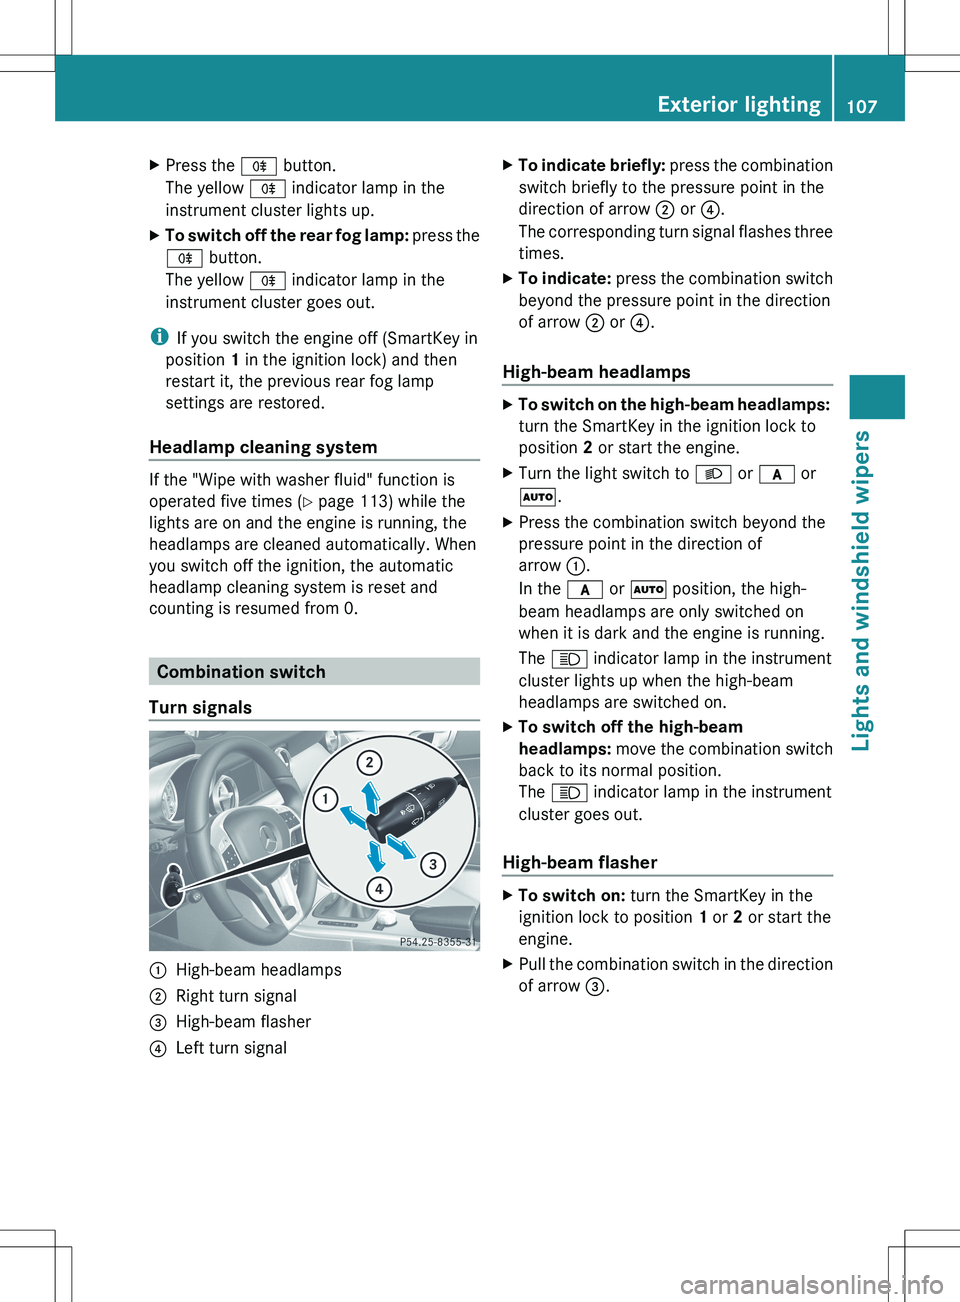
:High-beam headlamps;Right turn signal=High-beam flasher?Left turn signalXTo indicate briefly: press the combination
switch briefly to the pressure point in the
direction of arrow ; or ?.
The corresponding turn signal flashes three
times.XTo indicate: press the combination switch
beyond the pressure point in the direction
of arrow ; or ?.
High-beam headlamps
XTo switch on the high-beam headlamps:
turn the SmartKey in the ignition lock to
position 2 or start the engine.XTurn the light switch to L or c or
à .XPress the combination switch beyond the
pressure point in the direction of
arrow :.
In the c or à position, the high-
beam headlamps are only switched on
when it is dark and the engine is running.
The K indicator lamp in the instrument
cluster lights up when the high-beam
headlamps are switched on.XTo switch off the high-beam
headlamps: move the combination switch
back to its normal position.
The K indicator lamp in the instrument
cluster goes out.
High-beam flasher
XTo switch on: turn the SmartKey in the
ignition lock to position 1 or 2 or start the
engine.XPull the combination switch in the direction
of arrow =.Exterior lighting107Lights and windshield wipersZ
Page 112 of 336
If your vehicle is equipped with Xenon bulbs,
you can recognize this by the following: the
cone of light from the Xenon bulbs moves
from the top to the bottom and back again
when you start the engine. For this to be
observed, the lights must be switched on
before starting the engine.
Bulbs and lamps are an important aspect of
vehicle safety. You must therefore make sure
that these function correctly at all times.
Have the headlamp setting checked regularly.
Other bulbs
There are bulbs other than the Xenon bulbs
that you cannot replace. Replace only the
bulbs listed (Y page 110). Have the bulbs that
you cannot replace yourself changed at a
qualified specialist workshop.
If you require assistance changing bulbs,
consult a qualified specialist workshop.
Do not touch the glass tube of new bulbs with
your bare hands. Even minor contamination
can burn into the glass surface and reduce
the service life of the bulbs. Always use a lint-
free cloth or only touch the base of the bulb
when installing.
Only use bulbs of the correct type.
If the new bulb still does not light up, consult
a qualified specialist workshop.
Bulbs and lamps are an important aspect of
vehicle safety. You must therefore make sure
that these function correctly at all times.
Have the headlamp setting checked regularly.
GWARNING
Bulbs and lamps can become very hot. For
this reason, allow them to cool down before
changing them. Otherwise, you could burn
yourself when you touch them.
Keep bulbs out of the reach of children.
Otherwise, they could, for example, damage
the bulbs and injure themselves.
Never use a bulb which has been dropped.
Such a bulb may explode and injure you.
Halogen bulbs are pressurized and could
explode when you change them, especially if
they are very hot. You should therefore wear
eye protection and gloves when you are
changing them.
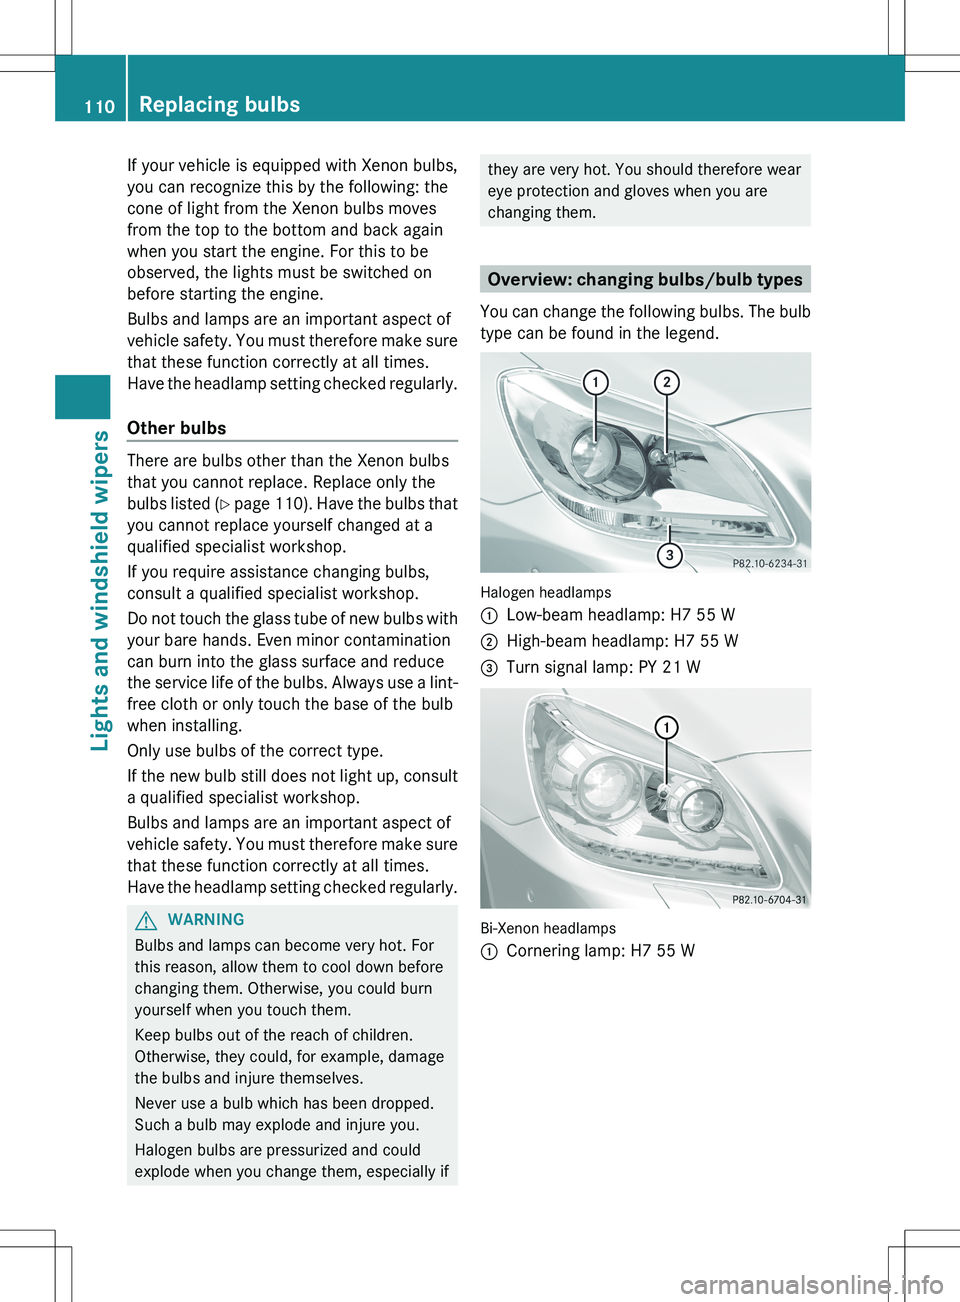
Overview: changing bulbs/bulb types
You can change the following bulbs. The bulb
type can be found in the legend.
Halogen headlamps
:Low-beam headlamp: H7 55 W;High-beam headlamp: H7 55 W=Turn signal lamp: PY 21 W
Bi-Xenon headlamps
:Cornering lamp: H7 55 W110Replacing bulbsLights and windshield wipers
Page 118 of 336

Useful information
i This Operator's Manual describes all
models and all standard and optional
equipment of your vehicle available at the
time of publication of the Operator's
Manual. Country-specific differences are
possible. Please note that your vehicle may
not be equipped with all features
described. This also applies to safety-
related systems and functions.
i Please read the information on qualified
specialist workshops ( Y page 23).
Overview of climate control systems
Important safety notes
GWARNING
Severe conditions (e.g. strong air pollution)
may require replacement of the filter before
its scheduled replacement interval. A clogged
filter will reduce the air volume to the interior
and the windows could fog up, impairing
visibility and endangering you and others.
Have a blocked filter replaced at a Mercedes-
Benz Center as soon as possible.
GWARNING
Follow the recommended settings for heating
and cooling given on the following pages.
Otherwise, the windows could fog up,
impairing visibility and endangering you and
others.
The air-conditioning system/automatic
climate control controls the temperature and
the humidity of the vehicle interior and filters
undesirable substances from the air.
The air-conditioning system/automatic
climate control is only operational when the
engine is running. 7
The system only works
optimally when the side windows and the roof
are closed.
i Ventilate the vehicle for a brief period
during warm weather. This will speed up the
cooling process and the desired vehicle
interior temperature will be reached more
quickly.
i The integrated filter can filter out most
particles of dust and completely filters out
pollen. A clogged filter reduces the amount
of air supplied to the vehicle interior. For
this reason, you should always observe the
interval for replacing the filter, which is
specified in the Maintenance Booklet. As it
depends on environmental conditions, e.g.
heavy air pollution, the interval may be
shorter than stated in the Maintenance
Booklet.7 The residual heat function can only be activated/deactivated when the ignition is switched off.116Overview of climate control systemsClimate control
Page 123 of 336

compartment as well. The indicator lamp in
the á button goes out.
R Use the residual heat function if you want
to heat or ventilate the vehicle interior
when the ignition is switched off. The
"residual heat" function can only be
activated or deactivated with the ignition
switched off.
Operating the climate control
systems
Activating/deactivating climate
control
Important information
GWARNING
When the climate control system is switched
off, the outside air supply and circulation are
also switched off. Only choose this setting for
a short time when the retractable hardtop
(vario-roof) is closed. Otherwise, the windows
could fog up, impairing visibility and
endangering you and others.
i Activate climate control primarily using
the à button ( Y page 122).
Activating/deactivating
Air-conditioning system
XTo activate: turn airflow control C
( Y page 117) clockwise to the desired
position (except position 0).XTo deactivate: turn airflow control C
( Y page 117) counter-clockwise to position
0 .Dual-zone automatic climate controlXTurn the SmartKey to position 2 in the
ignition lock.X To activate: press the à button.
The indicator lamp in the à button lights
up. Airflow and air distribution are set to
automatic mode.
or
XPress the ^ button.
The indicator lamp in the ^ button goes
out. The previously selected settings come
into effect again.XTo deactivate: press the ^ button.
The indicator lamp in the ^ button lights
up.
Activating/deactivating cooling with
air dehumidification
Important information
The cooling with air dehumidification function
is only available when the engine is running.
The air inside the vehicle is cooled and
dehumidified according to the temperature
selected.
GWARNING
If you switch off the cooling function, the
vehicle will not be cooled when weather
conditions are warm. The windows can fog up
more quickly. Window fogging may impair
visibility and endanger you and others.
Condensation may drip from the underside of
the vehicle when it is in cooling mode. This is
normal and not a sign that there is a
malfunction.
Depending on the equipment level, the
control panel has either the Á button or
¿ button.
i The cooling with air dehumidification
function uses refrigerant R134a. This
coolant does not contain
chlorofluorocarbons, and therefore does
not damage the ozone layer.
Operating the climate control systems121Climate controlZ