2012 MERCEDES-BENZ SLK-CLASS ROADSTER fuel cap
[x] Cancel search: fuel capPage 11 of 336
Switching off .................................. 150
Tow-starting (vehicle) ..................... 289
Engine electronics
Problem (malfunction) ...................138
Engine oil
Adding ........................................... 262
Additives ........................................ 327
Checking the oil level ..................... 261
Checking the oil level using the
dipstick .......................................... 261
Display message ............................ 218
Filling capacity ............................... 327
Notes about oil grades ................... 326
Notes on oil level/consumption ....261
Temperature (on-board computer) . 195
Viscosity ........................................ 327
ESP ®
(Electronic Stability
Program) AMG menu (on-board computer) ...196
Deactivating/activating (AMG
vehicles) .......................................... 60
Deactivating/activating (notes;
except AMG vehicles) ......................59
Display message ............................ 200
ETS .................................................. 59
Function/notes ................................ 58
Important safety information ...........58
Warning lamp ................................. 231
ETS (Electronic Traction System) ....... 59
Exhaust check ................................... 153
Exhaust tail pipe (cleaning
instructions) ...................................... 269
Exterior lighting see Lights
Exterior mirrors
Adjusting ......................................... 98
Dipping (automatic) .........................99
Folding in/out (automatically) .........99
Folding in/out (electrically) .............99
Folding in when locking (on-board
computer) ...................................... 195
Out of position (troubleshooting) .....99
Storing settings (memory
function) ........................................ 100
Storing the parking position ..........100
Eyeglasses compartment ................. 243F
Filler cap see Fuel filler flap
First-aid kit ......................................... 274
Flat tire Changing a wheel/mounting the
spare wheel ................................... 276
MOExtended run-flat system .........281
Preparing the vehicle .....................275
Raising the vehicle .........................277
see Emergency spare wheel
Floormat ............................................. 257
Front fog lamps ................................. 106
Display message ............................ 214
Switching on/off ........................... 106
Front windshield
see Windshield
Fuel
Additives ........................................ 326
Consumption statistics ..................185
Displaying the current
consumption .................................. 185
Displaying the range ......................185
Driving tips .................................... 152
Fuel gauge ....................................... 27
Grade (gasoline) ............................ 325
Important safety notes ..................325
Premium-grade unleaded gasoline . 325
Problem (malfunction) ...................149
Refueling ........................................ 146
Tank content/reserve fuel .............325
Fuel filler flap, opening/closing ....... 147
Fuel level Calling up the range (on-board
computer) ...................................... 185
Fuel tank
Capacity ........................................ 325
Problem (malfunction) ...................149
Fuse allocation chart (vehicle tool
kit) ...................................................... 274
Fuses Allocation chart ............................. 290
Before changing ............................. 290
Fuse box in the engine
compartment ................................. 290
Fuse box in the trunk .....................290
Important safety notes ..................289Index9
Page 149 of 336
Never allow sparks, flames or smoking
materials near gasoline.
Turn off the engine before refueling.
Whenever you are around gasoline, avoid
inhaling fumes and any skin or clothing
contact.
Direct skin contact with fuels and the
inhalation of fuel vapors are damaging to your
health.GWARNING
Overfilling of the fuel tank may create
pressure in the system which could cause a
gas discharge. This could cause the gasoline
to spray back out when removing the fuel
pump nozzle, which could cause personal
injury.
! Do not use diesel to refuel vehicles with a
gasoline engine. Even small amounts of the
wrong fuel result in damage to the fuel
system and engine.
! Do not switch on the ignition if you
accidentally refuel with the wrong fuel.
Otherwise, the fuel will enter the fuel lines.
Notify a qualified specialist workshop and
have the fuel tank and fuel lines drained
completely.
! Overfilling the fuel tank could damage the
fuel system.
! Take care not to spill any fuel on painted
surfaces. You could otherwise damage the
paintwork.
! Use a filter when refueling from a fuel can.
Otherwise, the fuel lines and/or injection
system could be blocked by particles from
the fuel can.
Further information on fuel and on fuel grades
can be found in the "Fuel" section
( Y page 325).
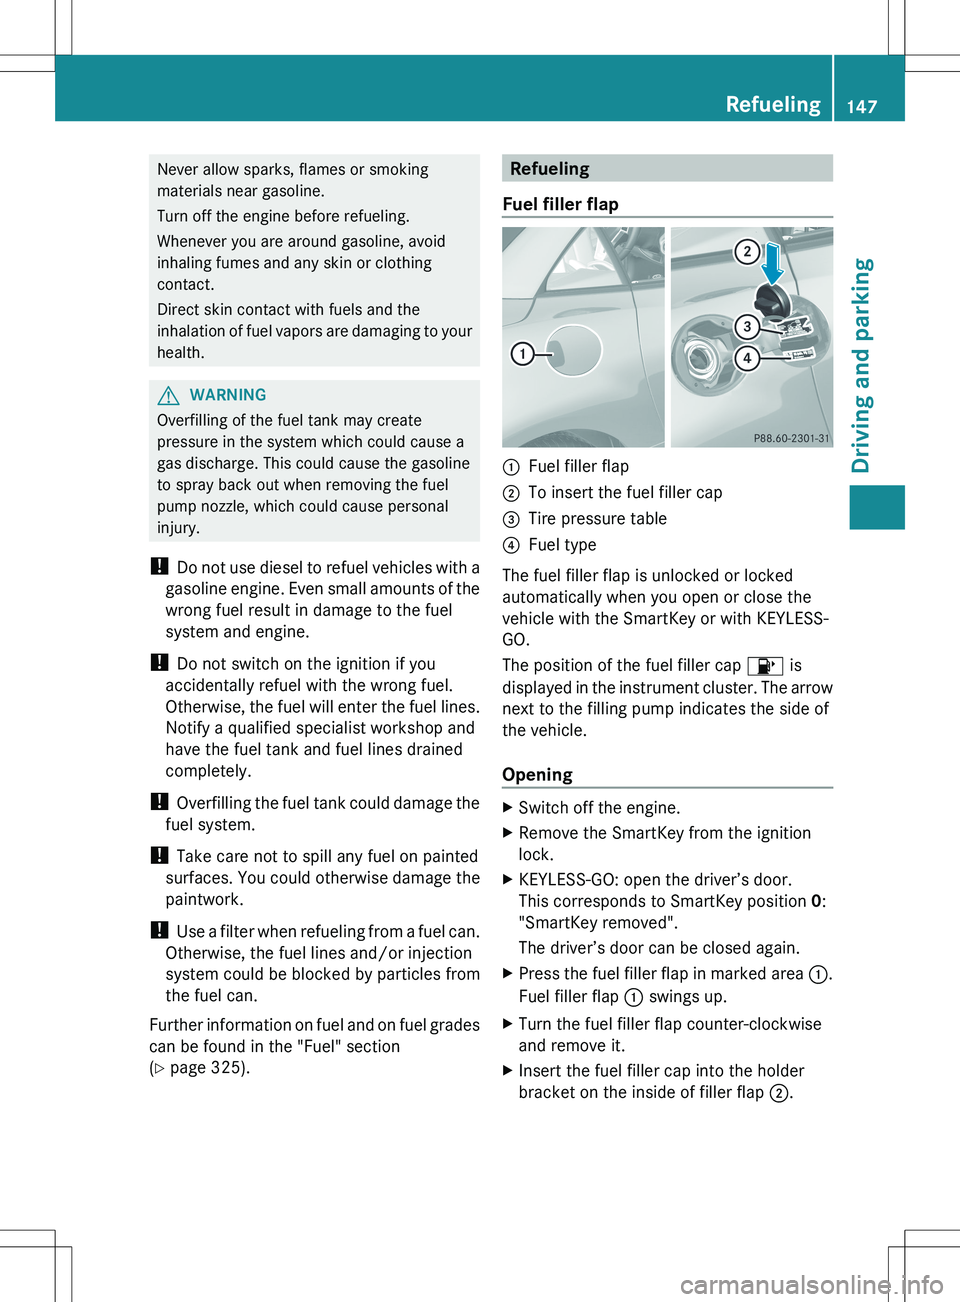
Refueling
Fuel filler flap:Fuel filler flap;To insert the fuel filler cap=Tire pressure table?Fuel type
The fuel filler flap is unlocked or locked
automatically when you open or close the
vehicle with the SmartKey or with KEYLESS-
GO.
The position of the fuel filler cap 8 is
displayed in the instrument cluster. The arrow
next to the filling pump indicates the side of
the vehicle.
Opening
XSwitch off the engine.XRemove the SmartKey from the ignition
lock.XKEYLESS-GO: open the driver’s door.
This corresponds to SmartKey position 0:
"SmartKey removed".
The driver’s door can be closed again.XPress the fuel filler flap in marked area :.
Fuel filler flap : swings up.XTurn the fuel filler flap counter-clockwise
and remove it.XInsert the fuel filler cap into the holder
bracket on the inside of filler flap ;.Refueling147Driving and parkingZ
Page 150 of 336
XCompletely insert the filler neck of the fuel
pump nozzle into the tank and refuel.XOnly fill the tank until the pump nozzle
switches off.
i Do not add any more fuel after the pump
stops filling for the first time. Otherwise,
fuel may leak out.
Closing
XReplace the cap on the filler neck and turn
clockwise until it engages audibly.XClose fuel filler flap :.
i
If you drive with the fuel filler cap open,
reserve fuel warning lamp 8 flashes. In
addition, the ; Check Engine warning
lamp may light up. A message appears in
the multifunction display ( Y page 219).
For further information on warning and
indicator lamps in the instrument cluster,
see ( Y page 234).
148RefuelingDriving and parking
Page 221 of 336
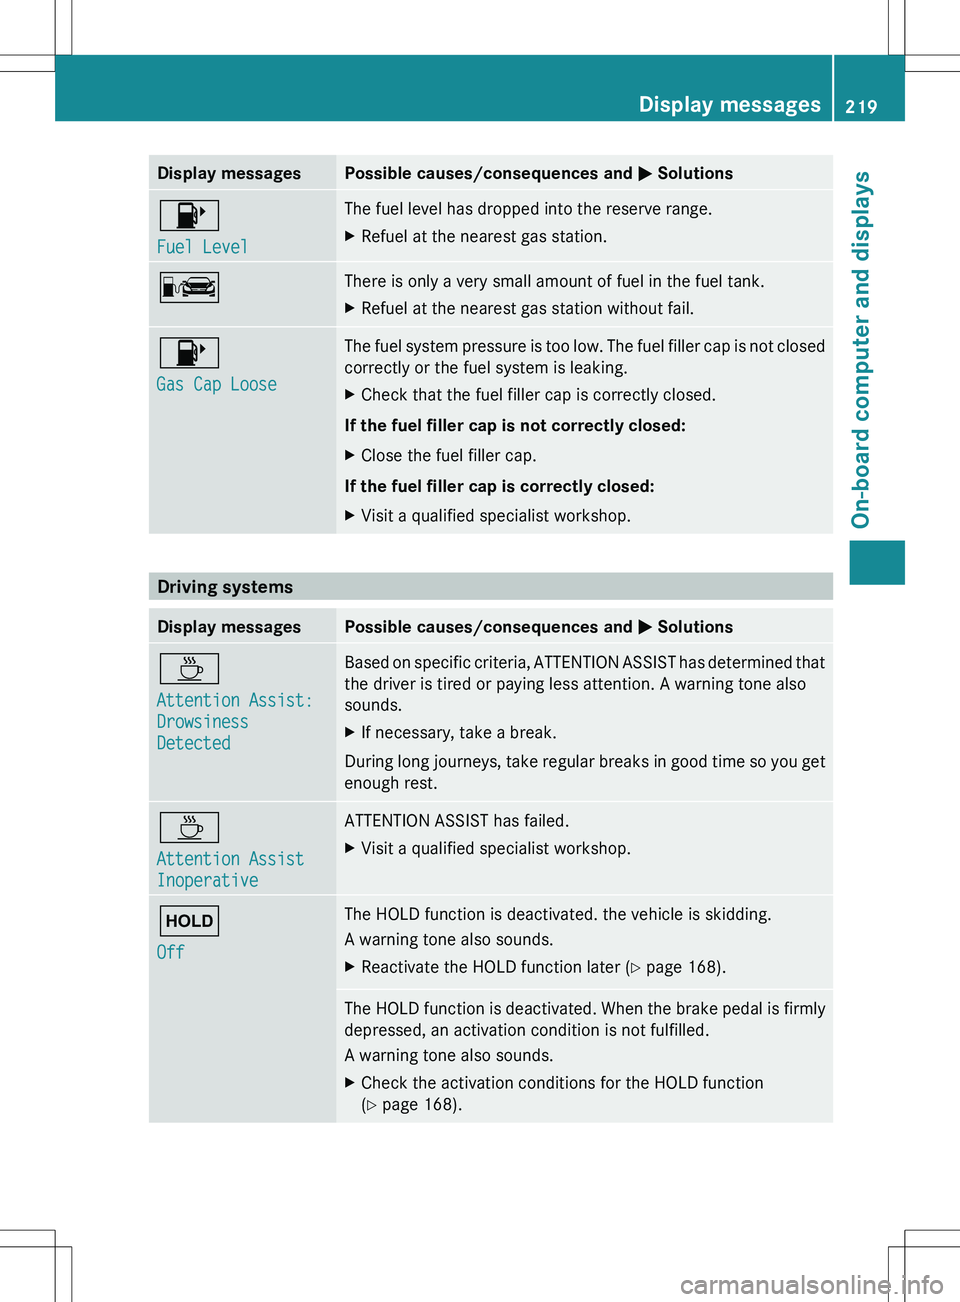
Display messagesPossible causes/consequences and M Solutions8
Fuel LevelThe fuel level has dropped into the reserve range.XRefuel at the nearest gas station.CThere is only a very small amount of fuel in the fuel tank.XRefuel at the nearest gas station without fail.8
Gas Cap LooseThe fuel system pressure is too low. The fuel filler cap is not closed
correctly or the fuel system is leaking.XCheck that the fuel filler cap is correctly closed.
If the fuel filler cap is not correctly closed:
XClose the fuel filler cap.
If the fuel filler cap is correctly closed:
XVisit a qualified specialist workshop.
Driving systems
Display messagesPossible causes/consequences and M SolutionsÀ
Attention Assist:
Drowsiness
DetectedBased on specific criteria, ATTENTION ASSIST has determined that
the driver is tired or paying less attention. A warning tone also
sounds.XIf necessary, take a break.
During long journeys, take regular breaks in good time so you get
enough rest.
À
Attention Assist
InoperativeATTENTION ASSIST has failed.XVisit a qualified specialist workshop.ë
OffThe HOLD function is deactivated. the vehicle is skidding.
A warning tone also sounds.XReactivate the HOLD function later ( Y page 168).The HOLD function is deactivated. When the brake pedal is firmly
depressed, an activation condition is not fulfilled.
A warning tone also sounds.XCheck the activation conditions for the HOLD function
( Y page 168).Display messages219On-board computer and displaysZ
Page 236 of 336
GWARNING
In the event a malfunction of the SRS is indicated as outlined above, the SRS may not be
operational.
For your safety, we strongly recommend that you contact an authorized Mercedes-Benz Center
immediately to have the system checked. Otherwise the SRS may not be activated when needed
in an accident, which could result in serious or fatal injury, or it might deploy unexpectedly and
unnecessarily which could also result in injury.
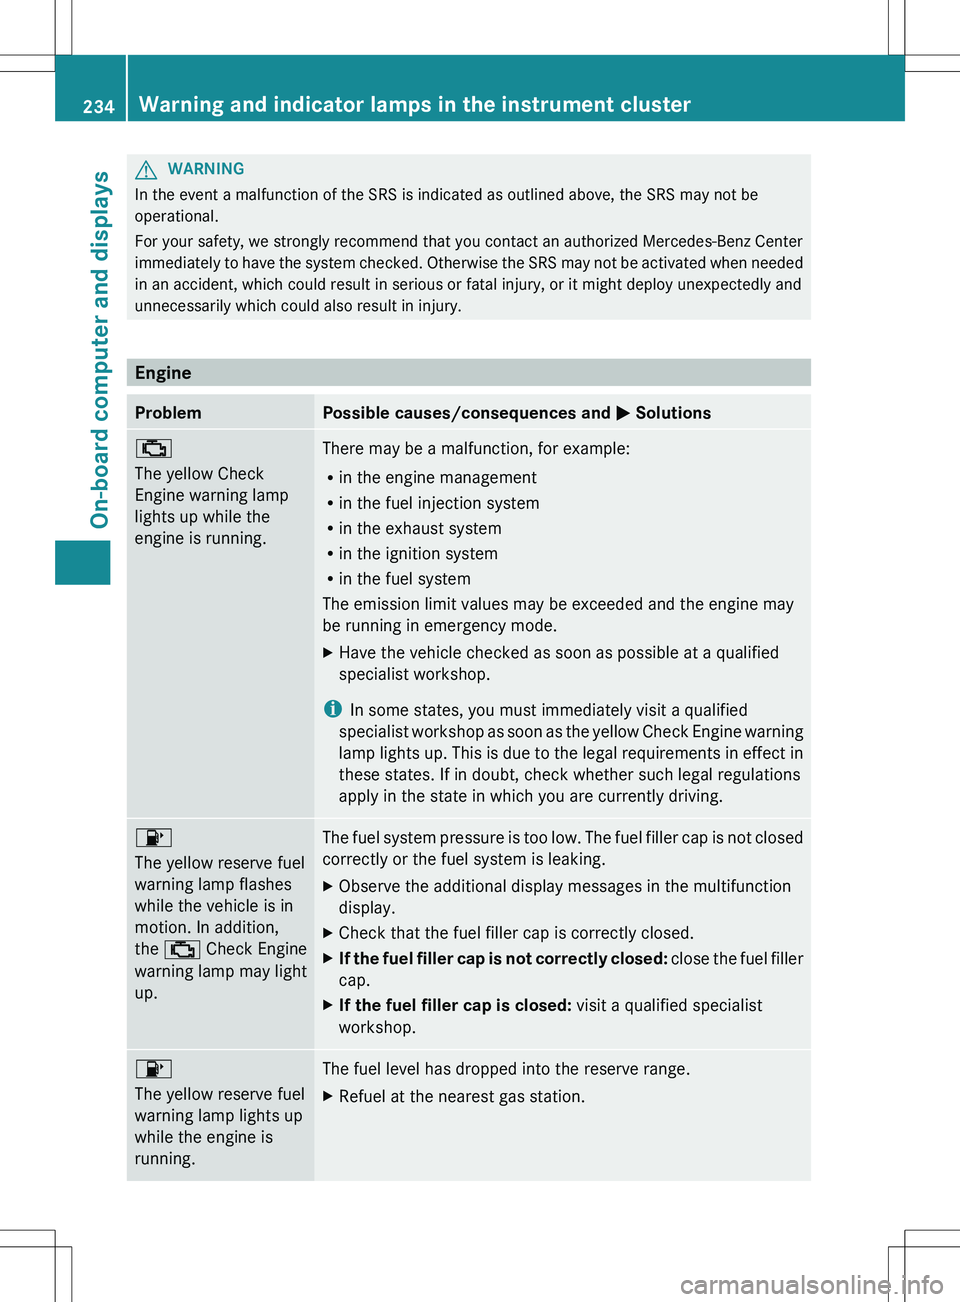
Engine
ProblemPossible causes/consequences and M Solutions;
The yellow Check
Engine warning lamp
lights up while the
engine is running.There may be a malfunction, for example:
R in the engine management
R in the fuel injection system
R in the exhaust system
R in the ignition system
R in the fuel system
The emission limit values may be exceeded and the engine may
be running in emergency mode.XHave the vehicle checked as soon as possible at a qualified
specialist workshop.
i In some states, you must immediately visit a qualified
specialist workshop as soon as the yellow Check Engine warning
lamp lights up. This is due to the legal requirements in effect in
these states. If in doubt, check whether such legal regulations
apply in the state in which you are currently driving.
8
The yellow reserve fuel
warning lamp flashes
while the vehicle is in
motion. In addition,
the ; Check Engine
warning lamp may light
up.The fuel system pressure is too low. The fuel filler cap is not closed
correctly or the fuel system is leaking.XObserve the additional display messages in the multifunction
display.XCheck that the fuel filler cap is correctly closed.XIf the fuel filler cap is not correctly closed: close the fuel filler
cap.XIf the fuel filler cap is closed: visit a qualified specialist
workshop.8
The yellow reserve fuel
warning lamp lights up
while the engine is
running.The fuel level has dropped into the reserve range.XRefuel at the nearest gas station.234Warning and indicator lamps in the instrument clusterOn-board computer and displays
Page 303 of 336
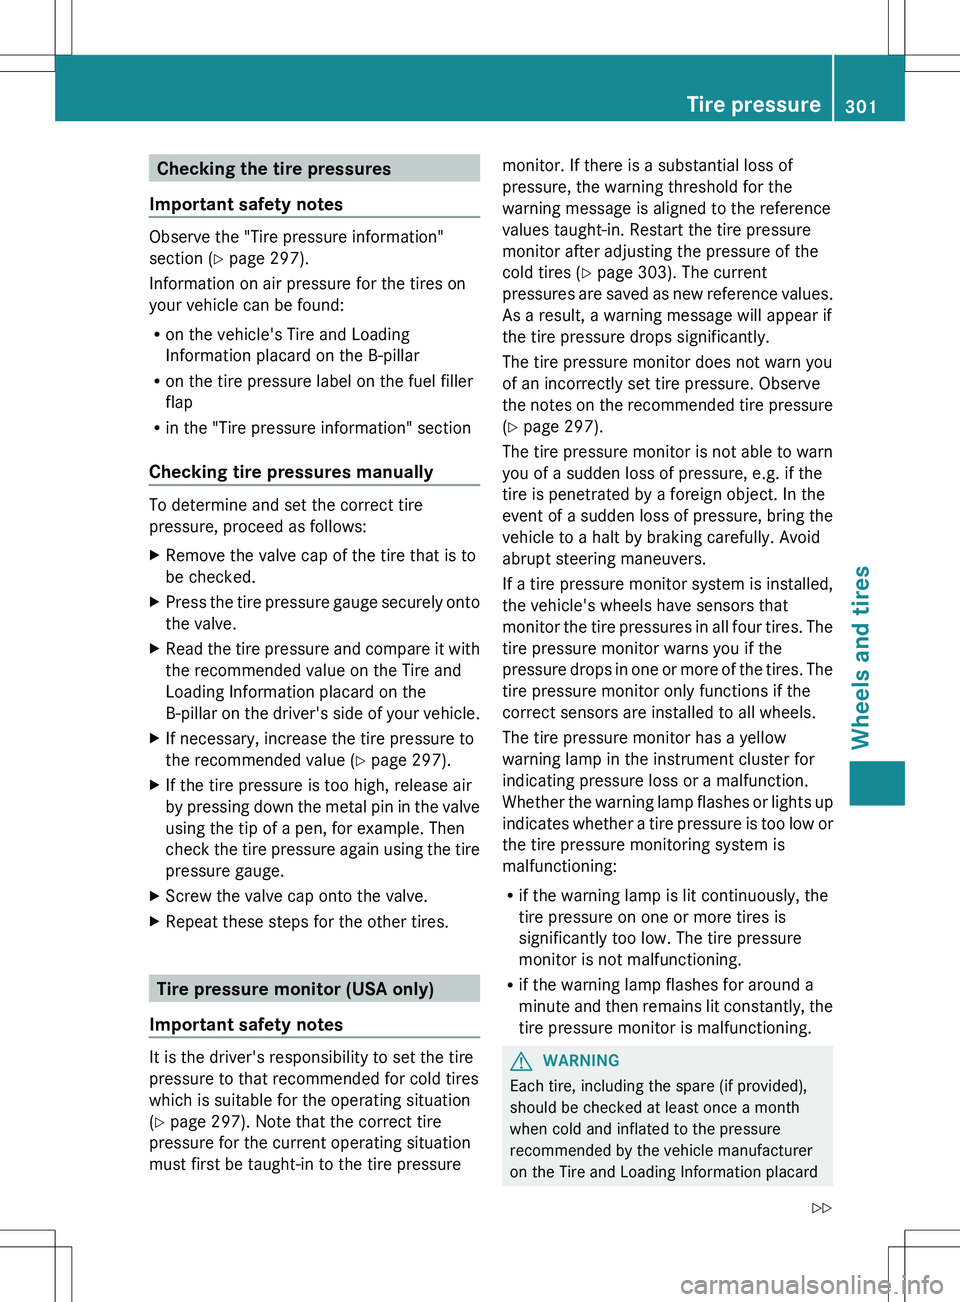
Checking the tire pressures
Important safety notes
Observe the "Tire pressure information"
section ( Y page 297).
Information on air pressure for the tires on
your vehicle can be found:
R on the vehicle's Tire and Loading
Information placard on the B-pillar
R on the tire pressure label on the fuel filler
flap
R in the "Tire pressure information" section
Checking tire pressures manually
To determine and set the correct tire
pressure, proceed as follows:
XRemove the valve cap of the tire that is to
be checked.XPress the tire pressure gauge securely onto
the valve.XRead the tire pressure and compare it with
the recommended value on the Tire and
Loading Information placard on the
B-pillar on the driver's side of your vehicle.XIf necessary, increase the tire pressure to
the recommended value ( Y page 297).XIf the tire pressure is too high, release air
by pressing down the metal pin in the valve
using the tip of a pen, for example. Then
check the tire pressure again using the tire
pressure gauge.XScrew the valve cap onto the valve.XRepeat these steps for the other tires.
Tire pressure monitor (USA only)
Important safety notes
It is the driver's responsibility to set the tire
pressure to that recommended for cold tires
which is suitable for the operating situation
( Y page 297). Note that the correct tire
pressure for the current operating situation
must first be taught-in to the tire pressure
monitor. If there is a substantial loss of
pressure, the warning threshold for the
warning message is aligned to the reference
values taught-in. Restart the tire pressure
monitor after adjusting the pressure of the
cold tires ( Y page 303). The current
pressures are saved as new reference values.
As a result, a warning message will appear if
the tire pressure drops significantly.
The tire pressure monitor does not warn you
of an incorrectly set tire pressure. Observe
the notes on the recommended tire pressure
( Y page 297).
The tire pressure monitor is not able to warn
you of a sudden loss of pressure, e.g. if the
tire is penetrated by a foreign object. In the
event of a sudden loss of pressure, bring the
vehicle to a halt by braking carefully. Avoid
abrupt steering maneuvers.
If a tire pressure monitor system is installed,
the vehicle's wheels have sensors that
monitor the tire pressures in all four tires. The
tire pressure monitor warns you if the
pressure drops in one or more of the tires. The
tire pressure monitor only functions if the
correct sensors are installed to all wheels.
The tire pressure monitor has a yellow
warning lamp in the instrument cluster for
indicating pressure loss or a malfunction.
Whether the warning lamp flashes or lights up
indicates whether a tire pressure is too low or
the tire pressure monitoring system is
malfunctioning:
R if the warning lamp is lit continuously, the
tire pressure on one or more tires is
significantly too low. The tire pressure
monitor is not malfunctioning.
R if the warning lamp flashes for around a
minute and then remains lit constantly, the
tire pressure monitor is malfunctioning.GWARNING
Each tire, including the spare (if provided),
should be checked at least once a month
when cold and inflated to the pressure
recommended by the vehicle manufacturer
on the Tire and Loading Information placard
Tire pressure301Wheels and tiresZ
Page 316 of 336
Kilopascal (kPa)
Metric unit for tire pressure. 6.9 kPa
corresponds to 1 psi. Another unit for tire
pressure is bar. There are 100 kilopascals
(kPa) to 1 bar.
Load index
In addition to the load-bearing index, the load
index may also be imprinted on the sidewall
of the tire. This specifies the load-bearing
capacity more precisely.
Curb weight
The weight of a vehicle with standard
equipment including the maximum capacity
of fuel, oil and coolant. It also includes the air-
conditioning system and optional equipment
if these are installed in the vehicle, but does
not include passengers or luggage.
Maximum load rating
The maximum load rating in kilograms or
pounds is the maximum weight for which a
tire is approved.
Maximum permissible tire pressure
Maximum permissible tire pressure for one
tire.
Maximum load on one tire
Maximum load on one tire. This is calculated
by dividing the maximum axle load of one axle
by two.
PSI (pounds per square inch)
A standard unit of measure for tire pressure.
Aspect ratio
Relationship between tire height and tire
width in percent.
Tire pressure
This is pressure inside the tire applying an
outward force to each square inch of the tire's
surface. The tire pressure is specified in
pounds per square inch (psi), in kilopascal
(kPa) or in bar. The tire pressure should only
be corrected when the tires are cold.
Tire pressure of cold tires
The tires are cold:
R if the vehicle has been parked without
direct sunlight on the tires for at least three
hours and
R if the vehicle has not been driven more than
1 mile (1.6 km).
Tread
The part of the tire that comes into contact
with the road.
Bead
The tire bead ensures that the tire sits
securely on the wheel. There are several steel
wires in the bead to prevent the tire from
coming loose from the wheel rim.
Sidewall
The part of the tire between the tread and the
bead.
Weight of optional extras
The combined weight of those optional extras
that weigh more than the replaced standard
part and more than 2.3 kg (5 lb). These
314Definition of terms for tires and loadingWheels and tires
Page 326 of 336
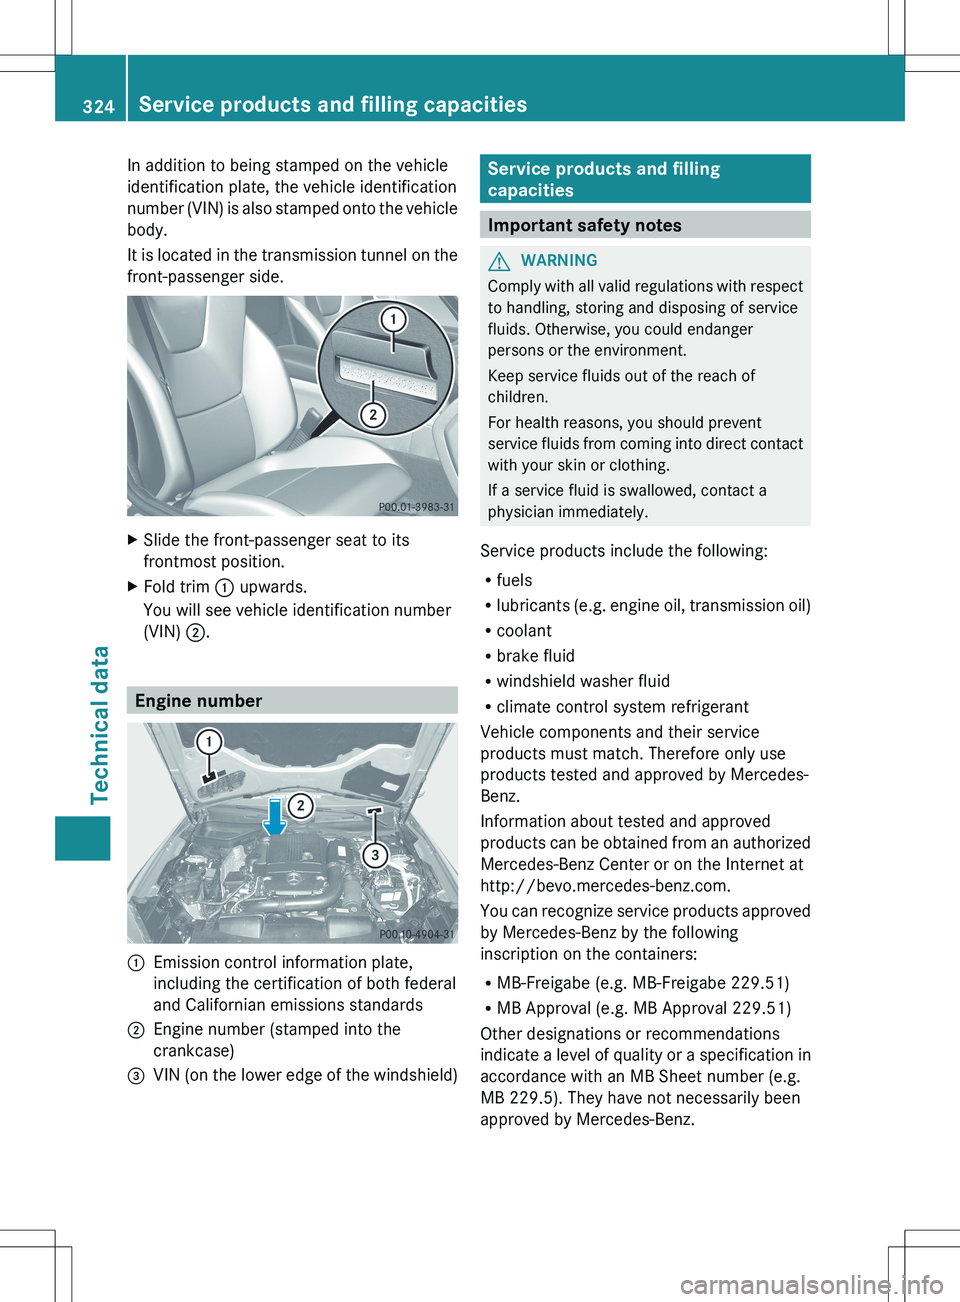
In addition to being stamped on the vehicle
identification plate, the vehicle identification
number (VIN) is also stamped onto the vehicle
body.
It is located in the transmission tunnel on the
front-passenger side.XSlide the front-passenger seat to its
frontmost position.XFold trim : upwards.
You will see vehicle identification number
(VIN) ;.
Engine number
:Emission control information plate,
including the certification of both federal
and Californian emissions standards;Engine number (stamped into the
crankcase)=VIN (on the lower edge of the windshield)Service products and filling
capacities
Important safety notes
GWARNING
Comply with all valid regulations with respect
to handling, storing and disposing of service
fluids. Otherwise, you could endanger
persons or the environment.
Keep service fluids out of the reach of
children.
For health reasons, you should prevent
service fluids from coming into direct contact
with your skin or clothing.
If a service fluid is swallowed, contact a
physician immediately.
Service products include the following:
R fuels
R lubricants (e.g. engine oil, transmission oil)
R coolant
R brake fluid
R windshield washer fluid
R climate control system refrigerant
Vehicle components and their service
products must match. Therefore only use
products tested and approved by Mercedes-
Benz.
Information about tested and approved
products can be obtained from an authorized
Mercedes-Benz Center or on the Internet at
http://bevo.mercedes-benz.com.
You can recognize service products approved
by Mercedes-Benz by the following
inscription on the containers:
R MB-Freigabe (e.g. MB-Freigabe 229.51)
R MB Approval (e.g. MB Approval 229.51)
Other designations or recommendations
indicate a level of quality or a specification in
accordance with an MB Sheet number (e.g.
MB 229.5). They have not necessarily been
approved by Mercedes-Benz.
324Service products and filling capacitiesTechnical data