2012 MERCEDES-BENZ SLK-CLASS ROADSTER inflation pressure
[x] Cancel search: inflation pressurePage 42 of 336
They are deployed:
R in the event of certain frontal impacts
R if the system determines that air bag
deployment can offer additional protection
to that provided by the seat belt
R if the seat belt is fastened
R independently of other air bags in the
vehicle
If the vehicle overturns, the front air bags are
generally not deployed. If the system detects
high vehicle deceleration in a longitudinal
direction, the front air bags are deployed.
Your vehicle has adaptive, two-stage front air
bags. In the event of a collision, the air bag
control unit evaluates the vehicle
deceleration. In the first deployment stage,
the front air bag is filled with enough
propellant gas to reduce the risk of injuries.
The front air bag is fully deployed if a second
deployment threshold is exceeded within a
few milliseconds.
The deployment of the front-passenger front
air bag is also influenced by the weight
category of the front passenger, which is
determined by the Occupant Classification
System (OCS) ( Y page 42).
The lighter the passenger-side occupant, the
higher the vehicle deceleration rate required
(predicted at the start of the impact) for
second stage inflation of the front-passenger
front air bag. In the second stage, the front
air bags are inflated with the maximum
amount of propellant gas available.
The front air bags are not deployed in
situations where a low impact severity is
predicted. You will then be protected by the
fastened seat belt.The front-passenger front air bag will only
deploy if:
R the system, based on the OCS weight
sensor readings, detects that the front-
passenger seat is occupied.
R the ^a indicator lamp in the center
console is not lit, ( Y page 42).
R the air bag control unit predicts a high
impact severity.
Knee bagsGWARNING
Observe "Important safety notes"
( Y page 38).
Knee bags provide increased protection for
the driver and front passenger against the risk
of:
R knee injuries
R thigh injuries
R lower leg injuries
Driver's knee bag ?(Y page 39) deploys
underneath the steering column and front-
passenger knee bag =(Y page 39)
underneath the glove box. They deploy
together with the front air bags. They are
designed to operate together with the front
air bags in frontal impacts if certain
thresholds are exceeded. The knee bags
operate at best in conjunction with correctly
positioned and fastened seat belts.
Side impact air bags
GWARNING
The pressure sensors for side impact air bag
control are located in the doors. Do not
modify any components of the doors or door
trim panels including, for example, the
addition of door speakers.
Improper repair work on the doors or the
modification or addition of components to the
doors create a risk of rendering the side
impact air bags inoperative or causing
unintended air bag deployment. Work on the
40Occupant safetySafety
Page 224 of 336
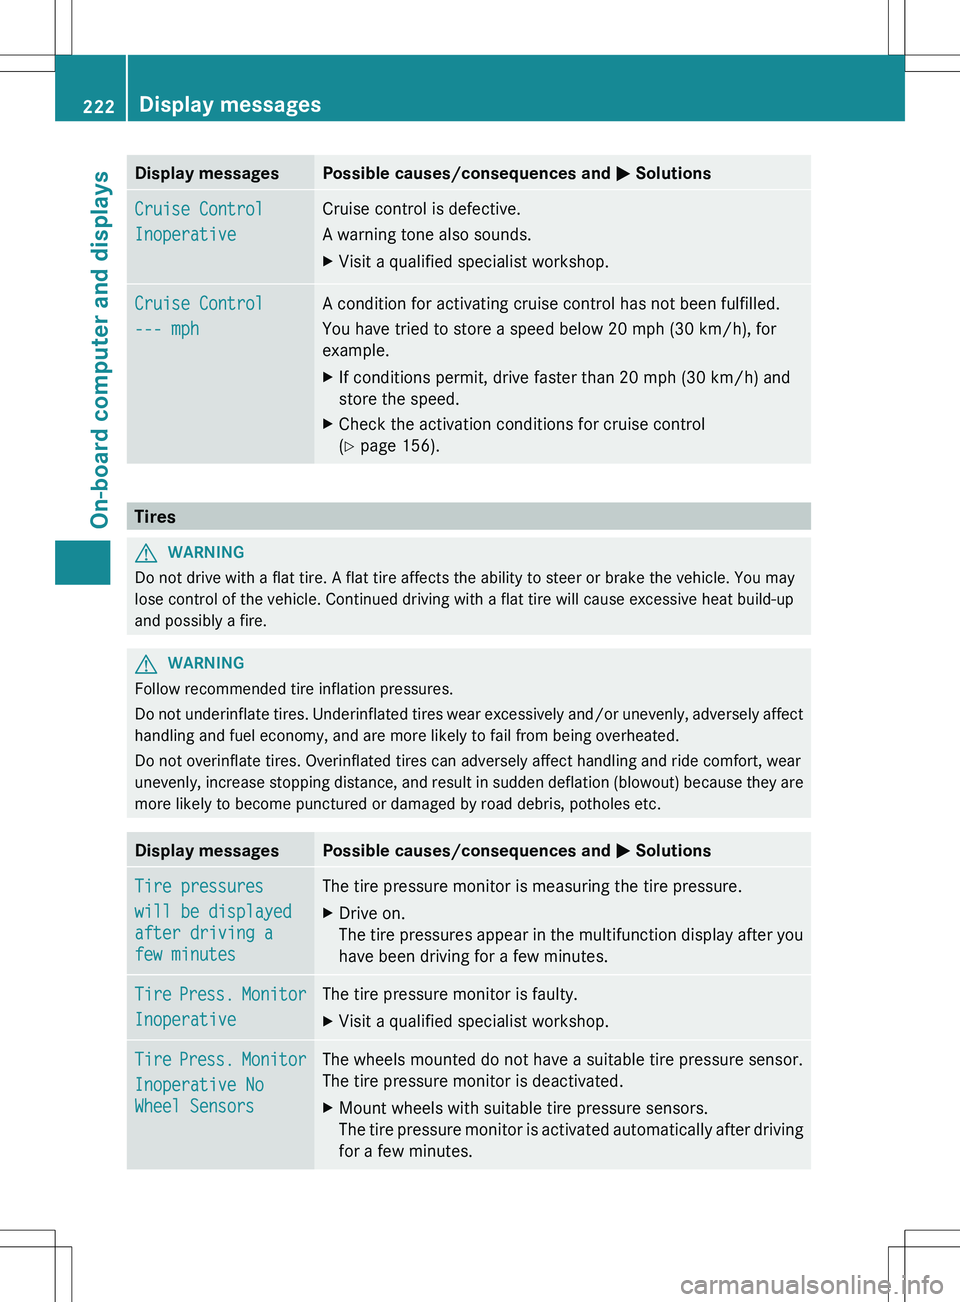
Display messagesPossible causes/consequences and M SolutionsCruise Control
InoperativeCruise control is defective.
A warning tone also sounds.XVisit a qualified specialist workshop.Cruise Control
--- mphA condition for activating cruise control has not been fulfilled.
You have tried to store a speed below 20 mph (30 km/h), for
example.XIf conditions permit, drive faster than 20 mph (30 km/h) and
store the speed.XCheck the activation conditions for cruise control
( Y page 156).
Tires
GWARNING
Do not drive with a flat tire. A flat tire affects the ability to steer or brake the vehicle. You may
lose control of the vehicle. Continued driving with a flat tire will cause excessive heat build-up
and possibly a fire.
GWARNING
Follow recommended tire inflation pressures.
Do not underinflate tires. Underinflated tires wear excessively and/or unevenly, adversely affect
handling and fuel economy, and are more likely to fail from being overheated.
Do not overinflate tires. Overinflated tires can adversely affect handling and ride comfort, wear
unevenly, increase stopping distance, and result in sudden deflation (blowout) because they are
more likely to become punctured or damaged by road debris, potholes etc.
Display messagesPossible causes/consequences and M SolutionsTire pressures
will be displayed
after driving a
few minutesThe tire pressure monitor is measuring the tire pressure.XDrive on.
The tire pressures appear in the multifunction display after you
have been driving for a few minutes.Tire Press. Monitor
InoperativeThe tire pressure monitor is faulty.XVisit a qualified specialist workshop.Tire Press. Monitor
Inoperative No
Wheel SensorsThe wheels mounted do not have a suitable tire pressure sensor.
The tire pressure monitor is deactivated.XMount wheels with suitable tire pressure sensors.
The tire pressure monitor is activated automatically after driving
for a few minutes.222Display messagesOn-board computer and displays
Page 240 of 336
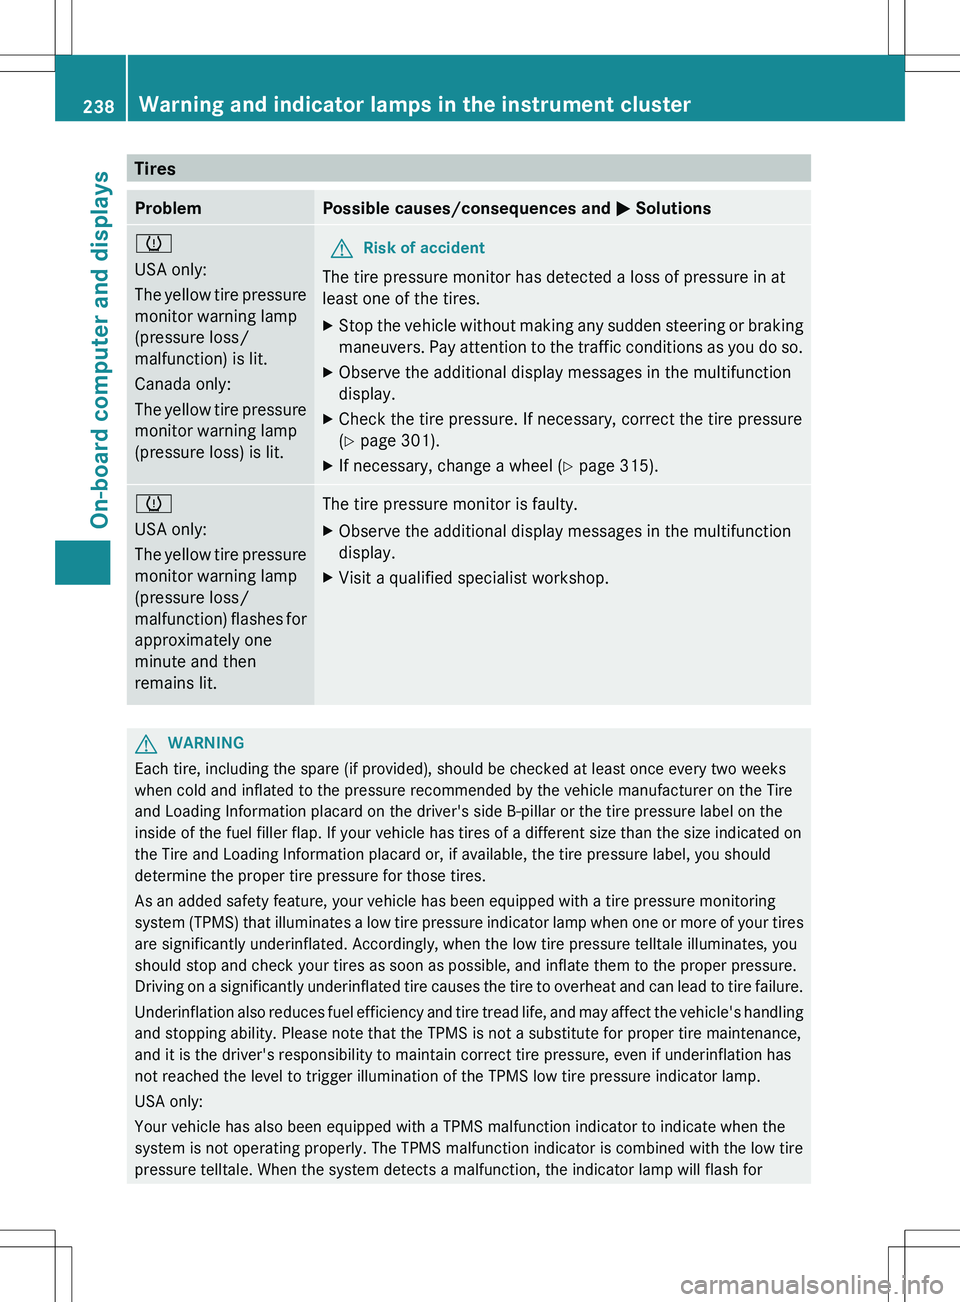
TiresProblemPossible causes/consequences and M Solutionsh
USA only:
The yellow tire pressure
monitor warning lamp
(pressure loss/
malfunction) is lit.
Canada only:
The yellow tire pressure
monitor warning lamp
(pressure loss) is lit.GRisk of accident
The tire pressure monitor has detected a loss of pressure in at
least one of the tires.
XStop the vehicle without making any sudden steering or braking
maneuvers. Pay attention to the traffic conditions as you do so.XObserve the additional display messages in the multifunction
display.XCheck the tire pressure. If necessary, correct the tire pressure
( Y page 301).XIf necessary, change a wheel ( Y page 315).h
USA only:
The yellow tire pressure
monitor warning lamp
(pressure loss/
malfunction) flashes for
approximately one
minute and then
remains lit.The tire pressure monitor is faulty.XObserve the additional display messages in the multifunction
display.XVisit a qualified specialist workshop.GWARNING
Each tire, including the spare (if provided), should be checked at least once every two weeks
when cold and inflated to the pressure recommended by the vehicle manufacturer on the Tire
and Loading Information placard on the driver's side B-pillar or the tire pressure label on the
inside of the fuel filler flap. If your vehicle has tires of a different size than the size indicated on
the Tire and Loading Information placard or, if available, the tire pressure label, you should
determine the proper tire pressure for those tires.
As an added safety feature, your vehicle has been equipped with a tire pressure monitoring
system (TPMS) that illuminates a low tire pressure indicator lamp when one or more of your tires
are significantly underinflated. Accordingly, when the low tire pressure telltale illuminates, you
should stop and check your tires as soon as possible, and inflate them to the proper pressure.
Driving on a significantly underinflated tire causes the tire to overheat and can lead to tire failure.
Underinflation also reduces fuel efficiency and tire tread life, and may affect the vehicle's handling
and stopping ability. Please note that the TPMS is not a substitute for proper tire maintenance,
and it is the driver's responsibility to maintain correct tire pressure, even if underinflation has
not reached the level to trigger illumination of the TPMS low tire pressure indicator lamp.
USA only:
Your vehicle has also been equipped with a TPMS malfunction indicator to indicate when the
system is not operating properly. The TPMS malfunction indicator is combined with the low tire
pressure telltale. When the system detects a malfunction, the indicator lamp will flash for
238Warning and indicator lamps in the instrument clusterOn-board computer and displays
Page 282 of 336
Inflating the collapsible spare wheel
! Inflate the collapsible spare wheel using
the tire inflation compressor before
lowering the vehicle. The wheel rim could
otherwise be damaged.
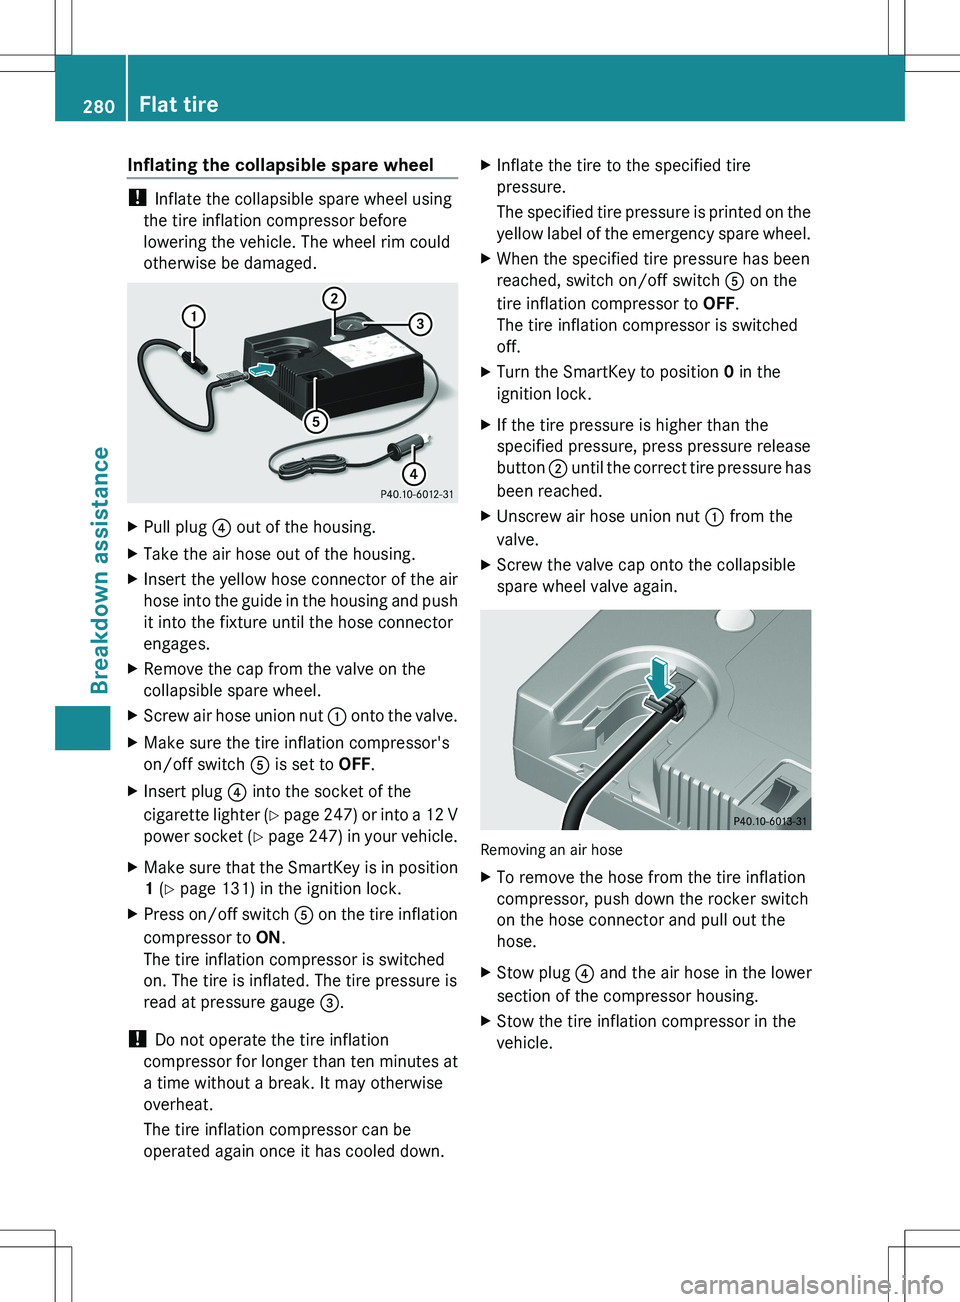
XPull plug ? out of the housing.XTake the air hose out of the housing.XInsert the yellow hose connector of the air
hose into the guide in the housing and push
it into the fixture until the hose connector
engages.XRemove the cap from the valve on the
collapsible spare wheel.XScrew air hose union nut : onto the valve.XMake sure the tire inflation compressor's
on/off switch A is set to OFF.XInsert plug ? into the socket of the
cigarette lighter (Y page 247) or into a 12 V
power socket (Y page 247) in your vehicle.XMake sure that the SmartKey is in position
1 (Y page 131) in the ignition lock.XPress on/off switch A on the tire inflation
compressor to ON.
The tire inflation compressor is switched
on. The tire is inflated. The tire pressure is
read at pressure gauge =.
!
Do not operate the tire inflation
compressor for longer than ten minutes at
a time without a break. It may otherwise
overheat.
The tire inflation compressor can be
operated again once it has cooled down.
XInflate the tire to the specified tire
pressure.
The specified tire pressure is printed on the
yellow label of the emergency spare wheel.XWhen the specified tire pressure has been
reached, switch on/off switch A on the
tire inflation compressor to OFF.
The tire inflation compressor is switched
off.XTurn the SmartKey to position 0 in the
ignition lock.XIf the tire pressure is higher than the
specified pressure, press pressure release
button ; until the correct tire pressure has
been reached.XUnscrew air hose union nut : from the
valve.XScrew the valve cap onto the collapsible
spare wheel valve again.
Removing an air hose
XTo remove the hose from the tire inflation
compressor, push down the rocker switch
on the hose connector and pull out the
hose.XStow plug ? and the air hose in the lower
section of the compressor housing.XStow the tire inflation compressor in the
vehicle.280Flat tireBreakdown assistance
Page 283 of 336
Lowering the vehicleGWARNING
Tire pressure that is too high or too low can
lead to a blowout of the mounted emergency
spare wheel/spare wheel, particularly when
driving with a heavy load and increasing
speed. There is a risk of accident.
Check the tire pressure of the emergency
spare wheel or spare wheel and adjust it.
When doing so, observe the specified tire
pressure.
! Inflate the collapsible spare wheel using
the tire inflation compressor before
lowering the vehicle. The wheel rim could
otherwise be damaged.
XTurn the crank of the jack counter-
clockwise until the vehicle is once again
standing firmly on the ground.XPlace the jack to one side.GWARNING
The wheels could work loose if the wheel nuts
and bolts are not tightened to the specified
tightening torque. There is a risk of accident.
Have the tightening torque immediately
checked at a qualified specialist workshop
after a wheel is changed.
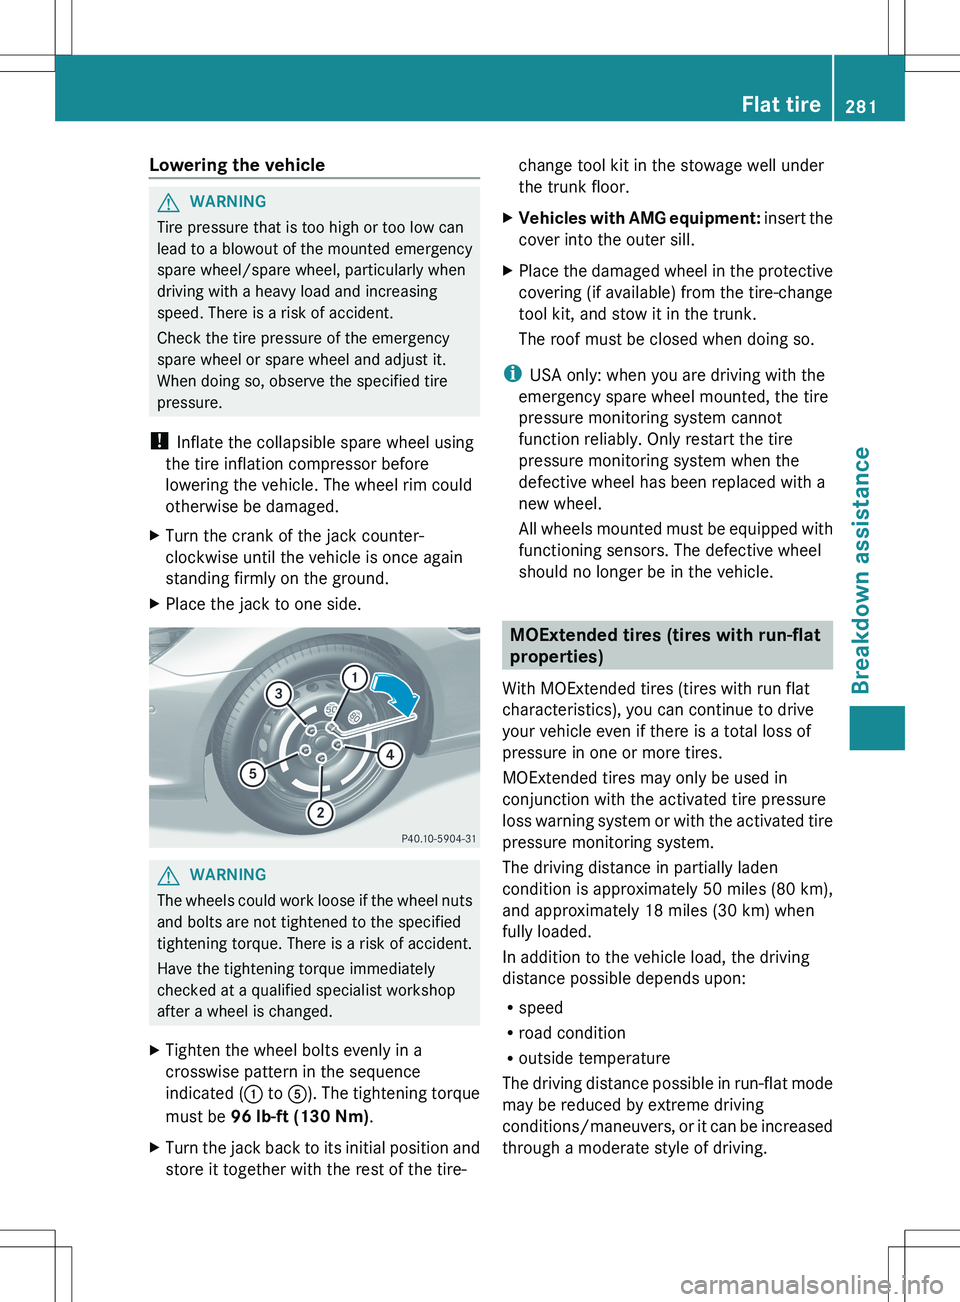
XTighten the wheel bolts evenly in a
crosswise pattern in the sequence
indicated ( : to A). The tightening torque
must be 96 lb-ft (130 Nm) .XTurn the jack back to its initial position and
store it together with the rest of the tire-change tool kit in the stowage well under
the trunk floor.XVehicles with AMG equipment: insert the
cover into the outer sill.XPlace the damaged wheel in the protective
covering (if available) from the tire-change
tool kit, and stow it in the trunk.
The roof must be closed when doing so.
i USA only: when you are driving with the
emergency spare wheel mounted, the tire
pressure monitoring system cannot
function reliably. Only restart the tire
pressure monitoring system when the
defective wheel has been replaced with a
new wheel.
All wheels mounted must be equipped with
functioning sensors. The defective wheel
should no longer be in the vehicle.
MOExtended tires (tires with run-flat
properties)
With MOExtended tires (tires with run flat
characteristics), you can continue to drive
your vehicle even if there is a total loss of
pressure in one or more tires.
MOExtended tires may only be used in
conjunction with the activated tire pressure
loss warning system or with the activated tire
pressure monitoring system.
The driving distance in partially laden
condition is approximately 50 miles (80 km),
and approximately 18 miles (30 km) when
fully loaded.
In addition to the vehicle load, the driving
distance possible depends upon:
R speed
R road condition
R outside temperature
The driving distance possible in run-flat mode
may be reduced by extreme driving
conditions/maneuvers, or it can be increased
through a moderate style of driving.
Flat tire281Breakdown assistanceZ
Page 297 of 336
Notes on regularly inspecting wheels
and tiresGWARNING
Damaged tires can cause tire inflation
pressure loss. As a result, you could lose
control of your vehicle. There is a risk of
accident.
Check the tires regularly for signs of damage
and replace any damaged tires immediately.
R Regularly check the wheels and tires of
your vehicle for damage (e.g. cuts,
punctures, tears, bulges on tires and
deformation or cracks or severe corrosion
on wheels) at least once a month, as well
as after driving off-road or on rough roads.
Damaged wheels can cause a loss of tire
pressure.
R Regularly check the tire tread depth and
the condition of the tread across the whole
width of the tire (Y page 295). If necessary,
turn the front wheels to full lock in order to
inspect the inner side of the tire surface.
R All wheels must have a valve cap to protect
the valve against dirt and moisture. Do not
mount anything onto the valve (such as tire
pressure monitoring systems) other than
the standard valve cap or other valve caps
approved by Mercedes-Benz for your
vehicle.
R Regularly check the pressure of all the tires
including the emergency spare wheel or the
spare wheel, particularly prior to long trips,
and correct the pressure as necessary
( Y page 297).
Tire tread
GWARNING
Insufficient tire tread will reduce tire traction.
The tire is no longer able to dissipate water.
This means that on wet road surfaces, the risk
of hydroplaning increases, in particular where
speed is not adapted to suit the driving
conditions. There is a risk of accident.
If the tire pressure is too high or too low, tires
may exhibit different levels of wear at
different locations on the tire tread. Thus, you
should regularly check the tread depth and
the condition of the tread across the entire
width of all tires.
Minimum tire tread depth for:
R Summer tires: â in (3 mm)
R M+S tires: ã in (4 mm)
For safety reasons, replace the tires before
the legally prescribed limit for the minimum
tire tread depth is reached.
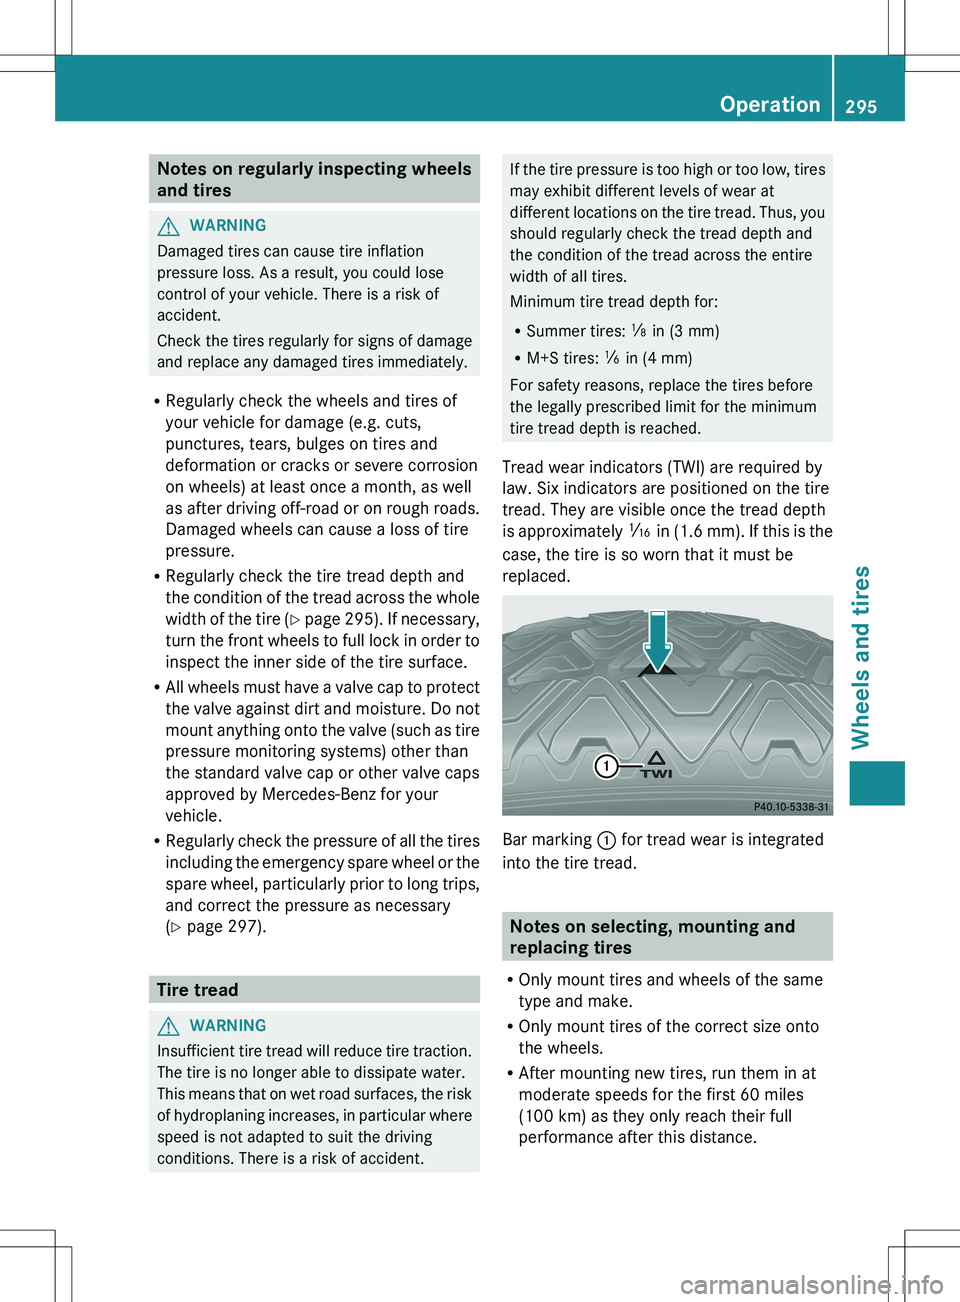
Tread wear indicators (TWI) are required by
law. Six indicators are positioned on the tire
tread. They are visible once the tread depth
is approximately á in (1.6 mm). If this is the
case, the tire is so worn that it must be
replaced.
Bar marking : for tread wear is integrated
into the tire tread.
Notes on selecting, mounting and
replacing tires
R Only mount tires and wheels of the same
type and make.
R Only mount tires of the correct size onto
the wheels.
R After mounting new tires, run them in at
moderate speeds for the first 60 miles
(100 km) as they only reach their full
performance after this distance.
Operation295Wheels and tiresZ
Page 300 of 336
Follow recommended tire inflation pressures
and check the pressure of all the tires
including the spare wheel:
R monthly, at least
R if the load changes
R before beginning a long journey
R under different operating conditions, e.g.
off-road driving
If necessary, correct the tire pressure.
The recommended tire pressures for the tires
mounted at the factory can be found on the
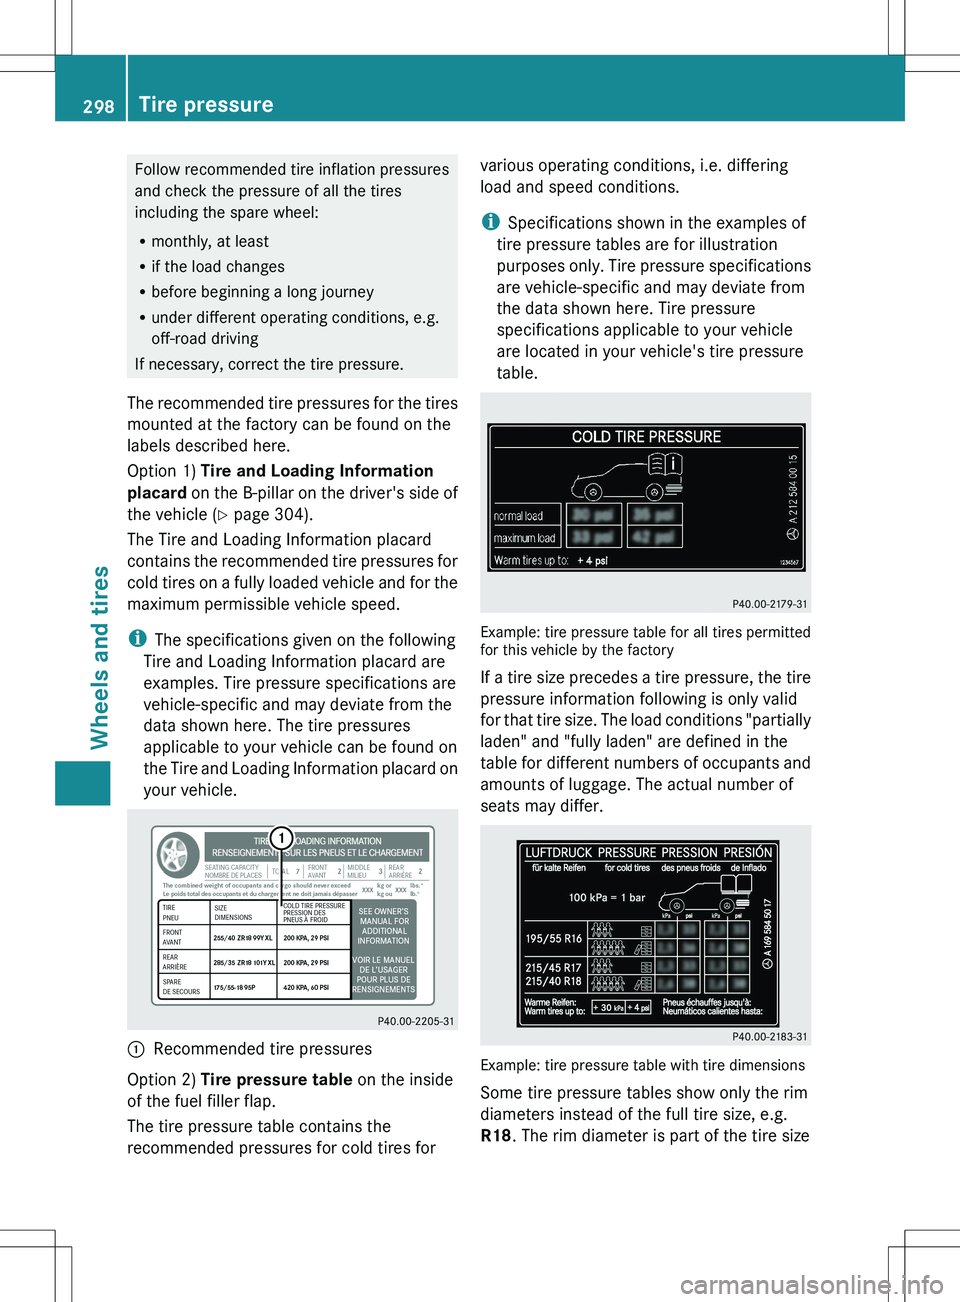
labels described here.Option 1) Tire and Loading Information
placard on the B-pillar on the driver's side of
the vehicle ( Y page 304).
The Tire and Loading Information placard
contains the recommended tire pressures for
cold tires on a fully loaded vehicle and for the
maximum permissible vehicle speed.
i The specifications given on the following
Tire and Loading Information placard are
examples. Tire pressure specifications are
vehicle-specific and may deviate from the
data shown here. The tire pressures
applicable to your vehicle can be found on
the Tire and Loading Information placard on
your vehicle.
:Recommended tire pressuresOption 2) Tire pressure table on the inside
of the fuel filler flap.
The tire pressure table contains the
recommended pressures for cold tires forvarious operating conditions, i.e. differing
load and speed conditions.
i Specifications shown in the examples of
tire pressure tables are for illustration
purposes only. Tire pressure specifications
are vehicle-specific and may deviate from
the data shown here. Tire pressure
specifications applicable to your vehicle
are located in your vehicle's tire pressure
table.
Example: tire pressure table for all tires permitted
for this vehicle by the factory
If a tire size precedes a tire pressure, the tire
pressure information following is only valid
for that tire size. The load conditions "partially
laden" and "fully laden" are defined in the
table for different numbers of occupants and
amounts of luggage. The actual number of
seats may differ.
Example: tire pressure table with tire dimensions
Some tire pressure tables show only the rim
diameters instead of the full tire size, e.g.
R18 . The rim diameter is part of the tire size
298Tire pressureWheels and tires
Page 302 of 336
changes by 18 ‡ (10 †), the tire pressure
changes by approximately 10 kPa (0.1 bar/
1.5 psi). Take this into account when
checking the pressure of warm tires and only
correct the tire pressure if it is too low for the
current operating conditions. If you check the
tire pressure when the tires are warm, the
resulting value will be higher than if the tires
were cold. This is normal. Do not reduce the
tire pressure to the value specified for cold
tires. The tire pressure would otherwise be
too low.
Observe the recommended tire pressures for
cold tires:
R on the Tire and Loading Information placard
on the B-pillar on the driver's side
R in the tire pressure table on the inside of
the fuel filler flap
R printed in yellow on the rim of the
emergency/collapsible spare wheel
(depending on vehicle equipment)
Underinflated or overinflated tires
Underinflation
GWARNING
Tires with pressure that is too low can
overheat and burst as a consequence. In
addition, they also suffer from excessive and/
or irregular wear, which can severely impair
the braking properties and the driving
characteristics. There is a risk of an accident.
Avoid tire pressures that are too low in all the
tires, including the spare wheel.
Underinflated tires may:
R wear quickly and unevenly
R have an adverse effect on fuel consumption
R overheat, leading to tire defects
R have an adverse effect on handling
characteristics
OverinflationGWARNING
Tires with excessively high pressure can burst
because they are damaged more easily by
road debris, potholes etc. In addition, they
also suffer from irregular wear, which can
severely impair the braking properties and the
driving characteristics. There is a risk of an
accident.
Avoid tire pressures that are too high in all the
tires, including the spare wheel.
Overinflated tires may:
R have an adverse effect on handling
characteristics
R wear quickly and unevenly
R be more susceptible to damage
R have an adverse effect on ride comfort
R increase the braking distance
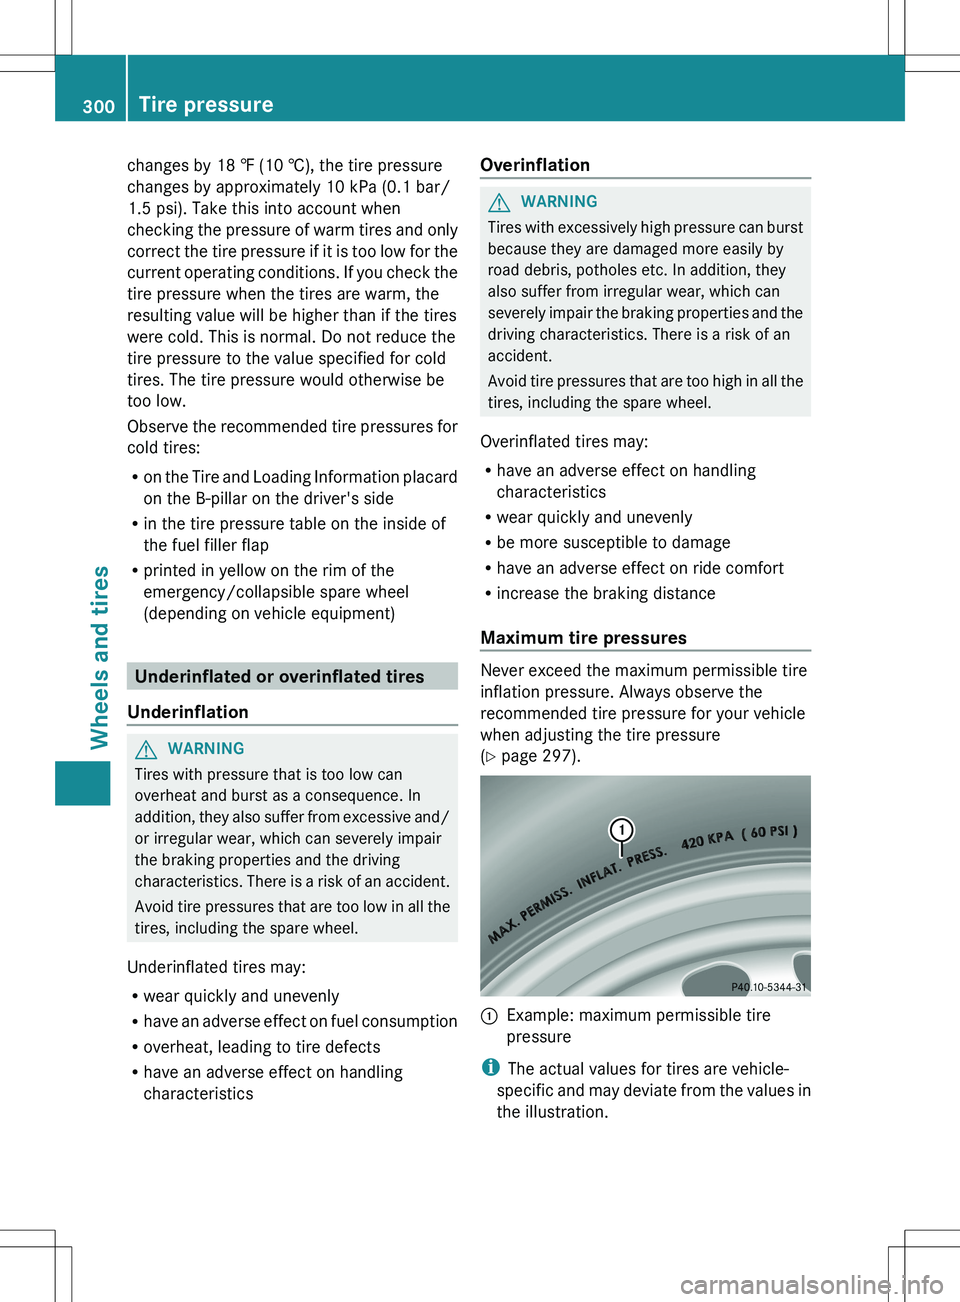
Maximum tire pressures
Never exceed the maximum permissible tire
inflation pressure. Always observe the
recommended tire pressure for your vehicle
when adjusting the tire pressure
( Y page 297).
:Example: maximum permissible tire
pressure
i The actual values for tires are vehicle-
specific and may deviate from the values in
the illustration.
300Tire pressureWheels and tires