2012 MERCEDES-BENZ SLK-CLASS ROADSTER trunk release
[x] Cancel search: trunk releasePage 10 of 336
Electronic brake force distribution ...62
ESP ®
(Electronic Stability
Program) .......................................... 58
ETS (Electronic Traction System) .....59
Important safety information ...........56
Overview .......................................... 56
PRE-SAFE ®
Brake ............................. 62
Driving systems
ATTENTION ASSIST ........................176
Cruise control ................................ 156
Display message ............................ 219
DISTRONIC PLUS ........................... 158
Dynamic handling package ............168
HOLD function ............................... 168
Parking Guidance ........................... 173
PARKTRONIC ................................. 170
Driving tips
Automatic transmission .................141
Brakes ........................................... 153
Break-in period .............................. 130
DISTRONIC PLUS ........................... 166
Downhill gradient ........................... 153
Drinking and driving .......................152
Driving abroad ............................... 104
Driving in winter ............................. 155
Driving on flooded roads ................155
Driving on wet roads ......................155
Exhaust check ............................... 153
Fuel ................................................ 152
General .......................................... 152
Hydroplaning ................................. 155
Icy road surfaces ........................... 155
Limited braking efficiency on
salted roads ................................... 154
Pedals ............................................ 152
Snow chains .................................. 297
Symmetrical low beam ..................104
Wet road surface ........................... 153
DVD audio (on-board computer) ...... 188
DVD video (on-board computer) ...... 189
Dynamic handling package Function/notes ............................. 168E
EASY-ENTRY feature Activating/deactivating .................194
Function/notes ................................ 97
EASY-EXIT feature
Crash-responsive ............................. 98
Function/notes ................................ 97
Switching on/off ........................... 194
EBD (electronic brake force
distribution) Display message ............................ 202
Function/notes ................................ 62
ECO start/stop function
Deactivating/activating .................136
General information .......................135
Important safety notes ..................135
Electrical fuses
see Fuses
Electronic brake force distribution
see EBD (electronic brake force
distribution)
Electronic Stability Program
see ESP ®
(Electronic Stability Program)
Electronic Traction System
see ETS (Electronic Traction System)
Emergency release
Driver's door .................................... 76
Trunk ............................................... 79
Vehicle ............................................. 76
Emergency spare wheel
Storage location ............................ 274
Stowing .......................................... 275
Emergency Tensioning Devices
Function ........................................... 52
Safety guidelines ............................. 37
Emissions control
Service and warranty information ....20
Engine
Check Engine warning lamp ........... 234
Display message ............................ 216
ECO start/stop function ................135
Engine number ............................... 324
Irregular running ............................ 138
Jump-starting ................................. 285
Starting problems ..........................138
Starting the engine with the key ....133
Starting with KEYLESS-GO .............1338Index
Page 19 of 336
Distribution of the vehicle
occupants (definition) ....................315
DOT, Tire Identification Number
(TIN) ............................................... 311
DOT (Department of
Transportation) (definition) ............312
GAWR (Gross Axle Weight Rating)
(definition) ..................................... 313
GVW (Gross Vehicle Weight)
(definition) ..................................... 313
GVWR (Gross Vehicle Weight
Rating) (definition) .........................313
Important safety notes ..................294
Increased vehicle weight due to
optional equipment (definition) ......313
Kilopascal (kPa) (definition) ...........314
Labeling (overview) ........................309
Load bearing index (definition) ......315
Load index ..................................... 311
Load index (definition) ...................314
Maximum loaded vehicle weight
(definition) ..................................... 313
Maximum load on a tire
(definition) ..................................... 314
Maximum permissible tire
pressure (definition) ....................... 314
Maximum tire load .........................307
Maximum tire load (definition) .......314
Optional equipment weight
(definition) ..................................... 314
PSI (pounds per square inch)
(definition) ..................................... 314
Replacing ....................................... 315
Service life ..................................... 295
Sidewall (definition) .......................314
Speed rating (definition) ................313
Storing ........................................... 316
Structure and characteristics
(definition) ..................................... 312
Temperature .................................. 308
TIN (Tire Identification Number)
(definition) ..................................... 315
Tire bead (definition) ......................314
Tire pressure (definition) ................314
Tire pressures (recommended) ......313
Tire size (data) ............................... 316
Tire size designation, load-bearing
capacity, speed rating .................... 309Tire tread ....................................... 295
Tire tread (definition) .....................314
Total load limit (definition) .............315
Traction ......................................... 308
Traction (definition) .......................315
Tread wear ..................................... 308
Uniform Tire Quality Grading
Standards ...................................... 307
Uniform Tire Quality Grading
Standards (definition) ....................313
Unladen weight (definition) ............314
Wear indicator (definition) .............315
Wheel rim (definition) ....................313
see Flat tire
Towing
Important safety guidelines ...........287
Installing the towing eye ................287
Removing the towing eye ...............288
With the rear axle raised ................288
Towing away
With both axles on the ground .......288
Tow-starting
Emergency engine starting ............289
Important safety notes ..................287
Installing the towing eye ................287
Removing the towing eye ...............288
Transmission
see Automatic transmission
see Manual transmission
Transporting the vehicle .................. 289
Trim pieces (cleaning instructions) . 270
Trip computer (on-board
computer) .......................................... 185
Trip meter see Trip odometer
Trip odometer
Calling up ....................................... 185
Resetting (on-board computer) ......186
Trunk
Emergency release ..........................79
Important safety notes ....................77
Locking separately ...........................78
Opening (automatically from
outside) ............................................ 78
Trunk lid
Display message ............................ 224
Opening/closing .............................. 77Index17
Page 79 of 336
iIf you lock the vehicle as described above,
the fuel filler flap is not locked. The anti-
theft alarm system is not armed.
Trunk
Important safety notes
Do not leave the SmartKey in the trunk. You
could otherwise lock yourself out.
GWARNING
When leaving the vehicle, always remove the
SmartKey from the ignition lock. Always take
the SmartKey with you and lock the vehicle.
Do not leave children unsupervised in the
vehicle, even if they are secured in a child
restraint system, and do not give them access
to an unlocked vehicle. A child's unsupervised
access to a vehicle could result in an accident
and/or serious personal injury. They could:
R injure themselves on vehicle parts
R be seriously or fatally injured by extreme
heat or cold
R injure themselves or have an accident with
vehicle equipment that may still be in
operation even after the SmartKey has
been removed from the ignition, such as the
seat adjustment, steering wheel
adjustment or memory function.
If children open a door, they could cause
severe or even fatal injury to other persons; if
they get out of the vehicle, they could injure
themselves when doing so or be seriously or
even fatally injured by any passing traffic.
Do not expose the child restraint system to
direct sunlight. The child restraint system's
metal parts, for example, could become very
hot, and a child could be burned on these
parts.
GWARNING
Do not carry heavy or hard objects in the
passenger compartment or trunk unless they
are firmly secured in place.
Unsecured or improperly positioned cargo
increases a child's risk of injury in the event
of
R strong braking maneuvers
R sudden changes of direction
R an accidentGWARNING
Make sure the trunk lid is closed when the
engine is running and while driving. Among
other dangers, deadly carbon monoxide (CO)
gases may enter the vehicle interior resulting
in unconsciousness and death.
! The trunk lid swings upwards when
opened. Therefore, make sure that there is
sufficient clearance above the trunk lid.
To open the trunk lid completely, a minimum
clearance of 5.90 ft (1.80 m) above the
ground is necessary.
The trunk lid can be:
R opened and closed manually from outside
R opened automatically from outside
R locked separately
R unlocked with the mechanical key
R opened with the emergency release button
Opening and closing manually
Opening
You can only unlock the trunk lid when the
vehicle is stationary and the roof is fully
opened or closed.
XPress the % button on the SmartKey.Trunk77Opening/closingZ
Page 81 of 336
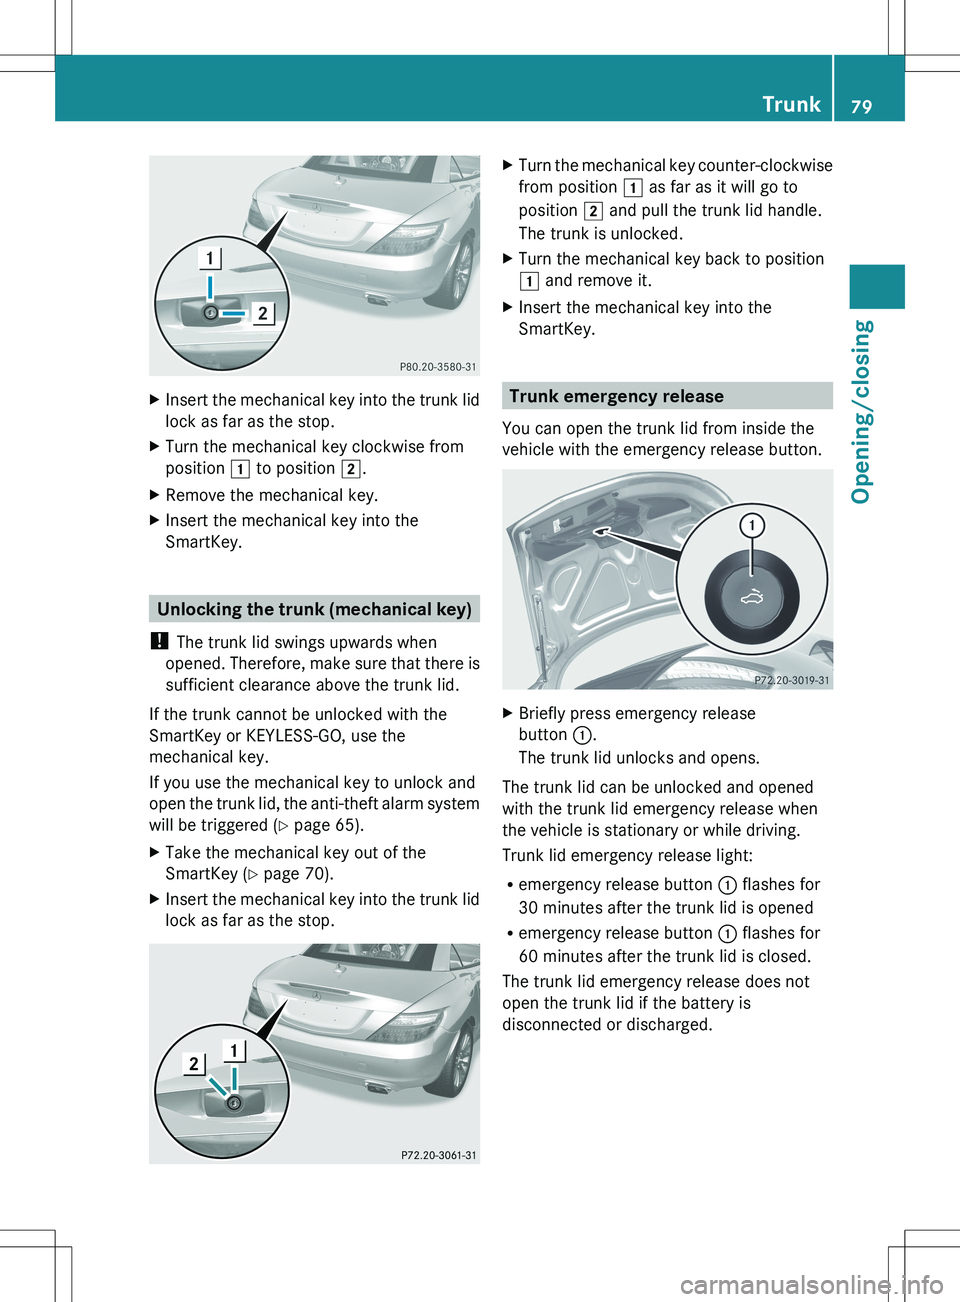
XInsert the mechanical key into the trunk lid
lock as far as the stop.XTurn the mechanical key clockwise from
position 1 to position 2.XRemove the mechanical key.XInsert the mechanical key into the
SmartKey.
Unlocking the trunk (mechanical key)
! The trunk lid swings upwards when
opened. Therefore, make sure that there is
sufficient clearance above the trunk lid.
If the trunk cannot be unlocked with the
SmartKey or KEYLESS-GO, use the
mechanical key.
If you use the mechanical key to unlock and
open the trunk lid, the anti-theft alarm system
will be triggered ( Y page 65).
XTake the mechanical key out of the
SmartKey ( Y page 70).XInsert the mechanical key into the trunk lid
lock as far as the stop.XTurn the mechanical key counter-clockwise
from position 1 as far as it will go to
position 2 and pull the trunk lid handle.
The trunk is unlocked.XTurn the mechanical key back to position
1 and remove it.XInsert the mechanical key into the
SmartKey.
Trunk emergency release
You can open the trunk lid from inside the
vehicle with the emergency release button.
XBriefly press emergency release
button :.
The trunk lid unlocks and opens.
The trunk lid can be unlocked and opened
with the trunk lid emergency release when
the vehicle is stationary or while driving.
Trunk lid emergency release light:
R emergency release button : flashes for
30 minutes after the trunk lid is opened
R emergency release button : flashes for
60 minutes after the trunk lid is closed.
The trunk lid emergency release does not
open the trunk lid if the battery is
disconnected or discharged.
Trunk79Opening/closingZ
Page 83 of 336
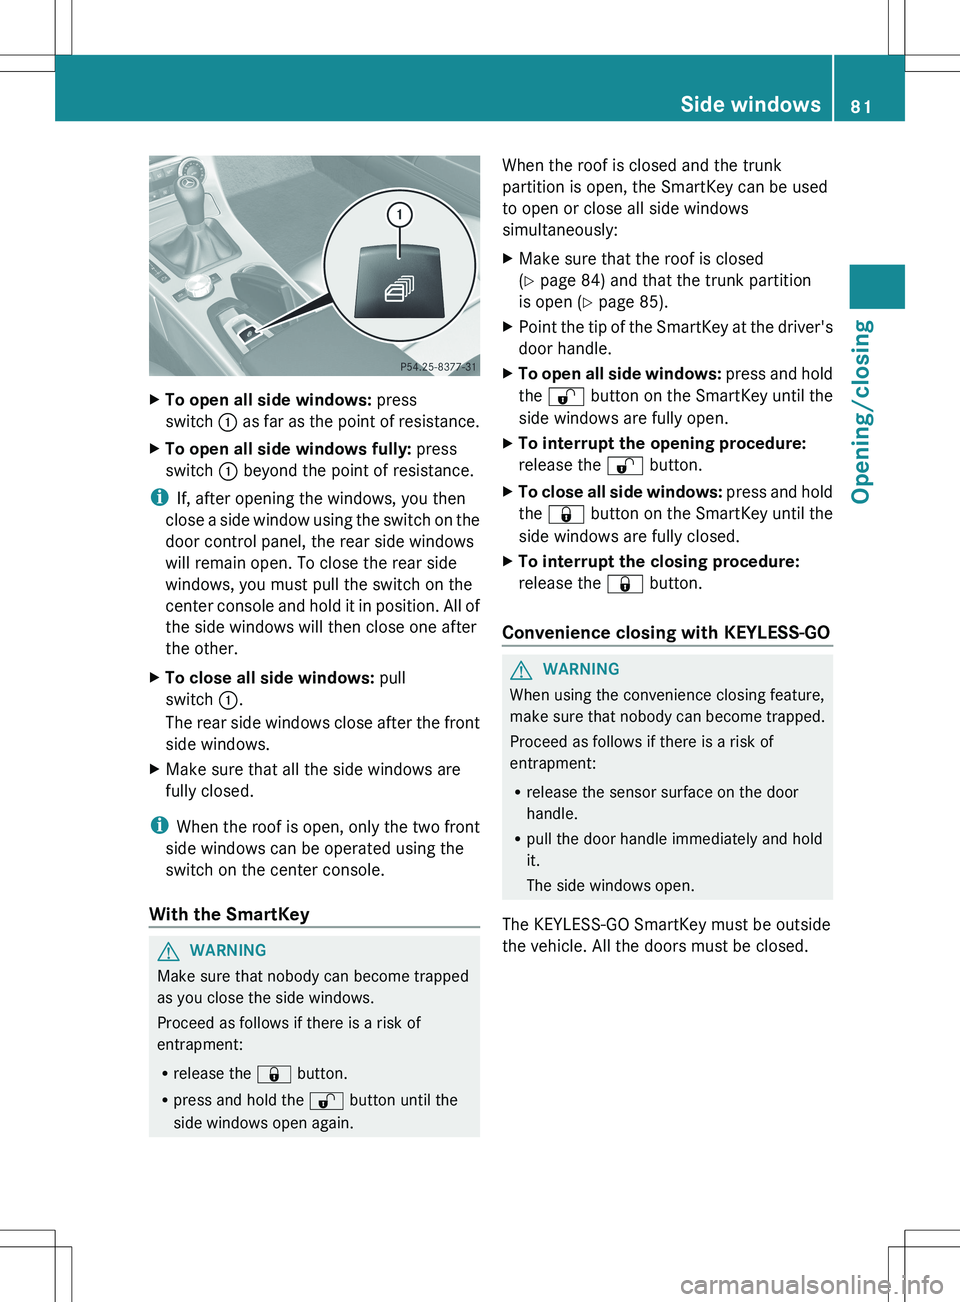
XTo open all side windows: press
switch : as far as the point of resistance.XTo open all side windows fully: press
switch : beyond the point of resistance.
i
If, after opening the windows, you then
close a side window using the switch on the
door control panel, the rear side windows
will remain open. To close the rear side
windows, you must pull the switch on the
center console and hold it in position. All of
the side windows will then close one after
the other.
XTo close all side windows: pull
switch :.
The rear side windows close after the front
side windows.XMake sure that all the side windows are
fully closed.
i When the roof is open, only the two front
side windows can be operated using the
switch on the center console.
With the SmartKey
GWARNING
Make sure that nobody can become trapped
as you close the side windows.
Proceed as follows if there is a risk of
entrapment:
R release the & button.
R press and hold the % button until the
side windows open again.
When the roof is closed and the trunk
partition is open, the SmartKey can be used
to open or close all side windows
simultaneously:XMake sure that the roof is closed
( Y page 84) and that the trunk partition
is open ( Y page 85).XPoint the tip of the SmartKey at the driver's
door handle.XTo open all side windows: press and hold
the % button on the SmartKey until the
side windows are fully open.XTo interrupt the opening procedure:
release the % button.XTo close all side windows: press and hold
the & button on the SmartKey until the
side windows are fully closed.XTo interrupt the closing procedure:
release the & button.
Convenience closing with KEYLESS-GO
GWARNING
When using the convenience closing feature,
make sure that nobody can become trapped.
Proceed as follows if there is a risk of
entrapment:
R release the sensor surface on the door
handle.
R pull the door handle immediately and hold
it.
The side windows open.
The KEYLESS-GO SmartKey must be outside
the vehicle. All the doors must be closed.
Side windows81Opening/closingZ
Page 85 of 336
GWARNING
Only drive with the roof fully open or closed.
If the roof does not open or close fully, the
roof hydraulics are depressurized and the soft
top is lowered:
R after about seven minutes if the ignition is
switched on
R after about 15 seconds if the ignition is
switched off
A warning tone sounds shortly beforehand.
The K symbol and the Retractable
Roof Lowering message appears in the
multifunction display.
Lock the roof again before driving on.
Otherwise, the unlocked roof could open
during the journey and cause you to lose
control of your vehicle. You or other persons
could be injured as a result.
GWARNING
Closing the roof manually is a complex,
technically challenging procedure.
Attempting to manually close the roof may
cause damage to the roof and/or injury.
For this reason, the manual closing process
should only be carried out at a qualified
specialist workshop.
! Never sit on the rear shelf or store heavy
objects there. You will otherwise damage
the roof and the rear shelf of your vehicle.
! Do not forget that the weather can
change abruptly. Make certain that the roof
is closed when you leave the vehicle. The
vehicle electronics can be damaged if
water enters the vehicle interior.
! When opening and closing the roof, make
sure that:
R there is sufficient upward clearance, as
the roof swings upwards.
R there is sufficient clearance behind the
vehicle, as the trunk lid swings
backwards beyond the bumper.
R the trunk is only loaded to below the
trunk partition.
R the trunk partition is not pushed up by
the load.
R the trunk partition is closed.
R the trunk lid is closed.
R the outside temperature is above
+5 ‡ (−15 †).
You could otherwise damage the roof,
trunk and other parts of the vehicle.
i Make sure that the roof and rear window
are clean and dry before opening the roof.
Otherwise, water or dirt could enter the
vehicle interior or trunk.
Opening and closing with the roof
switch
Important safety notes
GWARNING
Before operating the retractable hardtop
(vario-roof), make sure there is no danger of
anyone being injured by the moving parts
(retractable hardtop, roof frame, and trunk
lid).
Hands must never be placed near the roof
frame, upper windshield area, hardtop, shelf
behind roll bars, or trunk lid while the
retractable hardtop is being raised or
lowered. Serious personal injury may occur.
If potential danger exists, release the
retractable hardtop switch or the % or
& button on the SmartKey. This
immediately interrupts the raising or lowering
procedure. You can then operate the
retractable hardtop switch or press the
% or & button on the SmartKey to raise
or lower the retractable hardtop away from
the danger zone.
Roof83Opening/closingZ
Page 86 of 336
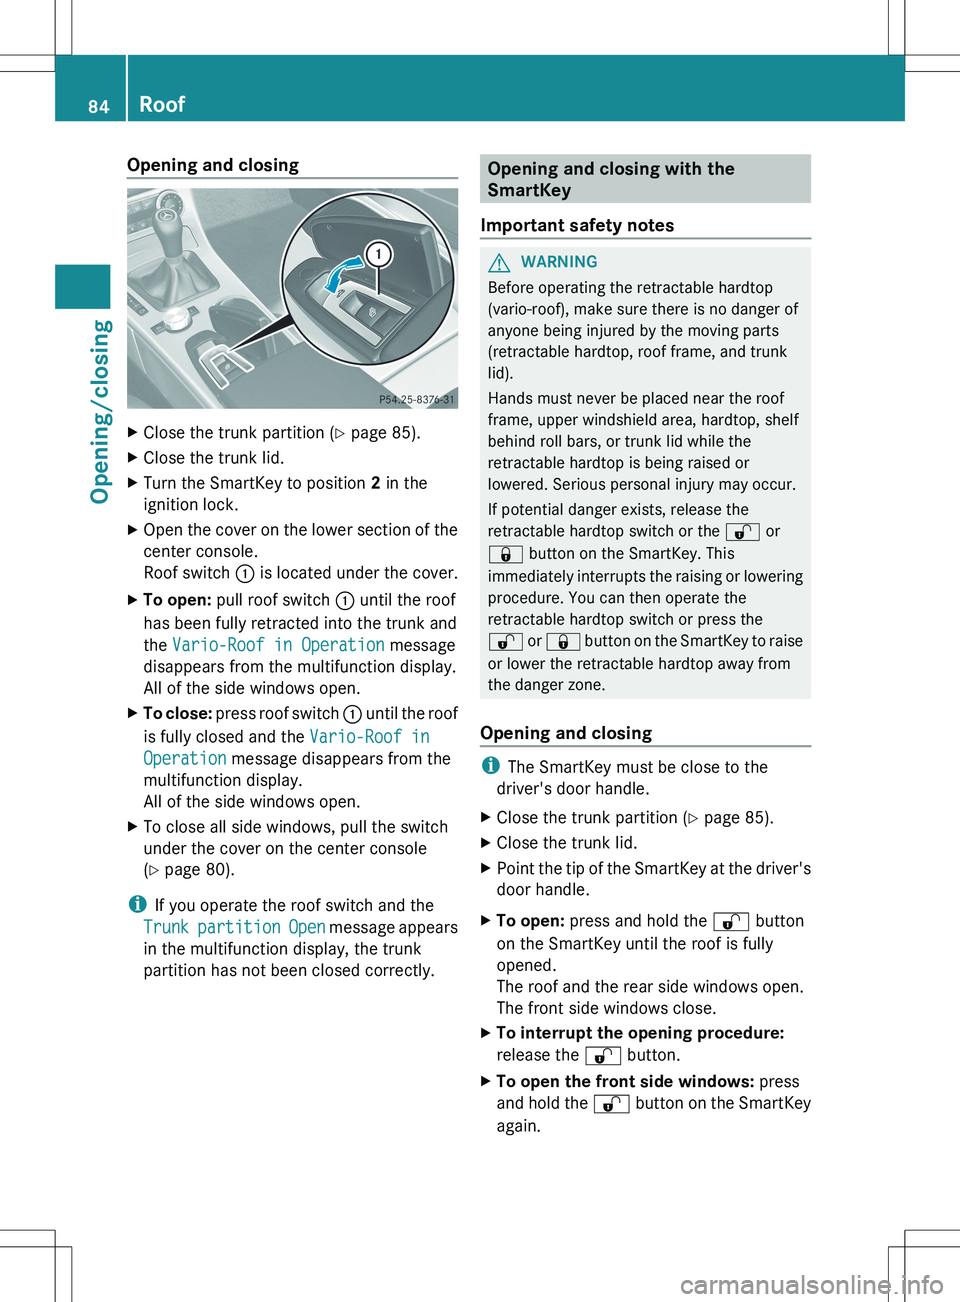
Opening and closingXClose the trunk partition (Y page 85).XClose the trunk lid.XTurn the SmartKey to position 2 in the
ignition lock.XOpen the cover on the lower section of the
center console.
Roof switch : is located under the cover.XTo open: pull roof switch : until the roof
has been fully retracted into the trunk and
the Vario-Roof in Operation message
disappears from the multifunction display.
All of the side windows open.XTo close: press roof switch : until the roof
is fully closed and the Vario-Roof in
Operation message disappears from the
multifunction display.
All of the side windows open.XTo close all side windows, pull the switch
under the cover on the center console
( Y page 80).
i
If you operate the roof switch and the
Trunk partition Open message appears
in the multifunction display, the trunk
partition has not been closed correctly.
Opening and closing with the
SmartKey
Important safety notesGWARNING
Before operating the retractable hardtop
(vario-roof), make sure there is no danger of
anyone being injured by the moving parts
(retractable hardtop, roof frame, and trunk
lid).
Hands must never be placed near the roof
frame, upper windshield area, hardtop, shelf
behind roll bars, or trunk lid while the
retractable hardtop is being raised or
lowered. Serious personal injury may occur.
If potential danger exists, release the
retractable hardtop switch or the % or
& button on the SmartKey. This
immediately interrupts the raising or lowering
procedure. You can then operate the
retractable hardtop switch or press the
% or & button on the SmartKey to raise
or lower the retractable hardtop away from
the danger zone.
Opening and closing
i The SmartKey must be close to the
driver's door handle.
XClose the trunk partition ( Y page 85).XClose the trunk lid.XPoint the tip of the SmartKey at the driver's
door handle.XTo open: press and hold the % button
on the SmartKey until the roof is fully
opened.
The roof and the rear side windows open.
The front side windows close.XTo interrupt the opening procedure:
release the % button.XTo open the front side windows: press
and hold the % button on the SmartKey
again.84RoofOpening/closing
Page 87 of 336
XTo close: press and hold the & button
on the SmartKey until the roof is fully
closed.
The roof and the side windows close.XTo interrupt the closing procedure:
release the & button.
i
When the roof is closed and the trunk
partition is open, the roof cannot be
opened using the SmartKey functions.
Instead, all side windows open or close
simultaneously ( Y page 80). Additionally,
the Trunk partition Open message
appears in the multifunction display.
Locking the roof again
GWARNING
Stop the vehicle in a safe location or as soon
as it is safe to do so and lock the retractable
hardtop before continuing to drive. You could
otherwise endanger yourself and others.
The roof is not locked when:
R the K symbol and the Vario-Roof in
Operation / Retractable Roof in
Operation message appear in the
multifunction display
R the K symbol and the Retractable
Roof Not Open/Close Completely
appear in the multifunction display and a
warning tone is heard
R you hear a warning tone for up to ten
seconds when pulling away or while driving.
You can lock the roof again if it is not locked
fully.
XStop the vehicle immediately, paying
attention to road and traffic conditions.XMake sure that the SmartKey is in position
2 in the ignition lock.XPress the roof switch ( Y page 84).Trunk partition
General notes
The trunk partition can be used to cover
luggage and loads in the trunk.
! To avoid damaging the roof or luggage
when folding back the roof, you should:
R only load the trunk to below the trunk
partition
R not place any objects on or in front of the
trunk partition
R not place any objects on the cover
behind the roll bars
R not allow the cargo to push the trunk
partition upwards
Opening and closing
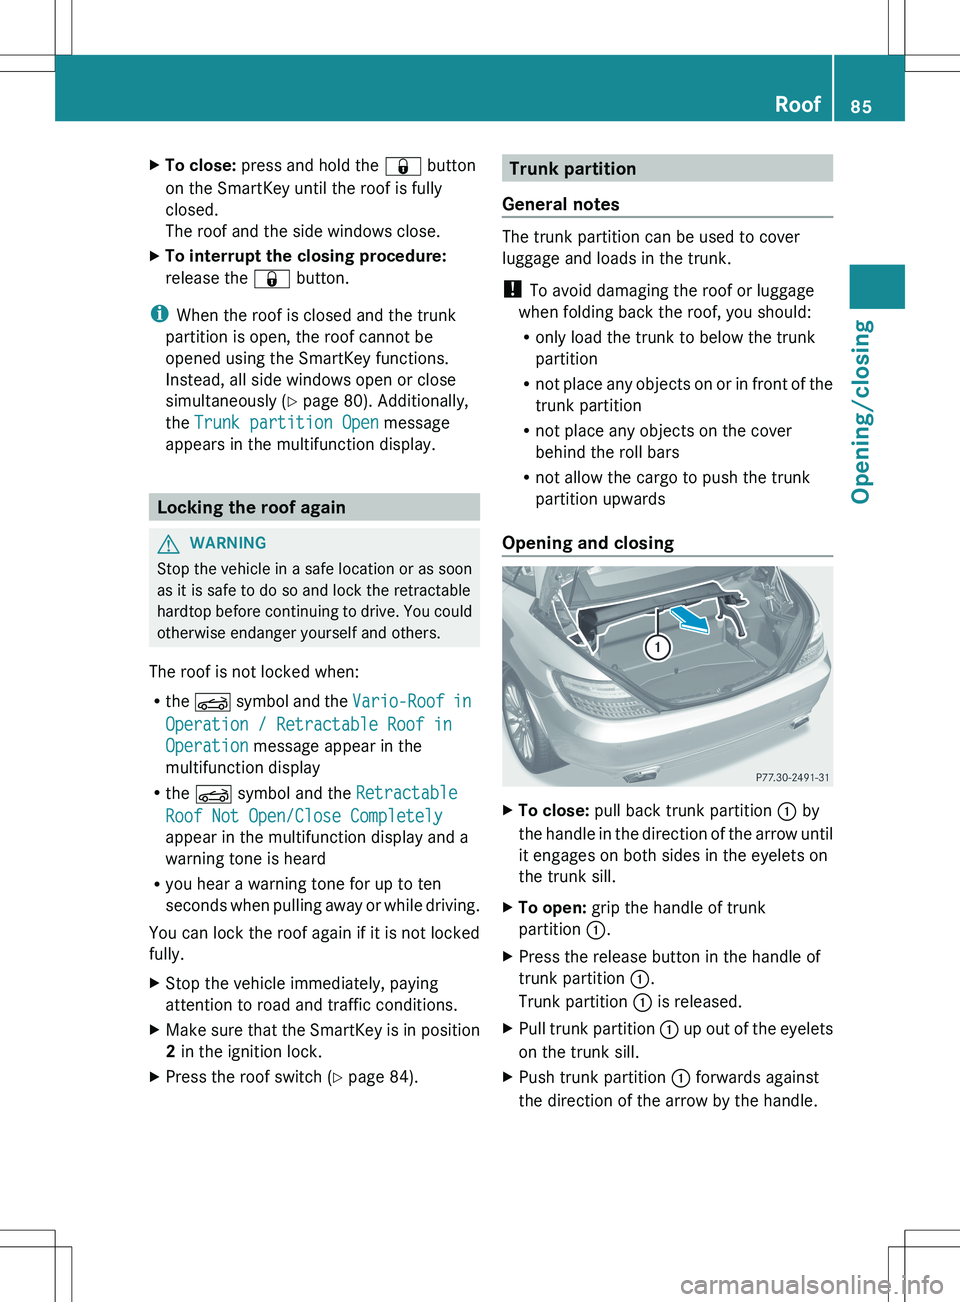
XTo close: pull back trunk partition : by
the handle in the direction of the arrow until
it engages on both sides in the eyelets on
the trunk sill.XTo open: grip the handle of trunk
partition :.XPress the release button in the handle of
trunk partition :.
Trunk partition : is released.XPull trunk partition : up out of the eyelets
on the trunk sill.XPush trunk partition : forwards against
the direction of the arrow by the handle.Roof85Opening/closingZ