2012 MERCEDES-BENZ SLK-CLASS ROADSTER instrument cluster
[x] Cancel search: instrument clusterPage 64 of 336
the instrument cluster does not flash. In such
situations, ESP ®
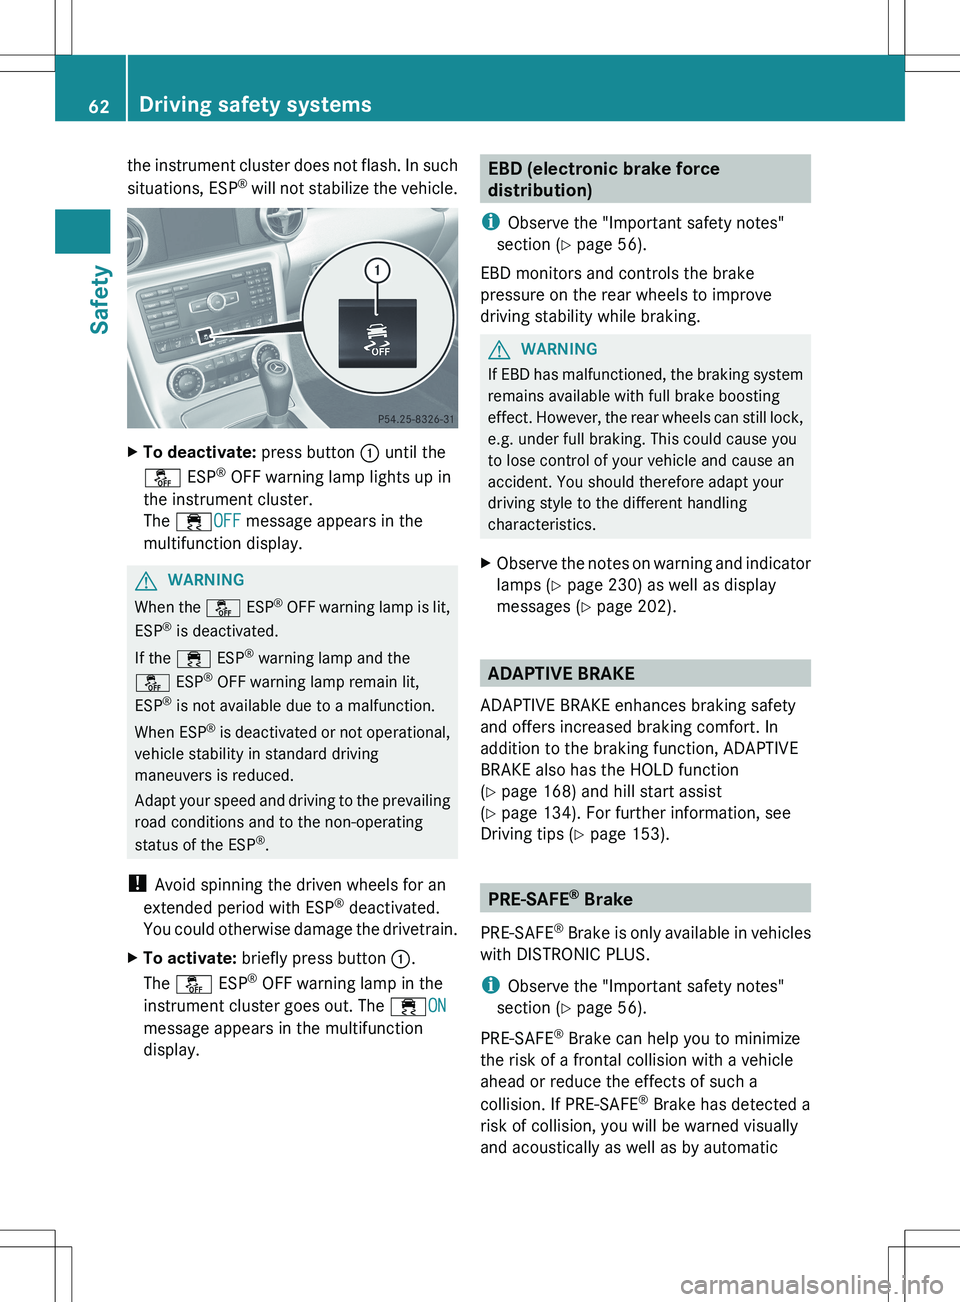
will not stabilize the vehicle.XTo deactivate: press button : until the
å ESP®
OFF warning lamp lights up in
the instrument cluster.
The ÷ OFF message appears in the
multifunction display.GWARNING
When the å ESP®
OFF warning lamp is lit,
ESP ®
is deactivated.
If the ÷ ESP®
warning lamp and the
å ESP®
OFF warning lamp remain lit,
ESP ®
is not available due to a malfunction.
When ESP ®
is deactivated or not operational,
vehicle stability in standard driving
maneuvers is reduced.
Adapt your speed and driving to the prevailing
road conditions and to the non-operating
status of the ESP ®
.
! Avoid spinning the driven wheels for an
extended period with ESP ®
deactivated.
You could otherwise damage the drivetrain.
XTo activate: briefly press button :.
The å ESP®
OFF warning lamp in the
instrument cluster goes out. The ÷ON
message appears in the multifunction
display.EBD (electronic brake force
distribution)
i Observe the "Important safety notes"
section ( Y page 56).
EBD monitors and controls the brake
pressure on the rear wheels to improve
driving stability while braking.GWARNING
If EBD has malfunctioned, the braking system
remains available with full brake boosting
effect. However, the rear wheels can still lock,
e.g. under full braking. This could cause you
to lose control of your vehicle and cause an
accident. You should therefore adapt your
driving style to the different handling
characteristics.
XObserve the notes on warning and indicator
lamps ( Y page 230) as well as display
messages ( Y page 202).
ADAPTIVE BRAKE
ADAPTIVE BRAKE enhances braking safety
and offers increased braking comfort. In
addition to the braking function, ADAPTIVE
BRAKE also has the HOLD function
( Y page 168) and hill start assist
( Y page 134). For further information, see
Driving tips ( Y page 153).
PRE-SAFE ®
Brake
PRE-SAFE ®
Brake is only available in vehicles
with DISTRONIC PLUS.
i Observe the "Important safety notes"
section ( Y page 56).
PRE-SAFE ®
Brake can help you to minimize
the risk of a frontal collision with a vehicle
ahead or reduce the effects of such a
collision. If PRE-SAFE ®
Brake has detected a
risk of collision, you will be warned visually
and acoustically as well as by automatic
62Driving safety systemsSafety
Page 65 of 336
braking. PRE-SAFE®
Brake cannot prevent a
collision without your intervention.
At speeds above approximately
20 mph (30 km/h), this function warns you
when you are rapidly approaching the vehicle
in front. An intermittent warning tone will
then sound and the · distance warning
lamp in the instrument cluster will light up.XBrake immediately in order to increase the
distance from the vehicle in front.
or
XTake evasive action provided it is safe to do
so.
At speeds of above approximately
20 mph (30 km/h), if the driver and front
passenger have fastened their seat belts,
PRE-SAFE ®
Brake can:
R brake the vehicle automatically at speeds
up to approximately 124 mph (200 km/h)
R trigger preventative occupant protection
measures (PRE-SAFE ®
) ( Y page 47)
Due to the nature of the system, particularly
complicated driving conditions may cause
unnecessary warnings or the unnecessary
intervention of PRE-SAFE ®
Brake. To stop the
braking action, you can either depress the
accelerator pedal further, activate kickdown
or release the brake pedal.
The braking action of PRE-SAFE ®
Brake is
ended automatically if:
R your speed drops below approximately
9 mph (15 km/h).
R you maneuver to avoid the obstacle.
R there is no longer any danger of a rear-end
collision.
R there is no longer an obstacle detected in
front of your vehicle.
i USA only: This device has been approved
by the FCC as a "Vehicular Radar System".
The radar sensor is intended for use in an
automotive radar system only. Removing,
altering or tampering with the device will
void any warranties, and is not permitted
by the FCC. Do not tamper with, alter, or
use in any non-approved way.
Any unauthorized modification to this
device could void the user's authority to
operate the equipment.
i Canada only: This device complies with
RSS-210 of Industry Canada. Operation is
subject to the following two conditions:
1. This device may not cause interference,
and
2. this device must accept any interference
received, including interference that may
cause undesired operation of the device.
Removal, tampering, or altering of the
device will void any warranties, and is not
permitted. Do not tamper with, alter, or use
in any non-approved way.
Any unauthorized modification to this
device could void the user's authority to
operate the equipment.
With the help of the radar sensor system,
PRE-SAFE ®
Brake can detect obstacles that
are in front of your vehicle for an extended
period of time.
At speeds up to approximately 40 mph
(70 km/h), PRE-SAFE ®
Brake can also react
to stationary obstacles, for example stopped
or parked vehicles.
If you approach an obstacle and PRE-SAFE ®
Brake detects a risk of collision, the system
will initially alert you both visually and
acoustically. If you do not brake or take
evasive action, the system will warn you by
automatically braking the vehicle gently. If
there is an increased risk of collision,
preventative passenger protection measures
(PRE-SAFE ®
) are activated (Y page 47). If the
risk of collision remains and you do not brake,
take evasive action or accelerate
significantly, the vehicle may perform
automatic emergency braking. Automatic
emergency braking is not performed until
immediately prior to an accident that can no
longer be avoided.Driving safety systems63SafetyZ
Page 94 of 336
Useful information
i This Operator's Manual describes all
models and all standard and optional
equipment of your vehicle available at the
time of publication of the Operator's
Manual. Country-specific differences are
possible. Please note that your vehicle may
not be equipped with all features
described. This also applies to safety-
related systems and functions.
i Please read the information on qualified
specialist workshops ( Y page 23).
Correcting the driver's seat position
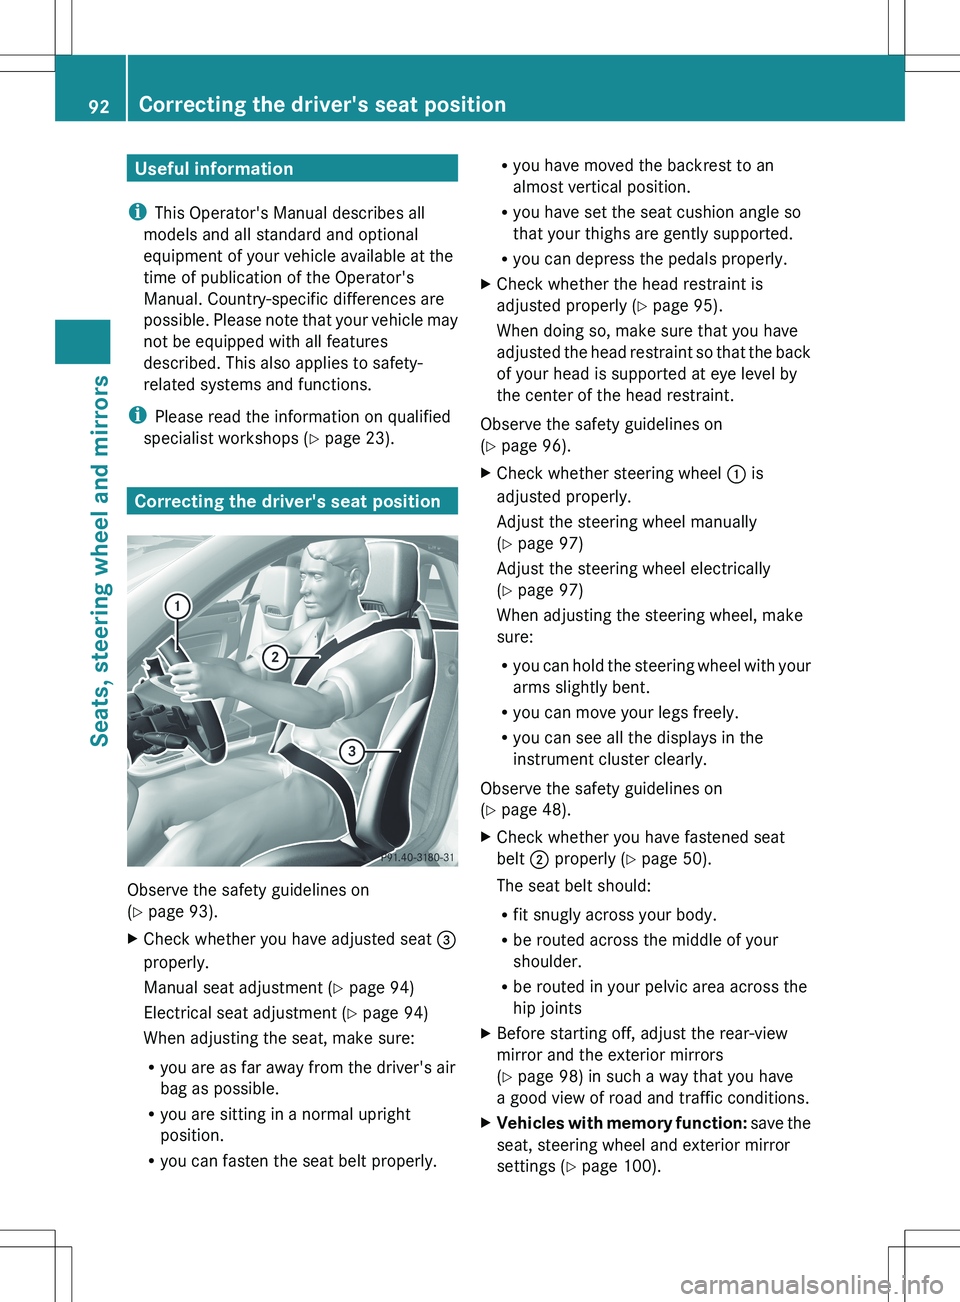
Observe the safety guidelines on
( Y page 93).
XCheck whether you have adjusted seat =
properly.
Manual seat adjustment ( Y page 94)
Electrical seat adjustment ( Y page 94)
When adjusting the seat, make sure:
R you are as far away from the driver's air
bag as possible.
R you are sitting in a normal upright
position.
R you can fasten the seat belt properly.Ryou have moved the backrest to an
almost vertical position.
R you have set the seat cushion angle so
that your thighs are gently supported.
R you can depress the pedals properly.XCheck whether the head restraint is
adjusted properly ( Y page 95).
When doing so, make sure that you have
adjusted the head restraint so that the back
of your head is supported at eye level by
the center of the head restraint.
Observe the safety guidelines on
( Y page 96).
XCheck whether steering wheel : is
adjusted properly.
Adjust the steering wheel manually
( Y page 97)
Adjust the steering wheel electrically
( Y page 97)
When adjusting the steering wheel, make
sure:
R you can hold the steering wheel with your
arms slightly bent.
R you can move your legs freely.
R you can see all the displays in the
instrument cluster clearly.
Observe the safety guidelines on
( Y page 48).
XCheck whether you have fastened seat
belt ; properly ( Y page 50).
The seat belt should:
R fit snugly across your body.
R be routed across the middle of your
shoulder.
R be routed in your pelvic area across the
hip jointsXBefore starting off, adjust the rear-view
mirror and the exterior mirrors
( Y page 98) in such a way that you have
a good view of road and traffic conditions.XVehicles with memory function: save the
seat, steering wheel and exterior mirror
settings ( Y page 100).92Correcting the driver's seat positionSeats, steering wheel and mirrors
Page 107 of 336
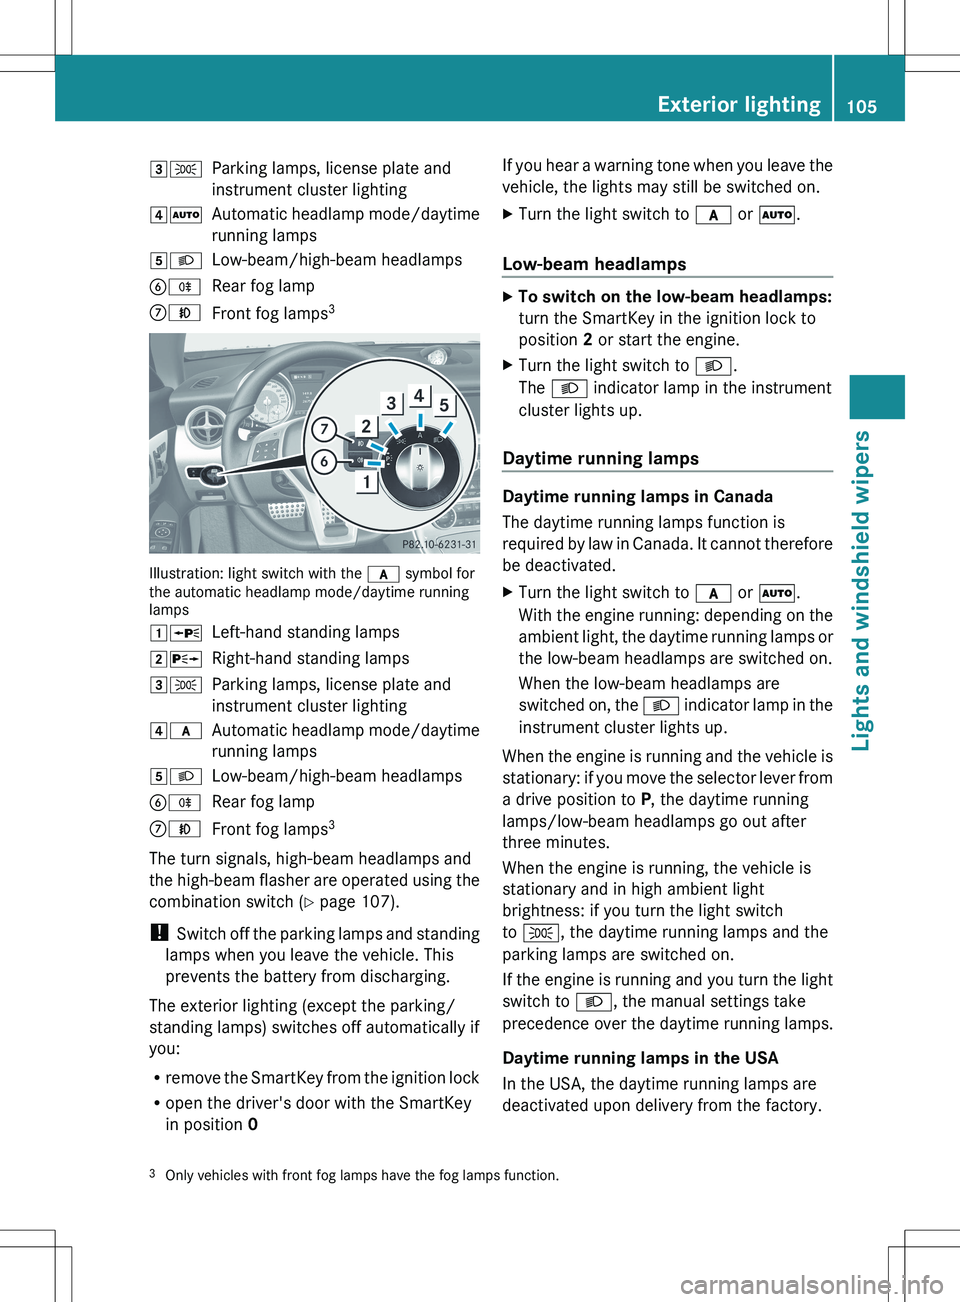
3TParking lamps, license plate and
instrument cluster lighting4 ÃAutomatic headlamp mode/daytime
running lamps5 LLow-beam/high-beam headlampsBRRear fog lampCNFront fog lamps 3
Illustration: light switch with the
c symbol for
the automatic headlamp mode/daytime running
lamps
1 WLeft-hand standing lamps2XRight-hand standing lamps3TParking lamps, license plate and
instrument cluster lighting4 cAutomatic headlamp mode/daytime
running lamps5 LLow-beam/high-beam headlampsBRRear fog lampCNFront fog lamps 3
The turn signals, high-beam headlamps and
the high-beam flasher are operated using the
combination switch ( Y page 107).
! Switch off the parking lamps and standing
lamps when you leave the vehicle. This
prevents the battery from discharging.
The exterior lighting (except the parking/
standing lamps) switches off automatically if
you:
R remove the SmartKey from the ignition lock
R open the driver's door with the SmartKey
in position 0
If you hear a warning tone when you leave the
vehicle, the lights may still be switched on.XTurn the light switch to c or à .
Low-beam headlamps
XTo switch on the low-beam headlamps:
turn the SmartKey in the ignition lock to
position 2 or start the engine.XTurn the light switch to L.
The L indicator lamp in the instrument
cluster lights up.
Daytime running lamps
Daytime running lamps in Canada
The daytime running lamps function is
required by law in Canada. It cannot therefore
be deactivated.
XTurn the light switch to c or à .
With the engine running: depending on the
ambient light, the daytime running lamps or
the low-beam headlamps are switched on.
When the low-beam headlamps are
switched on, the L indicator lamp in the
instrument cluster lights up.
When the engine is running and the vehicle is
stationary: if you move the selector lever from
a drive position to P, the daytime running
lamps/low-beam headlamps go out after
three minutes.
When the engine is running, the vehicle is
stationary and in high ambient light
brightness: if you turn the light switch
to T , the daytime running lamps and the
parking lamps are switched on.
If the engine is running and you turn the light
switch to L, the manual settings take
precedence over the daytime running lamps.
Daytime running lamps in the USA
In the USA, the daytime running lamps are
deactivated upon delivery from the factory.
3 Only vehicles with front fog lamps have the fog lamps function.Exterior lighting105Lights and windshield wipers
Page 108 of 336
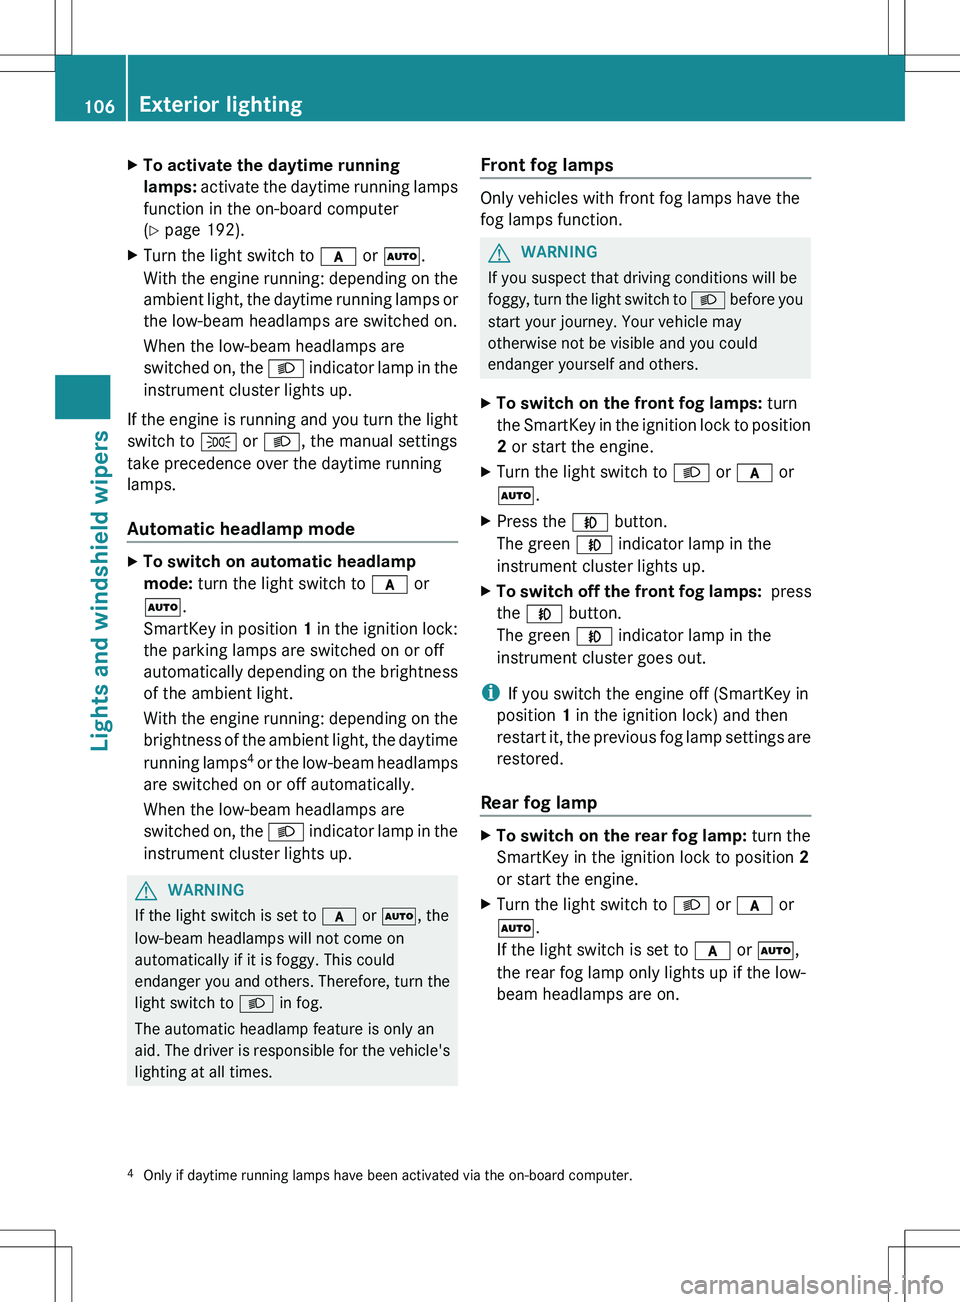
XTo activate the daytime running
lamps: activate the daytime running lamps
function in the on-board computer
( Y page 192).XTurn the light switch to c or à .
With the engine running: depending on the
ambient light, the daytime running lamps or
the low-beam headlamps are switched on.
When the low-beam headlamps are
switched on, the L indicator lamp in the
instrument cluster lights up.
If the engine is running and you turn the light
switch to T or L , the manual settings
take precedence over the daytime running
lamps.
Automatic headlamp mode
XTo switch on automatic headlamp
mode: turn the light switch to c or
à .
SmartKey in position 1 in the ignition lock:
the parking lamps are switched on or off
automatically depending on the brightness
of the ambient light.
With the engine running: depending on the
brightness of the ambient light, the daytime
running lamps 4
or the low-beam headlamps
are switched on or off automatically.
When the low-beam headlamps are
switched on, the L indicator lamp in the
instrument cluster lights up.GWARNING
If the light switch is set to c or à , the
low-beam headlamps will not come on
automatically if it is foggy. This could
endanger you and others. Therefore, turn the
light switch to L in fog.
The automatic headlamp feature is only an
aid. The driver is responsible for the vehicle's
lighting at all times.
Front fog lamps
Only vehicles with front fog lamps have the
fog lamps function.
GWARNING
If you suspect that driving conditions will be
foggy, turn the light switch to L before you
start your journey. Your vehicle may
otherwise not be visible and you could
endanger yourself and others.
XTo switch on the front fog lamps: turn
the SmartKey in the ignition lock to position
2 or start the engine.XTurn the light switch to L or c or
à .XPress the N button.
The green N indicator lamp in the
instrument cluster lights up.XTo switch off the front fog lamps: press
the N button.
The green N indicator lamp in the
instrument cluster goes out.
i If you switch the engine off (SmartKey in
position 1 in the ignition lock) and then
restart it, the previous fog lamp settings are
restored.
Rear fog lamp
XTo switch on the rear fog lamp: turn the
SmartKey in the ignition lock to position 2
or start the engine.XTurn the light switch to L or c or
à .
If the light switch is set to c or à ,
the rear fog lamp only lights up if the low-
beam headlamps are on.4 Only if daytime running lamps have been activated via the on-board computer.106Exterior lightingLights and windshield wipers
Page 109 of 336
XPress the R button.
The yellow R indicator lamp in the
instrument cluster lights up.XTo switch off the rear fog lamp: press the
R button.
The yellow R indicator lamp in the
instrument cluster goes out.
i If you switch the engine off (SmartKey in
position 1 in the ignition lock) and then
restart it, the previous rear fog lamp
settings are restored.
Headlamp cleaning system
If the "Wipe with washer fluid" function is
operated five times ( Y page 113) while the
lights are on and the engine is running, the
headlamps are cleaned automatically. When
you switch off the ignition, the automatic
headlamp cleaning system is reset and
counting is resumed from 0.
Combination switch
Turn signals
:High-beam headlamps;Right turn signal=High-beam flasher?Left turn signalXTo indicate briefly: press the combination
switch briefly to the pressure point in the
direction of arrow ; or ?.
The corresponding turn signal flashes three
times.XTo indicate: press the combination switch
beyond the pressure point in the direction
of arrow ; or ?.
High-beam headlamps
XTo switch on the high-beam headlamps:
turn the SmartKey in the ignition lock to
position 2 or start the engine.XTurn the light switch to L or c or
à .XPress the combination switch beyond the
pressure point in the direction of
arrow :.
In the c or à position, the high-
beam headlamps are only switched on
when it is dark and the engine is running.
The K indicator lamp in the instrument
cluster lights up when the high-beam
headlamps are switched on.XTo switch off the high-beam
headlamps: move the combination switch
back to its normal position.
The K indicator lamp in the instrument
cluster goes out.
High-beam flasher
XTo switch on: turn the SmartKey in the
ignition lock to position 1 or 2 or start the
engine.XPull the combination switch in the direction
of arrow =.Exterior lighting107Lights and windshield wipersZ
Page 134 of 336
Pressing the Start/Stop button several times
in succession corresponds to the different
SmartKey positions in the ignition lock. This
is only the case if you are not depressing the
brake pedal.
If you depress the brake pedal and press the
Start/Stop button, the engine starts
immediately.
The Start/Stop button can be removed from
the ignition lock. Then, you can insert the
SmartKey into the ignition lock.
i You do not have to remove the Start/Stop
button from the ignition lock when you
leave the vehicle. However, you should
always take the SmartKey with you when
leaving the vehicle. The vehicle can be
started with the Start/Stop button and the
electrical equipment can be operated while
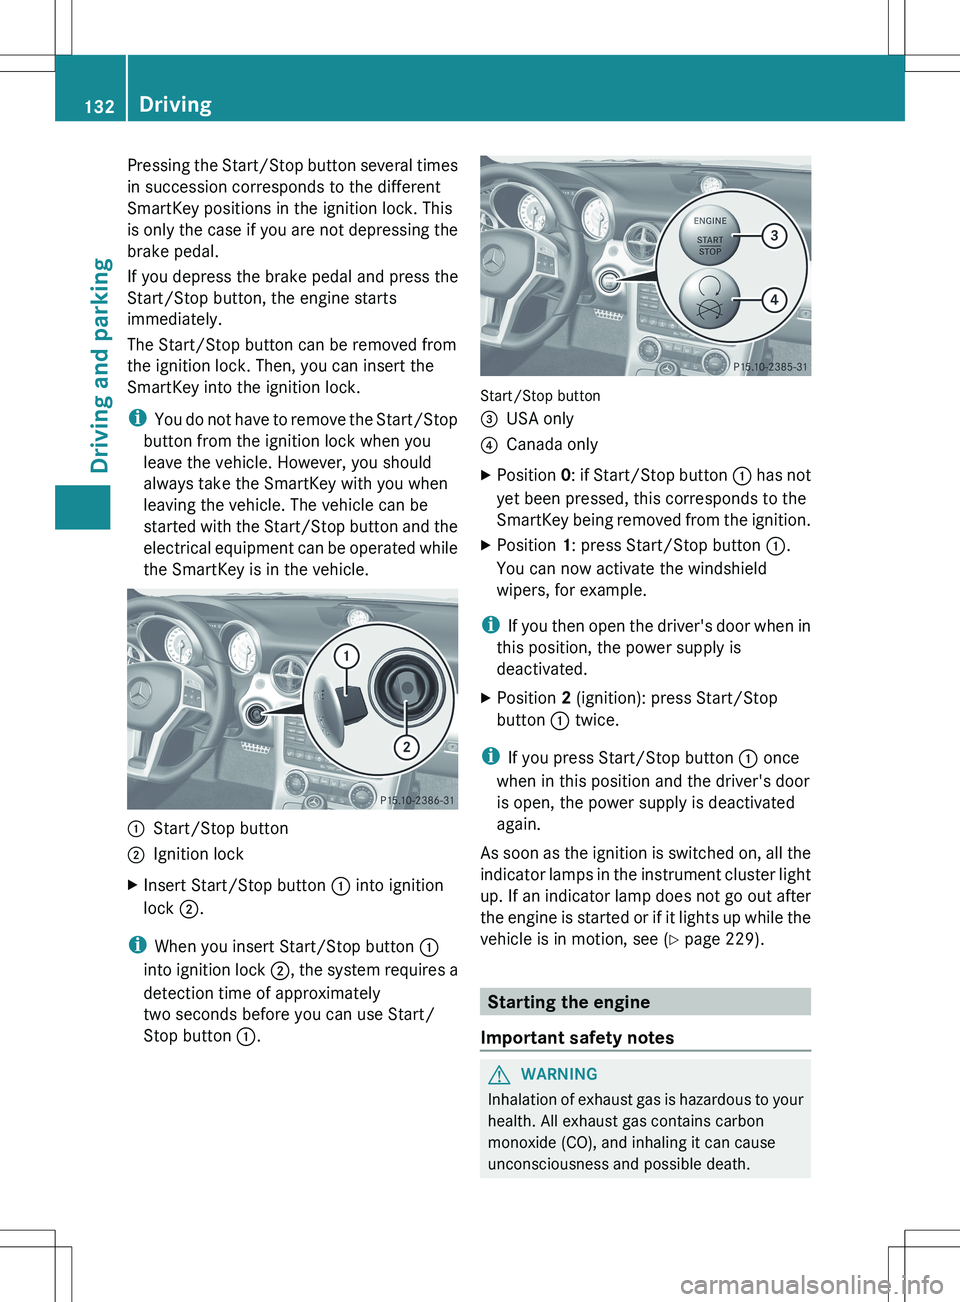
the SmartKey is in the vehicle.:Start/Stop button;Ignition lockXInsert Start/Stop button : into ignition
lock ;.
i
When you insert Start/Stop button :
into ignition lock ;, the system requires a
detection time of approximately
two seconds before you can use Start/
Stop button :.
Start/Stop button
=USA only?Canada onlyXPosition 0: if Start/Stop button : has not
yet been pressed, this corresponds to the
SmartKey being removed from the ignition.XPosition 1: press Start/Stop button :.
You can now activate the windshield
wipers, for example.
i If you then open the driver's door when in
this position, the power supply is
deactivated.
XPosition 2 (ignition): press Start/Stop
button : twice.
i
If you press Start/Stop button : once
when in this position and the driver's door
is open, the power supply is deactivated
again.
As soon as the ignition is switched on, all the
indicator lamps in the instrument cluster light
up. If an indicator lamp does not go out after
the engine is started or if it lights up while the
vehicle is in motion, see ( Y page 229).
Starting the engine
Important safety notes
GWARNING
Inhalation of exhaust gas is hazardous to your
health. All exhaust gas contains carbon
monoxide (CO), and inhaling it can cause
unconsciousness and possible death.
132DrivingDriving and parking
Page 136 of 336
XRelease the brake pedal.XSlowly release the clutch pedal and gently
depress the accelerator pedal.
! Change gear in good time and avoid
spinning the wheels. You could otherwise
damage the vehicle.
i The vehicle locks centrally once you have
pulled away. The locking knobs in the doors
drop down.
You can open the doors from the inside at
any time.
You can also deactivate the automatic
locking feature ( Y page 193).
Automatic transmission
GWARNING
It is dangerous to shift the automatic
transmission out of parking position P or
neutral position N if the engine speed is
higher than idle speed. If your foot is not firmly
on the brake pedal, the vehicle could
accelerate quickly forward or in reverse. You
could lose control of the vehicle and hit
someone or something. Only shift into gear
when the engine is idling normally and when
your right foot is firmly on the brake pedal.
i It is only possible to shift the transmission
from position P to the desired position if
you depress the brake pedal. Only then is
the selector lever lock released.
XDepress the brake pedal and keep it
depressed.XShift the transmission to position D or R.XRelease the brake pedal.XCarefully depress the accelerator pedal.
The electric parking brake ( Y page 150) is
automatically released.
The red F (USA only) or ! (Canada
only) indicator lamp in the instrument
cluster goes out.i The vehicle locks centrally once you have
pulled away. The locking knobs in the doors
drop down.
You can open the doors from the inside at
any time.
You can also deactivate the automatic
locking feature .
i Upshifts take place at higher engine
speeds after a cold start. This helps the
catalytic converter to reach its operating
temperature more quickly.
Hill start assist
Hill start assist helps you when pulling away
forwards or in reverse on an uphill gradient.
It holds the vehicle for a short time after you
have removed your foot from the brake pedal.
This gives you enough time to move your foot
from the brake pedal to the accelerator pedal
and to depress it before the vehicle begins to
roll.
GWARNING
Never leave the vehicle when it is held by hill
start assist. After approximately one second,
hill start assist will no longer brake your
vehicle and it could roll away.
XTake your foot off the brake pedal.
i Once you have taken your foot off the
brake pedal, the vehicle is held for around
one second.
XPull away.
Hill start assist will not function if:
R you are pulling away on a level road or on
a downhill gradient.
R on vehicles with automatic transmission,
the transmission is in position N.
R the electric parking brake is applied.
R ESP ®
is malfunctioning.
134DrivingDriving and parking