2012 MERCEDES-BENZ SL ROADSTER stop start
[x] Cancel search: stop startPage 42 of 637
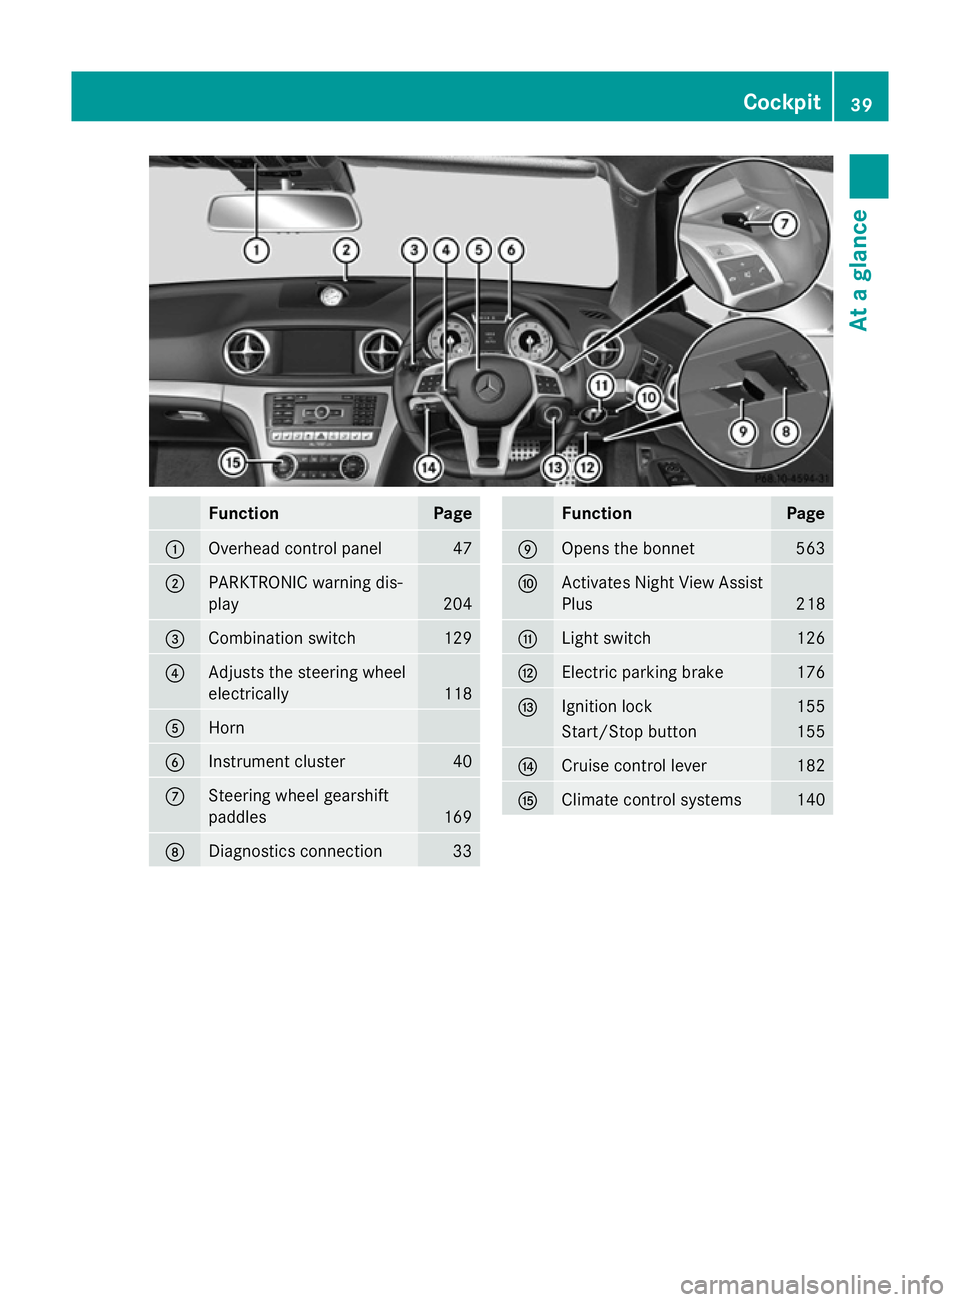
Function Page
:
Overhead control panel 47
;
PARKTRONIC warning dis-
play 204
=
Combination switch 129
?
Adjusts the steering wheel
electrically
118
A
Horn
B
Instrument cluster 40
C
Steering wheel gearshift
paddles
169
D
Diagnostics connection 33 Function Page
E
Opens the bonnet 563
F
Activates Night View Assist
Plus 218
G
Light switch 126
H
Electric parking brake 176
I
Ignition lock 155
Start/Stop button 155
J
Cruise control lever 182
K
Climate control systems 140Cockpit
39At a glance
Page 47 of 637
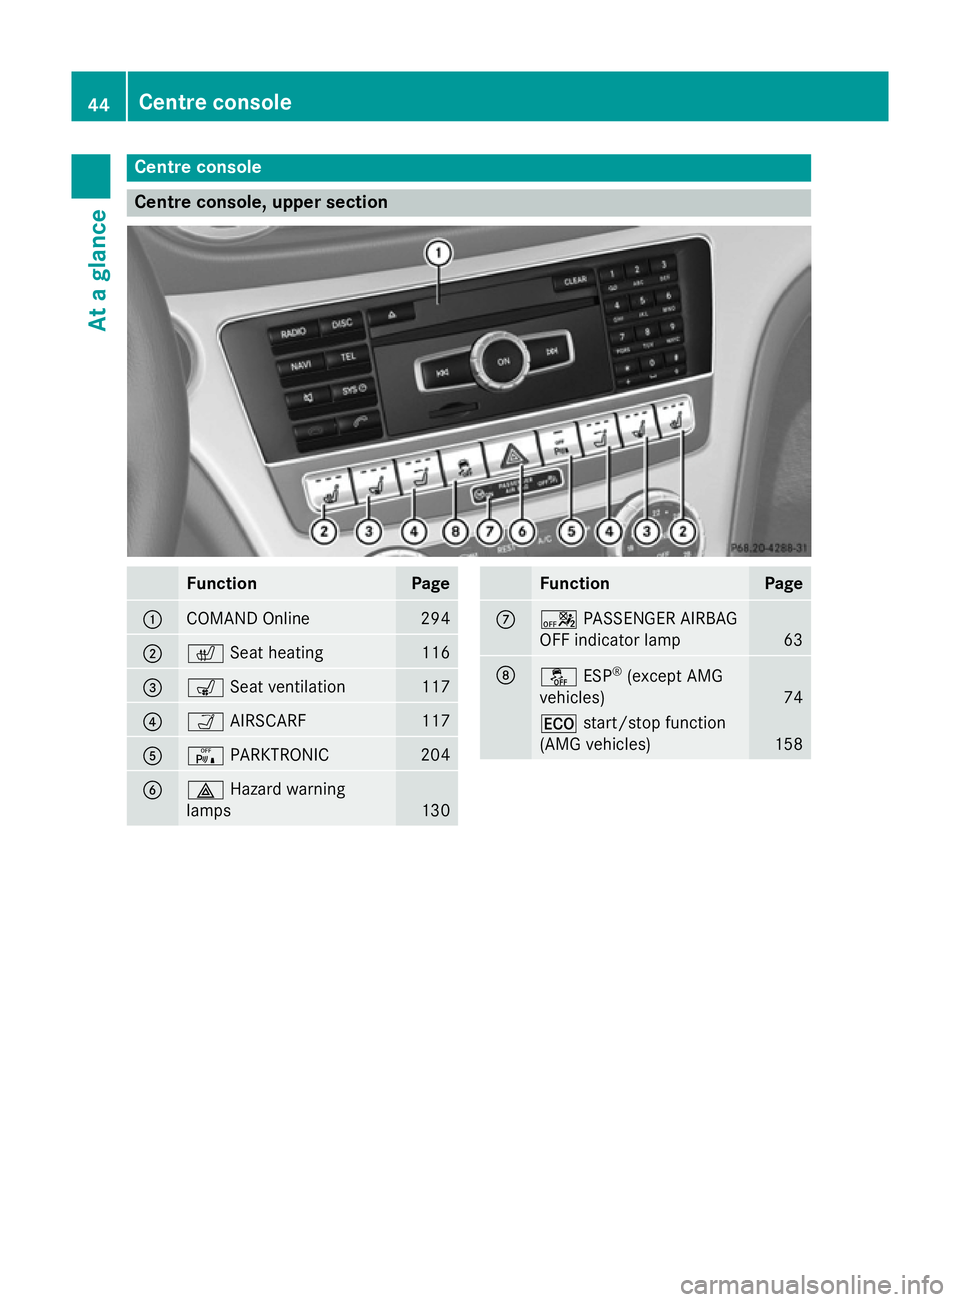
Centre console
Centre console, upper section
Function Page
:
COMAND Online 294
;
c
Seat heating 116
=
s
Seat ventilation 117
?
Ò
AIRSCARF 117
A
c
PARKTRONIC 204
B
£
Hazard warning
lamps 130 Function Page
C
a
PASSENGER AIRBAG
OFF indicator lamp 63
D
å
ESP®
(except AMG
vehicles) 74
¤
start/stop function
(AMG vehicles) 15844
Centre consoleAt a glance
Page 48 of 637
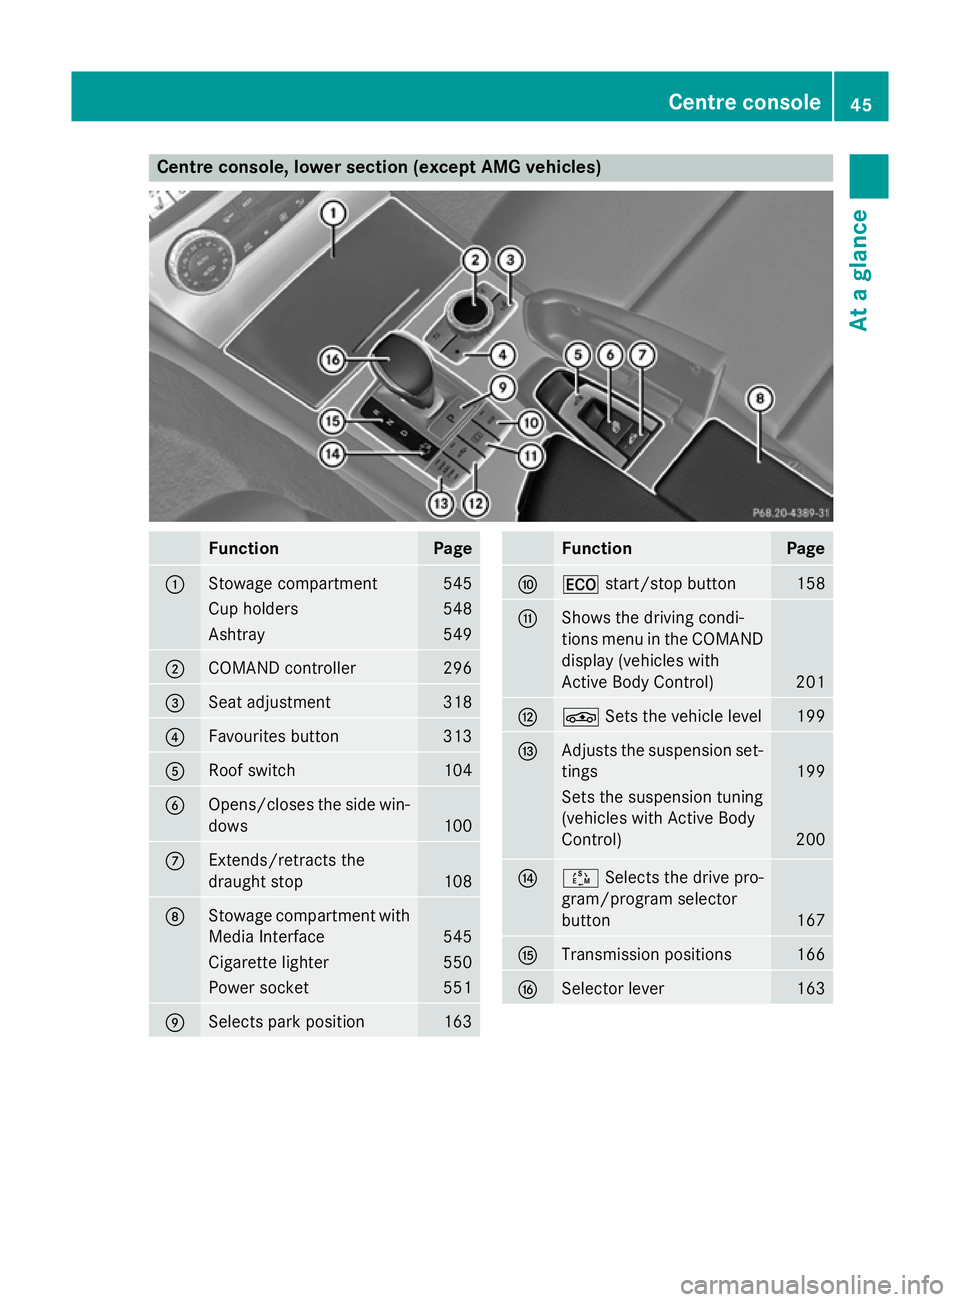
Centre console, lower section (except AMG vehicles)
Function Page
:
Stowage compartment 545
Cup holders 548
Ashtray 549
;
COMAND controller 296
=
Seat adjustment 318
?
Favourites button 313
A
Roof switch 104
B
Opens/closes the side win-
dows 100
C
Extends/retracts the
draught stop
108
D
Stowage compartment with
Media Interface 545
Cigarette lighter 550
Power socket 551
E
Selects park position 163 Function Page
F
¤
start/stop button 158
G
Shows the driving condi-
tions menu in the COMAND
display (vehicles with
Active Body Control) 201
H
É
Sets the vehicle level 199
I
Adjusts the suspension set-
tings 199
Sets the suspension tuning
(vehicles with Active Body
Control)
200
J
Ú
Selects the drive pro-
gram/program selector
button 167
K
Transmission positions 166
L
Selector lever 163Centre console
45At a glance
Page 53 of 637
Useful information
i This Owner's Manual describes all mod-
els, series and optional equipment for your
vehicle that were available at the time of
going to press. National variations are pos- sible. Note that your vehicle may not be
equipped with all of the functions descri-
bed. This is also the case for systems and
functions relevant to safety.
i Read the information on qualified special-
ist workshops: (Y page 34). Panic alarm
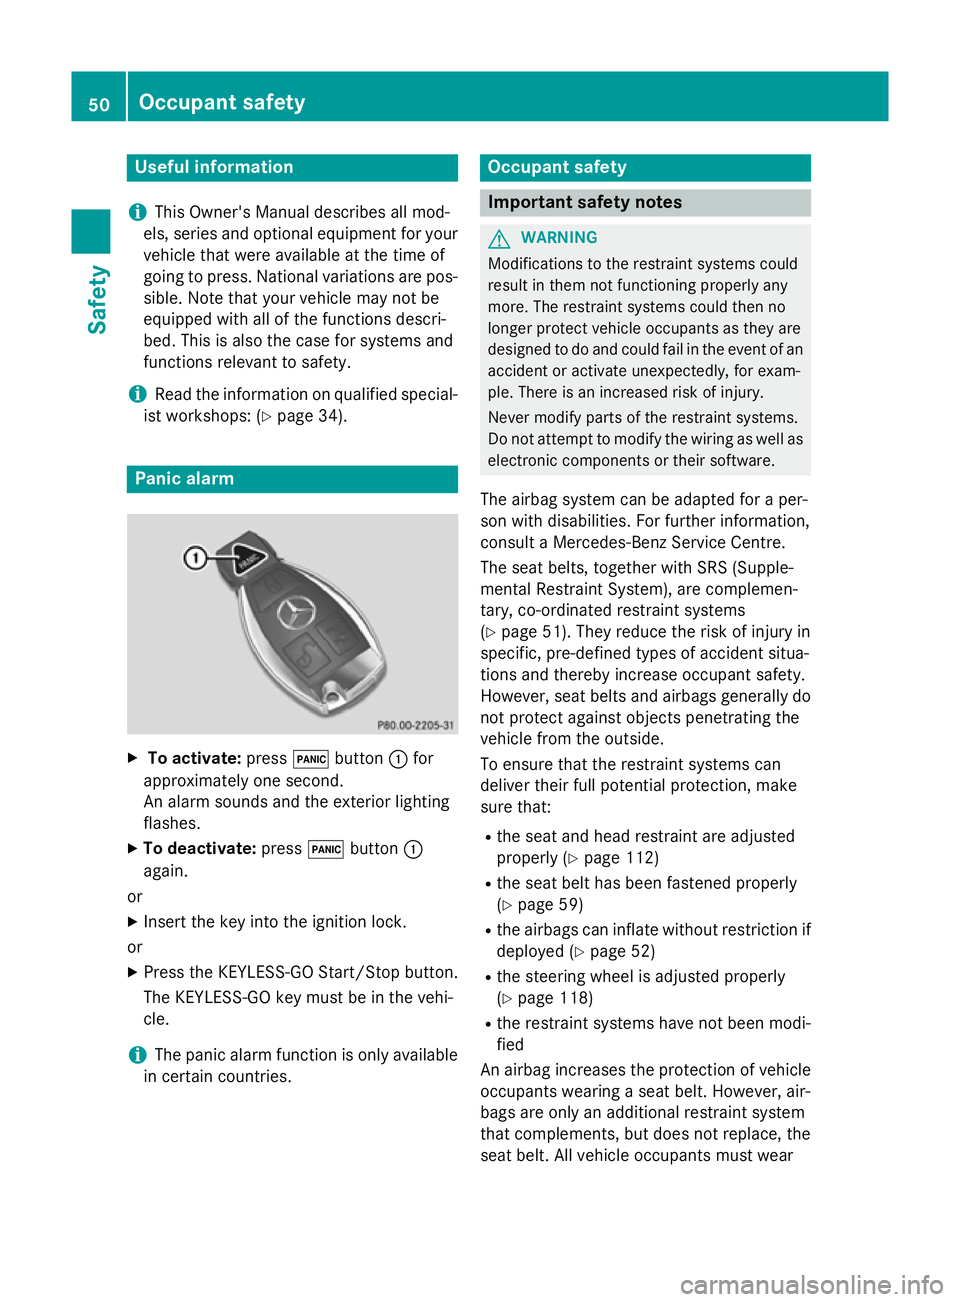
X
To activate: press!button :for
approximately one second.
An alarm sounds and the exterior lighting
flashes.
X To deactivate: press!button :
again.
or
X Insert the key into the ignition lock.
or X Press the KEYLESS-GO Start/Stop button.
The KEYLESS-GO key must be in the vehi-
cle.
i The panic alarm function is only available
in certain countries. Occupant safety
Important safety notes
G
WARNING
Modifications to the restraint systems could
result in them not functioning properly any
more. The restraint systems could then no
longer protect vehicle occupants as they are
designed to do and could fail in the event of an accident or activate unexpectedly, for exam-
ple. There is an increased risk of injury.
Never modify parts of the restraint systems.
Do not attempt to modify the wiring as well as
electronic components or their software.
The airbag system can be adapted for a per-
son with disabilities. For further information,
consult a Mercedes-Benz Service Centre.
The seat belts, together with SRS (Supple-
mental Restraint System), are complemen-
tary, co-ordinated restraint systems
(Y page 51). They reduce the risk of injury in
specific, pre-defined types of accident situa-
tions and thereby increase occupant safety.
However, seat belts and airbags generally do
not protect against objects penetrating the
vehicle from the outside.
To ensure that the restraint systems can
deliver their full potential protection, make
sure that:
R the seat and head restraint are adjusted
properly (Y page 112)
R the seat belt has been fastened properly
(Y page 59)
R the airbags can inflate without restriction if
deployed (Y page 52)
R the steering wheel is adjusted properly
(Y page 118)
R the restraint systems have not been modi-
fied
An airbag increases the protection of vehicle
occupants wearing a seat belt. However, air-
bags are only an additional restraint system
that complements, but does not replace, the
seat belt. All vehicle occupants must wear 50
Occupant safetySafety
Page 77 of 637
Important safety notes
G
WARNING
If ESP ®
is malfunctioning, ESP ®
is unable to
stabilise the vehicle. In addition, other driving
safety systems are switched off. This increa-
ses the risk of skidding and an accident.
Drive on carefully. Have ESP ®
checked at a
qualified specialist workshop.
! When testing the electric parking brake
on a braking dynamometer, switch off the
ignition. Application of the brakes by ESP ®
may otherwise destroy the brake system.
When towing your vehicle with the rear axle
raised, observe the notes on
ESP ®
(Y page 590).
ESP ®
is deactivated if the åwarning lamp
in the instrument cluster lights up continu-
ously when the engine is running.
If the ÷ warning lamp and the åwarn-
ing lamp are lit continuously, ESP ®
is not
available due to a malfunction.
Observe the information on warning lamps
(Y page 277) and display messages which
may be shown in the instrument cluster
(Y page 248).
i Only use wheels with the recommended
tyre sizes. Only then will ESP ®
function
properly.
Characteristics of ESP ®General notes
If the
÷ ESP warning lamp goes out before
beginning the journey, ESP ®
is automatically
active.
If ESP ®
intervenes, the ÷ESP®
warning
lamp flashes in the instrument cluster. If ESP
®
intervenes:
X Do not deactivate ESP ®
under any circum-
stances.
X When pulling away, only depress the accel-
erator pedal as far as is necessary.
X Adapt your driving style to suit the prevail-
ing road and weather conditions.
ECO start/stop function
The ECO start/stop function switches the
engine off automatically if the vehicle stops
moving. When pulling away again, the engine
starts automatically. ESP ®
remains in its pre-
viously selected status. Example:if ESP®
was deactivated before the engine was
switched off, ESP ®
remains deactivated when
the engine is switched on again.
Deactivating/activating ESP ®
(except
AMG vehicles) Important safety notes
i Observe the "Important safety notes" sec-
tion (Y page 70).
You can select between the following states
of ESP ®
:
R ESP ®
is activated
R ESP ®
is deactivated G
WARNING
If you deactivate ESP ®
, ESP ®
no longer sta-
bilises the vehicle. There is an increased risk
of skidding and an accident.
Only deactivate ESP ®
in the situations descri-
bed in the following.
It may be best to deactivate ESP ®
in the fol-
lowing situations:
R when using snow chains
R in deep snow
R on sand or gravel
i Activate ESP ®
as soon as the situations
described above no longer apply. ESP ®
will
otherwise not be able to stabilise the vehi- 74
Driving safety systemsSafety
Page 82 of 637
This steering support is provided in particular
if:
R both right wheels or both left wheels are on
a wet or slippery road surface when you
brake.
R the vehicle starts to skid.
Important safety notes i
Observe the "Important safety notes" sec-
tion (Y page 70).
No steering support is provided from STEER
CONTROL, if:
R ESP ®
is malfunctioning.
R the steering is faulty.
Power steering will, however, continue to
function. Anti-theft systems
Immobiliser
X To activate with the key: remove the key
from the ignition lock.
X To activate with KEYLESS-GO: switch the
ignition off and open the driver's door.
X To deactivate: switch on the ignition.
The immobiliser prevents your vehicle from
being started without the correct key.
When leaving the vehicle, always take the
SmartKey with you and lock the vehicle. The
engine can be started by anyone with a valid
key that is left inside the vehicle.
i The immobiliser is always deactivated
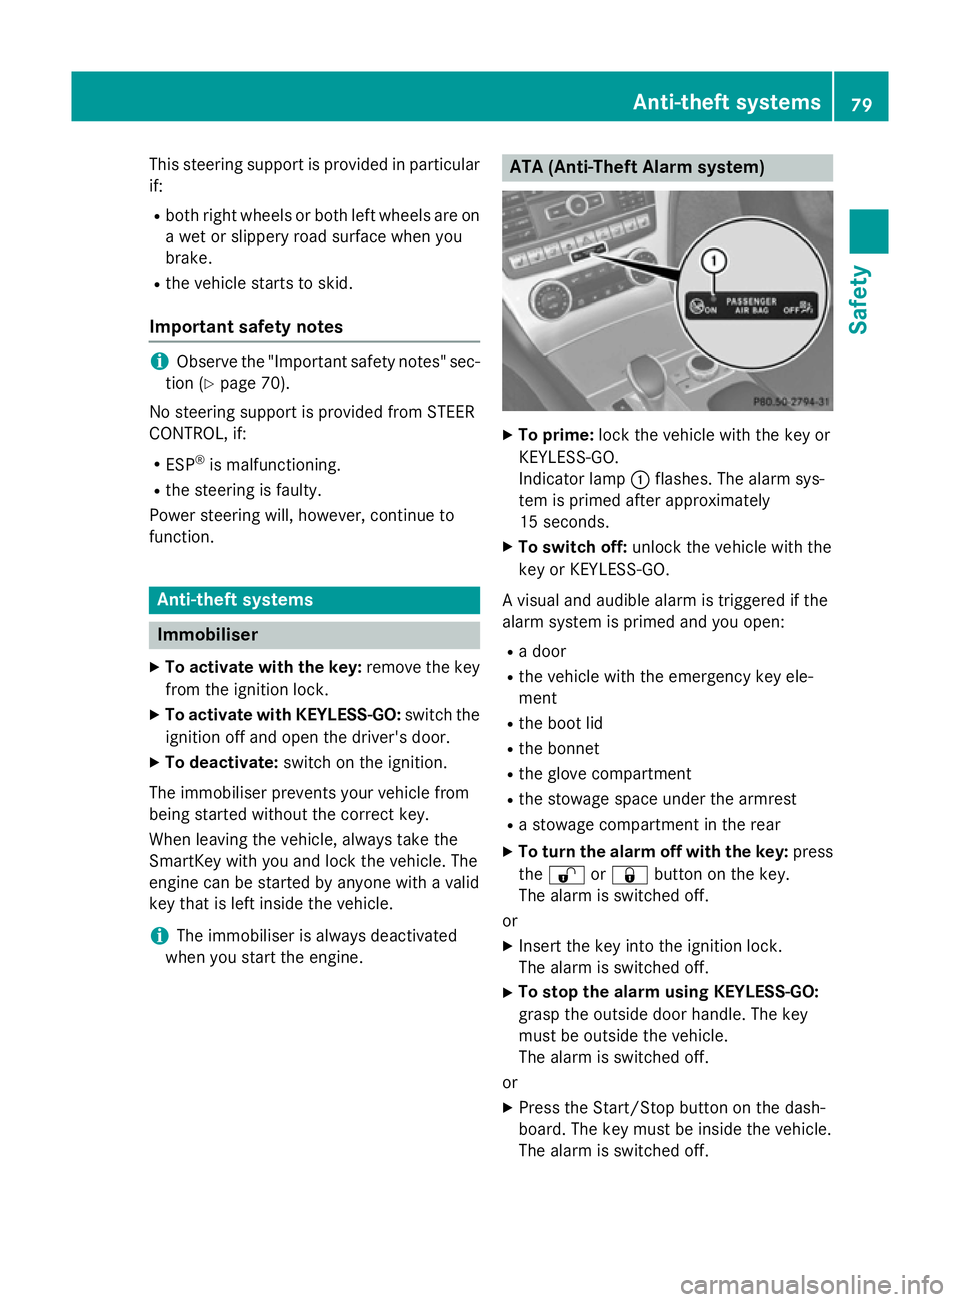
when you start the engine. ATA (Anti-Theft Alarm system)
X
To prime: lock the vehicle with the key or
KEYLESS-GO.
Indicator lamp :flashes. The alarm sys-
tem is primed after approximately
15 seconds.
X To switch off: unlock the vehicle with the
key or KEYLESS-GO.
A visual and audible alarm is triggered if the
alarm system is primed and you open:
R a door
R the vehicle with the emergency key ele-
ment
R the boot lid
R the bonnet
R the glove compartment
R the stowage space under the armrest
R a stowage compartment in the rear
X To turn the alarm off with the key: press
the % or& button on the key.
The alarm is switched off.
or
X Insert the key into the ignition lock.
The alarm is switched off.
X To stop the alarm using KEYLESS-GO:
grasp the outside door handle. The key
must be outside the vehicle.
The alarm is switched off.
or
X Press the Start/Stop button on the dash-
board. The key must be inside the vehicle.
The alarm is switched off. Anti-theft systems
79Safety Z
Page 89 of 637
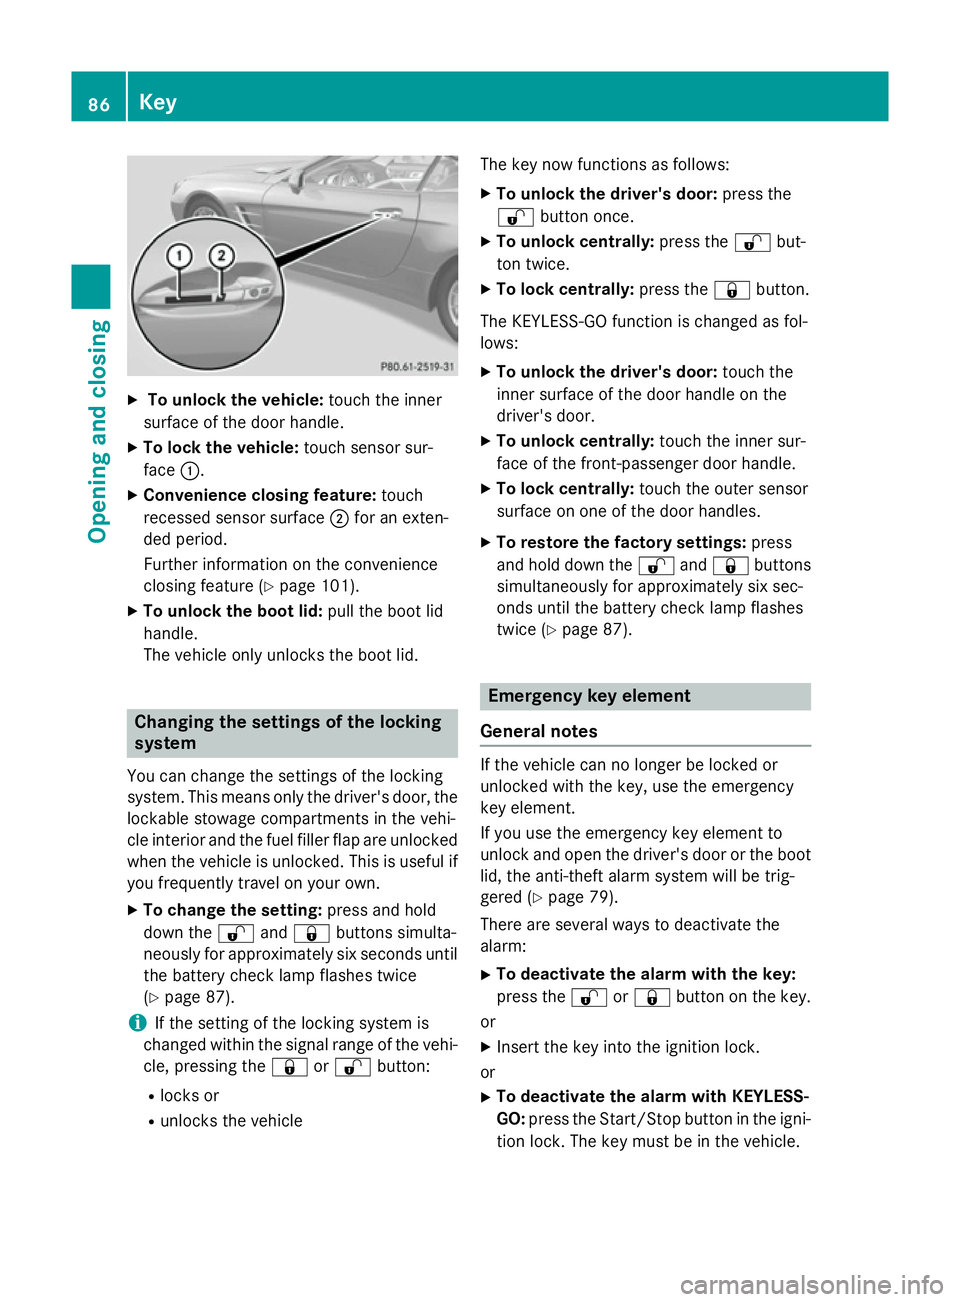
X
To unlock the vehicle: touch the inner
surface of the door handle.
X To lock the vehicle: touch sensor sur-
face :.
X Convenience closing feature: touch
recessed sensor surface ;for an exten-
ded period.
Further information on the convenience
closing feature (Y page 101).
X To unlock the boot lid: pull the boot lid
handle.
The vehicle only unlocks the boot lid. Changing the settings of the locking
system
You can change the settings of the locking
system. This means only the driver's door, the
lockable stowage compartments in the vehi-
cle interior and the fuel filler flap are unlocked when the vehicle is unlocked. This is useful if
you frequently travel on your own.
X To change the setting: press and hold
down the %and& buttons simulta-
neously for approximately six seconds until the battery check lamp flashes twice
(Y page 87).
i If the setting of the locking system is
changed within the signal range of the vehi- cle, pressing the &or% button:
R locks or
R unlocks the vehicle The key now functions as follows:
X To unlock the driver's door: press the
% button once.
X To unlock centrally: press the%but-
ton twice.
X To lock centrally: press the&button.
The KEYLESS-GO function is changed as fol-
lows:
X To unlock the driver's door: touch the
inner surface of the door handle on the
driver's door.
X To unlock centrally: touch the inner sur-
face of the front-passenger door handle.
X To lock centrally: touch the outer sensor
surface on one of the door handles.
X To restore the factory settings: press
and hold down the %and& buttons
simultaneously for approximately six sec-
onds until the battery check lamp flashes
twice (Y page 87). Emergency key element
General notes If the vehicle can no longer be locked or
unlocked with the key, use the emergency
key element.
If you use the emergency key element to
unlock and open the driver's door or the boot
lid, the anti-theft alarm system will be trig-
gered (Y page 79).
There are several ways to deactivate the
alarm:
X To deactivate the alarm with the key:
press the %or& button on the key.
or
X Insert the key into the ignition lock.
or
X To deactivate the alarm with KEYLESS-
GO: press the Start/Stop button in the igni-
tion lock. The key must be in the vehicle. 86
KeyOpening and closing
Page 100 of 637
ground and that there is sufficient clear-
ance to the rear of the vehicle. You could
otherwise lose your balance, e.g. on ice. R
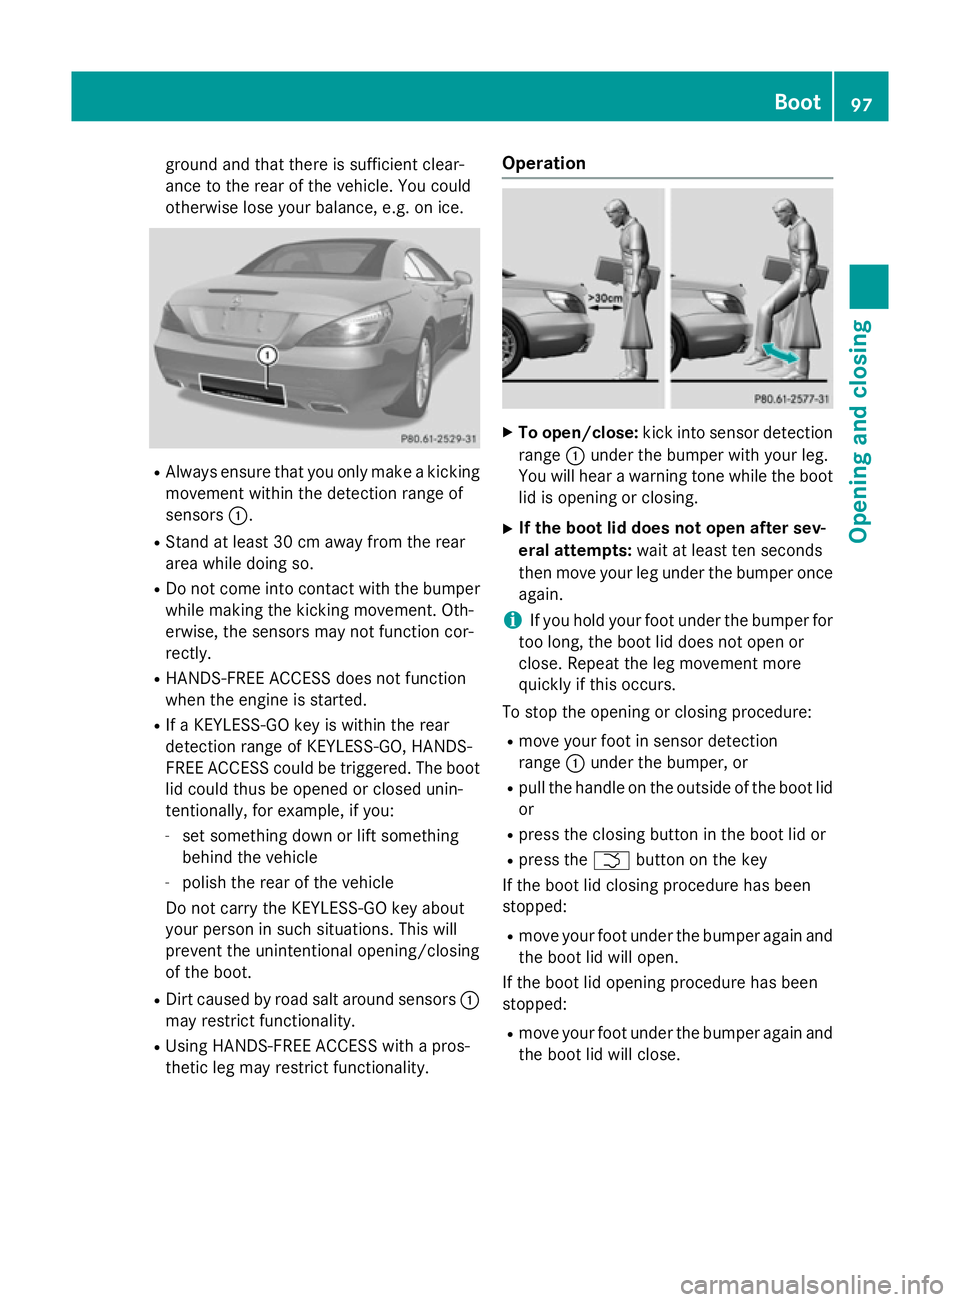
Always ensure that you only make a kicking
movement within the detection range of
sensors :.
R Stand at least 30 cm away from the rear
area while doing so.
R Do not come into contact with the bumper
while making the kicking movement. Oth-
erwise, the sensors may not function cor-
rectly.
R HANDS-FREE ACCESS does not function
when the engine is started.
R If a KEYLESS-GO key is within the rear
detection range of KEYLESS-GO, HANDS-
FREE ACCESS could be triggered. The boot
lid could thus be opened or closed unin-
tentionally, for example, if you:
- set something down or lift something
behind the vehicle
- polish the rear of the vehicle
Do not carry the KEYLESS-GO key about
your person in such situations. This will
prevent the unintentional opening/closing
of the boot.
R Dirt caused by road salt around sensors :
may restrict functionality.
R Using HANDS-FREE ACCESS with a pros-
thetic leg may restrict functionality. Operation
X
To open/close: kick into sensor detection
range :under the bumper with your leg.
You will hear a warning tone while the boot lid is opening or closing.
X If the boot lid does not open after sev-
eral attempts: wait at least ten seconds
then move your leg under the bumper once
again.
i If you hold your foot under the bumper for
too long, the boot lid does not open or
close. Repeat the leg movement more
quickly if this occurs.
To stop the opening or closing procedure:
R move your foot in sensor detection
range :under the bumper, or
R pull the handle on the outside of the boot lid
or
R press the closing button in the boot lid or
R press the Fbutton on the key
If the boot lid closing procedure has been
stopped:
R move your foot under the bumper again and
the boot lid will open.
If the boot lid opening procedure has been
stopped:
R move your foot under the bumper again and
the boot lid will close. Boot
97Opening and closing Z