2012 MERCEDES-BENZ SL ROADSTER radiator
[x] Cancel search: radiatorPage 285 of 637
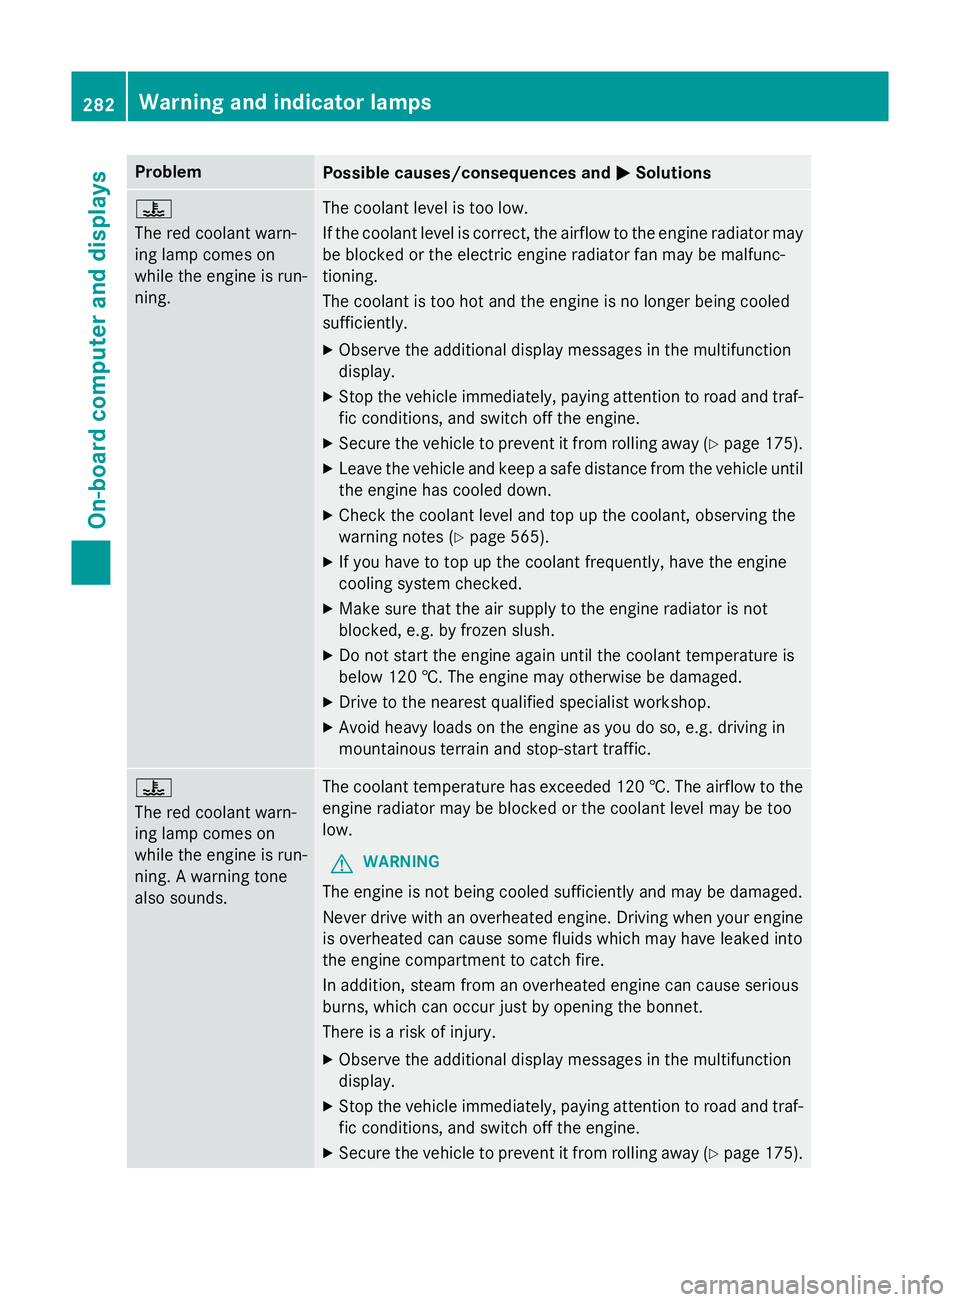
Problem
Possible causes/consequences and
M
MSolutions ?
The red coolant warn-
ing lamp comes on
while the engine is run-
ning.
The coolant level is too low.
If the coolant level is correct, the airflow to the engine radiator may
be blocked or the electric engine radiator fan may be malfunc-
tioning.
The coolant is too hot and the engine is no longer being cooled
sufficiently.
X Observe the additional display messages in the multifunction
display.
X Stop the vehicle immediately, paying attention to road and traf-
fic conditions, and switch off the engine.
X Secure the vehicle to prevent it from rolling away (Y page 175).
X Leave the vehicle and keep a safe distance from the vehicle until
the engine has cooled down.
X Check the coolant level and top up the coolant, observing the
warning notes (Y page 565).
X If you have to top up the coolant frequently, have the engine
cooling system checked.
X Make sure that the air supply to the engine radiator is not
blocked, e.g. by frozen slush.
X Do not start the engine again until the coolant temperature is
below 120 †. The engine may otherwise be damaged.
X Drive to the nearest qualified specialist workshop.
X Avoid heavy loads on the engine as you do so, e.g. driving in
mountainous terrain and stop-start traffic. ?
The red coolant warn-
ing lamp comes on
while the engine is run-
ning. A warning tone
also sounds.
The coolant temperature has exceeded 120 †. The airflow to the
engine radiator may be blocked or the coolant level may be too
low.
G WARNING
The engine is not being cooled sufficiently and may be damaged.
Never drive with an overheated engine. Driving when your engine is overheated can cause some fluids which may have leaked into
the engine compartment to catch fire.
In addition, steam from an overheated engine can cause serious
burns, which can occur just by opening the bonnet.
There is a risk of injury.
X Observe the additional display messages in the multifunction
display.
X Stop the vehicle immediately, paying attention to road and traf-
fic conditions, and switch off the engine.
X Secure the vehicle to prevent it from rolling away (Y page 175).282
Warning and indicator lampsOn-board computer and displays
Page 286 of 637
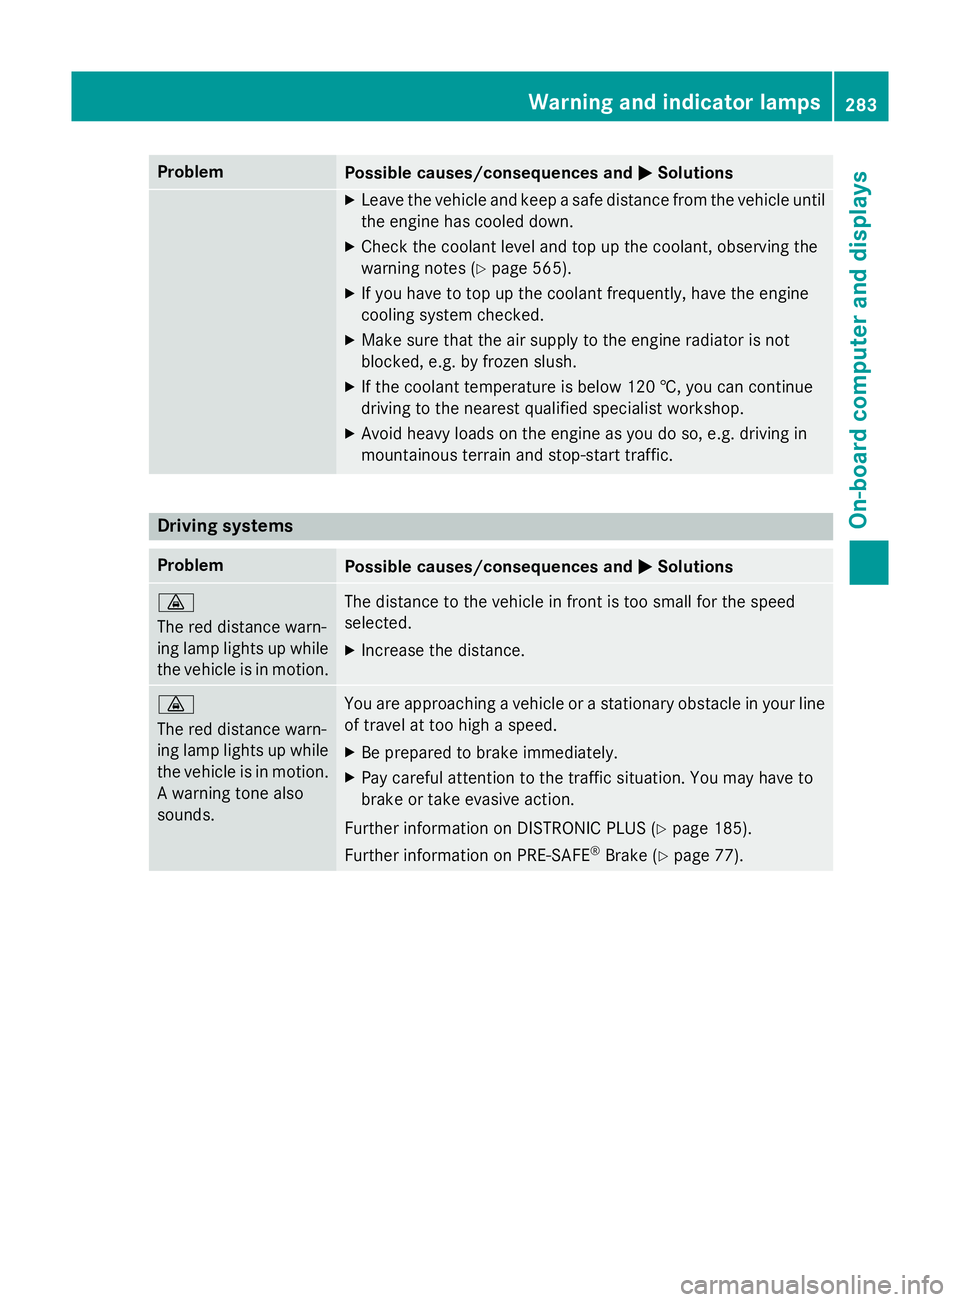
Problem
Possible causes/consequences and
M
MSolutions X
Leave the vehicle and keep a safe distance from the vehicle until
the engine has cooled down.
X Check the coolant level and top up the coolant, observing the
warning notes (Y page 565).
X If you have to top up the coolant frequently, have the engine
cooling system checked.
X Make sure that the air supply to the engine radiator is not
blocked, e.g. by frozen slush.
X If the coolant temperature is below 120 †, you can continue
driving to the nearest qualified specialist workshop.
X Avoid heavy loads on the engine as you do so, e.g. driving in
mountainous terrain and stop-start traffic. Driving systems
Problem
Possible causes/consequences and
M MSolutions ·
The red distance warn-
ing lamp lights up while
the vehicle is in motion. The distance to the vehicle in front is too small for the speed
selected.
X Increase the distance. ·
The red distance warn-
ing lamp lights up while
the vehicle is in motion. A warning tone also
sounds. You are approaching a vehicle or a stationary obstacle in your line
of travel at too high a speed.
X Be prepared to brake immediately.
X Pay careful attention to the traffic situation. You may have to
brake or take evasive action.
Further information on DISTRONIC PLUS (Y page 185).
Further information on PRE‑ SAFE®
Brake (Y page 77). Warning and indicator lamps
283On-board computer and displays Z
Page 565 of 637
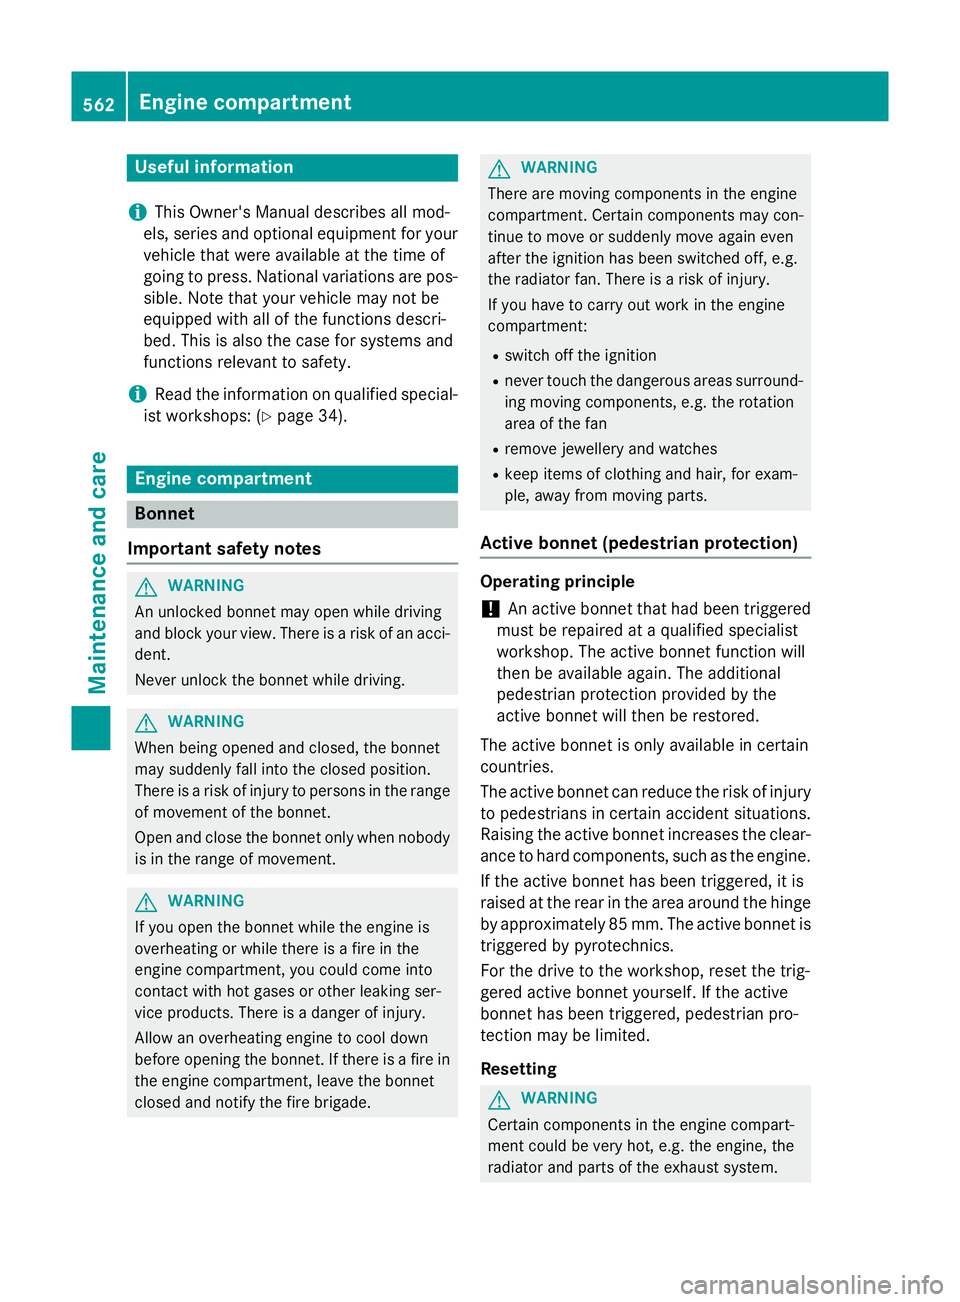
Useful information
i This Owner's Manual describes all mod-
els, series and optional equipment for your
vehicle that were available at the time of
going to press. National variations are pos- sible. Note that your vehicle may not be
equipped with all of the functions descri-
bed. This is also the case for systems and
functions relevant to safety.
i Read the information on qualified special-
ist workshops: (Y page 34). Engine compartment
Bonnet
Important safety notes G
WARNING
An unlocked bonnet may open while driving
and block your view. There is a risk of an acci- dent.
Never unlock the bonnet while driving. G
WARNING
When being opened and closed, the bonnet
may suddenly fall into the closed position.
There is a risk of injury to persons in the range of movement of the bonnet.
Open and close the bonnet only when nobody
is in the range of movement. G
WARNING
If you open the bonnet while the engine is
overheating or while there is a fire in the
engine compartment, you could come into
contact with hot gases or other leaking ser-
vice products. There is a danger of injury.
Allow an overheating engine to cool down
before opening the bonnet. If there is a fire in the engine compartment, leave the bonnet
closed and notify the fire brigade. G
WARNING
There are moving components in the engine
compartment. Certain components may con-
tinue to move or suddenly move again even
after the ignition has been switched off, e.g.
the radiator fan. There is a risk of injury.
If you have to carry out work in the engine
compartment:
R switch off the ignition
R never touch the dangerous areas surround-
ing moving components, e.g. the rotation
area of the fan
R remove jewellery and watches
R keep items of clothing and hair, for exam-
ple, away from moving parts.
Active bonnet (pedestrian protection) Operating principle
! An active bonnet that had been triggered
must be repaired at a qualified specialist
workshop. The active bonnet function will
then be available again. The additional
pedestrian protection provided by the
active bonnet will then be restored.
The active bonnet is only available in certain
countries.
The active bonnet can reduce the risk of injury to pedestrians in certain accident situations.
Raising the active bonnet increases the clear-
ance to hard components, such as the engine.
If the active bonnet has been triggered, it is
raised at the rear in the area around the hinge
by approximately 85 mm. The active bonnet is triggered by pyrotechnics.
For the drive to the workshop, reset the trig-
gered active bonnet yourself. If the active
bonnet has been triggered, pedestrian pro-
tection may be limited.
Resetting G
WARNING
Certain components in the engine compart-
ment could be very hot, e.g. the engine, the
radiator and parts of the exhaust system. 562
Engine compartmentMaintenance and care
Page 566 of 637
There is a risk of injury when accessing the
engine compartment.
As far as possible, allow the engine to cool
down and only touch the following compo-
nents. X
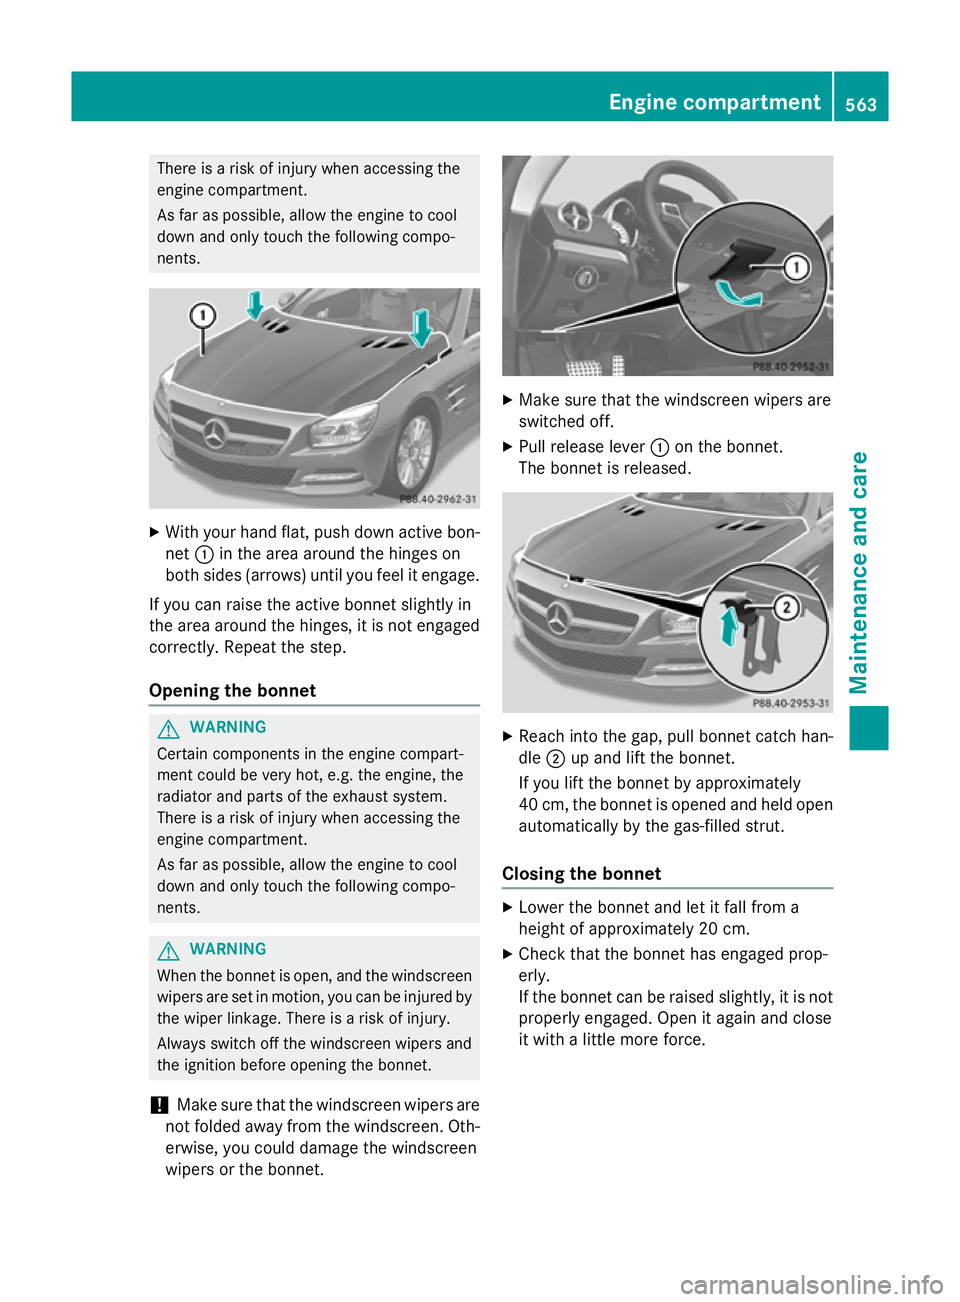
With your hand flat, push down active bon-
net :in the area around the hinges on
both sides (arrows) until you feel it engage.
If you can raise the active bonnet slightly in
the area around the hinges, it is not engaged correctly. Repeat the step.
Opening the bonnet G
WARNING
Certain components in the engine compart-
ment could be very hot, e.g. the engine, the
radiator and parts of the exhaust system.
There is a risk of injury when accessing the
engine compartment.
As far as possible, allow the engine to cool
down and only touch the following compo-
nents. G
WARNING
When the bonnet is open, and the windscreen wipers are set in motion, you can be injured by
the wiper linkage. There is a risk of injury.
Always switch off the windscreen wipers and
the ignition before opening the bonnet.
! Make sure that the windscreen wipers are
not folded away from the windscreen. Oth-
erwise, you could damage the windscreen
wipers or the bonnet. X
Make sure that the windscreen wipers are
switched off.
X Pull release lever :on the bonnet.
The bonnet is released. X
Reach into the gap, pull bonnet catch han-
dle ;up and lift the bonnet.
If you lift the bonnet by approximately
40 cm, the bonnet is opened and held open automatically by the gas-filled strut.
Closing the bonnet X
Lower the bonnet and let it fall from a
height of approximately 20 cm.
X Check that the bonnet has engaged prop-
erly.
If the bonnet can be raised slightly, it is not
properly engaged. Open it again and close
it with a little more force. Engine compartment
563Maintenance and care Z
Page 567 of 637
Engine oil
Notes on oil level Depending on your driving style, the vehicle
consumes up to 0.8 litres of oil per 1,000 km.
The oil consumption may be higher than this
when the vehicle is new or if you frequently
drive at high engine speeds.
Depending on the engine, the oil dipstick may be installed at a different location.
When checking the oil level:
R park the vehicle on a level surface.
R the engine should be switched off for
approximately five minutes if the engine is
at normal operating temperature.
R if the engine is not at normal operating
temperature, e.g. if the engine was only
started briefly, wait approximately
30 minutes before carrying out the meas-
urement.
Checking the oil level using the oil dip-
stick G
WARNING
Certain components in the engine compart-
ment could be very hot, e.g. the engine, the
radiator and parts of the exhaust system.
There is a risk of injury when accessing the
engine compartment.
As far as possible, allow the engine to cool
down and only touch the following compo-
nents. Example
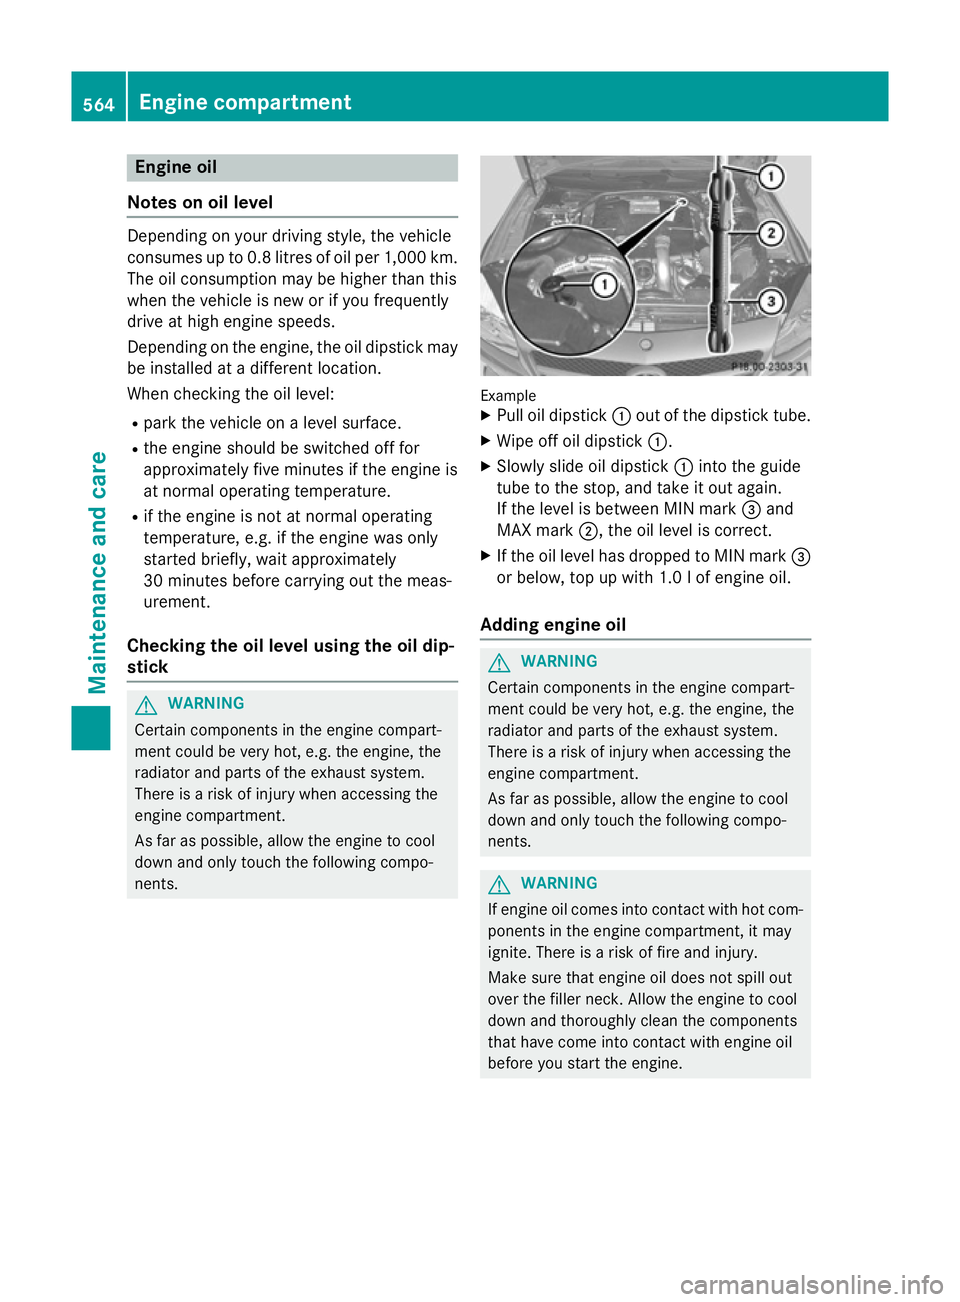
X Pull oil dipstick :out of the dipstick tube.
X Wipe off oil dipstick :.
X Slowly slide oil dipstick :into the guide
tube to the stop, and take it out again.
If the level is between MIN mark =and
MAX mark ;, the oil level is correct.
X If the oil level has dropped to MIN mark =
or below, top up with 1.0 l of engine oil.
Adding engine oil G
WARNING
Certain components in the engine compart-
ment could be very hot, e.g. the engine, the
radiator and parts of the exhaust system.
There is a risk of injury when accessing the
engine compartment.
As far as possible, allow the engine to cool
down and only touch the following compo-
nents. G
WARNING
If engine oil comes into contact with hot com- ponents in the engine compartment, it may
ignite. There is a risk of fire and injury.
Make sure that engine oil does not spill out
over the filler neck. Allow the engine to cool
down and thoroughly clean the components
that have come into contact with engine oil
before you start the engine. 564
Engine compartmentMaintenance and care
Page 568 of 637
H
Environmental note
When topping up the oil, take care not to spill any. If oil enters the soil or waterways, it is
harmful to the environment.
! Only use engine oils and oil filters that
have been approved for vehicles with a ser-
vice system. You can obtain a list of the
engine oils and oil filters tested and
approved in accordance with the
Mercedes-Benz Specifications for Service
Products at any Mercedes-Benz Service
Centre.
Damage to the engine or exhaust system is caused by the following:
R using engine oils and oil filters that have
not been specifically approved for the
service system
R changing the engine oil and oil filter after
missing the change interval required by
the service system
R using engine oil additives
! Do not add too much oil. If the oil level is
above the "max" mark on the dipstick, too
much oil has been added. This can lead to
damage to the engine or the catalytic con-
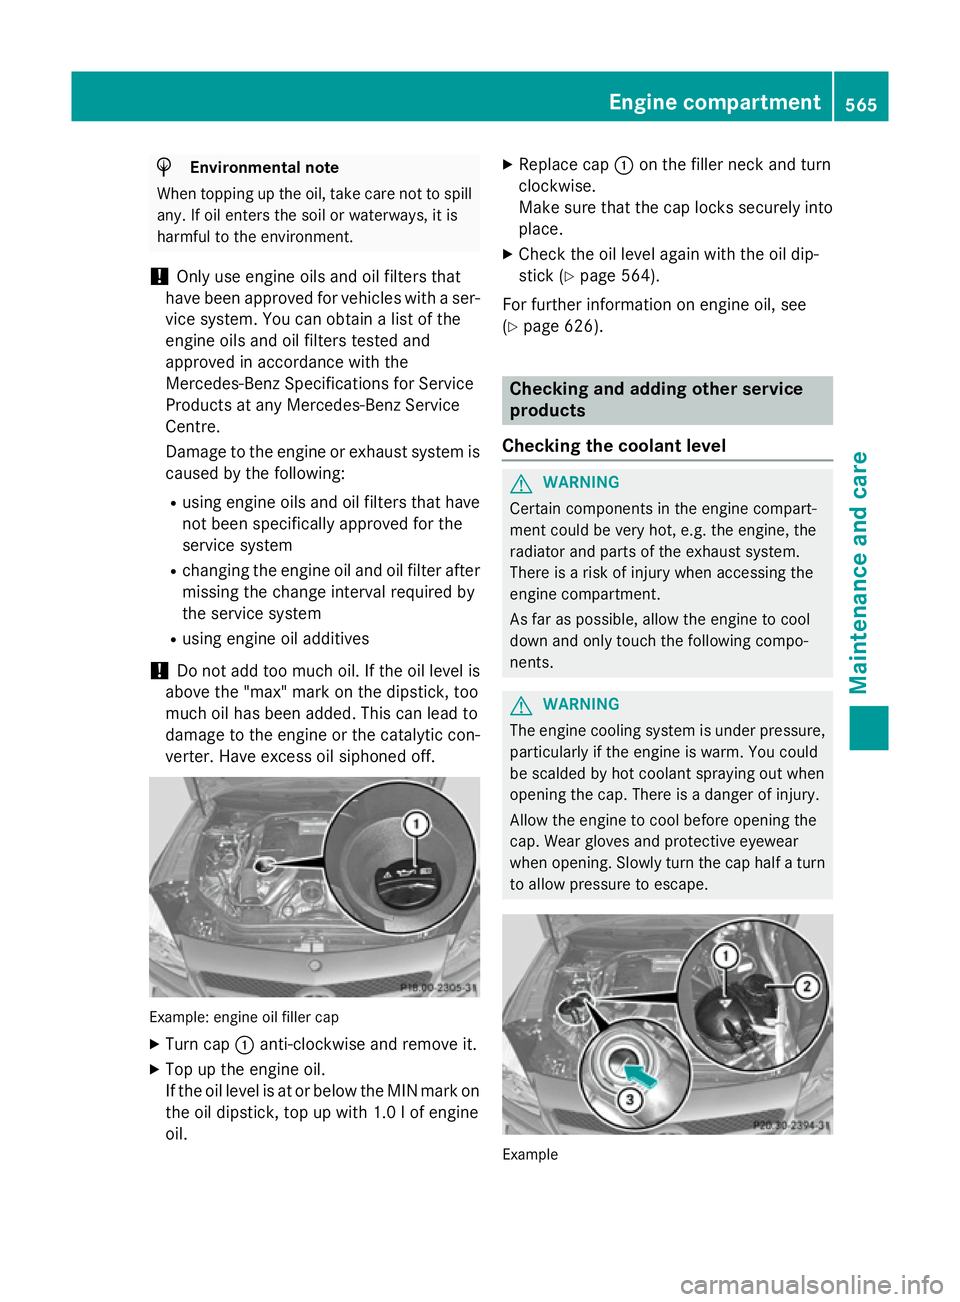
verter. Have excess oil siphoned off. Example: engine oil filler cap
X Turn cap :anti-clockwise and remove it.
X Top up the engine oil.
If the oil level is at or below the MIN mark on
the oil dipstick, top up with 1.0 l of engine
oil. X
Replace cap :on the filler neck and turn
clockwise.
Make sure that the cap locks securely into place.
X Check the oil level again with the oil dip-
stick (Y page 564).
For further information on engine oil, see
(Y page 626). Checking and adding other service
products
Checking the coolant level G
WARNING
Certain components in the engine compart-
ment could be very hot, e.g. the engine, the
radiator and parts of the exhaust system.
There is a risk of injury when accessing the
engine compartment.
As far as possible, allow the engine to cool
down and only touch the following compo-
nents. G
WARNING
The engine cooling system is under pressure, particularly if the engine is warm. You could
be scalded by hot coolant spraying out when
opening the cap. There is a danger of injury.
Allow the engine to cool before opening the
cap. Wear gloves and protective eyewear
when opening. Slowly turn the cap half a turn
to allow pressure to escape. Example Engine compartment
565Maintenance and care Z
Page 569 of 637
X
Park the vehicle on a level surface.
Only check the coolant level if the vehicle is
on a level surface and the engine has
cooled down.
X Turn the key to position 2in the ignition
lock (Y page 155).
On vehicles with KEYLESS-GO, press the
Start/Stop button twice (Y page 155).
X Check the coolant temperature gauge in
the multifunction display.
The coolant temperature must be below
70 †.
X Turn the key to position 0(Y page 155) in
the ignition lock.
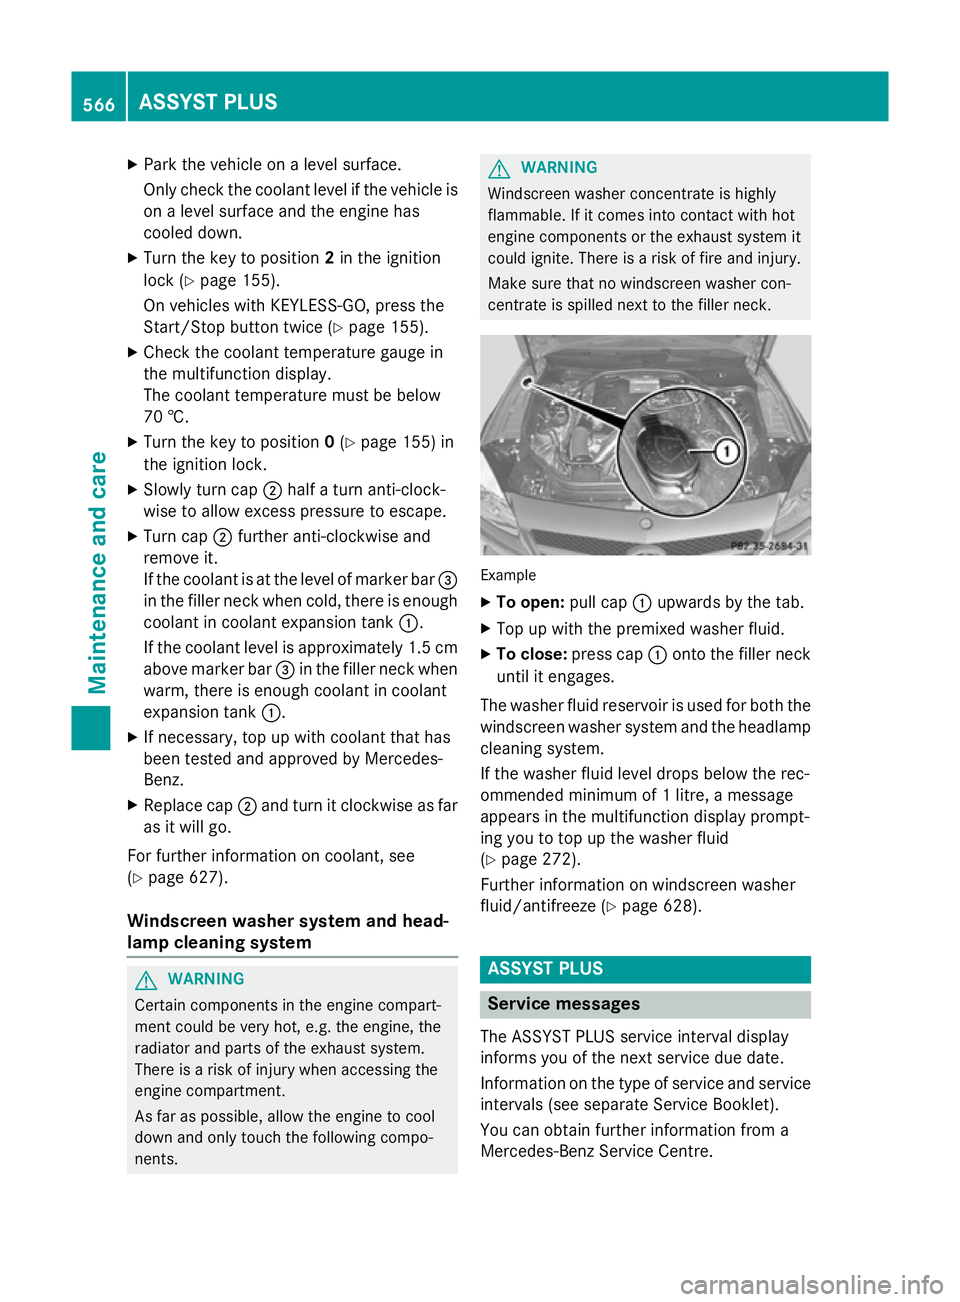
X Slowly turn cap ;half a turn anti-clock-
wise to allow excess pressure to escape.
X Turn cap ;further anti-clockwise and
remove it.
If the coolant is at the level of marker bar =
in the filler neck when cold, there is enough
coolant in coolant expansion tank :.
If the coolant level is approximately 1.5 cm above marker bar =in the filler neck when
warm, there is enough coolant in coolant
expansion tank :.
X If necessary, top up with coolant that has
been tested and approved by Mercedes-
Benz.
X Replace cap ;and turn it clockwise as far
as it will go.
For further information on coolant, see
(Y page 627).
Windscreen washer system and head-
lamp cleaning system G
WARNING
Certain components in the engine compart-
ment could be very hot, e.g. the engine, the
radiator and parts of the exhaust system.
There is a risk of injury when accessing the
engine compartment.
As far as possible, allow the engine to cool
down and only touch the following compo-
nents. G
WARNING
Windscreen washer concentrate is highly
flammable. If it comes into contact with hot
engine components or the exhaust system it
could ignite. There is a risk of fire and injury.
Make sure that no windscreen washer con-
centrate is spilled next to the filler neck. Example
X To open: pull cap:upwards by the tab.
X Top up with the premixed washer fluid.
X To close: press cap :onto the filler neck
until it engages.
The washer fluid reservoir is used for both the
windscreen washer system and the headlamp cleaning system.
If the washer fluid level drops below the rec-
ommended minimum of 1 litre, a message
appears in the multifunction display prompt-
ing you to top up the washer fluid
(Y page 272).
Further information on windscreen washer
fluid/antifreeze (Y page 628). ASSYST PLUS
Service messages
The ASSYST PLUS service interval display
informs you of the next service due date.
Information on the type of service and service
intervals (see separate Service Booklet).
You can obtain further information from a
Mercedes-Benz Service Centre. 566
ASSYST PLUSMaintenance and care
Page 576 of 637
X
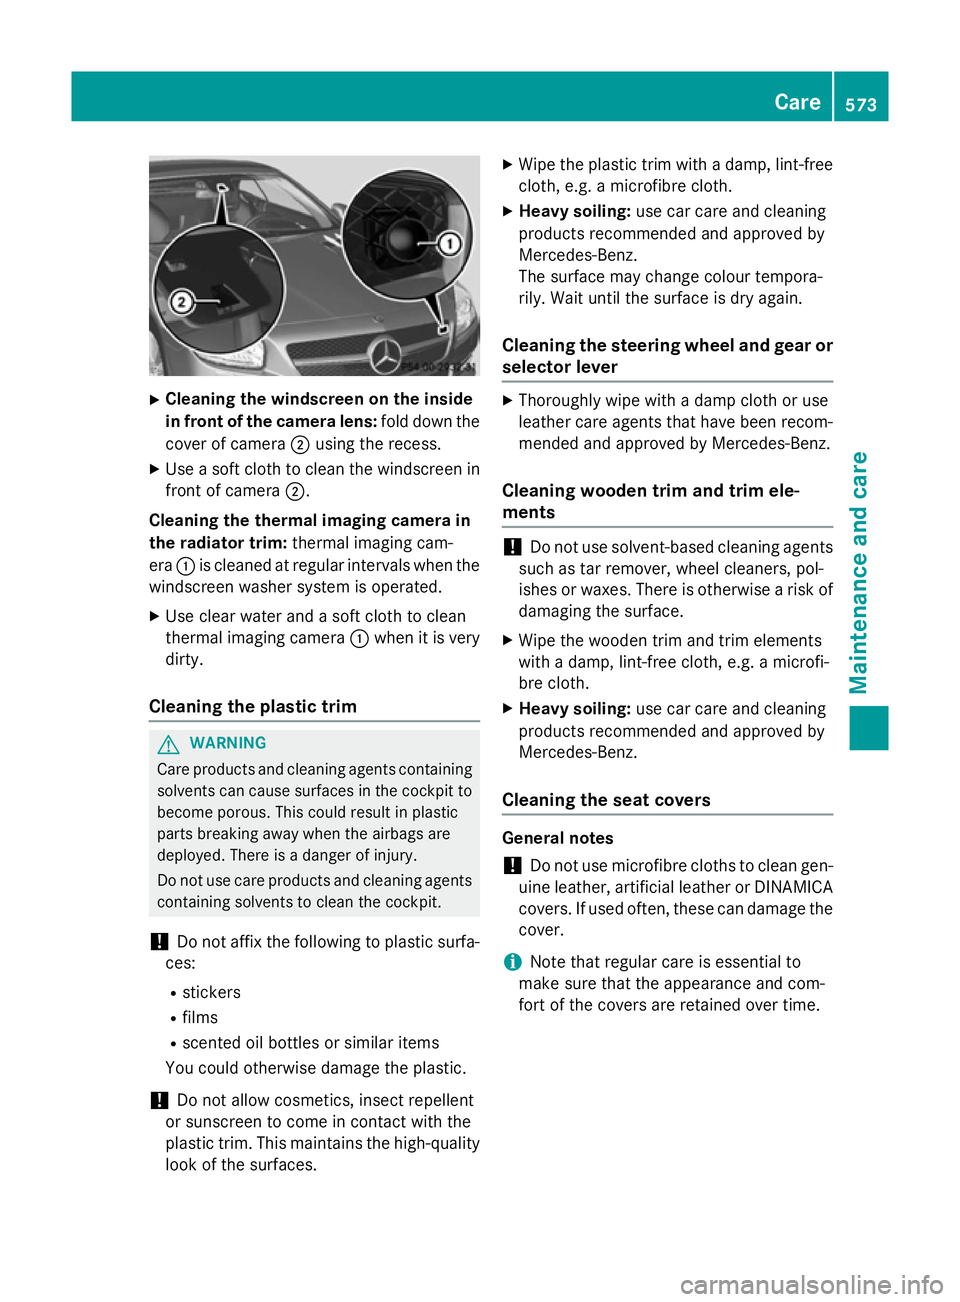
Cleaning the windscreen on the inside
in front of the camera lens: fold down the
cover of camera ;using the recess.
X Use a soft cloth to clean the windscreen in
front of camera ;.
Cleaning the thermal imaging camera in
the radiator trim: thermal imaging cam-
era :is cleaned at regular intervals when the
windscreen washer system is operated.
X Use clear water and a soft cloth to clean
thermal imaging camera :when it is very
dirty.
Cleaning the plastic trim G
WARNING
Care products and cleaning agents containing solvents can cause surfaces in the cockpit to
become porous. This could result in plastic
parts breaking away when the airbags are
deployed. There is a danger of injury.
Do not use care products and cleaning agents containing solvents to clean the cockpit.
! Do not affix the following to plastic surfa-
ces:
R stickers
R films
R scented oil bottles or similar items
You could otherwise damage the plastic.
! Do not allow cosmetics, insect repellent
or sunscreen to come in contact with the
plastic trim. This maintains the high-quality look of the surfaces. X
Wipe the plastic trim with a damp, lint-free
cloth, e.g. a microfibre cloth.
X Heavy soiling: use car care and cleaning
products recommended and approved by
Mercedes-Benz.
The surface may change colour tempora-
rily. Wait until the surface is dry again.
Cleaning the steering wheel and gear or selector lever X
Thoroughly wipe with a damp cloth or use
leather care agents that have been recom-
mended and approved by Mercedes-Benz.
Cleaning wooden trim and trim ele-
ments !
Do not use solvent-based cleaning agents
such as tar remover, wheel cleaners, pol-
ishes or waxes. There is otherwise a risk of damaging the surface.
X Wipe the wooden trim and trim elements
with a damp, lint-free cloth, e.g. a microfi-
bre cloth.
X Heavy soiling: use car care and cleaning
products recommended and approved by
Mercedes-Benz.
Cleaning the seat covers General notes
! Do not use microfibre cloths to clean gen-
uine leather, artificial leather or DINAMICA
covers. If used often, these can damage the cover.
i Note that regular care is essential to
make sure that the appearance and com-
fort of the covers are retained over time. Care
573Maintenance and care Z