2012 MERCEDES-BENZ GLK SUV reset
[x] Cancel search: resetPage 170 of 381
i
The ECO display summarises the driving
characteristics from the start of the journey
to its completion. Therefore, there are
dynamic changes in the bars at the start of
a journey. During a prolonged driving time,
these changes are smaller. For dynamic
changes, perform a manual reset.
For further information on the ECO display,
see (Y page 231). Short journeys
! Vehicles with a diesel particle filter: if
the vehicle is mostly driven for short dis-
tances, it is possible that malfunctions may
occur during the automatic cleaning of the
diesel particle filter. This may lead to fuel
collecting in the engine oil and cause
engine failure. Therefore, if you frequently
drive short distances, you should take a 20
minute trip on a motorway or rural road at
least every 500km. Braking
Important safety notes G
WARNING
If you shift down on a slippery road surface in
an attempt to increase the engine's braking
effect, the drive wheels could lose their grip.
This increases the risk of skidding and having
an accident.
Do not shift down for additional engine brak-
ing on a slippery road surface.
Downhill gradients On long and steep downhill gradients, you
must select shift range
1,2or 3in good time.
Take particular note of this when driving a
laden vehicle and when towing a trailer.
i This also applies if you have activated
cruise control or SPEEDTRONIC. This will use the braking effect of the engine,
so less braking will be required to prevent the
vehicle from gaining speed. This relieves the
load on the brake system and prevents the
brakes from overheating and wearing too
quickly.
Heavy and light loads
G
WARNING
The braking system can overheat if you leave
your foot on the brake pedal while driving.
This increases the braking distance and could
even cause the braking system to fail. There
is a risk of an accident.
Never use the brake pedal as a footrest. Do
not simultaneously depress both the brake
pedal and the accelerator pedal while driving.
! Depressing the brake pedal constantly
results in excessive and premature wear to
the brake pads.
If the brakes have been subjected to a heavy
load, do not stop the vehicle immediately.
Drive on for a short while. This allows the air-
flow to cool the brakes more quickly.
If the brakes have been used only moderately,
you should occasionally test their effective-
ness. To do this, brake more firmly from a
higher speed. This improves the grip of the
brakes.
Wet road surfaces If you have driven for a long time in heavy rain
without braking, there may be a delayed reac-
tion from the brakes when braking for the first
time. This may also occur after the vehicle has
been washed.
You have to depress the brake pedal more
firmly. Maintain a greater distance from the
vehicle in front.
After driving on a wet road or having the vehi-
cle washed, brake firmly while paying atten-
tion to the traffic conditions. This will warm
up the brake discs, thereby drying them more Driving tips
167Driving and parking Z
Page 181 of 381
Permanent SPEEDTRONIC
You can use the on-board computer to limit
the speed permanently to a value between
160 km/h(e.g. for driving on winter tyres) and
the maximum speed (Y page 241).
Shortly before the stored speed is reached, it
appears in the multifunction display.
Permanent SPEEDTRONIC remains active,
even if variable SPEEDTRONIC is deactivated.
You cannot exceed the stored limit speed,
even if you depress the accelerator pedal
beyond the pressure point (kickdown). DISTRONIC PLUS
Important safety notes DISTRONIC PLUS regulates the speed and
automatically helps you maintain the dis-
tance to the vehicle detected in front. DIS-
TRONIC PLUS brakes automatically so that
the set speed is not exceeded.
On long and steep downhill gradients, espe-
cially if the vehicle is laden or towing a trailer,
you must select shift range 1,2or 3in good
time. By doing so, you will make use of the
braking effect of the engine. This relieves the
load on the brake system and prevents the
brakes from overheating and wearing too
quickly.
If DISTRONIC PLUS detects a slower-moving
vehicle in front, your vehicle is braked in order
to maintain the preset distance to the vehicle
in front. G
WARNING
Do not change down for additional engine
braking on a slippery road surface. This could
cause the drive wheels to lose their grip and
the vehicle could skid. G
WARNING
DISTRONIC PLUS is only an aid designed to
assist driving. The driver remains fully respon-
sible for the vehicle's distance from other vehicles, the vehicle's speed and for braking
in good time.
DISTRONIC PLUS does not react in particular
to:
R pedestrians
R stationary obstacles on the road, e.g. stop-
ped or parked vehicles
R oncoming and crossing traffic
DISTRONIC PLUS may not detect narrow vehi-
cles driving in front, e.g. motorcycles, or vehi-
cles driving on a different line. Therefore,
always pay attention to traffic conditions even
when DISTRONIC PLUS is activated. Other-
wise, you may fail to recognise dangers in
time, cause an accident and injure yourself
and others. G
WARNING
DISTRONIC PLUS cannot take account of road
and traffic conditions. If DISTRONIC does not
recognise or no longer recognises the vehicle
in front, do not activate DISTRONIC or, if it is
already active, deactivate it. This is especially
the case:
R before corners
R on filter lanes
R when changing to a lane with faster moving
traffic
R in complex driving situations or where lanes
are diverted, e.g. at roadworks on a motor-
way
DISTRONIC PLUS otherwise maintains the
current speed set by you or accelerates up to
the set speed.
DISTRONIC PLUS cannot take account of
weather conditions. Deactivate, or do not
activate, DISTRONIC PLUS:
R if the roads are slippery, snow-covered or
icy. The wheels could lose their grip when
braking or accelerating. The vehicle could
start to skid.
R if the sensors are dirty or there is poor vis-
ibility, e.g. due to snow, rain or fog. Dis-
tance control may be impaired. 178
Driving systemsDriving and parking
Page 205 of 381
Warning and display messages in the
multifunction display Example: vehicles with automatic transmission
X Activate ATTENTION ASSIST using the on-
board computer (Y page 237).
Symbol :appears in the multifunction
display.
If ATTENTION ASSIST is active, you will be
warned no sooner than 20 minutes after your
journey has begun. You then hear an inter-
mittent warning tone twice and the Atten‐
Atten‐
tion tion Assist:
Assist: Drowsiness
Drowsiness detected
detectedmes-
sage appears in the multifunction display.
X If necessary, take a break.
X Press the abutton to confirm the mes-
sage.
On long journeys, take regular breaks in good
time to allow yourself to rest properly. If you
do not take a break, you will be warned again
after 15 minutes at the earliest. This will only
happen if ATTENTION ASSIST still detects
typical indicators of fatigue or increasing lap-
ses in concentration.
ATTENTION ASSIST is reset and starts
assessing your tiredness again when you con-
tinue your journey if:
R you switch off the engine.
R you take off your seat belt and open the
driver's door, e.g. for a change of drivers or
to take a break. Speed Limit Assist
Important safety notes Speed Limit Assist shows you detected speed
limits in the multifunction display. Data from
the navigation system is also used for this purpose. If a traffic sign indicating a speed
limit or the end of a speed limit is detected,
it is shown in the multifunction display. If
Speed Limit Assist does not detect any traffic
signs, the speed limit from the digital road
map is taken and shown in the display.
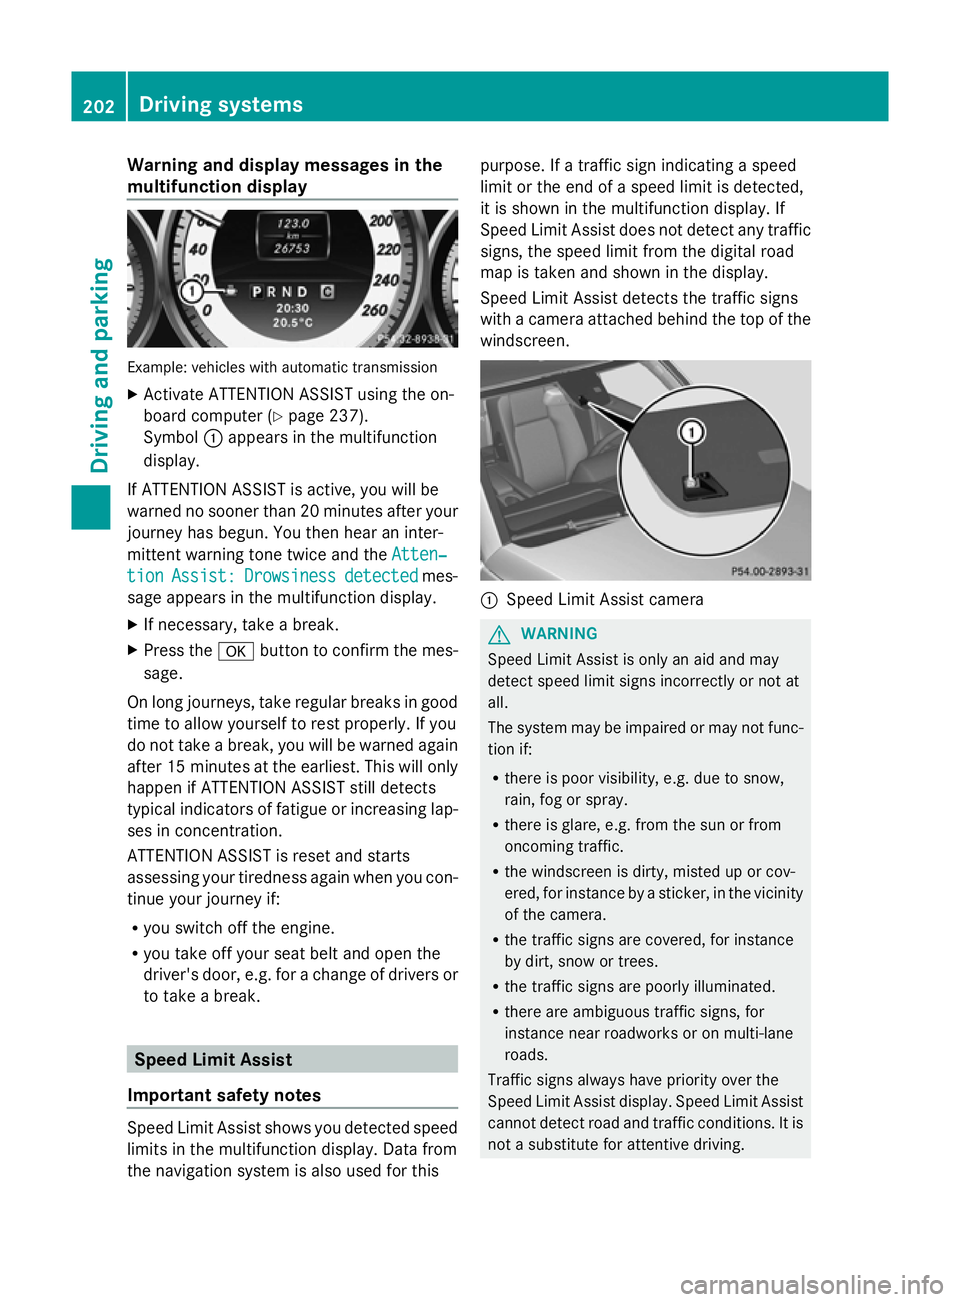
Speed Limit Assist detects the traffic signs
with a camera attached behind the top of the
windscreen.
:
Speed Limit Assist camera G
WARNING
Speed Limit Assist is only an aid and may
detect speed limit signs incorrectly or not at
all.
The system may be impaired or may not func-
tion if:
R there is poor visibility, e.g. due to snow,
rain, fog or spray.
R there is glare, e.g. from the sun or from
oncoming traffic.
R the windscreen is dirty, misted up or cov-
ered, for instance by a sticker, in the vicinity
of the camera.
R the traffic signs are covered, for instance
by dirt, snow or trees.
R the traffic signs are poorly illuminated.
R there are ambiguous traffic signs, for
instance near roadworks or on multi-lane
roads.
Traffic signs always have priority over the
Speed Limit Assist display. Speed Limit Assist
cannot detect road and traffic conditions. It is
not a substitute for attentive driving. 202
Driving systemsDriving and parking
Page 229 of 381
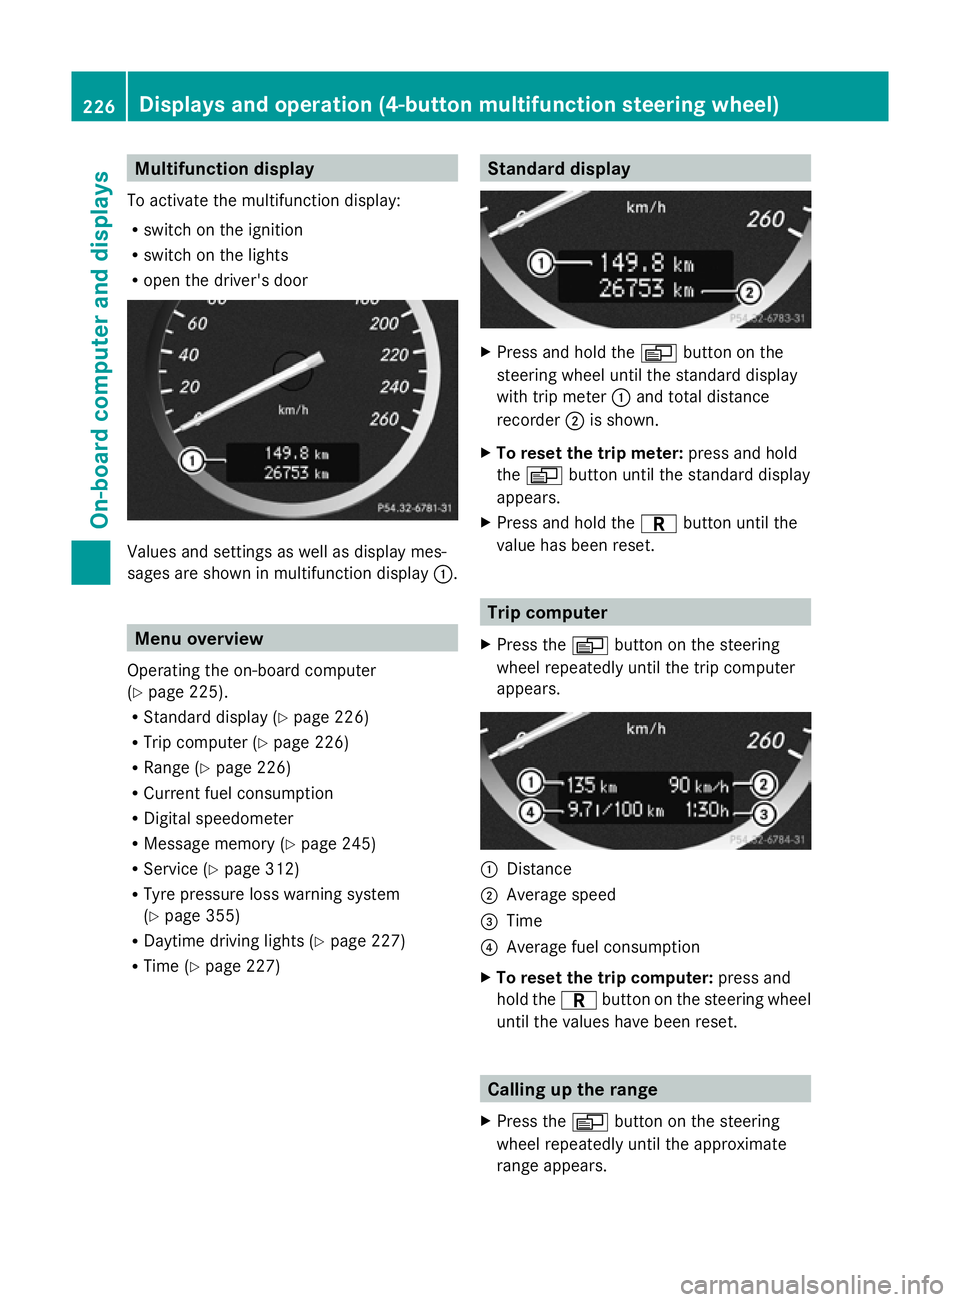
Multifunction display
To activate the multifunction display:
R switch on the ignition
R switch on the lights
R open the driver's door Values and settings as well as display mes-
sages are shown in multifunction display :.Menu overview
Operating the on-board computer
(Y page 225).
R Standard display (Y page 226)
R Trip computer (Y page 226)
R Range (Y page 226)
R Current fuel consumption
R Digital speedometer
R Message memory (Y page 245)
R Service (Y page 312)
R Tyre pressure loss warning system
(Y page 355)
R Daytime driving lights (Y page 227)
R Time (Y page 227) Standard display
X
Press and hold the Vbutton on the
steering wheel until the standard display
with trip meter :and total distance
recorder ;is shown.
X To reset the trip meter: press and hold
the V button until the standard display
appears.
X Press and hold the Cbutton until the
value has been reset. Trip computer
X Press the Vbutton on the steering
wheel repeatedly until the trip computer
appears. :
Distance
; Average speed
= Time
? Average fuel consumption
X To reset the trip computer: press and
hold the Cbutton on the steering wheel
until the values have been reset. Calling up the range
X Press the Vbutton on the steering
wheel repeatedly until the approximate
range appears. 226
Displays and operation (4-button multifunction steering wheel)On-board computer and displays
Page 233 of 381
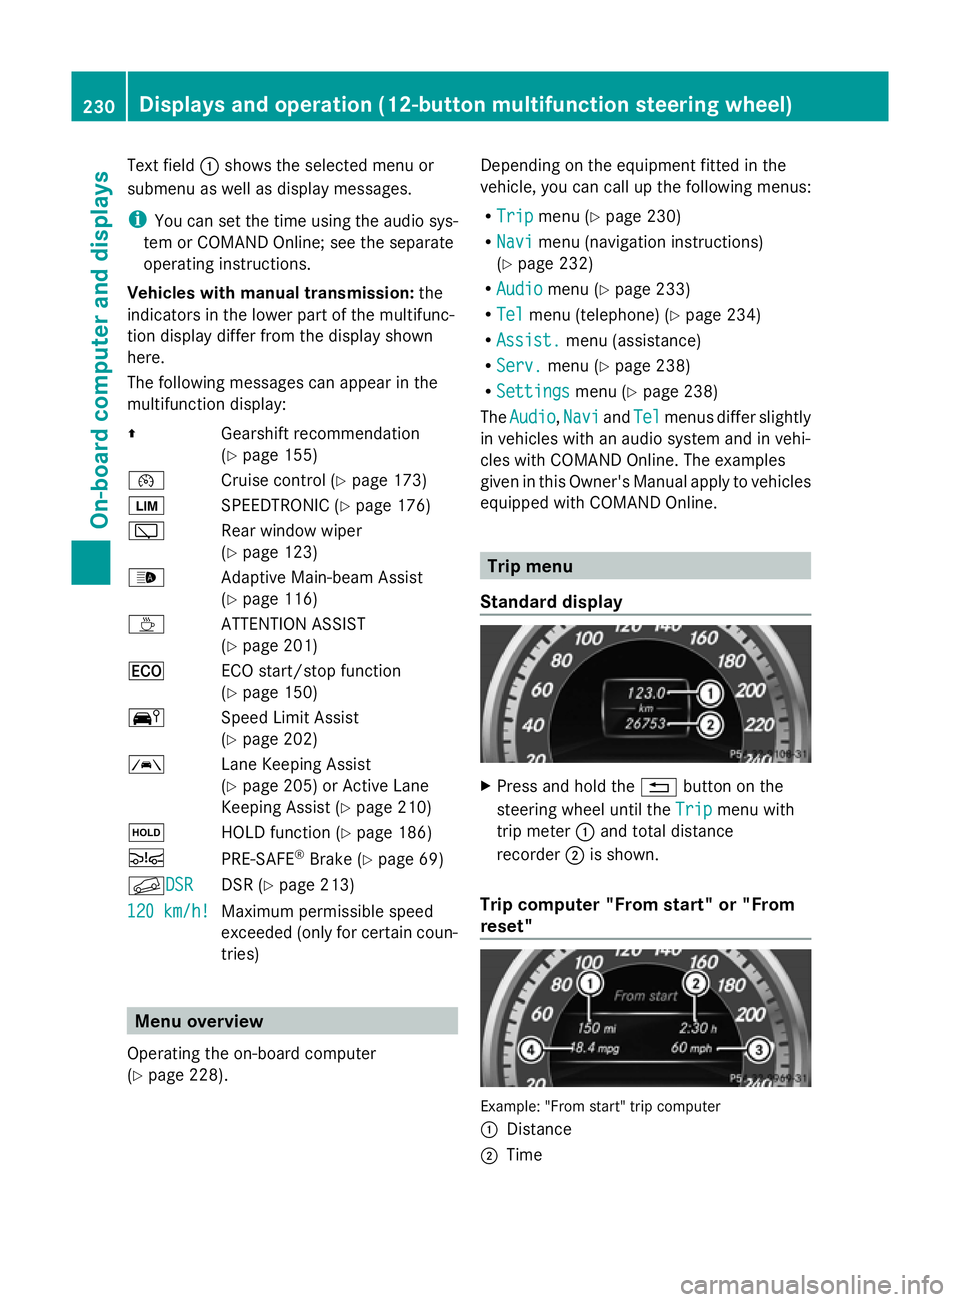
Text field
:shows the selected menu or
submenu as well as display messages.
i You can set the time using the audio sys-
tem or COMAND Online; see the separate
operating instructions.
Vehicles with manual transmission: the
indicators in the lower part of the multifunc-
tion display differ from the display shown
here.
The following messages can appear in the
multifunction display:
Z Gearshift recommendation
(Ypage 155)
¯ Cruise control (Y page 173)
È SPEEDTRONIC (Y page 176)
è Rear window wiper
(Ypage 123)
_ Adaptive Main-beam Assist
(Ypage 116)
À ATTENTION ASSIST
(Ypage 201)
¤ ECO start/stop function
(Ypage 150)
Ä Speed Limit Assist
(Ypage 202)
à Lane Keeping Assist
(Ypage 205) or Active Lane
Keeping Assist (Y page 210)
ë HOLD function (Y page 186)
Ä PRE-SAFE®
Brake (Y page 69)
fDSR DSR DSR (Y
page 213)
120 km/h! 120 km/h! Maximum permissible speed
exceeded (only for certain coun-
tries) Menu overview
Operating the on-board computer
(Y page 228). Depending on the equipment fitted in the
vehicle, you can call up the following menus:
R
Trip Trip menu (Y page 230)
R Navi Navi menu (navigation instructions)
(Y page 232)
R Audio
Audio menu (Y page 233)
R Tel
Tel menu (telephone) (Y page 234)
R Assist.
Assist. menu (assistance)
R Serv.
Serv. menu (Y page 238)
R Settings
Settings menu (Ypage 238)
The Audio
Audio ,Navi
Navi andTel
Tel menus differ slightly
in vehicles with an audio system and in vehi-
cles with COMAND Online. The examples
given in this Owner's Manual apply to vehicles
equipped with COMAND Online. Trip menu
Standard display X
Press and hold the %button on the
steering wheel until the Trip Tripmenu with
trip meter :and total distance
recorder ;is shown.
Trip computer "From start" or "From
reset" Example: "From start" trip computer
:
Distance
; Time 230
Displays and operation (12-button multifunction steering wheel)On-board computer and displays
Page 234 of 381
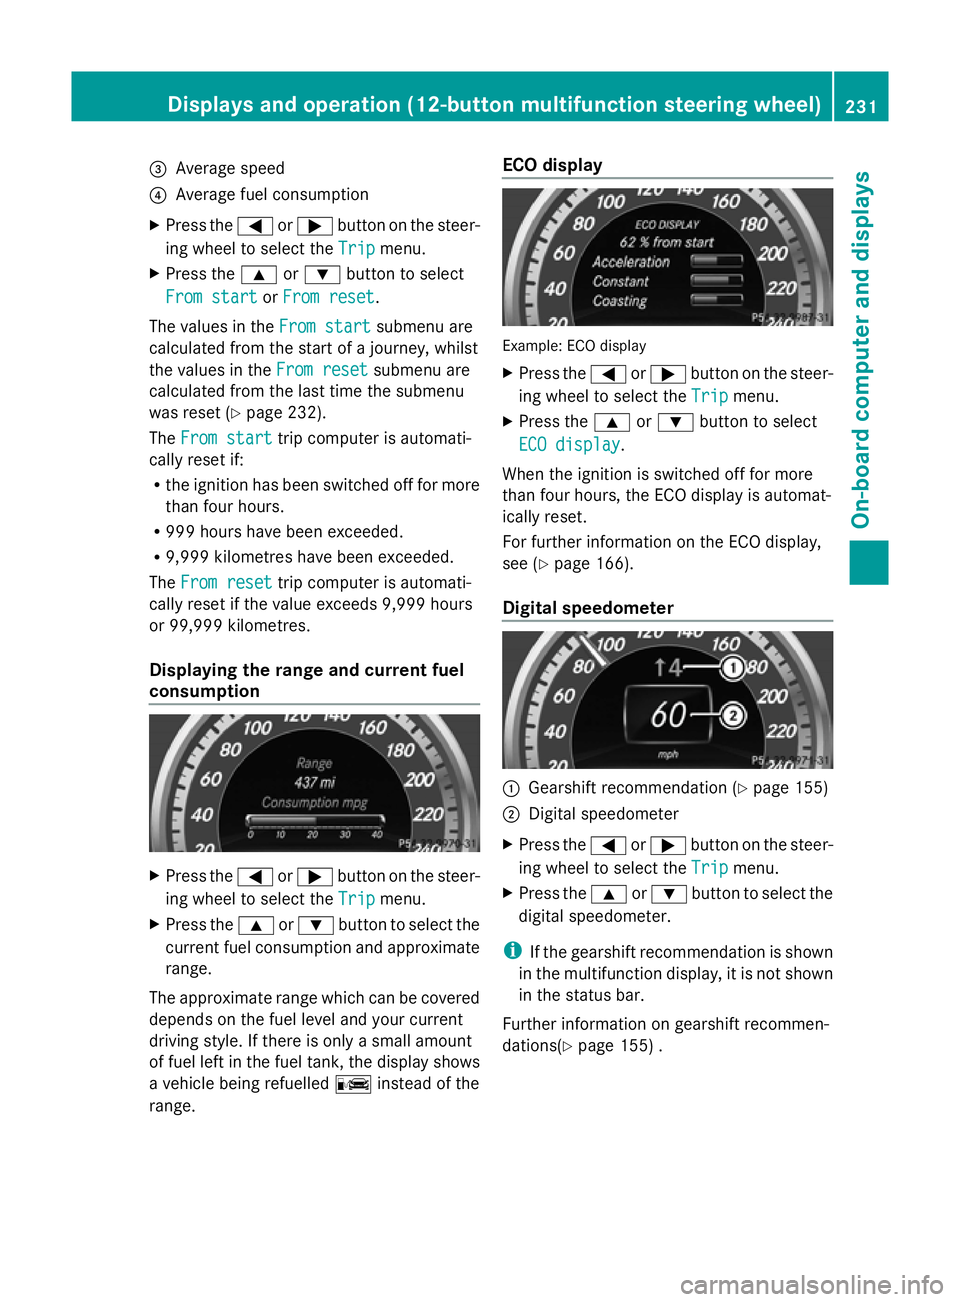
=
Average speed
? Average fuel consumption
X Press the =or; button on the steer-
ing wheel to select the Trip
Tripmenu.
X Press the 9or: button to select
From start
From start orFrom reset
From reset .
The values in the From start
From startsubmenu are
calculated from the start of a journey, whilst
the values in the From reset
From resetsubmenu are
calculated from the last time the submenu
was reset (Y page 232).
The From start
From start trip computer is automati-
cally reset if:
R the ignition has been switched off for more
than four hours.
R 999 hours have been exceeded.
R 9,999 kilometres have been exceeded.
The From reset
From reset trip computer is automati-
cally reset if the value exceeds 9,999 hours
or 99,999 kilometres.
Displaying the range and current fuel
consumption X
Press the =or; button on the steer-
ing wheel to select the Trip Tripmenu.
X Press the 9or: button to select the
current fuel consumption and approximate
range.
The approximate range which can be covered
depends on the fuel level and your current
driving style. If there is only a small amount
of fuel left in the fuel tank, the display shows
a vehicle being refuelled Cinstead of the
range. ECO display Example: ECO display
X
Press the =or; button on the steer-
ing wheel to select the Trip Tripmenu.
X Press the 9or: button to select
ECO display
ECO display.
When the ignition is switched off for more
than four hours, the ECO display is automat-
ically reset.
For further information on the ECO display,
see (Y page 166).
Digital speedometer :
Gearshift recommendation (Y page 155)
; Digital speedometer
X Press the =or; button on the steer-
ing wheel to select the Trip Tripmenu.
X Press the 9or: button to select the
digital speedometer.
i If the gearshift recommendation is shown
in the multifunction display, it is not shown
in the status bar.
Further information on gearshift recommen-
dations(Y page 155) . Displays and operation (12-button multifunction steering wheel)
231On-board computer and displays Z
Page 235 of 381
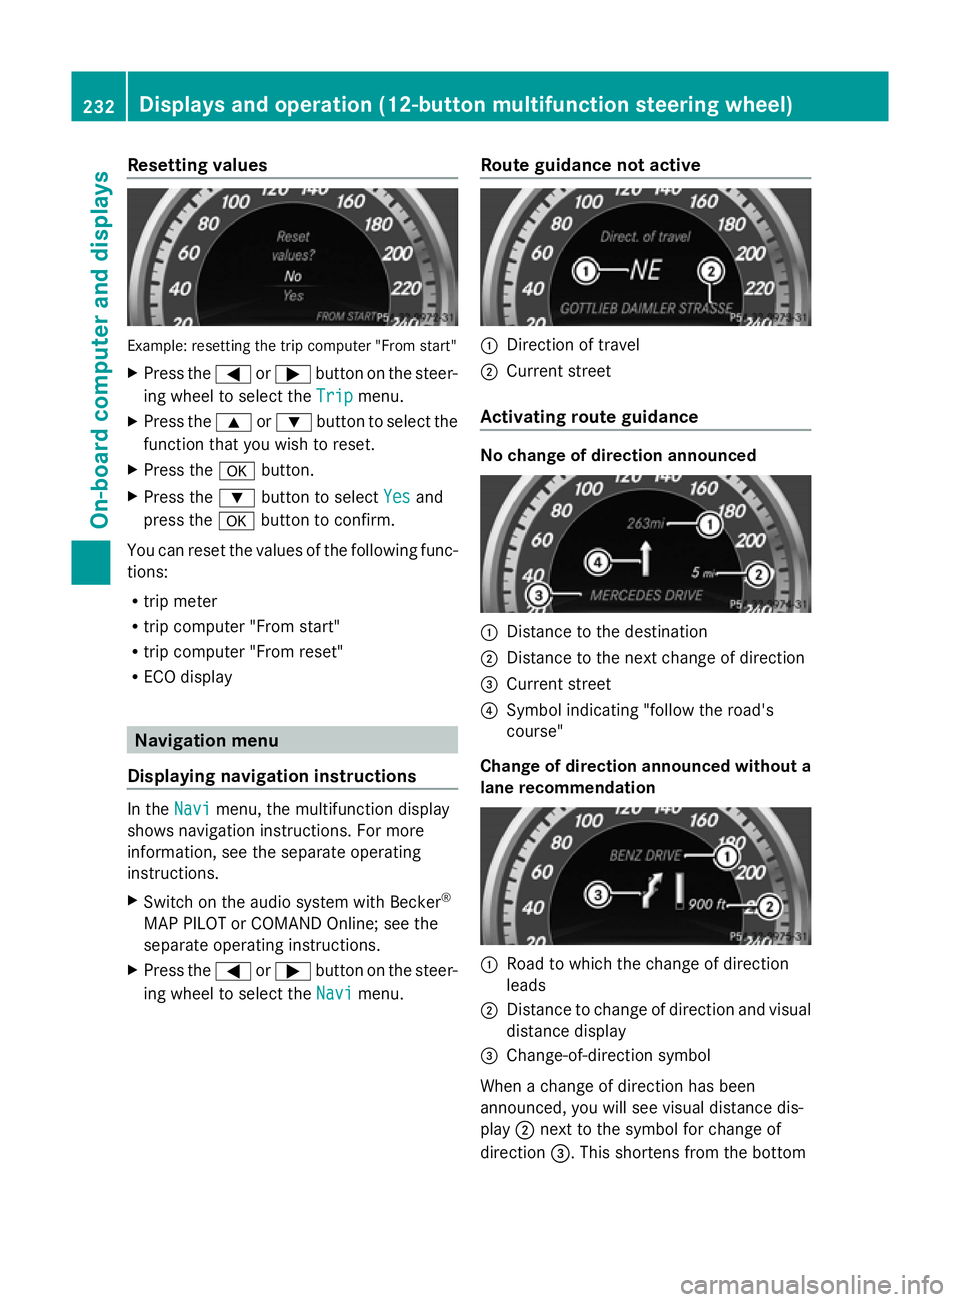
Resetting values
Example: resetting the trip computer "From start"
X Press the =or; button on the steer-
ing wheel to select the Trip
Trip menu.
X Press the 9or: button to select the
function that you wish to reset.
X Press the abutton.
X Press the :button to select Yes
Yes and
press the abutton to confirm.
You can reset the values of the following func-
tions:
R trip meter
R trip computer "From start"
R trip computer "From reset"
R ECO display Navigation menu
Displaying navigation instructions In the
Navi Navimenu, the multifunction display
shows navigation instructions. For more
information, see the separate operating
instructions.
X Switch on the audio system with Becker ®
MAP PILOT or COMAND Online; see the
separate operating instructions.
X Press the =or; button on the steer-
ing wheel to select the Navi
Navi menu. Route guidance not active :
Direction of travel
; Current street
Activating route guidance No change of direction announced
:
Distance to the destination
; Distance to the next change of direction
= Current street
? Symbol indicating "follow the road's
course"
Change of direction announced without a
lane recommendation :
Road to which the change of direction
leads
; Distance to change of direction and visual
distance display
= Change-of-direction symbol
When a change of direction has been
announced, you will see visual distance dis-
play ;next to the symbol for change of
direction =. This shortens from the bottom 232
Displays and operation (12-button multifunction steering wheel)On-board computer and displays
Page 247 of 381
Switching the Fold in mirrors when lock-
ing function on/off
This function is only available on vehicles with
a memory function (Y page 106).
When you activate the Auto. fold in
Auto. fold in func-
tion, the exterior mirrors are folded in when
the vehicle is locked. When you unlock the
vehicle and then open a door, the exterior
mirrors fold out again.
X Press the =or; button on the steer-
ing wheel to select the Settings
Settings menu.
X Press the :or9 button to select the
CONVENIENCE
CONVENIENCE submenu.
X Press ato confirm.
X Press the :or9 button to select the
Auto. fold in
Auto. fold in function.
If the Auto. Auto. fold
foldin
infunction is activated,
the vehicle's exterior mirror is displayed in
red in the multifunction display.
X Press the abutton to save the setting.
If you have switched the Auto. fold in
Auto. fold in
function on and you fold the exterior mirrors
in using the button on the door
(Y page 104), they will not fold out automat-
ically. The exterior mirrors can then only be
folded out using the button on the door.
Resetting to factory settings X
Press the =or; button on the steer-
ing wheel to select the Settings Settingsmenu.
X Press the :or9 button to select the
Factory setting
Factory setting submenu.
X Press ato confirm.
The Reset all settings?
Reset all settings? message
appears.
X Press the :or9 button to select
No
No orYes
Yes.
X Press the abutton to confirm the selec-
tion.
If you have selected Yes
Yes, the multifunction
display shows a confirmation message.
For safety reasons, not all functions are reset:
the Limit speed (winter tyres):
Limit speed (winter tyres): func-tion in permanent SPEEDTRONIC can only be
set in the
Vehicle Vehiclesubmenu. If you want to
reset the Daytime driving lights
Daytime driving lights in the
Light
Light submenu, you must turn the key to
position 1in the ignition lock. 244
Displays and operation (12-button multifunction steering wheel)On-board computer and displays