2012 MERCEDES-BENZ GLK SUV reset
[x] Cancel search: resetPage 52 of 381
!
Make sure that there are no objects in the
footwell or behind the seats when moving
the seat back. There is a risk that the seats
and/or the objects could be damaged.
More information about seat belt adjustment,
a convenience function integrated into PRE-
SAFE ®
, can be found in the "Seat belt adjust-
ment" section (Y page 51). NECK-PRO head restraints/NECK-
PRO luxury head restraints
NECK-PRO head restraints/NECK-PRO luxury
head restraints increase protection of the
driver's and front-passenger's head and
neck. In the event of a rear collision of a cer-
tain severity, the NECK-PRO head restraints/
NECK-PRO luxury head restraints on the driv-
er's and front-passenger seats are moved for-
wards and upwards. This provides better
head support. G
WARNING
Only use head restraint covers which have
been tested and approved by Mercedes-Benz
for your vehicle model.
The use of non-approved head restraint cov-
ers may prevent NECK-PRO head restraints/
NECK-PRO luxury head restraints from trig-
gering properly. The NECK-PRO head
restraints/NECK-PRO luxury head restraints
can therefore not provide the intended pro-
tection.
Consult a Mercedes-Benz Service Centre
regarding availability.
If the NECK-PRO head restraints/NECK-PRO
luxury head restraints have been triggered in
an accident, reset the NECK-PRO head
restraints/NECK-PRO luxury head restraints
on the driver's and front-passenger seats
(Y page 49). Otherwise, the additional pro-
tection will not be available in the event of
another rear-end collision. NECK-PRO head
restraints/NECK-PRO luxury head restraints
that have been triggered are moved forwards
and can no longer be adjusted. Resetting a triggered NECK-PRO head
restraint/NECK-PRO luxury head
restraint
Important safety notes Mercedes-Benz recommends that you have
NECK-PRO head restraints/NECK-PRO luxury
head restraints checked at a qualified spe-
cialist workshop, e.g. a Mercedes-Benz
Service Centre, if your vehicle is involved in a
rear-end collision.
NECK-PRO head restraints
i
Resetting the NECK-PRO head restraints
requires a lot of strength. If you have diffi-
culty resetting the NECK-PRO head
restraints, have this work carried out at a
qualified specialist workshop, e.g. a
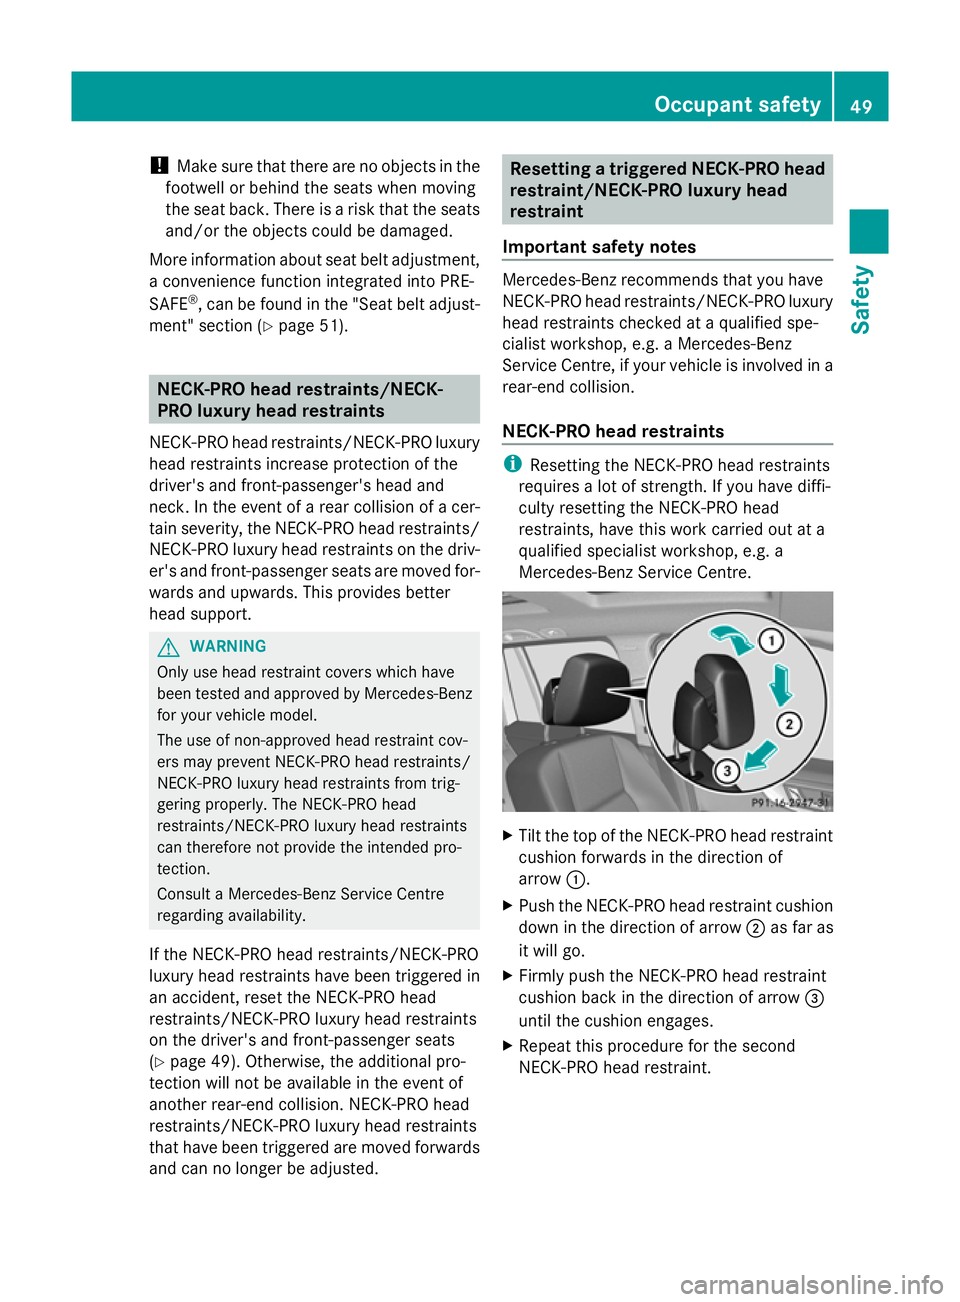
Mercedes-Benz Service Centre. X
Tilt the top of the NECK-PRO head restraint
cushion forwards in the direction of
arrow :.
X Push the NECK-PRO head restraint cushion
down in the direction of arrow ;as far as
it will go.
X Firmly push the NECK-PRO head restraint
cushion back in the direction of arrow =
until the cushion engages.
X Repeat this procedure for the second
NECK-PRO head restraint. Occupant safety
49Safety Z
Page 53 of 381
NECK-PRO luxury head restraints
i
If you have difficulty resetting the NECK-
PRO luxury head restraints, have this work
carried out at a qualified specialist work-
shop, e.g. a Mercedes-Benz Service
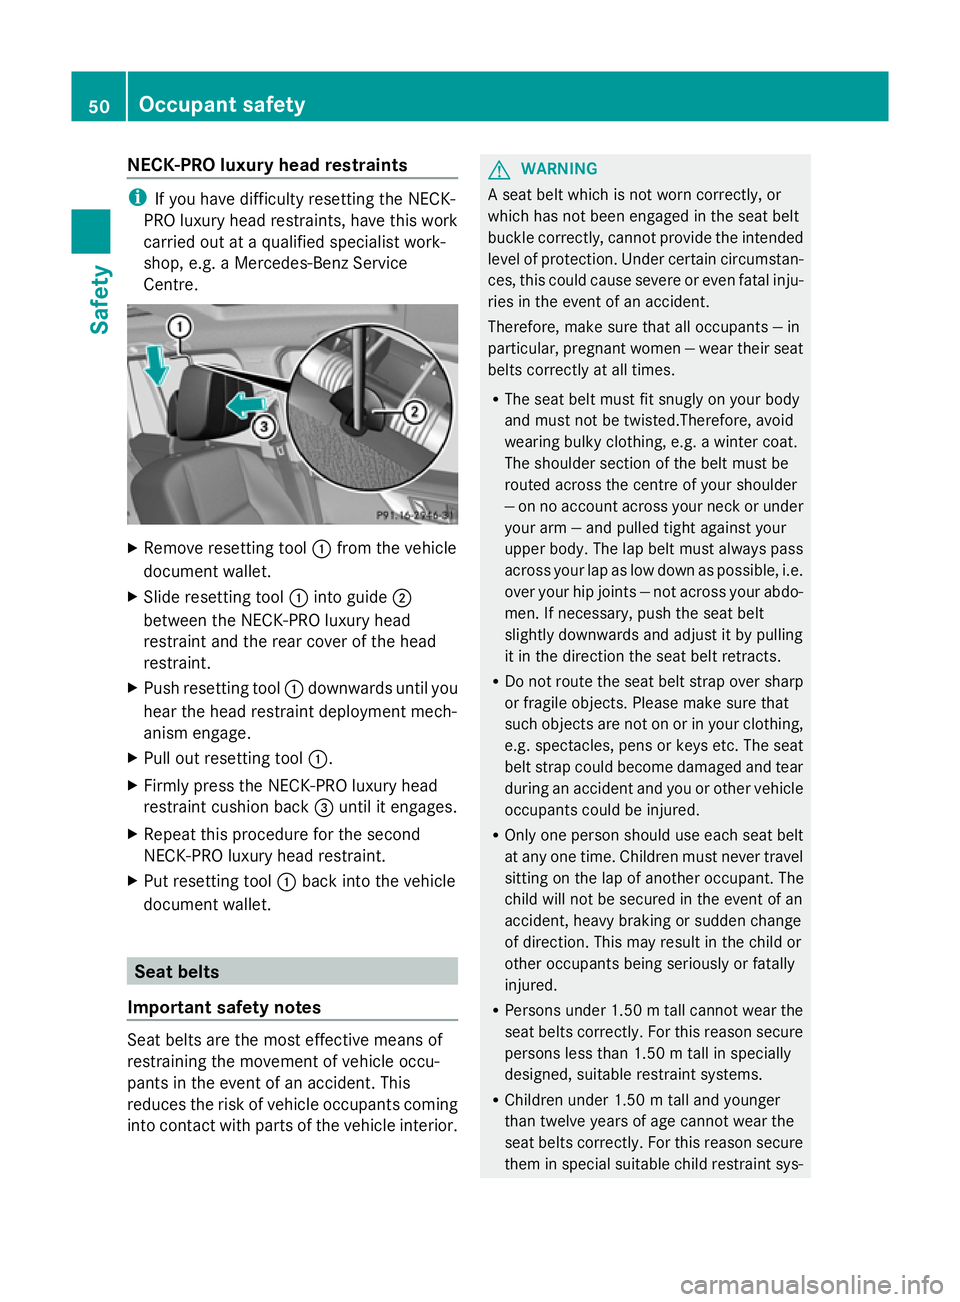
Centre. X
Remove resetting tool :from the vehicle
document wallet.
X Slide resetting tool :into guide ;
between the NECK-PRO luxury head
restraint and the rear cover of the head
restraint.
X Push resetting tool :downwards until you
hear the head restraint deployment mech-
anism engage.
X Pull out resetting tool :.
X Firmly press the NECK-PRO luxury head
restraint cushion back =until it engages.
X Repeat this procedure for the second
NECK-PRO luxury head restraint.
X Put resetting tool :back into the vehicle
document wallet. Seat belts
Important safety notes Seat belts are the most effective means of
restraining the movement of vehicle occu-
pants in the event of an accident. This
reduces the risk of vehicle occupants coming
into contact with parts of the vehicle interior. G
WARNING
A seat belt which is not worn correctly, or
which has not been engaged in the seat belt
buckle correctly, cannot provide the intended
level of protection. Under certain circumstan-
ces, this could cause severe or even fatal inju-
ries in the event of an accident.
Therefore, make sure that all occupants — in
particular, pregnant women — wear their seat
belts correctly at all times.
R The seat belt must fit snugly on your body
and must not be twisted.Therefore, avoid
wearing bulky clothing, e.g. a winter coat.
The shoulder section of the belt must be
routed across the centre of your shoulder
— on no account across your neck or under
your arm — and pulled tight against your
upper body. The lap belt must always pass
across your lap as low down as possible, i.e.
over your hip joints — not across your abdo-
men. If necessary, push the seat belt
slightly downwards and adjust it by pulling
it in the direction the seat belt retracts.
R Do not route the seat belt strap over sharp
or fragile objects. Please make sure that
such objects are not on or in your clothing,
e.g. spectacles, pens or keys etc. The seat
belt strap could become damaged and tear
during an accident and you or other vehicle
occupants could be injured.
R Only one person should use each seat belt
at any one time. Children must never travel
sitting on the lap of another occupant. The
child will not be secured in the event of an
accident, heavy braking or sudden change
of direction. This may result in the child or
other occupants being seriously or fatally
injured.
R Persons under 1.50 mtall cannot wear the
seat belts correctly. For this reason secure
persons less than 1.50 m tall in specially
designed, suitable restraint systems.
R Children under 1.50 m tall and younger
than twelve years of age cannot wear the
seat belts correctly. For this reason secure
them in special suitable child restraint sys- 50
Occupant safetySafety
Page 94 of 381
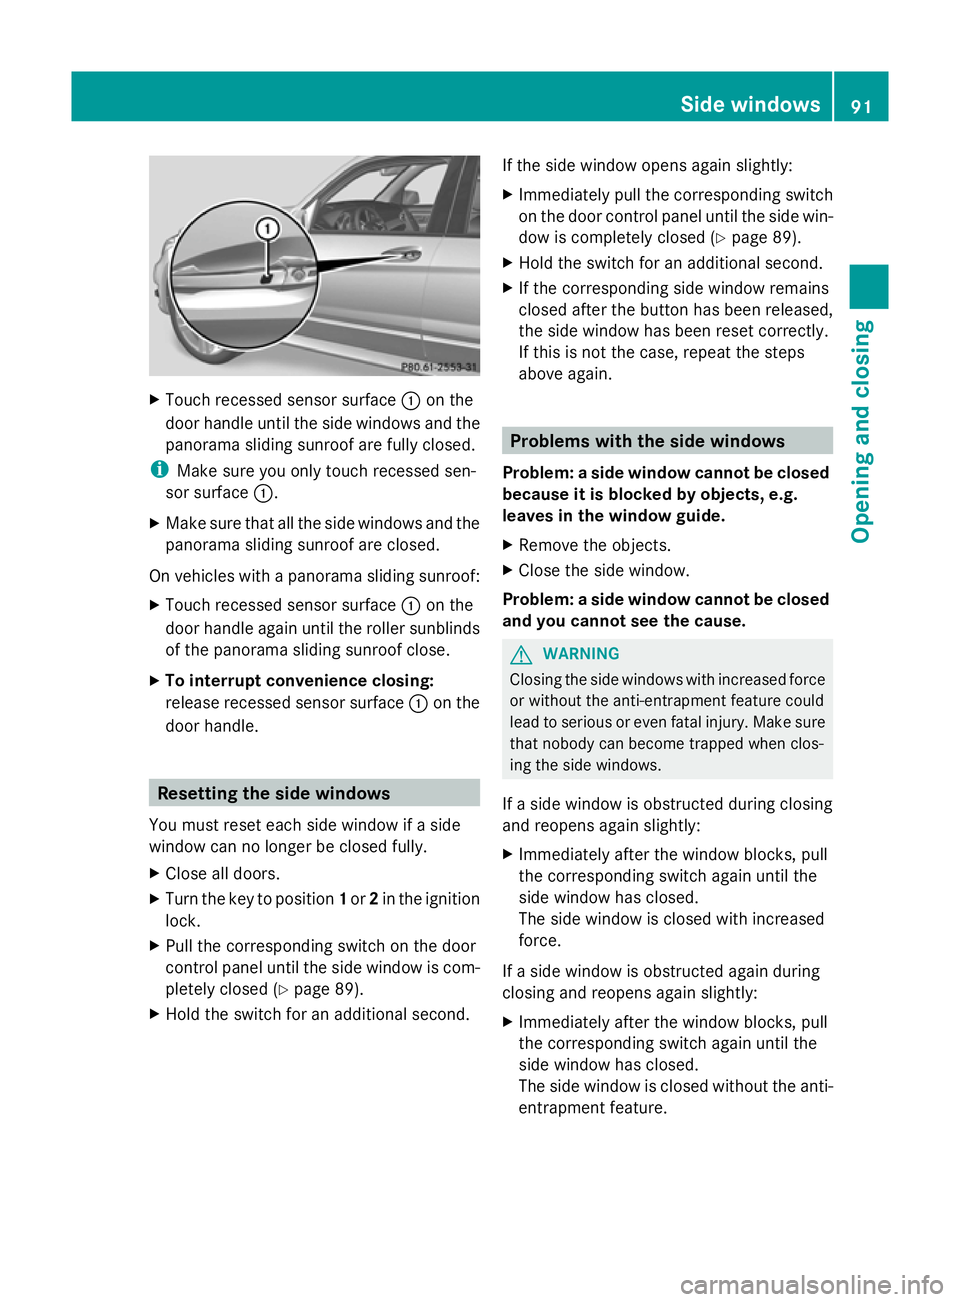
X
Touch recessed sensor surface :on the
door handle until the side windows and the
panorama sliding sunroof are fully closed.
i Make sure you only touch recessed sen-
sor surface :.
X Make sure that all the side windows and the
panorama sliding sunroof are closed.
On vehicles with a panorama sliding sunroof:
X Touch recessed sensor surface :on the
door handle again until the roller sunblinds
of the panorama sliding sunroof close.
X To interrupt convenience closing:
release recessed sensor surface :on the
door handle. Resetting the side windows
You must reset each side window if a side
window can no longer be closed fully.
X Close all doors.
X Turn the key to position 1or 2in the ignition
lock.
X Pull the corresponding switch on the door
control panel until the side window is com-
pletely closed (Y page 89).
X Hold the switch for an additional second. If the side window opens again slightly:
X
Immediately pull the corresponding switch
on the door control panel until the side win-
dow is completely closed (Y page 89).
X Hold the switch for an additional second.
X If the corresponding side window remains
closed after the button has been released,
the side window has been reset correctly.
If this is not the case, repeat the steps
above again. Problems with the side windows
Problem: a side window cannot be closed
because it is blocked by objects, e.g.
leaves in the window guide.
X Remove the objects.
X Close the side window.
Problem: a side window cannot be closed
and you cannot see the cause. G
WARNING
Closing the side windows with increased force
or without the anti-entrapment feature could
lead to serious or even fatal injury. Make sure
that nobody can become trapped when clos-
ing the side windows.
If a side window is obstructed during closing
and reopens again slightly:
X Immediately after the window blocks, pull
the corresponding switch again until the
side window has closed.
The side window is closed with increased
force.
If a side window is obstructed again during
closing and reopens again slightly:
X Immediately after the window blocks, pull
the corresponding switch again until the
side window has closed.
The side window is closed without the anti-
entrapment feature. Side windows
91Opening and closing Z
Page 96 of 381

feature, it opens again slightly. The rain-
closing feature is then deactivated.
The panorama sliding sunroof does not close
if:
R it is raised at the rear.
R it is blocked.
R no rain is falling on the area of the wind-
screen being monitored by the rain sensor,
e.g. because the vehicle is under a bridge. Operating the panorama sliding sun-
roof roller sunblinds
General notes The roller sunblinds shield the vehicle interior
from sunlight. The two roller sunblinds can
only be opened and closed together when the
panorama sliding sunroof is closed. G
WARNING
Make sure that nobody can become trapped
as you open or close the roller sunblinds.
Opening and closing Overhead control panel
:
To open
; To open
= To close
X Turn the key to position 1or 2in the ignition
lock.
X Press or pull the 3switch in the corre-
sponding direction. i
If you press the 3switch beyond the
point of resistance, an automatic opening/
closing process is started in the corre-
sponding direction. You can stop automatic
operation by pressing again.
Resetting the panorama sliding sunroof
and the roller sunblinds Reset the panorama sliding sunroof and the
roller sunblinds if the panorama sliding sun-
roof or the roller sunblinds do not move
smoothly.
X
Turn the key to position 1or 2in the ignition
lock.
X Press the 3switch to the point of resist-
ance in the direction of arrow ;and hold
it until the panorama sliding sunroof has
opened about 10 cm.
X Pull the 3switch repeatedly to the point
of resistance in the direction of arrow =
until the panorama sliding sunroof is fully
closed.
X Keep the 3switch pulled for an addi-
tional second.
X Press the 3switch to the point of resist-
ance in the direction of arrow ;and hold
it until the roller sunblinds are open
10 cm.
X Pull the 3switch repeatedly to the point
of resistance in the direction of arrow =
until the roller sunblinds are fully closed.
X Keep the 3switch pulled for an addi-
tional second.
X Make sure that the panorama sliding sun-
roof and the roller sunblinds can be fully
opened and closed again (Y page 92).
X If this is not the case, repeat the steps
above again.
! If the panorama sliding sunroof and the
roller sunblind cannot be fully opened or
closed after resetting, contact a qualified
specialist workshop. Sliding sunroof
93Opening and closing Z
Page 107 of 381
i
You can also heat up the exterior mirrors
manually by switching on the rear window
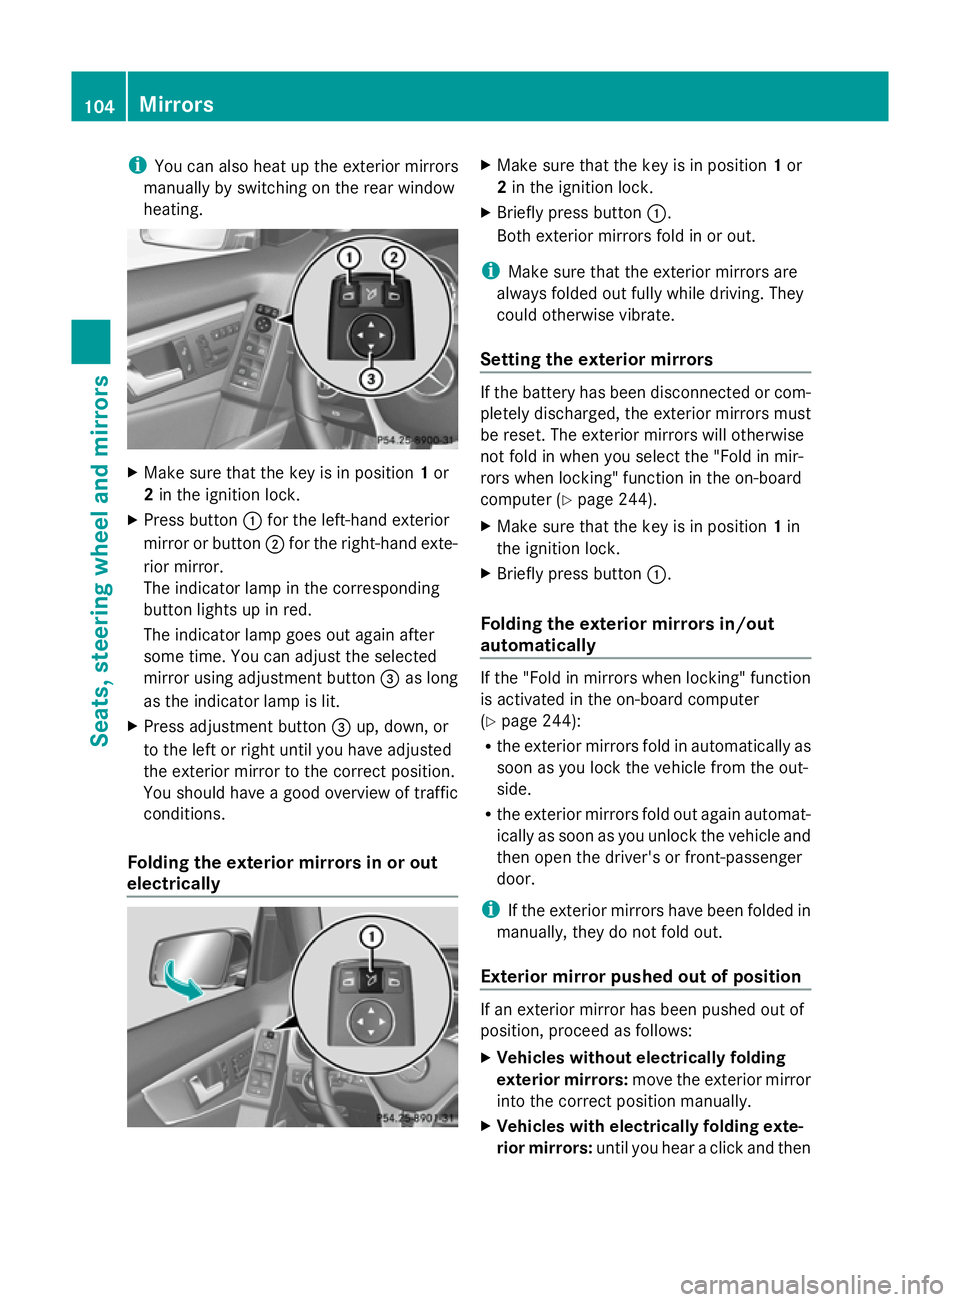
heating. X
Make sure that the key is in position 1or
2 in the ignition lock.
X Press button :for the left-hand exterior
mirror or button ;for the right-hand exte-
rior mirror.
The indicator lamp in the corresponding
button lights up in red.
The indicator lamp goes out again after
some time. You can adjust the selected
mirror using adjustment button =as long
as the indicator lamp is lit.
X Press adjustment button =up, down, or
to the left or right until you have adjusted
the exterior mirror to the correct position.
You should have a good overview of traffic
conditions.
Folding the exterior mirrors in or out
electrically X
Make sure that the key is in position 1or
2 in the ignition lock.
X Briefly press button :.
Both exterior mirrors fold in or out.
i Make sure that the exterior mirrors are
always folded out fully while driving. They
could otherwise vibrate.
Setting the exterior mirrors If the battery has been disconnected or com-
pletely discharged, the exterior mirrors must
be reset. The exterior mirrors will otherwise
not fold in when you select the "Fold in mir-
rors when locking" function in the on-board
computer (Y
page 244).
X Make sure that the key is in position 1in
the ignition lock.
X Briefly press button :.
Folding the exterior mirrors in/out
automatically If the "Fold in mirrors when locking" function
is activated in the on-board computer
(Y
page 244):
R the exterior mirrors fold in automatically as
soon as you lock the vehicle from the out-
side.
R the exterior mirrors fold out again automat-
ically as soon as you unlock the vehicle and
then open the driver's or front-passenger
door.
i If the exterior mirrors have been folded in
manually, they do not fold out.
Exterior mirror pushed out of position If an exterior mirror has been pushed out of
position, proceed as follows:
X
Vehicles without electrically folding
exterior mirrors: move the exterior mirror
into the correct position manually.
X Vehicles with electrically folding exte-
rior mirrors: until you hear a click and then104
MirrorsSeats, steering wheel and mirrors
Page 108 of 381
the mirrors engage in position.
(Y
page 104)
The mirror housing is engaged again and
you can adjust the exterior mirrors as usual
(Y page 103). Automatic anti-dazzle mirrors
G
WARNING
If incident light from headlamps is prevented
from striking the sensor in the rear-view mir-
ror, for instance, by luggage piled too high in
the vehicle, the mirror's automatic anti-dazzle
function will not operate.
Incident light could then blind you. This may
distract you from the traffic conditions and,
as a result, you may cause an accident.
The rear-view mirror and the exterior mirror
on the driver's side automatically go into anti-
dazzle mode if the following conditions are
met simultaneously:
R the ignition is switched on and
R incident light from headlamps strikes the
sensor in the rear-view mirror.
The mirrors do not go into anti-dazzle mode if
reverse gear is engaged or if the interior light-
ing is switched on. Parking position for the exterior mir-
ror on the front-passenger side
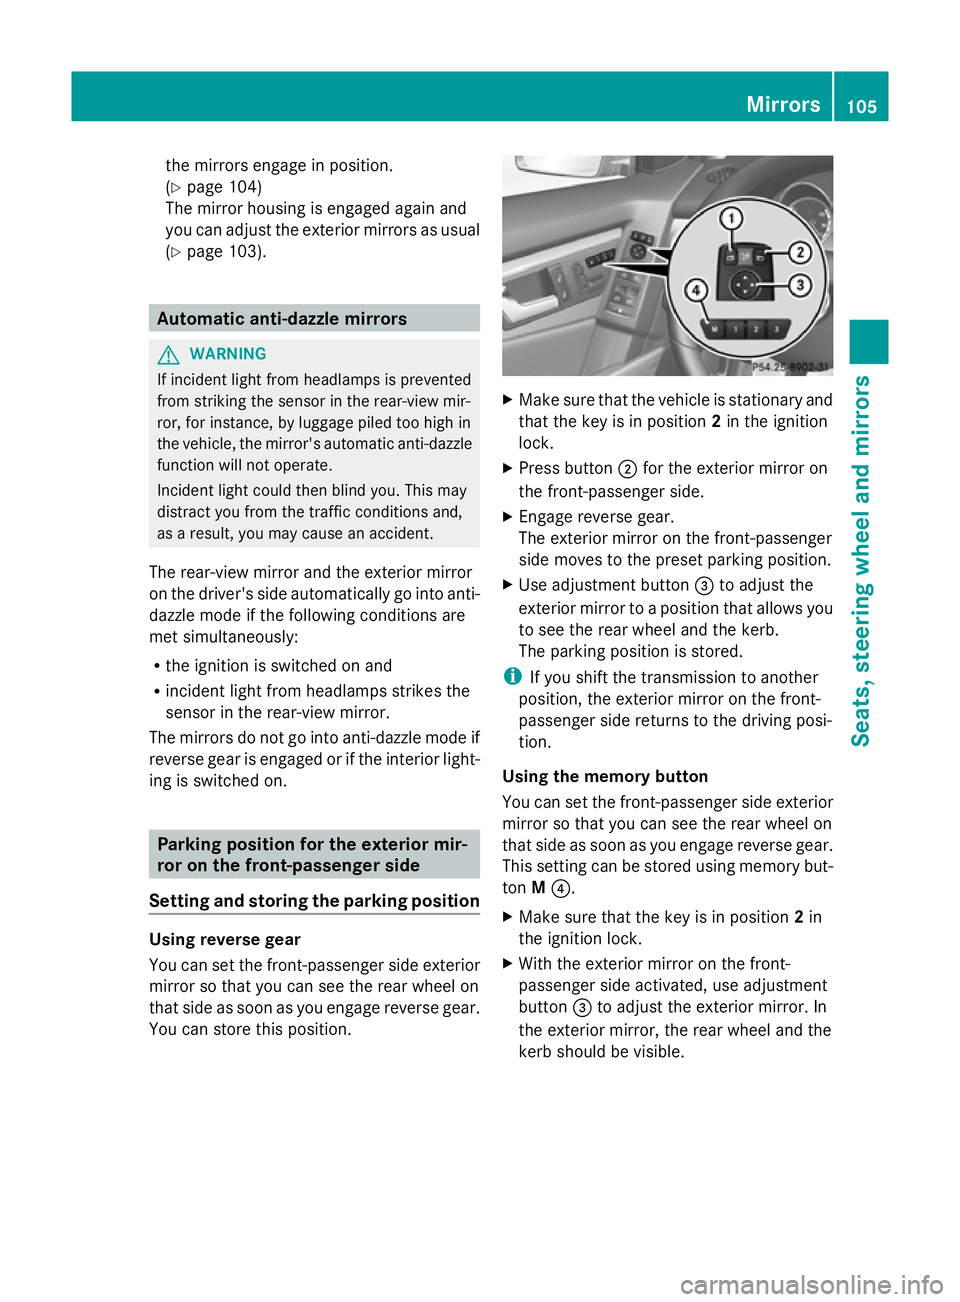
Setting and storing the parking position Using reverse gear
You can set the front-passenger side exterior
mirror so that you can see the rear wheel on
that side as soon as you engage reverse gear.
You can store this position. X
Make sure that the vehicle is stationary and
that the key is in position 2in the ignition
lock.
X Press button ;for the exterior mirror on
the front-passenger side.
X Engage reverse gear.
The exterior mirror on the front-passenger
side moves to the preset parking position.
X Use adjustment button =to adjust the
exterior mirror to a position that allows you
to see the rear wheel and the kerb.
The parking position is stored.
i If you shift the transmission to another
position, the exterior mirror on the front-
passenger side returns to the driving posi-
tion.
Using the memory button
You can set the front-passenger side exterior
mirror so that you can see the rear wheel on
that side as soon as you engage reverse gear.
This setting can be stored using memory but-
ton M?.
X Make sure that the key is in position 2in
the ignition lock.
X With the exterior mirror on the front-
passenger side activated, use adjustment
button =to adjust the exterior mirror. In
the exterior mirror, the rear wheel and the
kerb should be visible. Mirrors
105Seats, steering wheel and mirrors Z
Page 109 of 381
X
Press memory button M? and one of the
arrows on adjustment button =within
three seconds.
The parking position is stored if the exterior
mirror does not move.
X If the mirror moves out of position, repeat
the steps.
Calling up a stored parking position set-
ting X
Turn the key to position 2in the ignition
lock.
X Adjust the exterior mirror on the front-
passenger side using button ;.
X Engage reverse gear.
The exterior mirror on the front-passenger
side moves to the stored parking position.
The exterior mirror on the front-passenger
side moves back to its original position:
R as soon as you exceed a speed of
15 km/h
R if you press button :for the exterior mir-
ror on the driver's side Memory function
Storing settings
G
WARNING
Only use the memory function on the driver's
side when the vehicle is stationary. You could
otherwise be distracted from the traffic con-
ditions by the steering wheel and seat moving
of their own accord, and as a result, cause an
accident. G
WARNING
The memory function can still be used when
the key has been removed. For this reason,
children should never be left unsupervised in
the vehicle. They could otherwise become
trapped when adjusting the seat or the steer-
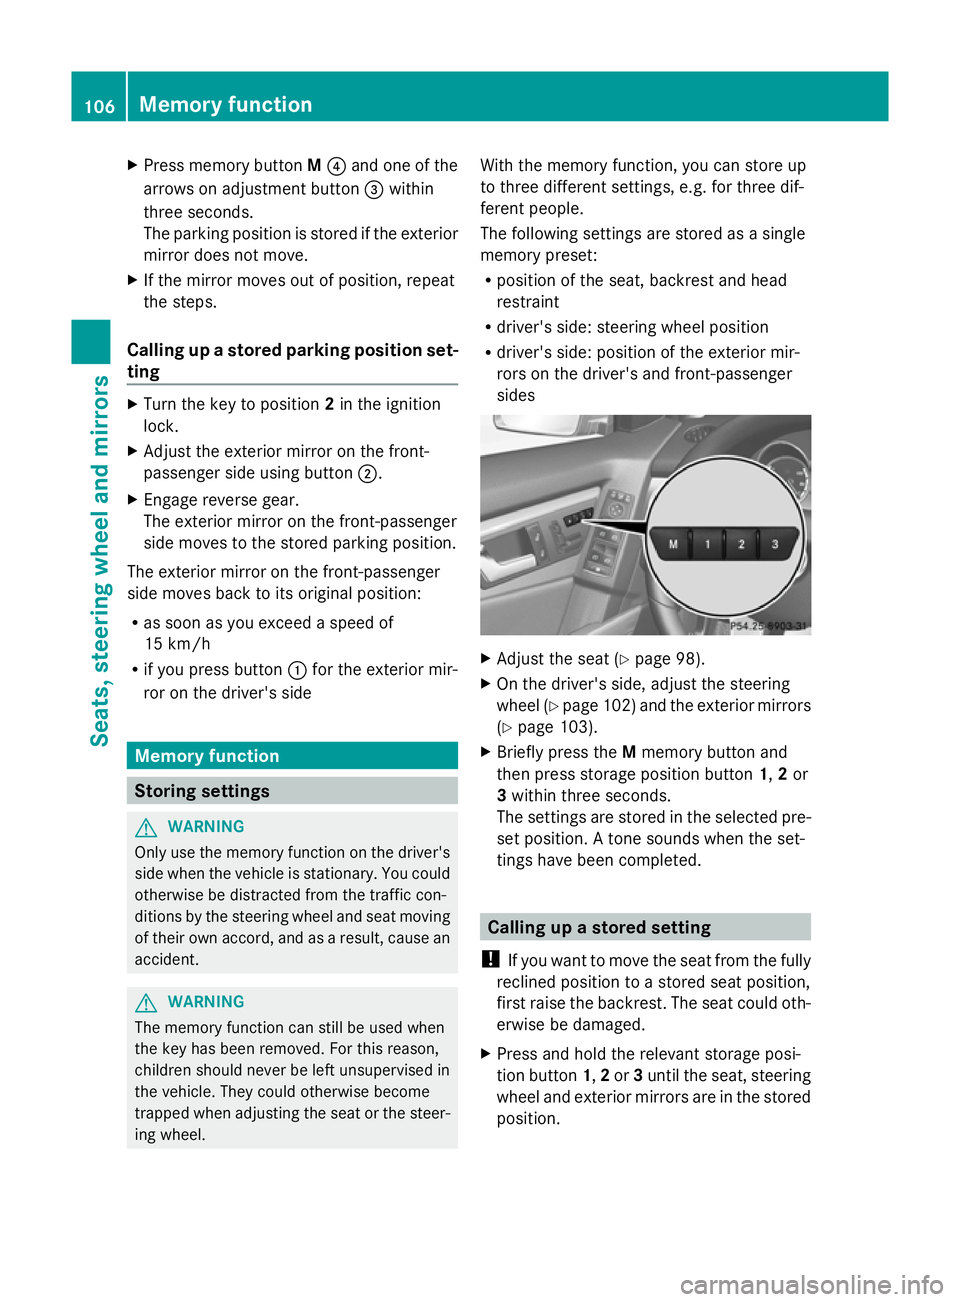
ing wheel. With the memory function, you can store up
to three different settings, e.g. for three dif-
ferent people.
The following settings are stored as a single
memory preset:
R position of the seat, backrest and head
restraint
R driver's side: steering wheel position
R driver's side: position of the exterior mir-
rors on the driver's and front-passenger
sides X
Adjust the seat (Y page 98).
X On the driver's side, adjust the steering
wheel (Y page 102) and the exterior mirrors
(Y page 103).
X Briefly press the Mmemory button and
then press storage position button 1,2or
3 within three seconds.
The settings are stored in the selected pre-
set position. A tone sounds when the set-
tings have been completed. Calling up a stored setting
! If you want to move the seat from the fully
reclined position to a stored seat position,
first raise the backrest. The seat could oth-
erwise be damaged.
X Press and hold the relevant storage posi-
tion button 1,2or 3until the seat, steering
wheel and exterior mirrors are in the stored
position. 106
Memory functionSeats, steering wheel and mirrors
Page 117 of 381
Hazard warning lamps
The hazard warning lamps automatically
switch on if:
R an airbag is deployed.
R the vehicle decelerates rapidly from a
speed of more than 70 km/h and comes to
a standstill.
X To switch on the hazard warning lamps:
press button :.
All turn signals flash. If you now switch on
a turn signal using the combination switch,
only the turn signal lamp on the corre-
sponding side of the vehicle will flash.
X To switch off the hazard warning
lamps: press button :.
The hazard warning lamps switch off auto-
matically if the vehicle reaches a speed of
over 10 km/h again after a full brake appli-
cation.
i The hazard warning lamps still operate if
the ignition is switched off. Headlamp cleaning system
The headlamps are cleaned automatically if
the "Wipe with washer fluid" function is oper-
ated five times while the lights are on and the
engine is running (Y page 122). When you
switch off the ignition, the automatic head-
lamp cleaning system is reset and counting is
resumed from 0. Intelligent Light System
General notes The Intelligent Light System is a system that
adjusts the headlamps automatically to suit
the prevailing driving and weather conditions.
It offers advanced functions for improved illu-
mination of the road surface, e.g. depending
on the vehicle speed or weather conditions.
The system includes the active light function,
cornering light function, motorway mode and
extended range foglamps. The system is only
active when it is dark.
You can activate or deactivate the "Intelligent
Light System" using the on-board computer
(Y
page 240).
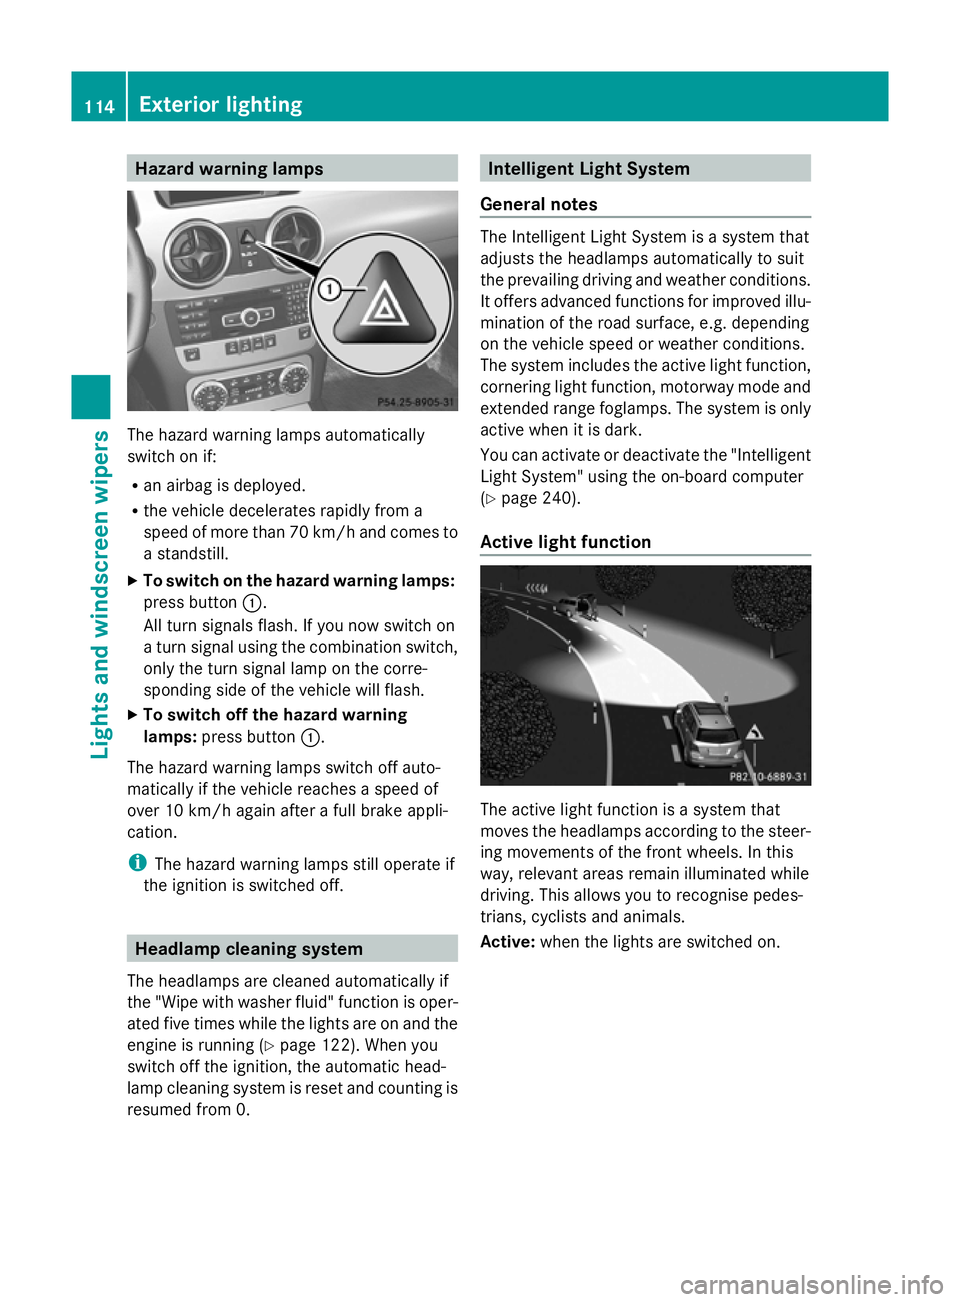
Active light function The active light function is a system that
moves the headlamps according to the steer-
ing movements of the front wheels. In this
way, relevant areas remain illuminated while
driving. This allows you to recognise pedes-
trians, cyclists and animals.
Active: when the lights are switched on. 114
Exterior lightingLights and windscreen wipers