2012 MERCEDES-BENZ GLK SUV reset
[x] Cancel search: resetPage 315 of 381

Useful information
i This Owner's Manual describes all mod-
els, series and optional equipment for your
vehicle that were available at the time of
going to press. National variations are pos-
sible. Note that your vehicle may not be
equipped with all of the functions descri-
bed. This is also the case for systems and
functions relevant to safety.
i Read the information on qualified special-
ist workshops: (Y page 27). Service
ASSYST PLUS
Service messages The ASSYST PLUS service interval display
informs you of the next service due date.
Information on the type of service and service
intervals (see separate Service Booklet).
You can obtain further information from a
Mercedes-Benz Service Centre.
i The ASSYST PLUS service interval display
does not show any information on the
engine oil level. Observe the notes on the
engine oil level (Y page 315).
The multifunction display shows a service
message for a few seconds, e.g.:
Next service A in .. days
Next service A in .. days
Service A due Service A due
Service A overdue by ... days Service A overdue by ... days
The letter indicates which service is due. A A
stands for a minor service and B
Bfor a major
service. A number or another letter may be
displayed after the letter. This figure indicates
any necessary additional maintenance work
to be performed.
If you notify a qualified specialist workshop of
this display, you will receive a statement on
the associated costs.
The ASSYST PLUS service interval display
does not take into account any periods of time during which the battery is disconnec-
ted.
Maintaining the time-dependent service
schedule:
X
Note down the service due date displayed
in the multifunction display before discon-
necting the battery.
or
X After reconnecting the battery, subtract
the battery disconnection periods from the
service date shown on the display.
Hiding a service message X
4-button multifunction steering wheel:
press the Cbutton.
X 12-button multifunction steering
wheel: press%ora.
Displaying service messages X
Switch the ignition on.
4-button multifunction steering wheel
X Use the Vbutton to select the
Service menu.
The service due date appears in the multi-
function display.
12-button multifunction steering wheel
X Press the toru button to select the
Serv.
Serv. menu.
X Press the sorr button to select the
ASSYST PLUS ASSYST PLUS submenu and confirm by
pressing the abutton.
The service due date appears in the multi-
function display.
Information about Service Resetting the ASSYST PLUS service inter-
val display
! If the ASSYST PLUS service interval dis-
play has been inadvertently reset, this set-
ting can be corrected at a qualified special-
ist workshop. 312
ServiceMaintenance and care
Page 316 of 381

Have service work carried out as described
in the Service Booklet. This may otherwise
lead to increased wear and damage to the
major assemblies or the vehicle.
A qualified specialist workshop, e.g. a
Mercedes-Benz Service Centre, will reset the
ASSYST PLUS service interval display after
the service work has been carried out. You
can also obtain further information on main-
tenance work, for example.
Special service requirements
Arduous operating conditions or increased
loads on the vehicle will require some service
work to be performed more often than for a
vehicle in normal use. Such arduous condi-
tions include regular city driving with frequent
intermediate stops and use in mountainous
terrain or on poor road surfaces.
For example, if the vehicle is used under ardu-
ous operating conditions, have air filters,
engine oil and oil filters changed frequently
and check the wheels often. Further informa-
tion can be obtained at a qualified specialist
workshop, e.g. a Mercedes-Benz Service
Centre.
Driving abroad
An extensive Mercedes-Benz Service network
is also available in other countries. The
Service Hotline's current telephone numbers
for use when you are abroad are to be found
in the "Mercedes-Benz Service24h" section
of the Service Booklet. AdBlue
®
service display
i For BlueTEC vehicles only.
To function properly, BlueTEC exhaust gas
aftertreatment must be operated with the
reducing agent AdBlue ®
. AdBlue ®
is topped
up as part of the service. Under normal oper-
ating conditions, a full tank of AdBlue ®
should
last until the next service due date.
Depending on how and where the vehicle is
used, there may be an increase in the AdBlue
®
consumption, resulting in the next
service due date being brought forward.
Certain display messages show that
AdBlue ®
must be topped up, e.g.
Refill AdBlue at workshop See Own‐
Refill AdBlue at workshop See Own‐
er's Manual er's Manual
Refill AdBlue at workshop No start Refill AdBlue at workshop No start
in .. km in .. km
A warning tone also sounds.
You can no longer start the engine when the
AdBlue ®
supply has been used up.
R 4-button multifunction steering wheel
(Y page 266)
R 12-button multifunction steering wheel
(Y page 269)
! Have the AdBlue ®
tank topped up at a
qualified specialist workshop only. The
vehicle may otherwise be damaged or
soiled.
Before taking a trip with your vehicle outside
Europe, have the AdBlue ®
supply checked at
a qualified specialist workshop. If necessary,
have AdBlue ®
topped up. Before a longer stay
outside of Europe, consult a qualified special-
ist workshop.
Observe the notes on AdBlue ®
(Y page 368).
You can obtain further information about
BlueTEC exhaust gas aftertreatment and
AdBlue ®
from any Mercedes-Benz Service
Centre. Engine compartment
Bonnet
Opening the bonnet G
WARNING
Do not pull the release lever while the vehicle
is in motion. If you do so, the bonnet may open
up and block your view. Engine compartment
313Maintenance and care Z
Page 342 of 381

!
You should have all work involving the
battery carried out at a qualified specialist
workshop. In the exceptional case that it is
necessary for you to disconnect the battery
yourself, make sure that:
R you switch off the engine and remove the
key. On vehicles with KEYLESS-GO,
ensure that the ignition is switched off.
Check that all the indicator lamps in the
instrument cluster are off. Otherwise,
electronic components, such as the
alternator, may be damaged.
R you first remove the negative terminal
clamp and then the positive terminal
clamp. Never swap the terminal clamps.
Otherwise, the vehicle's electronic sys-
tem may be damaged.
R in vehicles with automatic transmission,
the transmission is locked in position P
after disconnecting the battery. The vehi-
cle is secured against rolling away. You
can then no longer move the vehicle.
The battery and the cover of the positive
terminal clamp must be fitted securely dur-
ing operation.
In order for the battery to achieve the maxi-
mum possible service life, it must always be
sufficiently charged.
Have the battery charge checked more fre-
quently if you use the vehicle mainly for short
trips or if you leave it standing idle for a
lengthy period. Consult a qualified specialist
workshop if you wish to leave your vehicle
parked up for a long period of time.
Like other batteries, the vehicle battery may
discharge over time if you do not use the
vehicle. In such cases, have the battery dis-
connected at a qualified specialist workshop.
You can also charge the battery with a
charger recommended by Mercedes-Benz.
For more information, please contact a quali-
fied specialist workshop.
i When you park the vehicle, remove the
key if you do not require any electrical con-
sumers. The vehicle will then use very little
energy, thus conserving battery power. i
If the power supply has been interrupted,
e.g. if the battery was discharged, you will
have to:
R set the clock; see the separate operating
instructions.
For vehicles with Audio 20 and a 4-button
multifunction steering wheel, see "Date/
Time" (Y page 227).
R reset the panorama sliding sunroof
(Y page 93).
R reset the function for automatically fold-
ing the exterior mirrors in/out by folding
the mirrors out once (Y page 104). Charging the battery
G
WARNING
Only charge the battery in a well-ventilated
area. As the battery is being charged, gases
can escape and generate minor explosions.
This could injure you and other persons or
cause damage to the paintwork or acid cor-
rosion on the vehicle.
You can obtain information on battery charg-
ers which allow the battery to be charged
while still installed from a qualified specialist
workshop. G
WARNING
There is a risk of acid burns during the charg-
ing process due to the gases which escape
from the battery. Do not lean over the battery
during the charging process. G
WARNING
Battery acid is caustic. Avoid contact with the
skin, eyes or clothing.
! Only charge the installed battery with a
battery charger which has been tested and
approved by Mercedes-Benz. These battery
chargers allow the battery to be charged
while still installed in the vehicle.
! Only use battery chargers with a maxi-
mum charging voltage of 14.8 V. Battery (vehicle)
339Breakdown assistance Z
Page 347 of 381

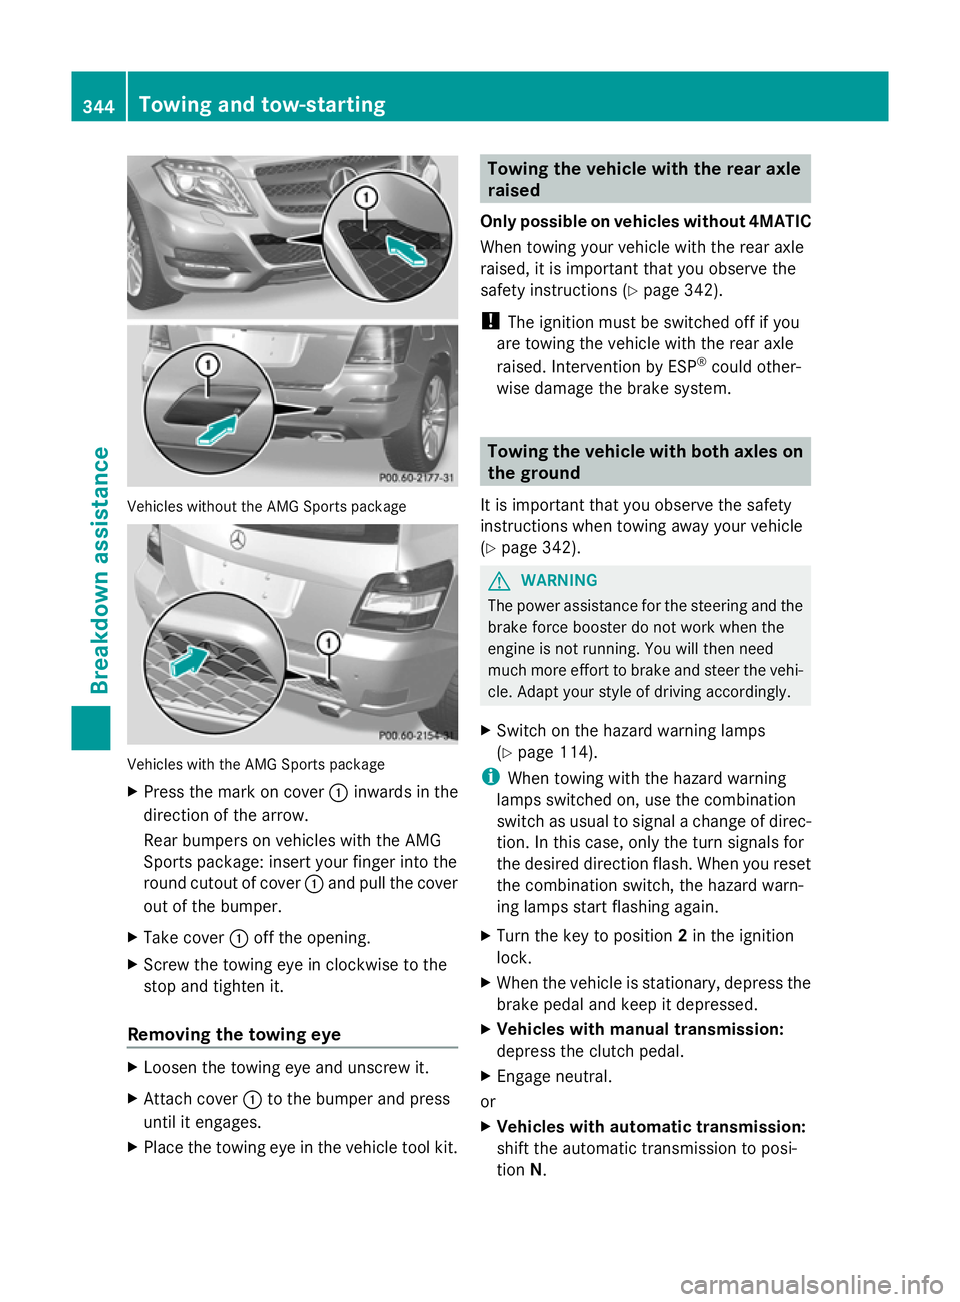
Vehicles without the AMG Sports package
Vehicles with the AMG Sports package
X
Press the mark on cover :inwards in the
direction of the arrow.
Rear bumpers on vehicles with the AMG
Sports package: insert your finger into the
round cutout of cover :and pull the cover
out of the bumper.
X Take cover :off the opening.
X Screw the towing eye in clockwise to the
stop and tighten it.
Removing the towing eye X
Loosen the towing eye and unscrew it.
X Attach cover :to the bumper and press
until it engages.
X Place the towing eye in the vehicle tool kit. Towing the vehicle with the rear axle
raised
Only possible on vehicles without 4MATIC
When towing your vehicle with the rear axle
raised, it is important that you observe the
safety instructions (Y page 342).
! The ignition must be switched off if you
are towing the vehicle with the rear axle
raised. Intervention by ESP ®
could other-
wise damage the brake system. Towing the vehicle with both axles on
the ground
It is important that you observe the safety
instructions when towing away your vehicle
(Y page 342). G
WARNING
The power assistance for the steering and the
brake force booster do not work when the
engine is not running. You will then need
much more effort to brake and steer the vehi-
cle. Adapt your style of driving accordingly.
X Switch on the hazard warning lamps
(Y page 114).
i When towing with the hazard warning
lamps switched on, use the combination
switch as usual to signal a change of direc-
tion. In this case, only the turn signals for
the desired direction flash. When you reset
the combination switch, the hazard warn-
ing lamps start flashing again.
X Turn the key to position 2in the ignition
lock.
X When the vehicle is stationary, depress the
brake pedal and keep it depressed.
X Vehicles with manual transmission:
depress the clutch pedal.
X Engage neutral.
or
X Vehicles with automatic transmission:
shift the automatic transmission to posi-
tion N. 344
Towing and tow-startingBreakdown assistance