2012 MERCEDES-BENZ GLK SUV spare wheel
[x] Cancel search: spare wheelPage 11 of 381

Setting the air vents
......................141
Setting the climate mode .............. .132
Setting the temperature ................132
Switching air-recirculation mode
on/off ............................................ 135
Switching on/off ........................... 131
Switching residual heat on/off ......136
Switching the rear window heat-
ing on/off ...................................... 135
Switching the ZONE function on/
off .................................................. 134
THERMATIC automatic climate
control (2-zone) ............................. 129
THERMOTRONIC (3-zone) auto-
matic climate control .....................130
Clock
Setting (4-button multifunction
steering wheel) .............................. 227
Coat hooks ......................................... 303
Cockpit Overview .......................................... 30
see Instrument cluster
Collapsible emergency spare
wheel
see Emergency spare wheel
COMAND Online
see separate operating instructions
Combination switch ..........................113
Constant headlamp mode see Daytime driving lights
Consumption statistics
On-board computer (12-button
multifunction steering wheel) ........230
On-board computer (4-button
multifunction steering wheel) ........226
Convenience closing feature ..............90
Convenience opening/closing (air-
recirculation mode) ........................... 136
Convenience opening feature ............90
Coolant (engine) Checking the level .........................316
Display message (12-button mul-
tifunction steering wheel) ..............267
Display message (4-button multi-
function steering wheel) ................264
Important safety notes ..................371
Temperature gauge (12-button
multifunction steering wheel) ........227 Temperature gauge (4-button
multifunction steering wheel)
........224
Warning lamp ................................. 292
Cooling
see Climate control
Cornering lamps
Changing bulbs .............................. 121
Cornering light function
Display message (12-button mul-
tifunction steering wheel) ..............260
Display message (4-button multi-
function steering wheel) ................257
Function/notes ............................. 115
Crash-responsive emergency light-
ing ....................................................... 118
Cruise control Cruise control lever .......................174
Deactivating ................................... 175
Display message (12-button mul-
tifunction steering wheel) ..............275
Display message (4-button multi-
function steering wheel) ................270
Driving system ............................... 173
Important safety notes ..................173
LIM indicator lamp .........................174
Selecting ........................................ 174
Setting a speed .............................. 175
Storing and maintaining current
speed ............................................ .174
Cup holder
Centre console .............................. 305
Important safety notes ..................305
Rear compartment .........................305 D
Dashboard lighting see Instrument cluster lighting
Data
see Technical data
Date
Setting (4-button multifunction
steering wheel) .............................. 227
Daytime driving lamps
Switching on/off (on-board com-
puter, 12-button multifunction
steering wheel) .............................. 2398
Index
Page 14 of 381

E
EASY-ENTRY feature Activating/deactivating (12-but-
ton multifunction steering wheel) ..243
Function/notes ............................. 102
EASY-EXIT feature
Activating/deactivating (12-but-
ton multifunction steering wheel) ..243
Crash-responsive ........................... 103
Function/notes ............................. 102
EBD (electronic brake force distri-
bution)
Display message (12 button mul-
tifunction steering wheel) ..............253
Function/notes ................................ 69
EBD (Electronic Brake-force Distri-
bution)
Display message (4-button multi-
function steering wheel) ................248
ECO display
Function/notes ............................. 166
On-board computer (12-button
multifunction steering wheel) ........231
ECO start/stop function
Deactivating/activating .................150
General information .......................150
Electrical fuses
see Fuses
Electronic Stability Program
see ESP ®
(Electronic Stability Program)
Electronic Traction System
see ETS/4ETS (Electronic Trac-
tion System)
Emergency key
Unlocking the driver's door ..............84
Emergency key element
Function/notes ................................ 78
Locking vehicle ................................ 84
Emergency release
Driver's door .................................... 84
Emergency spare wheel
Inflating the collapsible spare
wheel ............................................. 336
Notes/data .................................... 359
Storage location ............................ 328
Stowing .......................................... 328 Emergency unlocking
Tailgate ............................................ 88
Vehicle ............................................. 84
Engine
ECO start/stop function ................150
Engine number ............................... 365
Jump-starting ................................. 341
Running irregularl y......................... 153
Starting problems ..........................153
Starting the engine with the key ....148
Starting with KEYLESS GO .............149
Stopping ........................................ 164
Tow-starting (vehicle) ..................... 345
Warning lamp (engine diagnos-
tics) ............................................... 291
Engine electronics
Notes ............................................. 363
Problem (fault) ............................... 153
Engine oil
Additives ........................................ 370
Checking the oil level ..................... 315
Checking the oil level using the
dipstick .......................................... 315
Display message (12-button mul-
tifunction steering wheel) ..............268
Display message (4-button multi-
function steering wheel) ................265
Filling capacity ............................... 370
Notes about oil grades ................... 369
Notes on oil level/consumption ....315
Topping up ..................................... 316
Viscosity ........................................ 370
Environmental protection
Returning an end-of-life vehicle .......25
ESP ®
(Electronic Stability Pro-
gram) Deactivating/activating ...................68
Display message (12-button mul-
tifunction steering wheel) ..............252
Display message (4-button multi-
function steering wheel) ................247
ETS/4ETS ........................................ 68
Function/notes ................................ 67
Important safety guidelines .............67
Trailer stabilisatio n.......................... 69
Warning lamp ................................. 288
ETS/4ETS (Electronic Traction Sys-
tem) ...................................................... 68 Index
11
Page 15 of 381
Exhaust tail pipe (cleaning instruc-
tions) .................................................. 321
Exterior lighting Settings options ............................ .110
see Lights
Exterior mirrors
Adjusting ....................................... 103
Anti-dazzle mode (automatic) ........105
Folding in/out (automatically). ......104
Folding in/out (electrically). ..........104
Folding in (12-button multifunc-
tion steering wheel) .......................244
Out of position (troubleshooting) ...104
Parking position ............................. 105
Resetting ....................................... 104
Storing settings (memory func-
tion) ............................................... 106F
Fault message see Display messages
Filler cap
see Fuel filler flap
Fire extinguisher ............................... 326
First-aid kit ......................................... 326
Flat tyre Changing a wheel/fitting the
spare wheel ................................... 332
Preparing the vehicle .....................329
Raising the vehicle .........................333
TIREFIT kit ...................................... 329
see Emergency spare wheel
Floormat ............................................ .310
Foglamps Extended range .............................. 115
Switching on/off ........................... 112
Folding the rear bench seat for-
wards/back ....................................... 298
Fording Off-road ......................................... 169
On flooded roads ........................... 168
Frequencies
Mobile phone ................................. 363
Two-way radio ................................ 363
Front foglamp
Display message (12-button mul-
tifunction steering wheel) ..............262Front foglamps
Display message (4-button multi-
function steering wheel) ................259
Fuel
Additives ........................................ 366
Consumption information ..............368
Displaying the range (12-button
multifunction steering wheel) ........231
Displaying the range (4-button
multifunction steering wheel) ........226
Grade (petrol) ................................ 366
Important safety notes ..................365
Problem (malfunction) ...................163
Quality (diesel )............................... 367
Refuelling ...................................... .161
Tank content/reserve fuel .............366
Tank content display (12-button
multifunction steering wheel) ..........33
Tank content display (4-button
multifunction steering wheel) ..........31
Fuel consumption
Current (12-button multifunction
steering wheel) .............................. 231
Fuel filler flap
Opening/closing ............................ 162
Fuel filter
Display message (12-button mul-
tifunction steering wheel) ..............269
Display message (4-button multi-
function steering wheel) ................266
Fuel reserve
Display message (12-button mul-
tifunction steering wheel) ..............268
Display message (4-button multi-
function steering wheel) ................265
see Fuel
Fuel tank
Capacity ........................................ 366
Problem (malfunction) ...................163
Fuse allocation chart (vehicle tool
kit) ...................................................... 327
Fuses Allocation chart ............................. 346
Before changing ............................. 346
Dashboard fuse box .......................347
Fuse box in the engine compart-
ment .............................................. 34712
Index
Page 23 of 381
Side lamps
Changing bulbs .............................. 120
Switching on/off ........................... 112
Side windows
Convenience closing ........................90
Convenience opening ......................90
Important safety notes ....................88
Opening/closing .............................. 89
Problem (malfunction) .....................91
resetting .......................................... 91
Sliding sunroof
see Panorama sliding sunroof
Snow chains ...................................... 353
Socket Centre console .............................. 308
Luggage compartment ...................308
Rear compartment .........................308
Sockets
General notes ................................ 307
Spare wheel
Storage location ............................ 328
Storing ........................................... 328
Specialist workshop ............................ 27
Speed, controlling see Cruise control
Speed Limit Assist
Activating/deactivating the warn-
ing function ................................... .236
Displaying ...................................... 236
Display message (12-button mul-
tifunction steering wheel) ..............271
Display message in the multifunc-
tion displa y.................................... 203
Important safety notes ..................202
Speedometer
Activating/deactivating the addi-
tional speedometer ........................239
Digital ............................................ 231
In the instrument cluster (12-but-
ton multifunction steering wheel) ....33
In the instrument cluster (4-but-
ton multifunction steering wheel) ....31
Segments ...................................... 228
Selecting the unit of measure-
ment .............................................. 238
see Instrument cluster SPEEDTRONIC
Deactivating variable .....................177
Display message (12-button mul-
tifunction steering wheel) ..............275
Display message (4-button multi-
function steering wheel) ................270
Function/notes ............................. 176
Important safety notes ..................176
LIM indicator lamp .........................176
Permanent ..................................... 178
Selecting ........................................ 176
Variabl e......................................... 176
SRS (Supplemental Restraint Sys-
tem)
Display message (12-button mul-
tifunction steering wheel) ..............256
Display message (4-button multi-
function steering wheel) ................250
Introduction ..................................... 43
Warning lamp ................................. 291
Warning lamp (function) ................... 43
Starting (engine) ................................ 148
Steering Display message (12-button mul-
tifunction steering wheel) ..............281
Display message (4-button multi-
function steering wheel) ................279
Steering wheel
Adjusting (electrically) ...................102
Adjusting (manually). .....................102
Buttons (12-button multifunction
steering wheel) .............................. 228
Buttons (4-button multifunction
steering wheel) .............................. 225
Cleaning ......................................... 322
Gearshift paddles ........................... 159
Important safety notes ..................101
Storing settings (memory func-
tion) ............................................... 106
Steering wheel gearshift paddles ....159
Stowage areas ................................... 296
Stowage compartments Armrest (under) ............................. 297
Centre console .............................. 297
Cup holder ..................................... 305
Glove compartment .......................297
Important safety information .........296 20
Index
Page 196 of 381
procedure is calculated, e. g. overhanging
loads, tail sections or loading ramps of goods
vehicles. In some circumstances, Active Park-
ing Assist may therefore guide you into the
parking space too early. This may lead to a
collision. For this reason, you should avoid
using Active Parking Assist in such situations. G
WARNING
The front of the vehicle will veer out in the
direction of the oncoming traffic during the
parking operation. In some cases the vehicle
will also take you onto sections of the oncom-
ing lane during the parking procedure.
You are responsible for safety at all times and
must pay attention to any road users
approaching or passing. Stop the vehicle if
necessary or cancel the Active Parking Assist
parking procedure. G
WARNING
Make sure that no persons or animals are in
the manoeuvring range. Otherwise, they
could be injured.
Use Active Parking Assist for parking spaces:
R that are parallel to the direction of travel
R that are on straight roads, not bends
R that are on the same level as the road, e.g.
not on the pavement
Parking tips:
R on narrow roads, drive as closely as possi-
ble past the parking space.
R parking spaces that are littered, overgrown
or partially occupied by trailer drawbars
might be identified incorrectly or not at all.
R snowfall or heavy rain may lead to a parking
space being measured inaccurately.
R pay attention to the PARKTRONIC
(Y page 189 )warning messages during the
parking procedure.
R at any time, you can intervene in the steer-
ing procedure to correct it. Active Parking
Assist will then be cancelled. R
when transporting a load which protrudes
from your vehicle, you should not use
Active Parking Assist.
R when snow chains or an emergency spare
wheel are fitted, you should not use Active
Parking Assist here either.
R make sure that the tyre pressures are
always correct. This has a direct influence
on the parking characteristics of the vehi-
cle.
R the way your vehicle is positioned in the
parking space after parking is dependent
on various factors. These include the posi-
tion and shape of the vehicles parked in
front and behind it and the conditions of the
location. It may be the case that Active
Parking Assist guides you too far into a
parking space, or not far enough into it. In
some cases, it may also lead you across or
onto the kerb. If necessary, you should can-
cel the parking procedure with Active Park-
ing Assist.
R you can also engage forward gear prema-
turely. The vehicle redirects and does not
drive as far into the parking space. Should
a gear be changed too early to achieve a
sensible parking position, the parking pro-
cedure will be cancelled.
! If unavoidable, you should drive over
obstacles such as kerbs slowly and not at
a sharp angle. Otherwise, you may damage
the wheels or tyres.
Detecting parking spaces Active Parking Assist is switched on automat-
ically when driving forwards. The system is
operational at speeds of up to approximately
35 km/h. While in operation, the system inde-
pendently locates and measures parking
spaces on both sides of the vehicle. When
driving at speeds below 30 km/h, you will see
parking symbol as a status indicator in the
instrument cluster. Active Parking Assist only
displays parking spaces on the front-
passenger side as standard. Parking spaces
on the driver's side are displayed as soon as Driving systems
193Driving and parking Z
Page 306 of 381
Detaching and storing the safety net
X
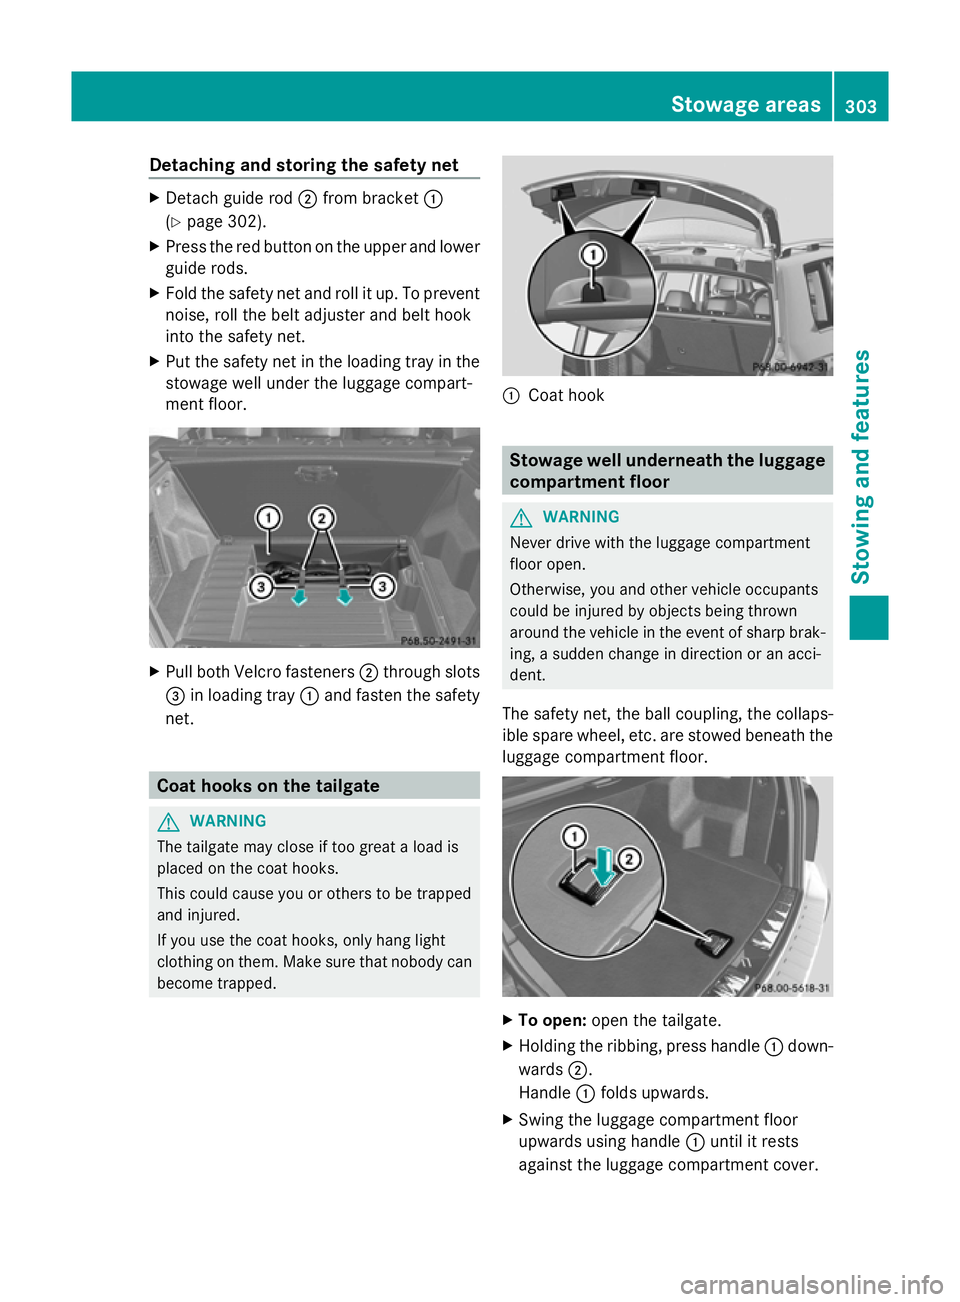
Detach guide rod ;from bracket :
(Y page 302).
X Press the red button on the upper and lower
guide rods.
X Fold the safety net and roll it up. To prevent
noise, roll the belt adjuster and belt hook
into the safety net.
X Put the safety net in the loading tray in the
stowage well under the luggage compart-
ment floor. X
Pull both Velcro fasteners ;through slots
= in loading tray :and fasten the safety
net. Coat hooks on the tailgate
G
WARNING
The tailgate may close if too great a load is
placed on the coat hooks.
This could cause you or others to be trapped
and injured.
If you use the coat hooks, only hang light
clothing on them. Make sure that nobody can
become trapped. :
Coat hook Stowage well underneath the luggage
compartment floor
G
WARNING
Never drive with the luggage compartment
floor open.
Otherwise, you and other vehicle occupants
could be injured by objects being thrown
around the vehicle in the event of sharp brak-
ing, a sudden change in direction or an acci-
dent.
The safety net, the ball coupling, the collaps-
ible spare wheel, etc. are stowed beneath the
luggage compartment floor. X
To open: open the tailgate.
X Holding the ribbing, press handle :down-
wards ;.
Handle :folds upwards.
X Swing the luggage compartment floor
upwards using handle :until it rests
against the luggage compartment cover. Stowage areas
303Stowing and fea tures Z
Page 331 of 381
X
Vehicles with a collapsible emergency
spare wheel: lift up the luggage compart-
ment floor ( Ypage 303).
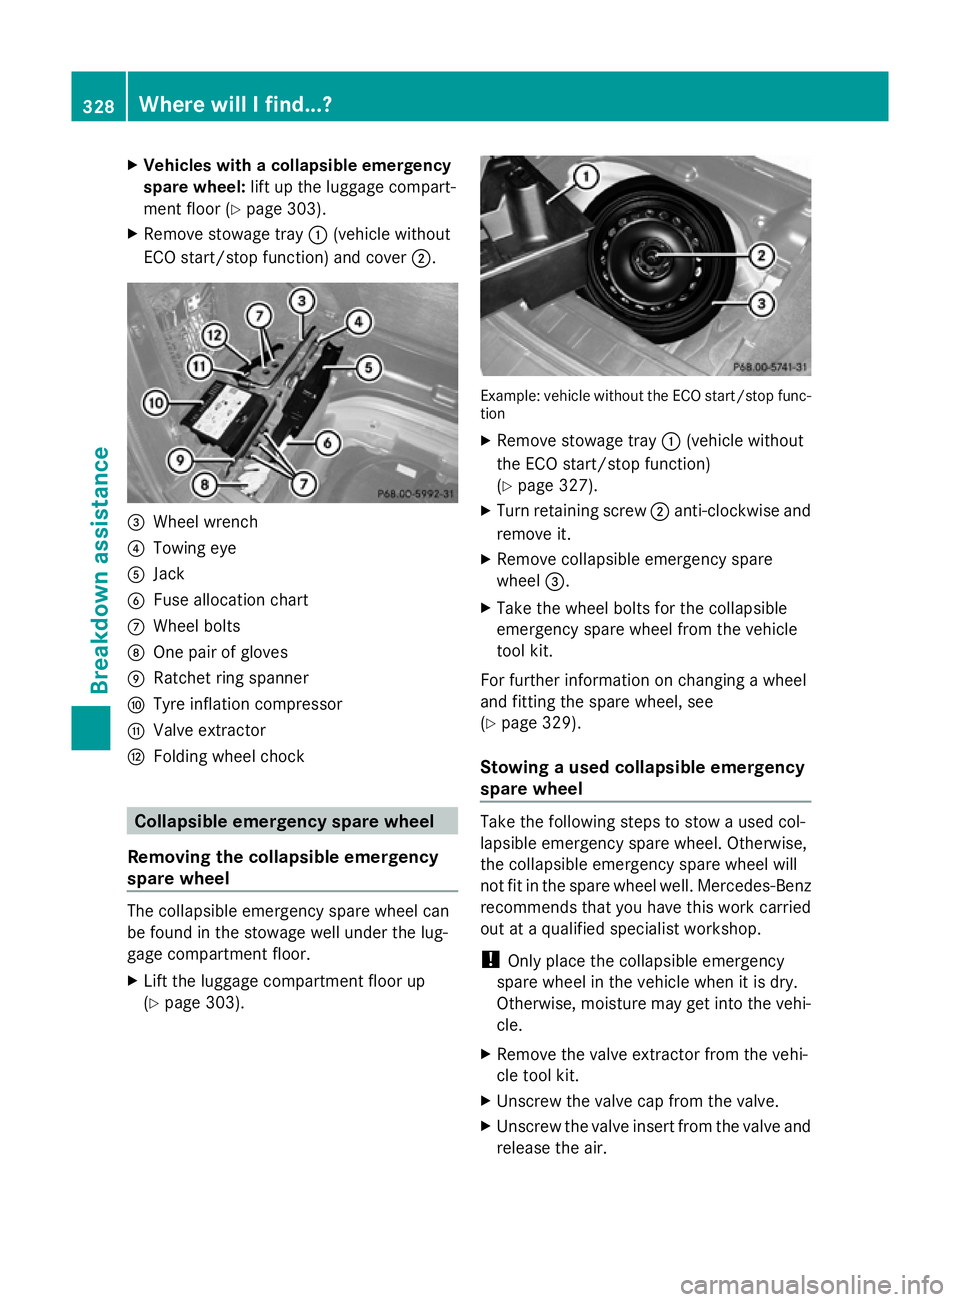
X Remove stowage tray :(vehicle without
ECO start/stop function) and cover ;.=
Wheel wrench
? Towing eye
A Jack
B Fuse allocation chart
C Wheel bolts
D One pair of gloves
E Ratchet ring spanner
F Tyre inflation compressor
G Valve extractor
H Folding wheel chock Collapsible emergency spare wheel
Removing the collapsible emergency
spare wheel The collapsible emergency spare wheel can
be found in the stowage well under the lug-
gage compartment floor.
X Lift the luggage compartment floor up
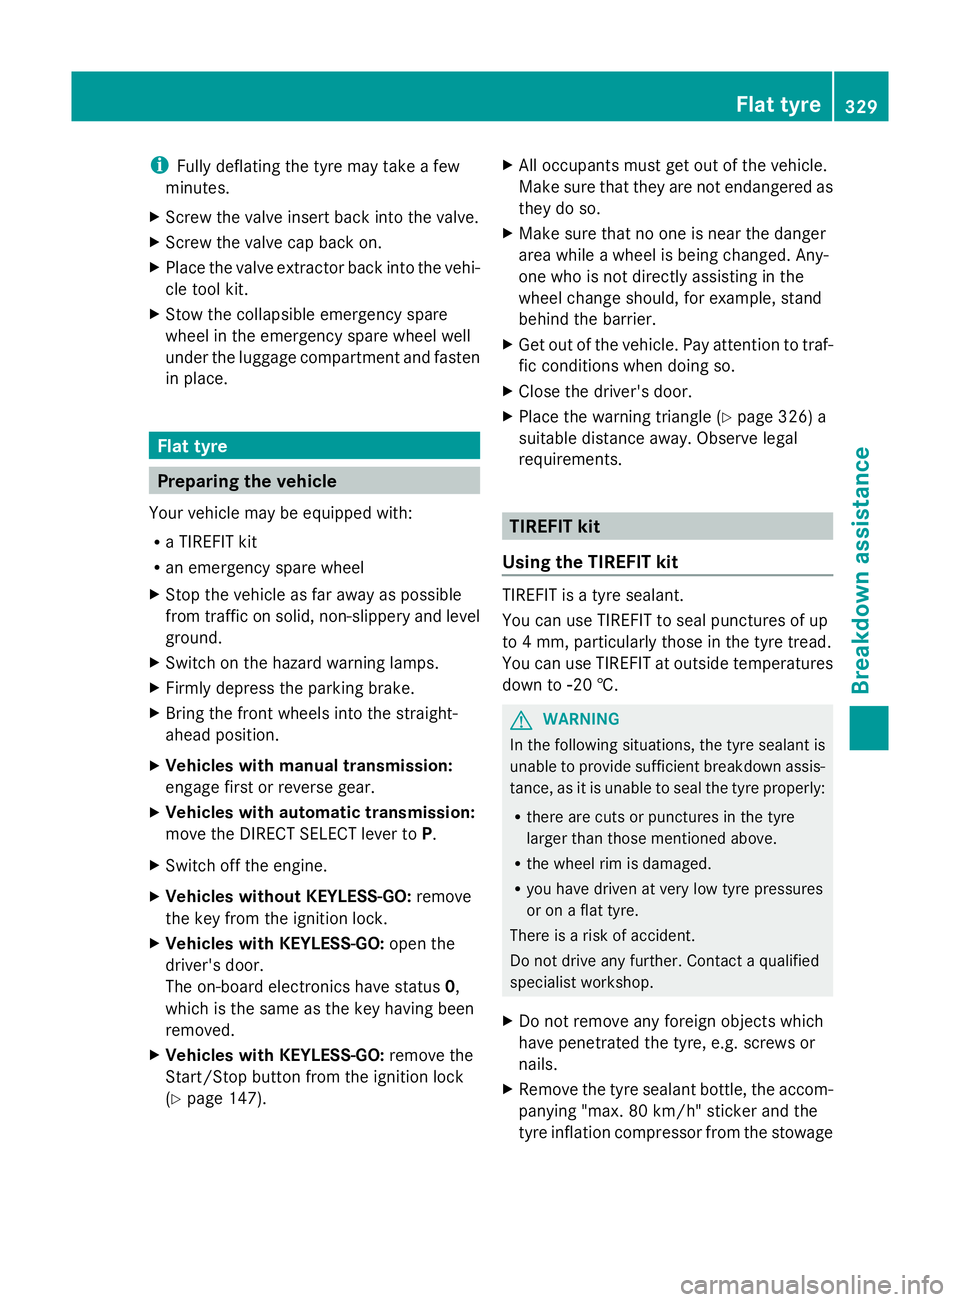
(Y page 303). Example: vehicle without the ECO start/stop func-
tion
X
Remove stowage tray :(vehicle without
the ECO start/stop function)
(Y page 327).
X Turn retaining screw ;anti-clockwise and
remove it.
X Remove collapsible emergency spare
wheel =.
X Take the wheel bolts for the collapsible
emergency spare wheel from the vehicle
tool kit.
For further information on changing a wheel
and fitting the spare wheel, see
(Y page 329).
Stowing a used collapsible emergency
spare wheel Take the following steps to stow a used col-
lapsible emergency spare wheel. Otherwise,
the collapsible emergency spare wheel will
not fit in the spare wheel well. Mercedes-Benz
recommends that you have this work carried
out at a qualified specialist workshop.
!
Only place the collapsible emergency
spare wheel in the vehicle when it is dry.
Otherwise, moisture may get into the vehi-
cle.
X Remove the valve extractor from the vehi-
cle tool kit.
X Unscrew the valve cap from the valve.
X Unscrew the valve insert from the valve and
release the air. 328
Where will I find...?Breakdown assistance
Page 332 of 381
i
Fully deflating the tyre may take a few
minutes.
X Screw the valve insert back into the valve.
X Screw the valve cap back on.
X Place the valve extractor back into the vehi-
cle tool kit.
X Stow the collapsible emergency spare
wheel in the emergency spare wheel well
under the luggage compartment and fasten
in place. Flat tyre
Preparing the vehicle
Your vehicle may be equipped with:
R a TIREFIT kit
R an emergency spare wheel
X Stop the vehicle as far away as possible
from traffic on solid, non-slippery and level
ground.
X Switch on the hazard warning lamps.
X Firmly depress the parking brake.
X Bring the front wheels into the straight-
ahead position.
X Vehicles with manual transmission:
engage first or reverse gear.
X Vehicles with automatic transmission:
move the DIRECT SELECT lever to P.
X Switch off the engine.
X Vehicles without KEYLESS-GO: remove
the key from the ignition lock.
X Vehicles with KEYLESS-GO: open the
driver's door.
The on-board electronics have status 0,
which is the same as the key having been
removed.
X Vehicles with KEYLESS-GO: remove the
Start/Stop button from the ignition lock
(Y page 147). X
All occupants must get out of the vehicle.
Make sure that they are not endangered as
they do so.
X Make sure that no one is near the danger
area while a wheel is being changed. Any-
one who is not directly assisting in the
wheel change should, for example, stand
behind the barrier.
X Get out of the vehicle. Pay attention to traf-
fic conditions when doing so.
X Close the driver's door.
X Place the warning triangle (Y page 326) a
suitable distance away. Observe legal
requirements. TIREFIT kit
Using the TIREFIT kit TIREFIT is a tyre sealant.
You can use TIREFIT to seal punctures of up
to 4 mm, particularly those in the tyre tread.
You can use TIREFIT at outside temperatures
down to Ò20 †. G
WARNING
In the following situations, the tyre sealant is
unable to provide sufficient breakdown assis-
tance, as it is unable to seal the tyre properly:
R there are cuts or punctures in the tyre
larger than those mentioned above.
R the wheel rim is damaged.
R you have driven at very low tyre pressures
or on a flat tyre.
There is a risk of accident.
Do not drive any further. Contact a qualified
specialist workshop.
X Do not remove any foreign objects which
have penetrated the tyre, e.g. screws or
nails.
X Remove the tyre sealant bottle, the accom-
panying "max. 80 km/h" sticker and the
tyre inflation compressor from the stowage Flat tyre
329Breakdown assistance Z