Page 230 of 357

X
Press the %button on the steering
wheel.
X Press ato confirm Yes .
The RACETIMER is interrupted if you stop the
vehicle and turn the key to position
1(Y page 143) in the ignition lock. If you turn
the key to position 2or 3(Y page 143) and
then press ato confirm Start , timing is
continued.
Resetting the current lap
X Stop the RACETIMER (Y page 226).
X Press =or; to select Reset Lap .
X Press ato reset the lap time to "0".
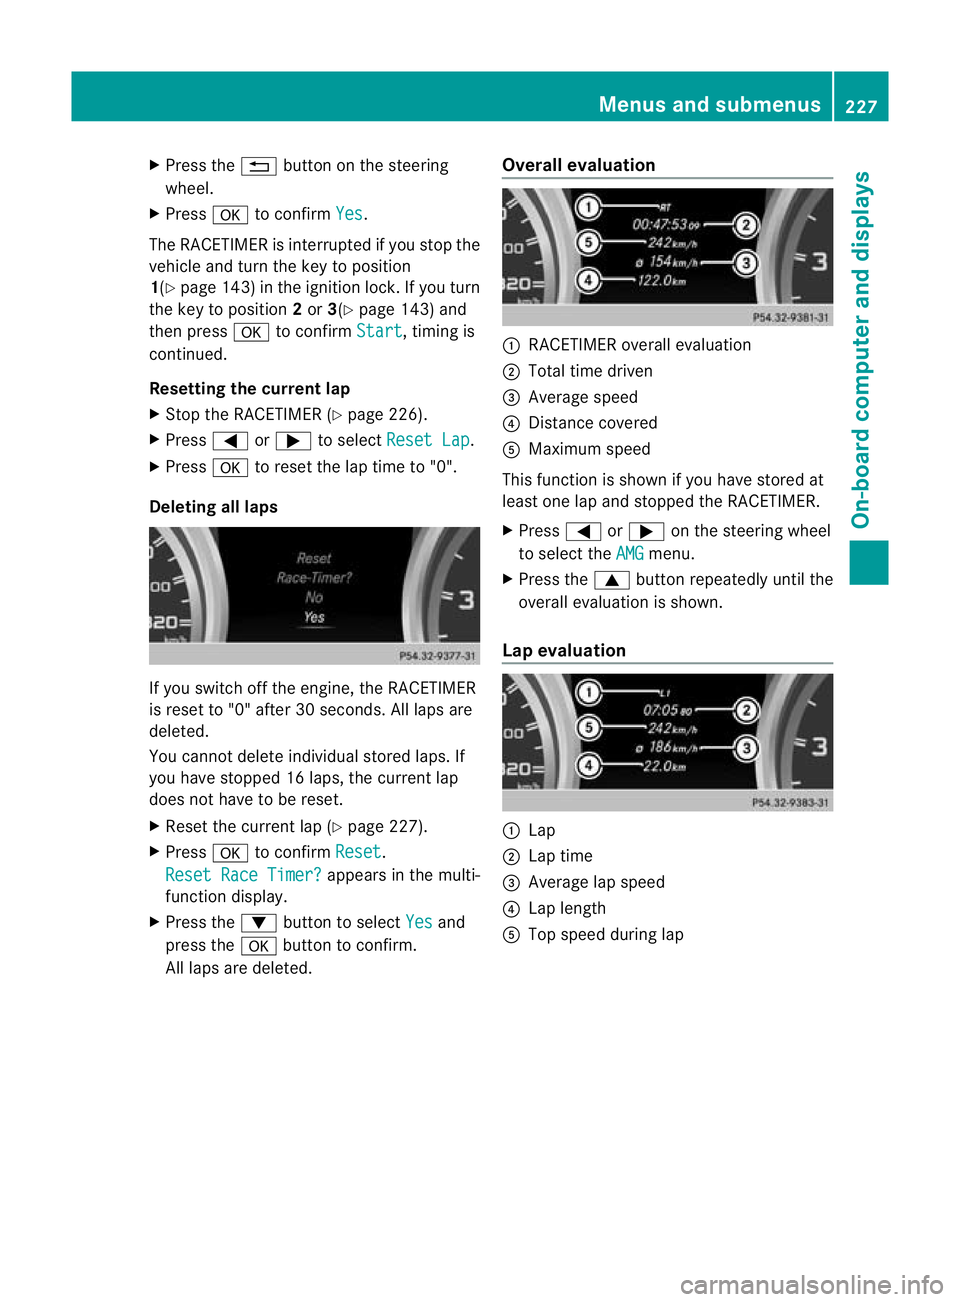
Deleting all laps If you switch off the engine, the RACETIMER
is reset to "0" after 30 seconds. All laps are
deleted.
You cannot delete individual stored laps. If
you have stopped 16 laps, the curren tlap
does no thave to be reset.
X Reset the curren tlap (Y page 227).
X Press ato confirm Reset .
Reset Race Timer? appears in the multi-
function display.
X Press the :button to select Yes and
press the abutton to confirm.
All laps are deleted. Overall evaluation :
RACETIMER overall evaluation
; Total time driven
= Average speed
? Distance covered
A Maximum speed
This function is shown if you have stored at
least one lap and stopped th eRACETIMER.
X Press =or; on the steering wheel
to select the AMG menu.
X Press the 9button repeatedly until the
overall evaluation is shown.
Lap evaluation :
Lap
; Lap time
= Average lap speed
? Lap length
A Top speed during lap Menus and submenus
227On-board computer and displays Z
Page 314 of 357

In order for the battery to achieve the maxi-
mum possible service life, it must always be
sufficiently charged.
Comply with safety precautions and take pro-
tective measures when handling batteries. WARNING
Avoid the creation of sparks and
heat.
Avoid fire, naked flames and smok-
ing. Creation of sparks.
Battery acid is caustic.
Avoid contact with the skin, eyes
or clothing.
Wear eye protection.
Keep childre
naway. Observe this Owner's Manual.
The vehicle battery, like other batteries, can
discharge over time if you do not use the
vehicle. In such cases, have the battery dis-
connected at a qualified specialist workshop.
You can also charge the battery with a
charger recommended by Mercedes-Benz.
For more information, please contac taquali-
fied specialist workshop.
Explosive gases are created during charging
and jump-starting.
For safety reasons, Mercedes-Benz recom-
mends that you only use batteries which have
been tested and approved for your vehicle by
Mercedes-Benz .These batteries provide
increased impact protection to prevent vehi-
cle occupants from suffering acid burns
should the battery be damaged in the event
of an accident.
Have the battery charge checked more fre-
quently if you use the vehicle mainly for short trips or if you leave it standing idle for a
lengthy period. Consult a qualified specialist
workshop if you wish to leave your vehicle
parked up for a long period of time.
i
When you park the vehicle, remove the
key if you do not require any electrical con-
sumers. The vehicle will then use very little
energy, thus conserving battery power.
i If the power supply has been interrupted,
e.g. due to a discharged battery, you will
have to:
R set the clock. Information on setting the
clock can be found in the separate oper-
ating instructions.
On vehicles with COMAND Online and a
navigation system, the clock is set auto-
matically.
R reset the head restraints on the front
seats (Y page 93).
R reset the function for folding the exterior
mirrors in/out automatically, by folding
the mirrors out once (Y page 100). Charging the battery
G
WARNING
During charging and jump-starting, explosive
gases can escape from the battery. There is a
risk of an explosion.
Particularly avoid fire, naked flames, creating
sparks and smoking. Ensure there is sufficient
ventilation while charging and jump-starting.
Do not lean over a battery. G
WARNING
Battery acid is caustic. There is a risk of injury.
Avoid contact with the skin, eyes or clothing.
Do not inhale any battery gases. Do not lean
over the battery. Keep children away from
batteries. Wash battery acid immediately with
water and seek medical attention. Battery (vehicle)
311Breakdown assistance Z
Page 320 of 357

Towing the vehicle with both axles on
the ground
It is important tha tyou observe the safety
instructions when towing away your vehicle
(Y page 315).
X Switch on the hazard warning lamps
(Y page 109).
i In order to signal a change of direction
when towing the vehicle with the hazard
warning lamps switched on, use the com-
bination switch as usual.Int his case, only
the turn signals for the desired direction
flash. When you reset the combination
switch, the hazard warning lamps start
flashing again.
X Turn the key to position 2in the ignition
lock (Y page 143).
X When the vehicle is stationary, depress the
brake pedal and keep it depressed.
X Shift the transfer case to neu-
tral(Y page 203).
X Shift the automatic transmission to posi-
tion N.
X Release the brake pedal.
X Release the parking brake (Y page 164).
i The transmission can only change gear
when the battery has sufficient charge.
If you cannot move the selector lever to N,
you must remove the propeller shafts to the
driven axles. Transporting the vehicle
! Only lash the vehicle down by the wheels
or wheel rims, not by parts of the vehicle
such as axle or steering components. Oth-
erwise, the vehicle could be damaged.
Use the towing eyes to pull the vehicle if it
needs to be transported on a trailer or trans-
porter (Y page 316).
X Apply the parking brake.
X Turn the key to position 2in the ignition
lock (Y page 143). X
Move the selector lever to N.
X Shift the transfer case to neu-
tral(Y page 203).
X Secure the towing cable to the towing eyes
(Y page 316).
X Make sure that the vehicle cannot roll
away.
X Release the parking brake.
X Load the vehicle onto the transporter.
As soon as the vehicle is loaded:
X Apply the parking brake.
X Shift the automatic transmission to posi-
tion P.
X Turn the key to position 0in the ignition
lock (Y page 143) and remove it.
X Secure the vehicle. Recovering
avehicle that has become
stuck
! When recovering a trapped vehicle, do not
jerk the vehicle or pull it at an angle. If the
tractive power is too high, the vehicles
could be damaged.
If the drive wheels get trapped on loose or
muddy ground, recover th evehicle with the
utmost care, especially so if the vehicle is
laden.
Never attempt to recover a vehicle with a
trailer attached.
Pull out the vehicle backwards, if possible,
using the tracks it made when it became
stuck. Towing in the event of malfunctions
General notes !
If you are removing the propeller shaft,
use M10 nuts as spacers on the M8 bolts
and secure them with M8 nuts.
New self-locking nuts must be used when
the propeller shafts are refitted. Towing and tow-starting
317Breakdown assistance Z
Page:
< prev 1-8 9-16 17-24