2012 MERCEDES-BENZ G-CLASS SUV audio
[x] Cancel search: audioPage 218 of 357
R
Service menu (Y
page 220)
R Settings menu (Y
page 221)
R AMG menu in AMG vehicles (Y
page 225)
The Audio ,
Navi and
Tel menus differ slightly
in vehicles with an audio system and in vehi-
cles with COMAND Online. The examples
given in this Owner's Manual apply to vehicles
equipped with COMAND Online. Trip menu
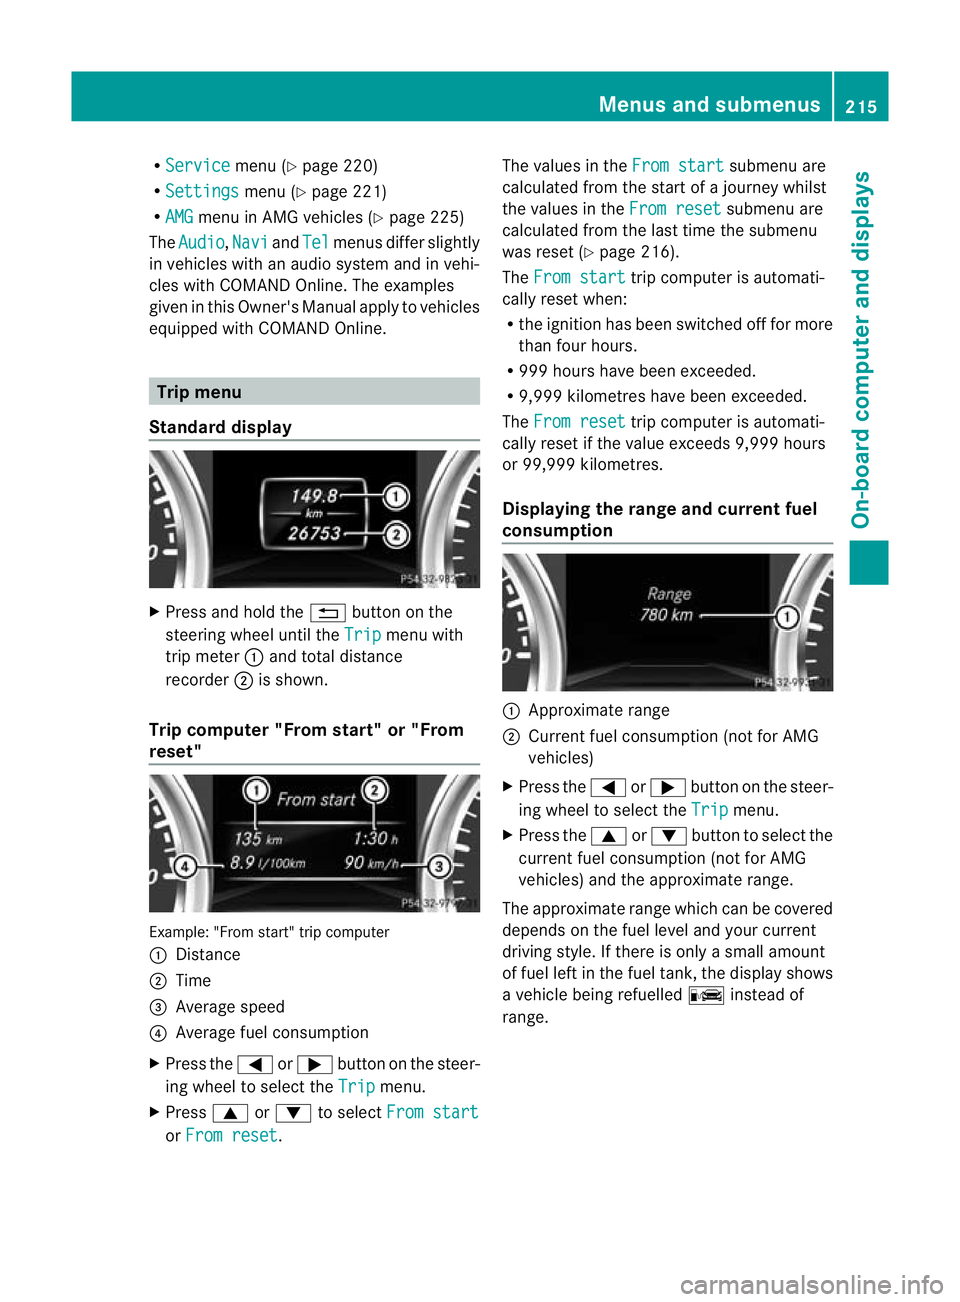
Standard display X
Press and hold the %button on the
steering wheel until the Trip menu with
trip meter :and total distance
recorder ;is shown.
Trip computer "From start" or "From
reset" Example: "From start" trip computer
:
Distance
; Time
= Average speed
? Average fuel consumption
X Press the =or; button on the steer-
ing wheel to select the Trip menu.
X Press 9or: to select From start or
From reset .The values in the
From start submenu are
calculated from the start of a journey whilst
the values in the From reset submenu are
calculated from the last time the submenu
was reset (Y page 216).
The From start trip computer is automati-
cally reset when:
R the ignition has been switched off for more
than four hours.
R 999 hours have been exceeded.
R 9,999 kilometres have been exceeded.
The From reset trip computer is automati-
cally reset if the value exceeds 9,999 hours
or 99,999 kilometres.
Displaying the range and current fuel
consumption :
Approximate range
; Current fuel consumption (not for AMG
vehicles)
X Press the =or; button on the steer-
ing wheel to select the Trip menu.
X Press the 9or: button to select the
current fuel consumption (not for AMG
vehicles) and the approximate range.
The approximate range which can be covered
depends on the fuel level and your current
driving style. If there is only a small amount
of fuel left in the fuel tank, the display shows
a vehicle being refuelled Cinstead of
range. Menus and submenus
215On-board computer and displays Z
Page 219 of 357
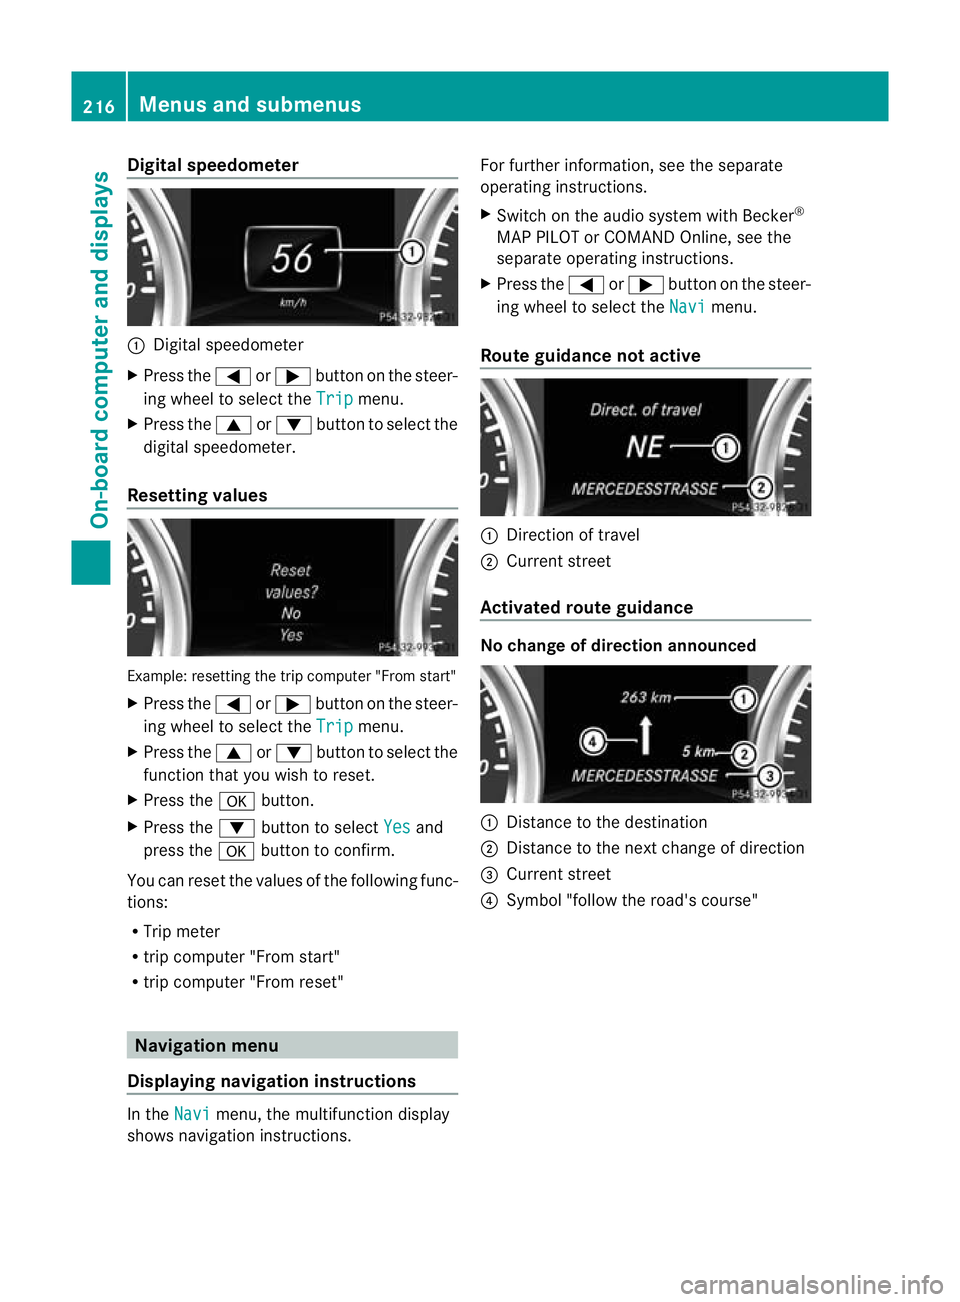
Digital speedometer
:
Digital speedometer
X Press the =or; buttononthe steer-
ing wheel to select the Trip menu.
X Press the 9or: button to select the
digital speedometer.
Resetting values Example: resetting the trip computer "From start"
X
Press the =or; button on the steer-
ing wheel to select the Trip menu.
X Press the 9or: button to select the
function that you wish to reset.
X Press the abutton.
X Press the :button to select Yes and
press the abutton to confirm.
You can reset the values of the following func-
tions:
R Trip meter
R trip computer "From start"
R trip computer "From reset" Navigation menu
Displaying navigation instructions In the
Navi menu, the multifunction display
shows navigation instructions. For further information, see the separate
operating instructions.
X
Switch on the audio system with Becker ®
MAP PILOT or COMAND Online, see the
separate operating instructions.
X Press the =or; button on the steer-
ing wheel to select the Navi menu.
Route guidance not active :
Direction of travel
; Current street
Activated route guidance No change of direction announced
:
Distance to the destination
; Distance to the next change of direction
= Current street
? Symbol "follow the road's course" 216
Menus and submenusOn-board computer and displays
Page 220 of 357
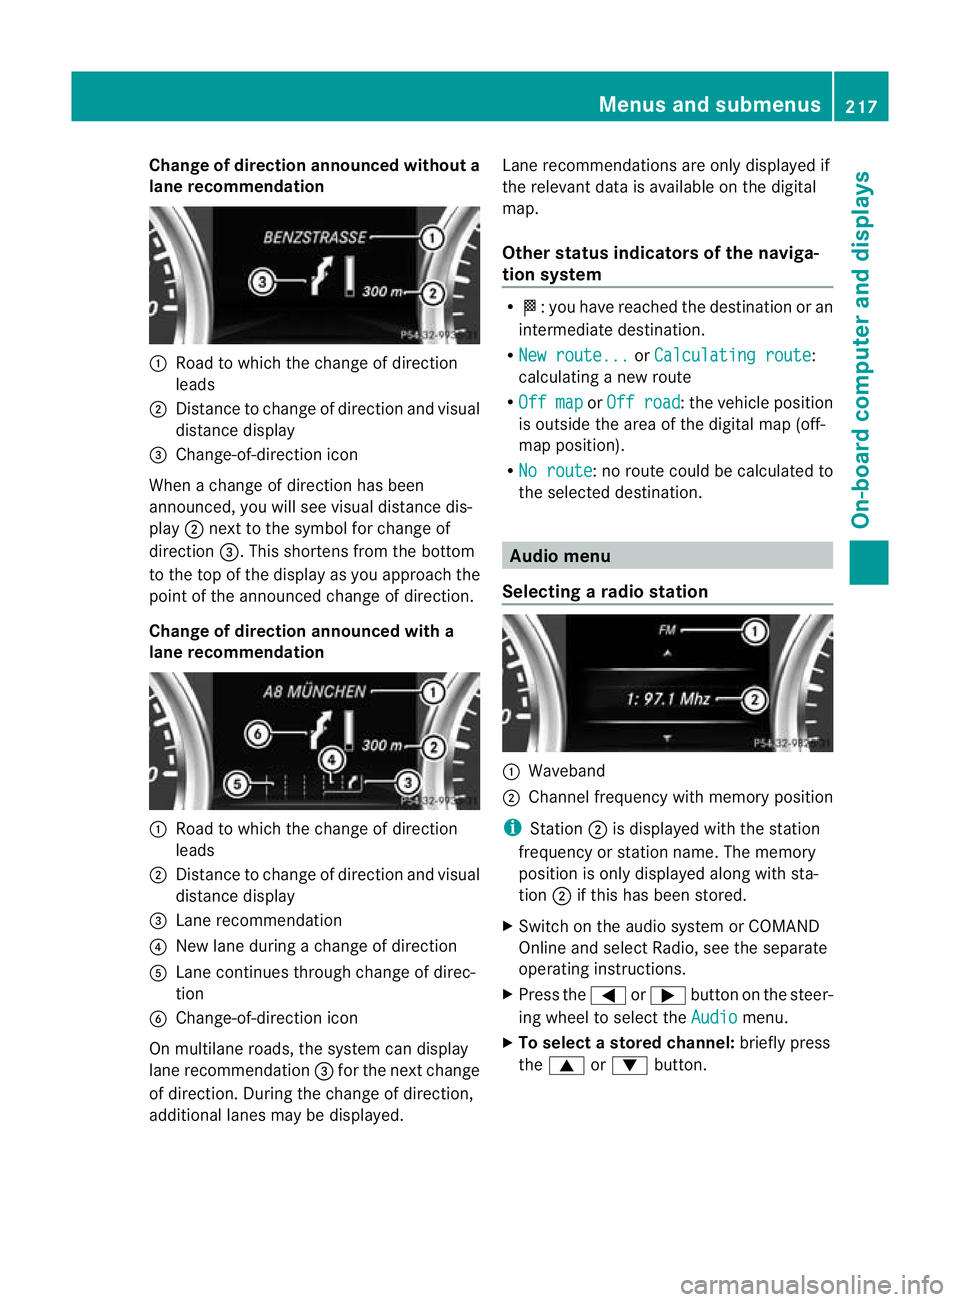
Change of direction announced without a
lane recommendation :
Road to which the change of direction
leads
; Distance to change of direction and visual
distance display
= Change-of-direction icon
When a change of direction has been
announced, you will see visual distance dis-
play ;next to the symbol for change of
direction =.This shortens from the bottom
to the top of the display as you approach the
point of the announced change of direction.
Change of direction announced with a
lane recommendation :
Road to which the change of direction
leads
; Distance to change of direction and visual
distance display
= Lane recommendation
? New lane during a change of direction
A Lane continues through change of direc-
tion
B Change-of-direction icon
On multilane roads, the system can display
lane recommendation =for the next change
of direction. During the change of direction,
additional lanes may be displayed. Lane recommendations are only displayed if
the relevant data is available on the digital
map.
Other status indicators of the naviga-
tion system R
O:y ou have reached the destination or an
intermediate destination.
R New route... or
Calculating route :
calculating a new route
R Off map or
Off road :t
he vehicle position
is outside the area of the digital map (off-
map position).
R No route :n
o route could be calculated to
the selected destination. Audio menu
Selecting aradio station :
Waveband
; Channel frequency with memory position
i Station ;is displayed with the station
frequency or station name. The memory
position is only displayed along with sta-
tion ;if this has bee nstored.
X Switch on the audio syste morCOMAND
Online and select Radio, see the separate
operating instructions.
X Press the =or; button on the steer-
ing wheel to select the Audio menu.
X To select astore dchannel: briefly press
the 9 or: button. Menus and submenus
217On-board computer and displays Z
Page 221 of 357
X
To select a station from the station
list: press and briefly hold the 9
or : button.
If no statio nlist is received:
X To select astation using the station
search: press and briefly hold the 9
or : button.
i For informatio nonswitching wavebands
and storing stations, see the separate oper-
ating instructions.
i DABradio mode ( DigitalAudioBroadcast-
ing), see the separate operating instruc-
tions.
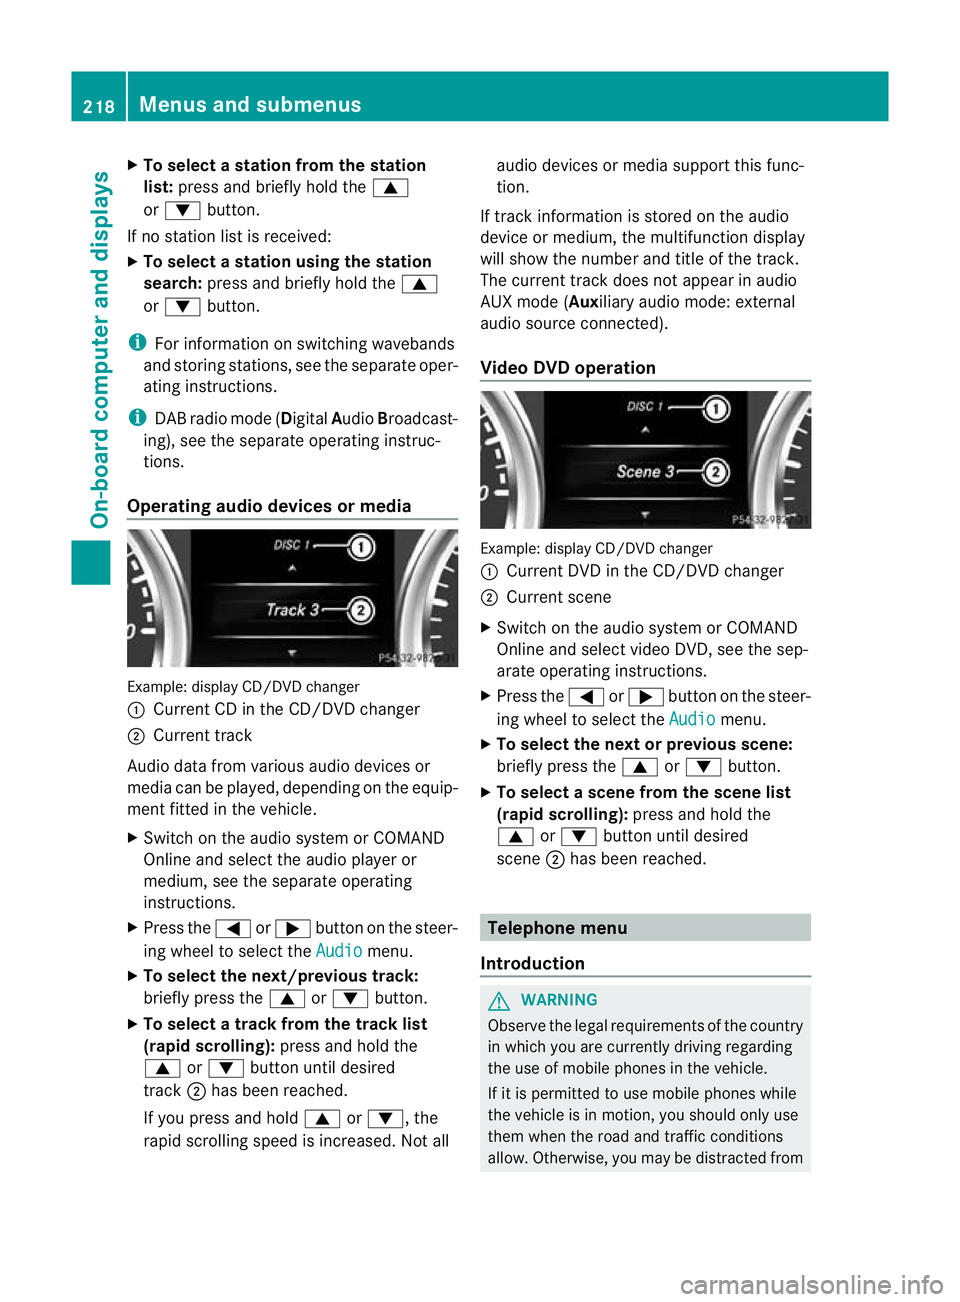
Operating audio devices or media Example
:display CD/DVD changer
: Current CD in the CD/DVD changer
; Current track
Audio data from various audio devices or
media can be played, depending on the equip-
ment fitted in the vehicle.
X Switch on the audio syste morCOMAND
Online and select the audio player or
medium, see the separate operating
instructions.
X Press the =or; button on the steer-
ing wheel to select the Audio menu.
X To select the next/previous track:
briefly press the 9or: button.
X To select a track from the track list
(rapid scrolling): press and hold the
9 or: button until desired
track ;has been reached.
If you press and hold 9or:, the
rapid scrolling speed is increased. Not all audio devices or media support this func-
tion.
If track information is stored on the audio
device or medium, the multifunction display
will show the number and title of the track.
The current track does not appearina udio
AUX mode (Aux iliary audio mode: external
audio source connected).
Video DVD operation Example: display CD/DV
Dchanger
: Current DVD in the CD/DVD changer
; Current scene
X Switch on the audio system or COMAND
Online and select video DVD, see the sep-
arate operating instructions.
X Press the =or; button on the steer-
ing wheel to select the Audio menu.
X To selectt he nextorprevious scene:
briefly press the 9or: button.
X To select ascene from the scene list
(rapid scrolling): press and hold the
9 or: buttonuntil desired
scene ;has been reached. Telephone menu
Introduction G
WARNING
Observe the legal requirements of the country
in which you are currently driving regarding
the use of mobile phones in the vehicle.
If it is permitted to use mobile phones while
the vehicle is in motion, you should only use
them when the road and traffic conditions
allow. Otherwise, you may be distracted from 218
Menus and submenusOn-board computer and displays
Page 222 of 357

the traffic conditions, cause an accident and
injure yourself and others.
X Switch on the mobile phone (see the sep-
arate operating instructions).
X Switch on the audio system or COMAND
Online, see the separate operating instruc-
tions.
X Insert the mobile phone into the bracket
(Y page 279).
or
X Establish a Bluetooth ®
connection to the
audio system or COMAND Online, see the
separate operating instructions.
X Press the =or; button on the steer-
ing wheel to select the Tel menu.
You will see one of the following display mes-
sages in the multifunctio ndisplay:
R Please enter PIN :t
he mobile phone has
been placed in the mobile phone bracket
and the PIN has not been entered.
When you enter your PIN via the mobile
phone, LINGUATRONIC, the audio system
or COMAND Online, the mobile phone
searches for a network.
R Telephone ready or the name of the net-
work provider: the mobile phone has found
a network and is ready to receive.
R Telephone No service : there is no net-
work available or the mobile phone is
searching for a network.
i You can obtain further information about
suitable mobile phones and connecting
mobile phones via Bluetooth ®
:
R in any Mercedes Benz Service Centre
R on the Internet at http://
www.mercedes-benz.com/connect Accepting
acall Example: incoming call
If someone calls you whe
nyou are in the
Tel menu, a display message appears in the
multifunction display.
X Press the 6button on the steering
wheel to accept an incoming call.
You can accept a call even if you are not in
the Tel menu.
Rejecting or ending acall X
Press the ~button on the steering
wheel.
You can end or reject a call even if you are not
in the Tel menu.
Dialling anumber from the phone book X
Press the =or; button on the steer-
ing wheel to select the Tel menu.
X Press the 9,:ora button to
switch to the phone book.
X Press the 9or: button to select the
desired name.
or
X To begin rapid scrolling: press and hold
the 9 or: button for longer than
one second.
Rapid scrolling stops whe nyou release the
button or reach the end of the list.
X If only one telephone number is stored
for a name: press the6ora button
to start dialling.
or
X If there is more than one number for a
particular name: press the6ora
button to display the numbers. Menus and submenus
219On-board computer and displays Z
Page 282 of 357
motion, you must only do so if the traffic sit-
uation permits. Otherwise, you could be dis-
tracted from the traffic conditions, cause an
accident and injure yourself and others.
Two-way radios and fax equipment used with-
out low-reflection exterior aerials can inter-
fere with the vehicle's electronics and thereby
jeopardise the operating safety of the vehicle
and yours afety. Therefore, you must only use
this equipment if it is correctly connected to
a separate reflection-free exterio raerial. G
WARNING
Excessive levels of electromagnetic radiation
may cause damage to your health and the
health of others. Using an exterior aerial takes
into account current scientific discussions
relating to the possible health risk posed by
electromagnetic fields.
Mercedes-Benz recommends the use of an
approved exterior aerial. This ensures:
R optimal mobile phone reception quality in
the vehicle
R mutual influences between the vehicle
electronics and mobile phones are mini-
mised
An exterior aerial has the following advan-
tages:
R it conducts the electromagnetic fields gen-
erated by a wireless device to the exterior.
R the field strength in the vehicle interior is
lower than in a vehicle that does not have
an exterior aerial.
i There are various mobile phone brackets
that may be fitted in your vehicle; in some
cases, these are country-specific. You can
obtain these mobile phone brackets from a
qualified specialist workshop.
The functions and services available when
you use the phone depend on your mobile
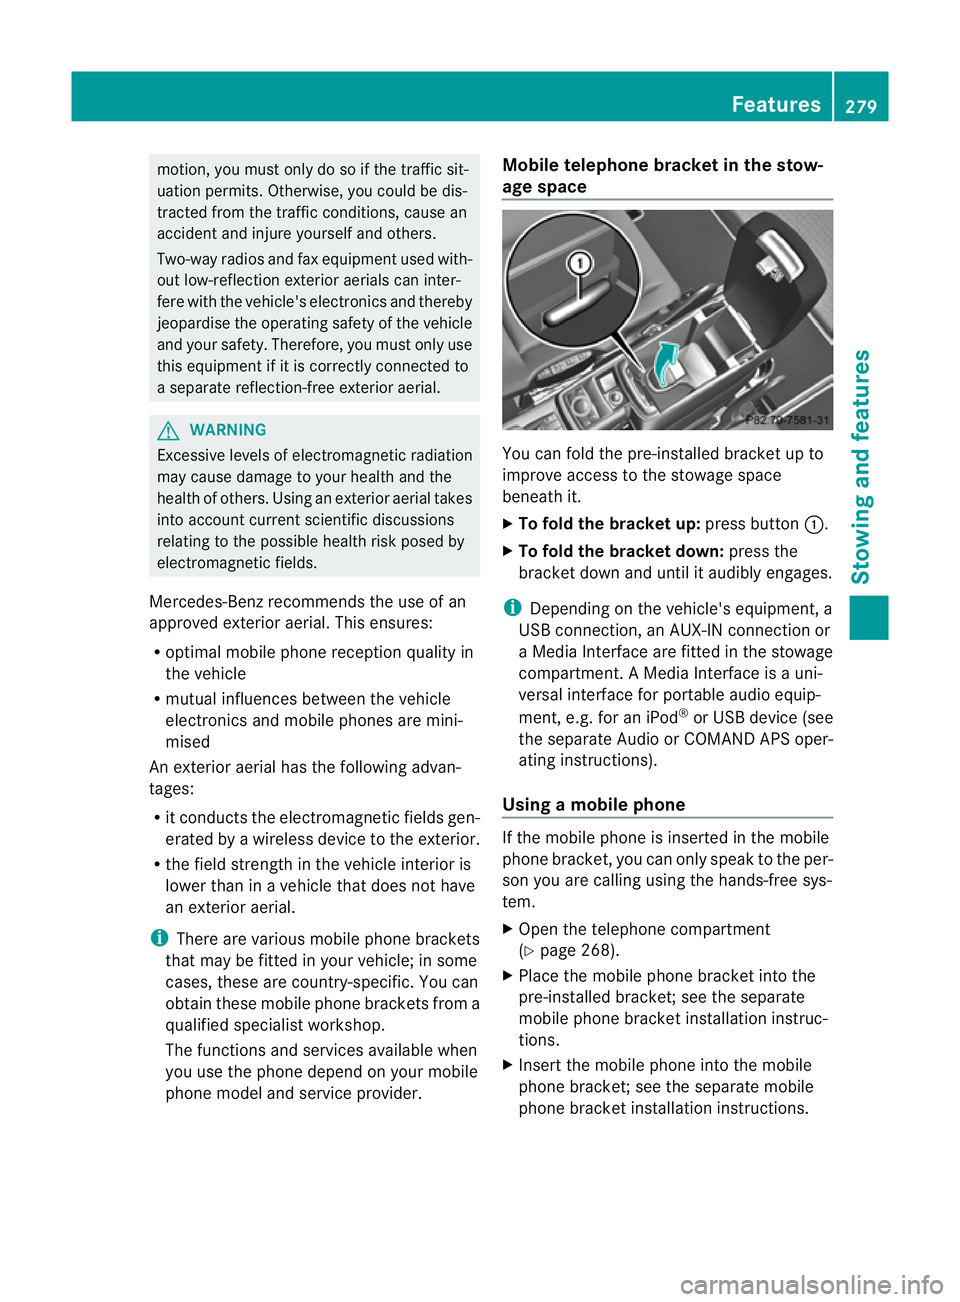
phone model and service provider. Mobile telephone bracket in the stow-
age space
You can fold the pre-installed bracket up to
improve access to the stowage space
beneath it.
X
To fold the bracket up: press button:.
X To fold the bracket down: press the
bracket down and until it audibly engages.
i Depending on the vehicle's equipment, a
USB connection, an AUX-IN connection or
a Media Interface are fitted in the stowage
compartment. A Media Interface is a uni-
versal interface for portable audio equip-
ment, e.g. for an iPod ®
or USB device (see
the separate Audio or COMAND APS oper-
ating instructions).
Using amobile phone If the mobile phone is inserted in the mobile
phone bracket, you can only speak to the per-
son you are calling using the hands-free sys-
tem.
X
Open the telephone compartment
(Y page 268).
X Place the mobile phone bracket into the
pre-installed bracket; see the separate
mobile phone bracket installation instruc-
tions.
X Inser tthe mobile phone into the mobile
phone bracket; see the separate mobile
phone bracket installation instructions. Features
279Stowing and features Z
Page 341 of 357

Useful information
i This Owner's Manual describes all mod-
els, series and optional equipment for your
vehicle that were available at the time of
going to press. Country-specific differen-
ces are possible. Note that your vehicle
may not be fitted with all features descri-
bed. This is also the case for systems and
functions relevant to safety.
i Read the information on qualified special-
ist workshops: (Y page 22). Information on technical data
You can find current technical data on the
Internet at:
http://www.mercedes-benz.com
i The technical data was determined in
accordance with EC directives. All data
applies to the vehicle's standard equip-
ment. The data may therefore differ for
vehicles with optional equipment .You can
obtain further information from a
Mercedes-Benz Service Centre. Genuine Mercedes-Benz parts
G
WARNING
Driving safety may be impaired if non-
approved parts, tyres and wheels or safety-
relevant accessories are used.
This could lead to malfunctions in safety-rel-
evant systems, e.g. the brake system. This
could cause you to lose control of your vehicle
and cause an accident.
For this reason, Mercedes-Benz recommends
that you use genuine Mercedes-Benz parts or
parts of equal quality. Only use tyres, wheels
and accessories that have been specifically
approved for your vehicle. H
Environmental note
Daimler AG also supplies reconditioned
assemblies and parts which are of the same
quality as new parts. For these, the same war-
ranty applies as for new parts.
! The use of non-approved parts could
affect your vehicle's operating safety.
Therefore, Mercedes-Benz recommends
genuine Mercedes-Benz parts and conver-
sion parts and accessories that have been
approved for your vehicle.
! Airbags and seat belt tensioners, as well
as control units and sensors for these
restraint systems, may be installed in the
following areas of your vehicle:
R doors
R door pillars
R door sills
R seats
R dashboard
R instrument cluster
R centre console
Do not install accessories such as audio
systems in these areas. Do not carry out
repairs or welding. You could impair the
operating efficiency of the restraint sys-
tems.
Have accessories retrofitted at a qualified
specialist workshop.
Mercedes-Benz tests genuine parts and con-
version parts and accessories that have been
specifically approved for your vehicle for their
reliability, safety and suitability. Despite
ongoing market research, Mercedes-Benz is
unable to assess other parts. Mercedes-Benz
accepts no responsibility for the use of parts
that have been independently or officially
approved.
In Germany, certain parts are only officially
approved for installation or modification if
they comply with legal requirements. This
also applies to some other countries. All gen-
uine Mercedes-Benz parts meet the approval
requirements. The use of non-approved parts 338
Genuine Mercedes-Benz partsTechnical data