2012 MERCEDES-BENZ G-CLASS SUV differential
[x] Cancel search: differentialPage 10 of 357

Switching the ZONE function on/
off
.................................................. 131
THERMATIC automatic climate
control (2-zone) ............................. 125
Cockpit
Overview .......................................... 26
see Instrument cluster
COMAND
see Separate operating instructions
Combination switch ..........................108
Constant headlamp mode see Daytime driving lights
Consumption statistics (on-board
computer) .......................................... 215
Convenience opening feature see Side windows
Coolan t(engine)
Checkin gthe level ......................... 293
Display message ............................ 237
Notes ............................................. 347
Temperature (on-board computer) .225
Temperature gauge ........................ 212
Warning lamp ................................. 260
Cooling
see Climate control
Cornering light function
Function/notes ............................. 110
Courtesy lights .................................. 114
Cruise control Cruise control leve r....................... 174
Display message ............................ 245
Driving system ............................... 173
Selecting ........................................ 175
Cup holder
Centre console .............................. 275
Important safety notes ..................275
Rea rcompartmen t......................... 275 D
Data see Technical data
Daytime driving lights
Display message ............................ 236
Switching on/off (on-board com-
puter) ............................................. 222
Switching on/off (switch) ..............105Delaye
dswitch-off
Exterio rlighting (on-board com-
puter )............................................. 222
Interior lighting .............................. 222
Diagnostics connection ......................22
Diesel ................................................. .343
Diesel particle filter ..........................164
Differential locks ............................... 204
Digital speedometer .........................216
Dipped-beam headlamp Switching on/off ........................... 105
Dipped-beam headlamps
Display message ............................ 234
Setting for driving abroad (sym-
metrical) ........................................ 104
Display (cleaning instructions) ........300
Display message ASSYST service interval display .....294
General information .......................228
Hiding (on-board computer) ...........228
Display messages
Calling up (on-board computer) .....228
Driving systems ............................. 241
Engine ............................................ 237
Key ................................................ 251
Lights ............................................ .234
Safety systems .............................. 229
Tyres .............................................. 245
Vehicle .......................................... .248
Distance display (on-board com-
puter) ................................................. .220
Distance warning signal (warning
lamp) .................................................. 262
DISTRONIC PLUS Activating ....................................... 184
Activatio ncondition s..................... 184
Cruise control leve r....................... 183
Deactivating ................................... 188
Display message ............................ 243
Displays in the multifunctio ndis-
play ................................................ 187
Drivin gtips .................................... 189
Function/notes ............................. 182
Important safety notes ..................182
Selecting ........................................ 183
Setting the specified minimum
distance ......................................... 188
Warning lamp ................................. 262 Index
7
Page 15 of 357

Limit speed
Variable SPEEDTRONI C................. 178
Loading guidelines ............................266
Locking Emergency locking ........................... 75
From the inside (central locking
button) ............................................. 73
see Centra llocking
Locking (doors)
Automatic ........................................ 74
Locking centrally
see Centra llocking
Locking verification signal (on-
board computer) ............................... 223
LOW RANGE off-road gear ................202
Luggage compartment cover Fitting/removing ........................... 272
Notes/function .............................. 271
Opening and closing ......................272
Overview ........................................ 271
Luggage compartment enlarge-
ment
Important safety notes ..................268
Overview ........................................ 268
Luggage net ....................................... 268
Lumbar support Adjusting the 4-way lumba rsup-
por t.................................................. 94
Luxury head restraint .........................92 M
M+S tyres ........................................... 324
Main-beam headlamps Display message ............................ 235
Switching on/off ........................... 109
Matt finish (cleaning instructions) ..297
Memory card (audio) .........................218
Memory function ............................... 102
Mercedes-Benz Service Centre see Qualified specialist workshop
Message memory (on-board com-
puter) ................................................. .228
Messages see Display messages Mirrors
Sun visor ........................................ 276
see Exterior mirrors
see Rear-view mirror
Mobile phone
Frequencies ................................... 339
Important notes ............................. 278
Installatio n..................................... 339
Menu (on-board computer) ............218
Notes/placing in the bracket ......... 279
Operating (on-board computer) .....280
Transmission output (maximum) .... 339
Mobile telephone
Pre-installe dbracket ...................... 279
MP3
Operating ...................................... .218
see Separate operating instructions
Multifunction display
Function/notes ............................. 214
Permanent displa y......................... 221
Multifunction steering wheel
Back button ................................... 214
Operating the on-board computer .213
Overview .......................................... 31 N
Navigation Menu (on-board computer) ............216
see separate operating instructions
NECK-PRO head restraints
Operation ........................................ .42
Resetting after being triggered ........43
Notes on running in anew vehicle ..142 O
Occupant safety Childre ninthe vehicle ..................... 48
Important safety notes ....................38
Odometer
see Total distance recorder
see Trip meter
Off-road
Differential locks ............................ 204
Off-road ABS .................................... 6112
Index
Page 65 of 357

light up continuously. The hazard warning
lamps switch off automatically if you travel
faster than 10 km/h
.You can also switch off
the hazard warning lamps using the hazard
warning switch button (Y page 109).ESP
®
(Electronic Stability Program)
Important safety notes i
Observe the "Important safety notes" sec-
tion (Y page 60). G
WARNING
If ESP ®
is malfunctioning, ESP ®
is unable to
stabilise the vehicle. In addition, other driving
safety systems are switched off. This increa-
ses the risk of skidding and an accident.
Drive on carefully. Have ESP ®
checked at a
qualified specialist workshop.
! Only operate the vehicle for a maximum
of ten seconds on a brake dynamometer.
Switch off the ignition.
Application of the brakes by ESP ®
may oth-
erwise destroy the brake system.
! A function or performance test should
only be carried out on atwin-axle dyna-
mometer. Before you operate the vehicle
on such a dynamometer, please consult a
qualified workshop .You could otherwise
damage the drive train or the brake system.
ESP ®
monitors driving stability and traction.
Traction is the transmission of power from the
tyres to the road surface.
ESP ®
is deactivated if the åwarning lamp
in the instrument cluster lights up continu-
ously when the engine is running.
If the ÷ warning lamp and the åwarn-
ing lamp are lit continuously, ESP ®
is not
available due to a malfunction.
Observe the information on warning lamps
(Y page 256) and any display messages that
appear in the instrument cluster
(Y page 229). If ESP
®
detects that the vehicle is deviating
from the direction desired by the driver, one
or more wheels are braked to stabilise the
vehicle. If necessary, the engine output is also
modified to keep the vehicle on the desired
course within physical limits. ESP ®
assists
the driver when pulling away on wet or slip-
pery roads. ESP ®
can also stabilise the vehi-
cle during braking.
If ESP ®
intervenes, the ÷warning lamp
flashes in the instrument cluster.
If ESP ®
intervenes:
X Do not deactivate ESP ®
under any circum-
stances.
X When pulling away, only depress the accel-
erator pedal as far as is necessary.
X Adapt your driving style to suit the prevail-
ing road and weather conditions.
i Only use wheels with the recommended
tyre sizes. Only then will ESP ®
function
properly.
i If differential locks are switched on, ABS,
BAS and ESP ®
switch off automatically.
4ETS (Electronic Traction System) Traction control remains active if you deacti-
vate ESP
®
.
X If appropriate for the driving conditions,
engage the LOW RANGE off-road gear
(Y page 202).
Traction control is part of ESP ®
.
Traction control brakes the drive wheels indi-
vidually if they spin. This enables you to pull
away and accelerate on slippery surfaces, for
example if the road surface is slippery on one
side. In addition, more drive torque is trans-
ferred to the wheel or wheels with traction.
Traction control remains active if you deacti-
vate ESP ®
.
Traction control is no longer active above a
speed of about 60 km/h. 62
Driving safety systemsSafety
Page 145 of 357
Useful information
i This Owner's Manual describes all mod-
els, series and optional equipment for your
vehicle that were available at the time of
going to press. Country-specific differen-
ces are possible. Note that your vehicle
may not be fitted with all features descri-
bed. This is also the case for systems and
functions relevant to safety.
i Read the information on qualified special-
ist workshops: (Y page 22). Running-in notes
Important safety notes
New brake pads/brake pads and discs that
have been replaced only achieve optimum
braking effec tafter several hundred kilome-
tres of driving. Compensate for the reduced
braking effect by applying greater force to the
brake pedal. The first 1,500 km
If you treat the engine with sufficient care
from the very start, you will be rewarded with
excellent performance for the remainder of
the engine's life.
R Drive at varying vehicle speeds and engine
speeds for the first 1,500 km.
R Avoid overstraining the vehicle during this
period, e.g. driving at full throttle.
R Change gea ringood time, before the rev
counter needle is Ôof the way to the red
area of the rev counter.
R Do not shift down a gear manually in order
to brake.
R Try to avoid depressing the accelerator
pedal beyond the point of resistance (kick-
down).
R The shift ranges 3,2or 1should only be
engaged when driving slowly, e.g. when
driving in mountainous terrain. After 1,500 km, you may gradually bring the
vehicle up to full road and engine speeds.
Additional running-in notes for AMG vehicles:
R
Do not drive at speeds above 140 km/h for
the first 1,500 km.
R Only allow the engine to reach a maximum
engine speed of 4,500 rpm briefly.
R Avoid driving off-road before the differen-
tial oil change at 3,000 km.
R Drive the vehicle mainly in drive program
Cfor the first 1,500 km.
i You should also observe these notes on
running in if the engine or parts of the drive
train on your vehicle have been replaced. AMG vehicles with rear axle differen-
tial lock
To improve the protection of the differential,
change the oil after a run-in distance of
3,000 km. This oil change will lengthen the
service life of the differential. Have the oil
change carried out at a qualified specialist
workshop. Driving
Important safety notes
G
WARNING
Objects in the driver's footwell can restric tthe
pedal travel or obstruct adepressed pedal.
The operating and road safety of the vehicle
is jeopardised. There is a risk of an accident.
Make sure that all objects in the vehicle are
stowed correctly, and that they cannot enter
the driver's footwell. Fit the floormats
securely and as specified in order to ensure
sufficien tclearance for the pedals. Do not use
loose floormats. 142
DrivingDriving and parking
Page 169 of 357
New brake pads/linings
New brake pads/brake pads and discs that
have been replaced only achieve optimum
braking effect after several hundred kilome-
tres of driving. Compensate for the reduced
braking effect by applying greate rforce to the
brake pedal.
For safety reasons, Mercedes-Benz recom-
mends that you only have brake pads/linings
fitted to your vehicle which have been
approved for Mercedes-Benz vehicles or
which correspond to an equivalent quality
standard. Brake pads/linings which have not
been approved for Mercedes-Benz vehicles or
which are not of an equivalent quality could
affect your vehicle's operating safety.
High-performance brake system for
AMG vehicles The high-performance brake system is
designed for high loads. This may lead to
noise when braking. This is dependent on:
R speed
R braking force
R environmental conditions, such as temper-
ature and humidity.
The wear of individual components of the
brake system, such as the brake pads/linings
or brake discs, depends on the individual driv-
ing style and operating conditions.
For this reason, it is impossible to state a
mileage (service life) that will be valid under
all circumstances. An aggressive driving style
will lead to high wear. You can obtain further
information about this from your Mercedes-
Benz Service Centre.
Parking brake G
WARNING
If you must brake the vehicle with the parking
brake, the braking distance is considerably
longer and the wheels could lock. This increa-
ses the risk of skidding and an accident. Only use the parking brake to brake the vehi-
cle when the service brake is faulty. Do not
apply the parking brake too firmly. If the
wheels lock, release the parking brake until
the wheels begin turning again.
When you apply the parking brake to brake
the vehicle, the brake lamps do not light up.
If you drive on wet roads or dirt-covered sur-
faces, road salt and/or dirt could get into the
parking brake.
In order to prevent corrosion and a reduction
in the braking power of the parking brake,
observe the following:
R pull the parking brake upwards with the
release button depressed from time to time
before beginning the journey
(Y page 164).
R drive for approximately 100 m at a maxi-
mum speed of 20 km/h. Tyre traction
G
WARNING
Whereas the vehicle can be fully controlled at
a certain speed on dry roads, you must reduce
your speed on wet or icy roads to achieve the
same road safety. You could otherwise cause
an accident.
Pay particular attention to the road conditions
at temperatures around freezing point.
If ice has formed on the road surface (e.g.
from fog), a thin film of water rapidly forms on
the ice when you brake, considerably reduc-
ing tyre traction. Drive with particular care in
such weather conditions. Driving on slippery surfaces
! If possible, do not let the drive wheels
spin. Otherwise, you could damage the
drive train.
X Engage the differential locks if necessary
(Y page 204). 166
Driving tipsDriving and parking
Page 170 of 357
Driving on wet roads
Aquaplaning If water has accumulated to a certain depth
on the road surface, there is a danger of aqua-
planing occurring, eve nif:
R you are driving at low speeds
R the tyres have adequate tread depth.
For this reason, do not drive in tyre ruts, and
brake carefully.
Driving on flooded roads !
Bear in mind that vehicles travelling in
front or in the opposite direction create
waves. This may cause the maximu mper-
missible water depth to be exceeded.
These notes must be observed under all
circumstances. You could otherwise dam-
age the engine, the electronics or the trans-
mission.
If you have to drive on stretches of road on
which water has collected, please bear in
mind that:
R the maximum permissible fording depth in
still water is 60 cm
R you should drive no faster than walking
pace
Off-road fording !
The water depth must not exceed 60 cm.
Note that the possible fording depth is less
in flowing water.
! Under no circumstances should you
accelerate before entering the water. The
bow wave could cause water to enter and
damage the engine and neighbouring
assemblies.
! Do not open any of the vehicle's doors
while fording. Otherwise, water could get
into the vehicle interior and damage the
vehicle's electronics and interior equip-
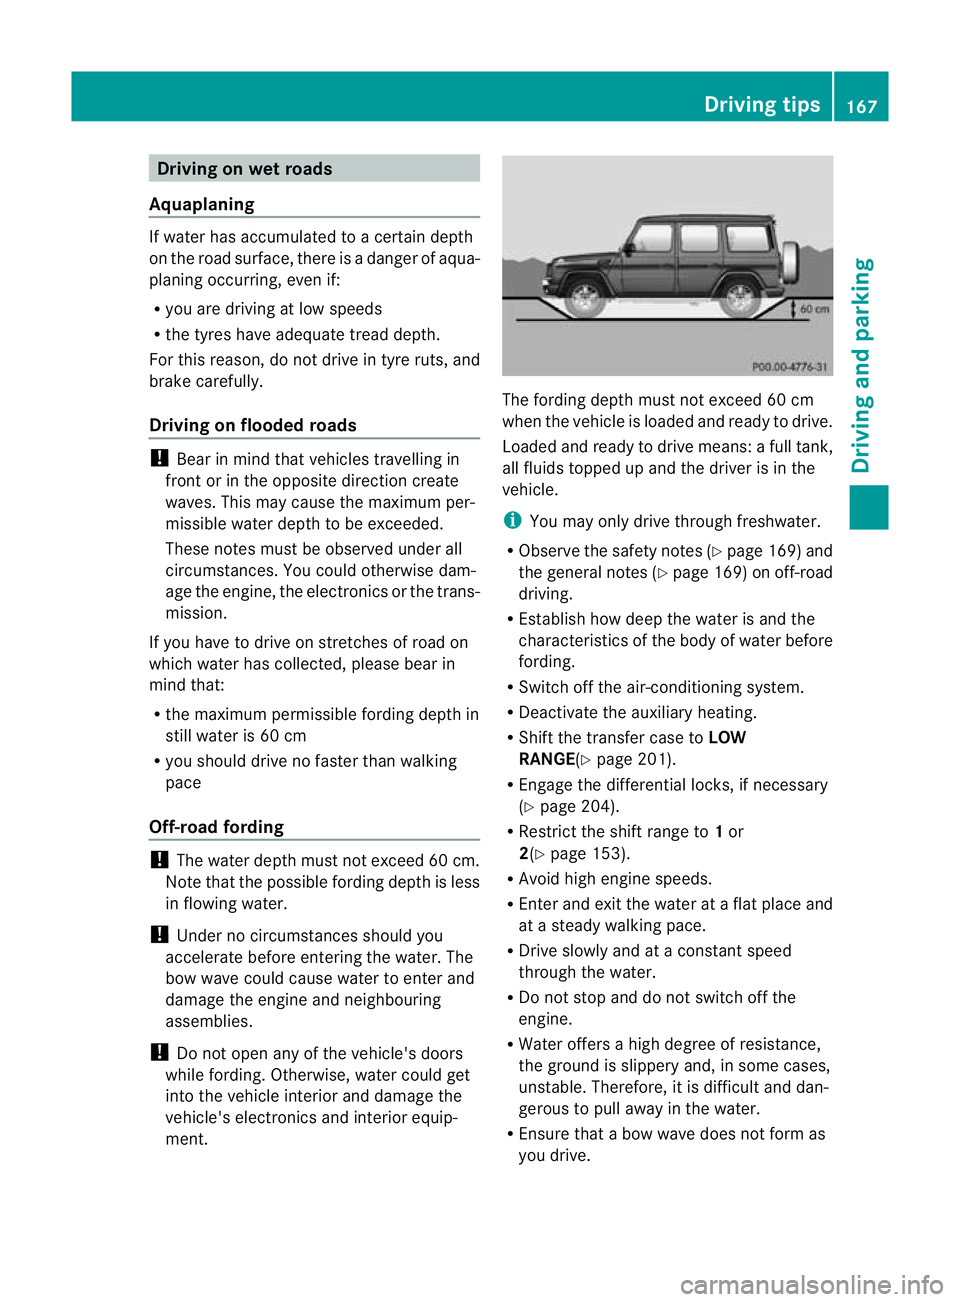
ment. The fording depth must not exceed 60 cm
when the vehicle is loaded and ready to drive.
Loaded and ready to drive means: a full tank,
all fluids topped up and the driver is in the
vehicle.
i
You may only drive through freshwater.
R Observe the safety notes (Y page 169)and
the general notes (Y page 169) on off-road
driving.
R Establish how deep the water is and the
characteristics of the body of water before
fording.
R Switch off the air-conditioning system.
R Deactivate the auxiliary heating.
R Shift the transfer case to LOW
RANGE( Ypage 201).
R Engage the differential locks, if necessary
(Y page 204).
R Restrict the shift range to 1or
2(Y page 153).
R Avoid high engine speeds.
R Enter and exi tthe water at a flat place and
at a steady walking pace.
R Drive slowly and at a constant speed
through the water.
R Do not stop and do not switch off the
engine.
R Water offers a high degree of resistance,
the ground is slippery and, in some cases,
unstable. Therefore, it is difficult and dan-
gerous to pull away in the water.
R Ensure that a bow wave does not form as
you drive. Driving tips
167Driving and parking Z
Page 172 of 357
Off-road driving
Important safety notes G
WARNING
If you drive up a steep incline at an angle or
turn on a steep incline, the vehicle could slip
sideways, tip and overturn. There is a risk of
an accident.
When driving up an incline, drive into the line
of fall (upwards or downwards in a straight
line) and do not turn.
! G350 BlueTEC:
The level in the AdBlue ®
tank needs to be
sufficiently high to compensate for driving
at extreme angles when driving off-road.
Before driving off-road, make sure that the
tank contains a minimum of ten litres.
When driving off-road, sand, mud and water,
possibly mixed with oil, for example, could get
into the brakes. This may lead to a reduction
in braking performance or total brake failure
as a result of increased wear. The braking
characteristics will vary, depending on the
substances that get int othe brakes. Cleant he
brakes after driving off-road. If you notice
grinding noises or a reduction in braking per-
formance, have the brake system checked at
a qualified specialist workshop immediately.
Adapt your driving style to the altered braking
characteristics.
Driving off-road increases the possibility of
damage to the vehicle, which may cause
assemblies or systems to fail. Adapt your
driving style to the conditions of the terrain.
Drive carefully. Have vehicle damage rectified
immediately at a qualified specialist work-
shop. Observe the following when on hilly roads:
R
Do not shift the transmission to position
N.
R If the gradient is too steep for your vehicle,
back up in reverse gear.
R Do not continuously depress the brake
pedal, as doing so could cause you to lose
control.
General notes H
Environmental note
Protection of the environment is of primary
importance. Treat nature with respect.
Observe all prohibiting signs.
Read this section before driving your vehicle
off-road. Practise by travelling over more gen-
tle off-road terrain first.
The following driving systems are specially
adapted to off-road driving:
R 4ETS (Y page 62)
R Transfer case (Y page 201)
R Differential locks (Y page 204)
Observe the following notes:
R stop your vehicle and, if necessary, shift the
transfer case to LOW
RANGE(Y page 202) before driving off-
road.
R AMG vehicles: to shift the transfer case to
LOW RANGE, deactivate the ECO start/
stop function (Y page 146).
R engage the differential locks, if necessary
(Y page 204)
i ABS,4 ETS, ESP ®
and BAS are deactivated
while the differential locks are engaged.
This allows the front wheels to lock briefly,
so tha tthey can dig into a loose surface.
However, please note that locked wheels
skid and can no longer steer. Driving tips
169Driving and parking Z
Page 174 of 357
Checklist after driving off-road
Driving ove
rrough terrain places greater
demands on your vehicle than driving on nor-
mal roads. After driving off-road, check the
vehicle. This allows you to detect damage
promptly and reduce the risk of an accident
to yourself and other road users.
X Shift the transfer case to HIGH
RANGE(Y page 202).
X Disengage the differential locks
(Y page 204).
X Clean the headlamps and rear lights and
check for damage.
X Clean the front and rear licence plates.
X Clean the wheels and tyres with a water jet
and remove any foreign objects.
X Clean the wheels, tyres, wheel arches and
the vehicle underside with a water jet;
check for any foreign objects and damage.
X Check whether twigs or other parts of
plants have become trapped. These
increase the risk of fire and can damage
fuel pipes, brake hoses or the rubber bel-
lows of the axle joints and propeller shafts.
X After the trip, examine without fail the
entire undercarriage, wheels, tyres, brakes,
bodywork structure, steering, chassis and
exhaust system for damage.
X After driving for extended periods across
sand, mud, gravel, water or in similarly dirty
conditions, have the brake discs, wheels,
brake pads/linings and axle joints checked
and cleaned.
X If you notice strong vibrations after off-road
driving, check for foreign objects in the
wheels and drive train and, if necessary,
remove them. Foreign objects can disturb
the balance and cause vibrations. Driving on sand Observe the following rules when driving on
sand:
R
Shift the transfer case to LOW
RANGE(Y page 202).
R Avoid high engine speeds.
R Limit the shift range of the automatic trans-
mission according to the off-road condi-
tions.
R Drive quickly to overcome the rolling resist-
ance. Otherwise, the vehicle could dig itself
into the sand.
R Drive in the tracks of other vehicles if pos-
sible. Make sure that the ruts are not too
deep, that the sand is firm enough and that
your vehicle has sufficient ground clear-
ance.
Tyre ruts and gravel roads !
Check that the ruts are not too deep and
that your vehicle has sufficient clearance.
Otherwise, your vehicle could be damaged
or bottom out and get stuck.
Observe the following rules when driving
along ruts in off-road terrain or on roads with
loose gravel:
R Shift the transfer case to LOW
RANGE(Y page 202).
R Avoid high engine speeds.
R Observe the safety notes (Y page 169) and
the general notes (Y page 169) on off-road
driving.
R Restrict the shift range of the automatic
transmission to 1(Ypage 153).
R Drive slowly.
R Where ruts are too deep, drive with the
wheels on one side on the middle section
of turf if possible.
Driving over obstacles !
Obstacles could damage the floor of the
vehicle or components of the chassis. Ask
passengers for guidance when driving over Driving tips
171Driving and parking Z