2012 MERCEDES-BENZ E-CLASS ESTATE height
[x] Cancel search: heightPage 115 of 457
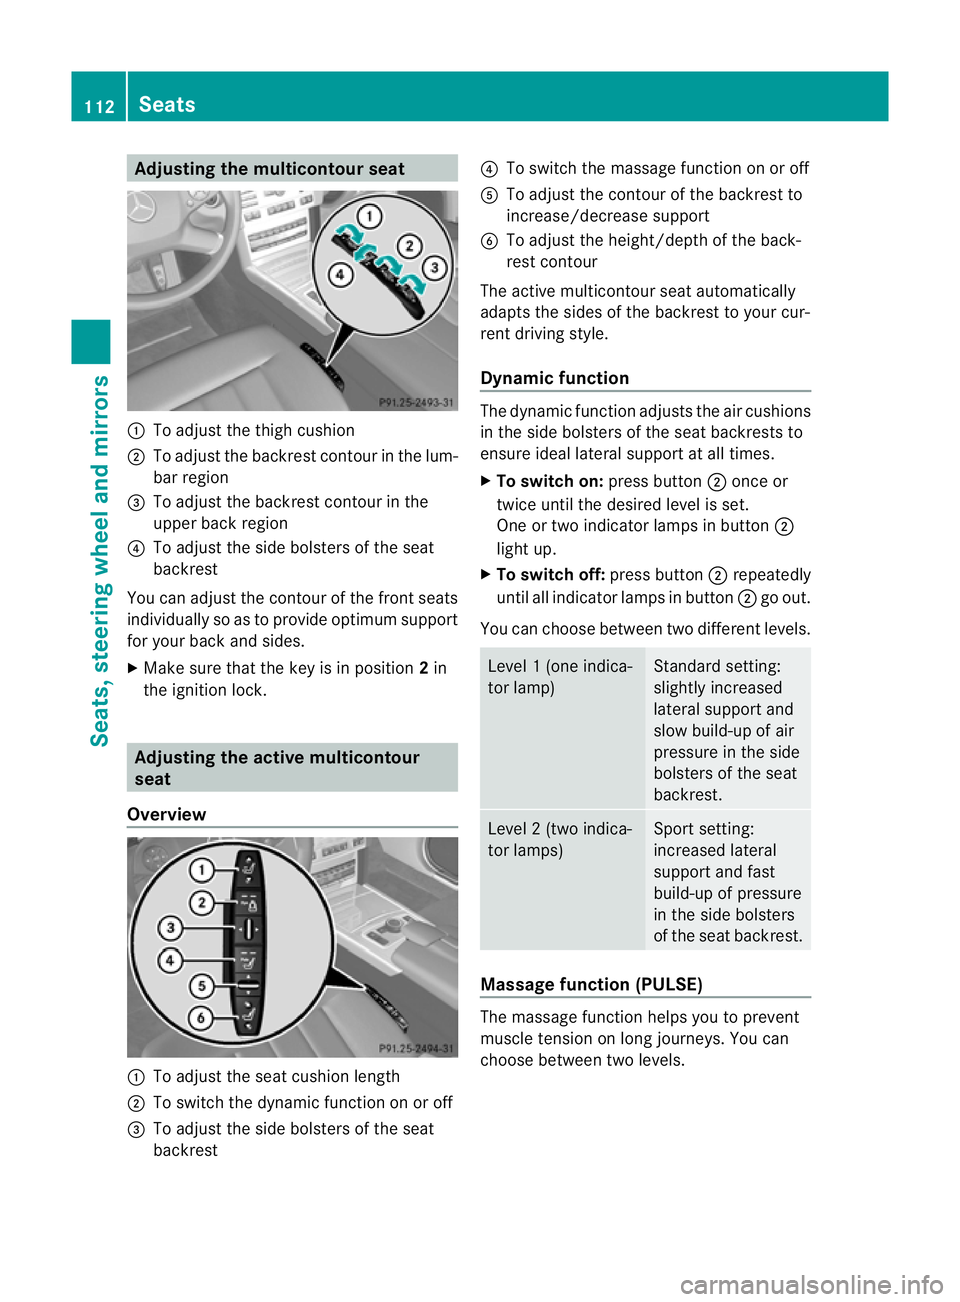
Adjusting the multicontour seat
:
To adjust the thigh cushion
; To adjust the backrest contour in the lum-
bar region
= To adjust the backrest contour in the
upper bac kregion
? To adjust the side bolsters of the seat
backrest
You can adjust the contour of the fron tseats
individually so as to provide optimum support
for your back and sides.
X Make sure that the key is in position 2in
the ignition lock. Adjusting the active multicontour
seat
Overview :
To adjust the seat cushion length
; To switch the dynamic function on or off
= To adjust the side bolsters of the seat
backrest ?
To switch the massage function on or off
A To adjust the contour of the backrest to
increase/decrease support
B To adjust the height/depth of the back-
rest contour
The active multicontour seat automatically
adapts the sides of the backrest to your cur-
rent driving style.
Dynamic function The dynamic function adjusts the air cushions
in the side bolsters of the seat backrests to
ensure ideal lateral support at all times.
X To switch on: press button;once or
twice until the desired level is set.
One or two indicator lamps in button ;
light up.
X To switch off: press button;repeatedly
until all indicator lamps in button ;go out.
You can choose between two differen tlevels. Level
1(one indica-
tor lamp) Standard setting:
slightly increased
lateral support and
slow build-up of air
pressure in the side
bolsters of the seat
backrest.
Level
2(two indica-
tor lamps) Sport setting:
increased lateral
support and fast
build-up of pressure
in the side bolsters
of the seat backrest.
Massage function (PULSE)
The massage functio
nhelps you to prevent
muscle tension on long journeys. You can
choose between two levels. 112
SeatsSeats, steering wheel and mirrors
Page 120 of 457
Steering wheel
Important safety notes
G
WARNING
Do not adjust the steering wheel while driving.
Adjusting the steering wheel while driving, or
driving without the steering wheel adjustment
feature locked could cause the driver to lose
control of the vehicle.
The electrical steering wheel adjustment fea-
ture can be operated at any time. Therefore,
do not leave children unattended in the vehi-
cle, or with access to an unlocked vehicle. A
child's unsupervised access to a vehicle could
result in an accident and/or serious personal
injury. Adjusting the steering wheel man-
ually
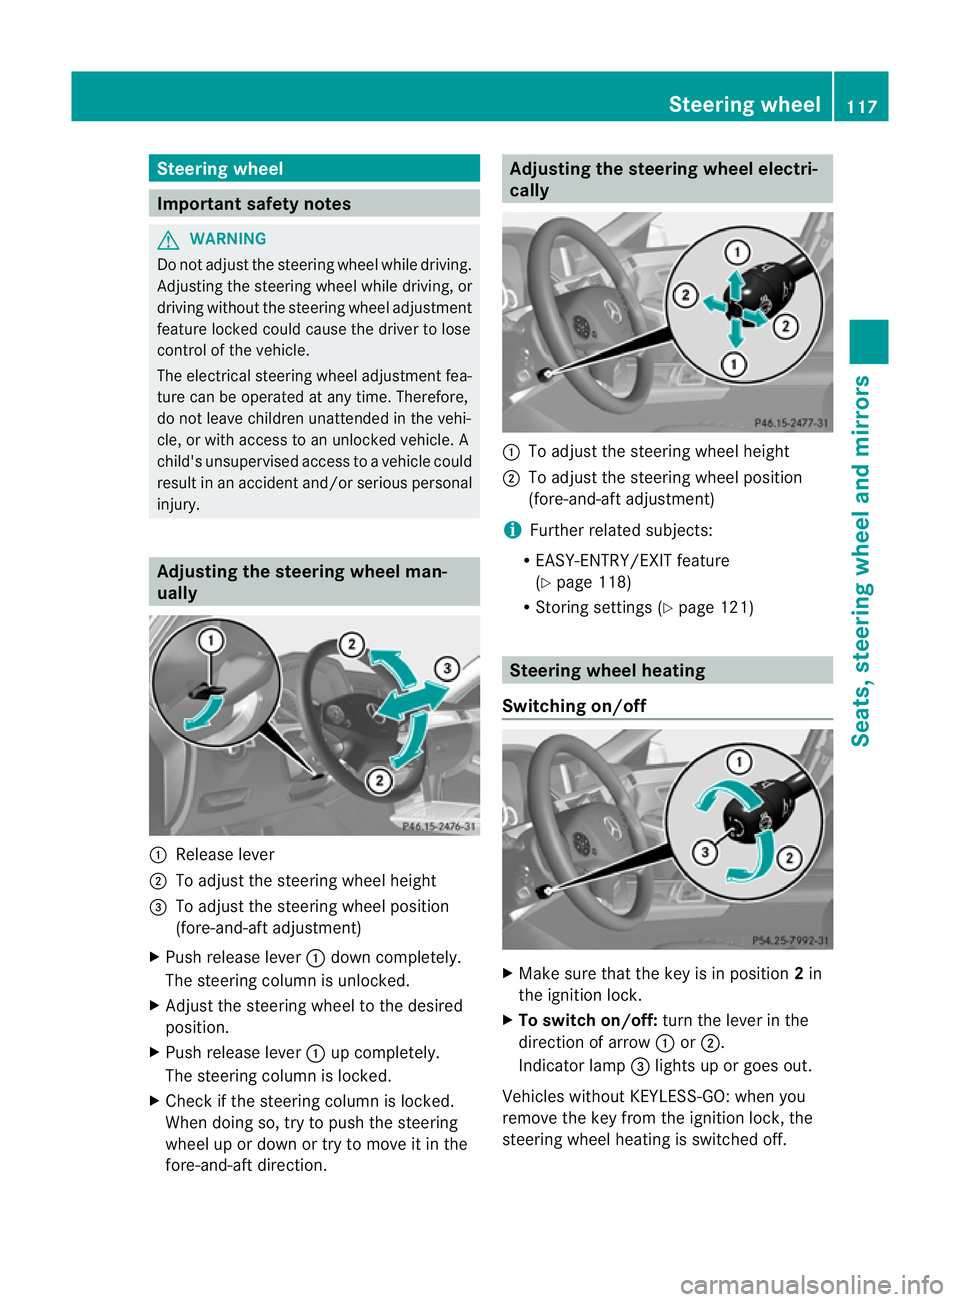
:
Release lever
; To adjust the steering wheel height
= To adjust the steering wheel position
(fore-and-aft adjustment)
X Push release lever :down completely.
The steering column is unlocked.
X Adjust the steering wheel to the desired
position.
X Push release lever :up completely.
The steering column is locked.
X Check if the steering column is locked.
When doing so, try to push the steering
wheel up or down or try to move it in the
fore-and-aft direction. Adjusting the steering wheel electri-
cally
:
To adjust the steering wheel height
; To adjust the steering wheel position
(fore-and-aft adjustment)
i Further related subjects:
R EASY-ENTRY/EXIT feature
(Y page 118)
R Storing settings (Y page 121) Steering wheel heating
Switching on/off X
Make sure that the key is in position 2in
the ignition lock.
X To switch on/off: turn the lever in the
direction of arrow :or;.
Indicator lamp =lights up or goes out.
Vehicles without KEYLESS-GO: when you
remove the key from the ignition lock, the
steering wheel heating is switched off. Steering wheel
117Seats, steering wheel and mirrors Z
Page 211 of 457
Drive program
S+is activated .SPORT han-
dling mode remains activated.
RACE START is deactivated immediately if
you release the accelerator pedal during
RACE START or if any of the activation condi-
tions are no longer fulfilled. The RACE START
not possible See Owner's Manual mes-
sage appears in the multifunction display.
i After using it several times in short suc-
cession, RACE START will be unavailable
until a certain distance has been driven. AIRMATIC
Vehicle level Important safety notes
G
WARNING
If you have selected "Comfort tuning", the
vehicle will be lowered if you lock it within
60 seconds of the engine being switched off.
Make sure, therefore, that nobody is in the
vicinity of the wheel housing or under the
vehicle when you lock the vehicle. Otherwise,
limbs could become trapped.
! The vehicle is lowered by about 15 mm if:
R you have selected "Comfort tuning"
R you switch off the engine and
R you lock the vehicle within approximately
60 seconds
When parking, position your vehicle so that
it does not make contact with the kerb as
the vehicle is lowered. Your vehicle could
otherwise be damaged.
Observe the notes on driving with a trailer
(Y page 236).
Your vehicle regulates its height automati-
cally. All-round level control ensures the best
possible suspension and constant ground
clearance, even with a laden vehicle. When
you drive fast, the vehicle is lowered auto-
matically to improve driving safety and to
reduce fuel consumption. The following vehicle levels are possible:
R
normal
R raised (vehicles without 4MATIC): the vehi-
cle is raised by about 25 mm when com-
pared with the normal level.
R raised (vehicles with 4MATIC): the vehicle
is raised by about 35 mm when compared
with the normal level.
R lowered: the vehicle is lowered by about
10 mm when compared with the normal
level.
The "Normal" and "Raised" vehicle levels can
be set manually.
The "Lowered” vehicle level is set automati-
cally:
R at speeds above 140 km/h
R if you have selected "Sports tuning"
(Y page 209)
Setting the vehicle level G
WARNING
Make sure that nobody is in the vicinity of the
wheel housing or under the vehicle while low-
ering the vehicle when it is stationary. Other-
wise, limbs could become trapped.
Select the "Normal" setting for normal road
surfaces and "Raised" for driving with snow
chains or on particularly poor road surfaces.
Your selection remains stored even if you
remove the key from the ignition lock.
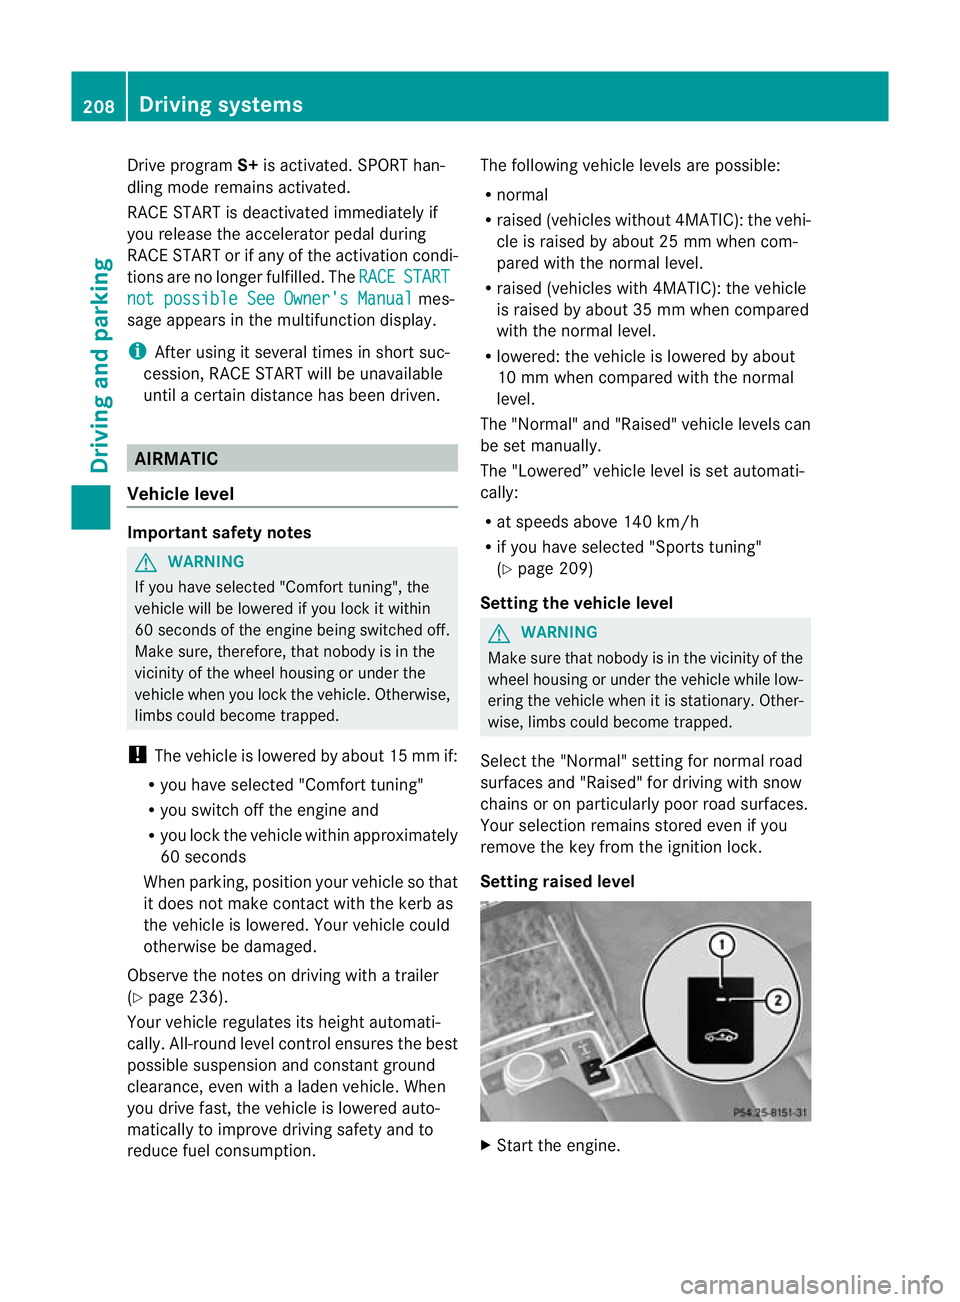
Setting raised level X
Start the engine. 208
Driving systemsDriving and parking
Page 212 of 457
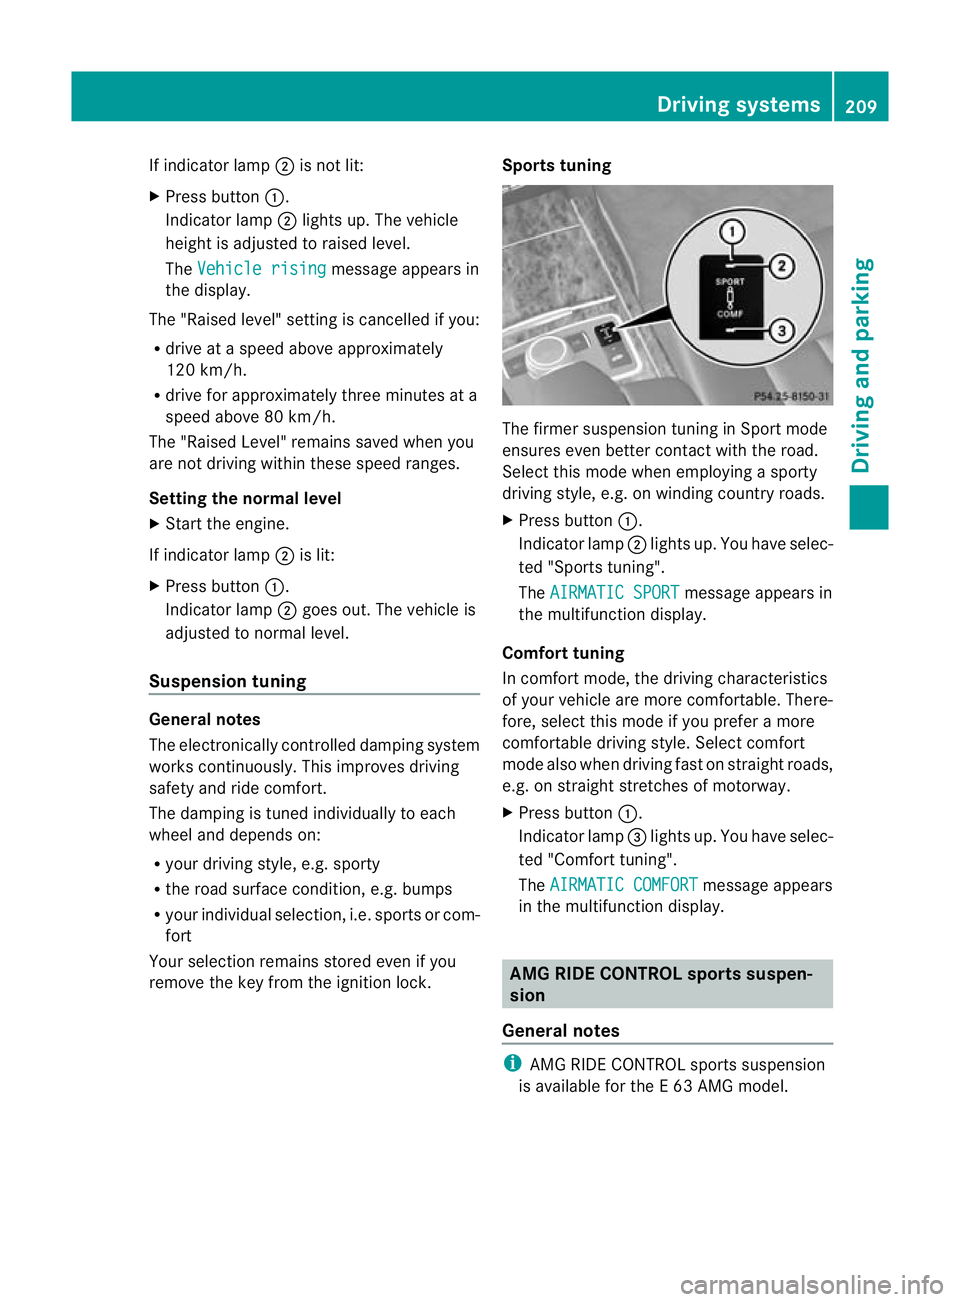
If indicator lamp
;is not lit:
X Press button :.
Indicator lamp ;lights up. The vehicle
heighti s adjusted to raised level.
The Vehicle rising message appears in
the display.
The "Raised level" setting is cancelled if you:
R drive at a speed above approximately
120 km/h.
R drive for approximately three minutes at a
speed above 80 km/h.
The "Raised Level" remains saved when you
are not driving within these speed ranges.
Setting the normal level
X Start the engine.
If indicator lamp ;is lit:
X Press button :.
Indicator lamp ;goes out. The vehicle is
adjusted to normal level.
Suspension tuning General notes
The electronically controlled damping system
works continuously. This improves driving
safety and ride comfort.
The damping is tuned individually to each
wheel and depends on:
R your driving style, e.g. sporty
R the road surface condition, e.g. bumps
R your individual selection, i.e. sports or com-
fort
Your selection remains stored even if you
remove the key from the ignition lock. Sports tuning The firmer suspension tuning in Sport mode
ensures even better contact with the road.
Select this mode when employing a sporty
driving style, e.g. on winding country roads.
X
Press button :.
Indicator lamp ;lights up. You have selec-
ted "Sports tuning".
The AIRMATIC SPORT message appears in
the multifunction display.
Comfort tuning
In comfort mode, the driving characteristics
of your vehicle are more comfortable. There-
fore, select this mode if you prefer a more
comfortable driving style. Select comfort
mode also when driving fast on straight roads,
e.g. on straight stretches of motorway.
X Press button :.
Indicator lamp =lights up. You have selec-
ted "Comfort tuning".
The AIRMATIC COMFORT message appears
in the multifunction display. AMG RIDE CONTROL sports suspen-
sion
General notes i
AMG RIDE CONTROL sports suspension
is available for the E63AMG model. Driving systems
209Driving and parking Z
Page 218 of 457
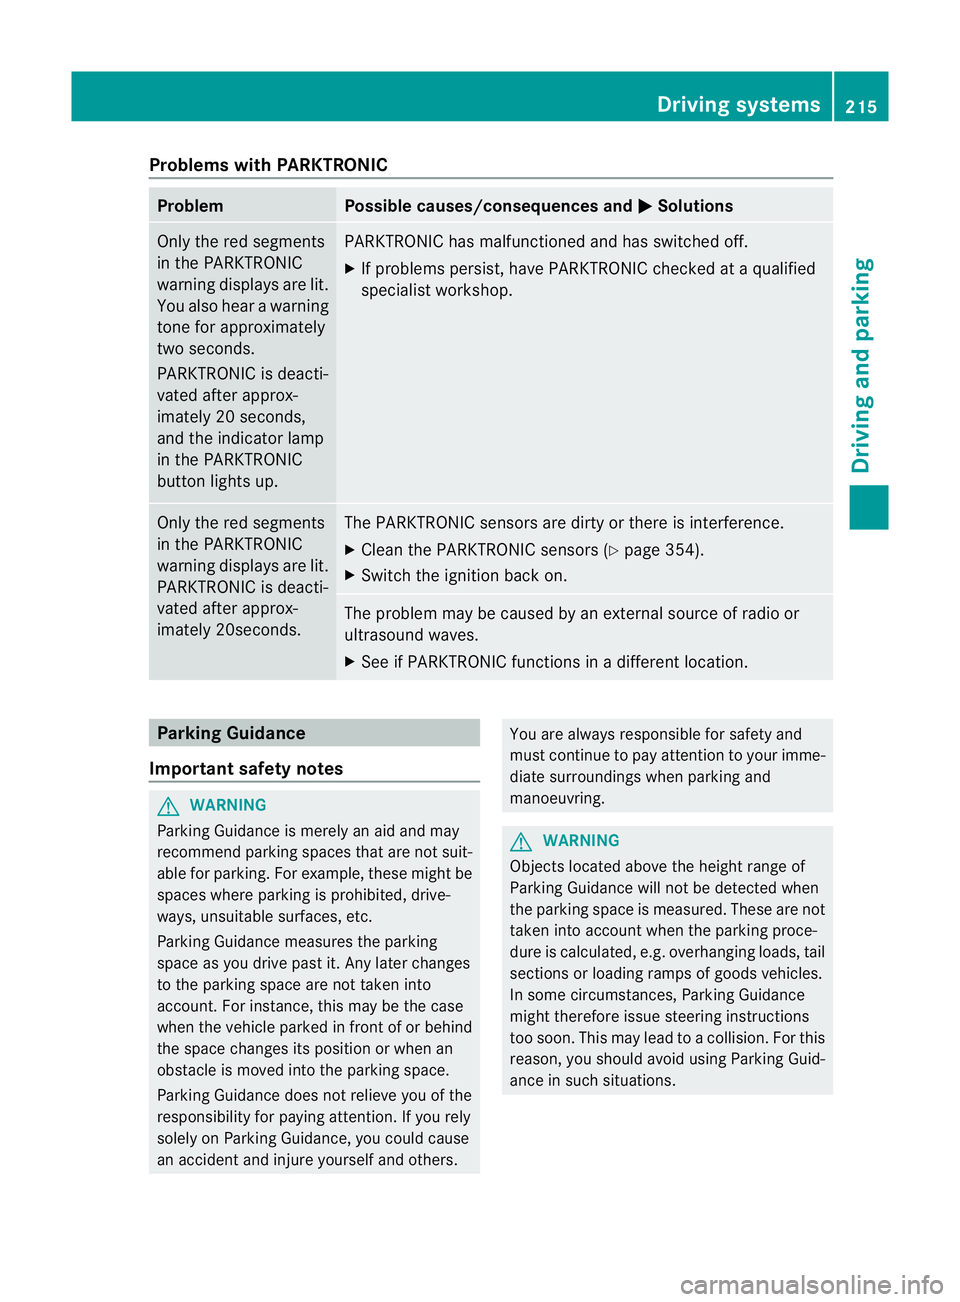
Problems with PARKTRONIC
Problem Possible causes/consequences and
M Solutions
Only the red segments
in the PARKTRONIC
warning displays are lit.
You also hear a warning
tone for approximately
two seconds.
PARKTRONIC is deacti-
vated after approx-
imately 20 seconds,
and the indicator lamp
in the PARKTRONIC
button lights up. PARKTRONIC has malfunctioned and has switched off.
X
If problems persist, have PARKTRONIC checked at a qualified
specialist workshop. Only the red segments
in the PARKTRONIC
warning displays are lit.
PARKTRONIC is deacti-
vated after approx-
imately 20seconds. The PARKTRONIC sensors are dirty or there is interference.
X
Cleant he PARKTRONIC sensors (Y page 354).
X Switch the ignition back on. The problem may be caused by an external source of radio or
ultrasound waves.
X See if PARKTRONIC functions in a different location. Parking Guidance
Important safety notes G
WARNING
Parking Guidance is merely an aid and may
recommend parking spaces that are not suit-
able for parking. For example, these might be
spaces where parking is prohibited, drive-
ways, unsuitable surfaces, etc.
Parking Guidance measures the parking
space as you drive past it. Any later changes
to the parking space are not taken into
account. For instance, this may be the case
when the vehicle parked in front of or behind
the space changes its position or when an
obstacle is moved into the parking space.
Parking Guidance does not relieve you of the
responsibility for paying attention. If you rely
solely on Parking Guidance, you could cause
an accident and injure yourself and others. You are always responsible for safety and
must continue to pay attention to your imme-
diate surroundings when parking and
manoeuvring.
G
WARNING
Objects located above the height range of
Parking Guidance will not be detected when
the parking space is measured. These are not
taken into account when the parking proce-
dure is calculated, e.g. overhanging loads, tail
sections or loading ramps of goods vehicles.
In some circumstances, Parking Guidance
might therefore issue steering instructions
too soon. This may lead to a collision. For this
reason, you should avoid using Parking Guid-
ance in such situations. Driving systems
215Driving and parking Z
Page 239 of 457
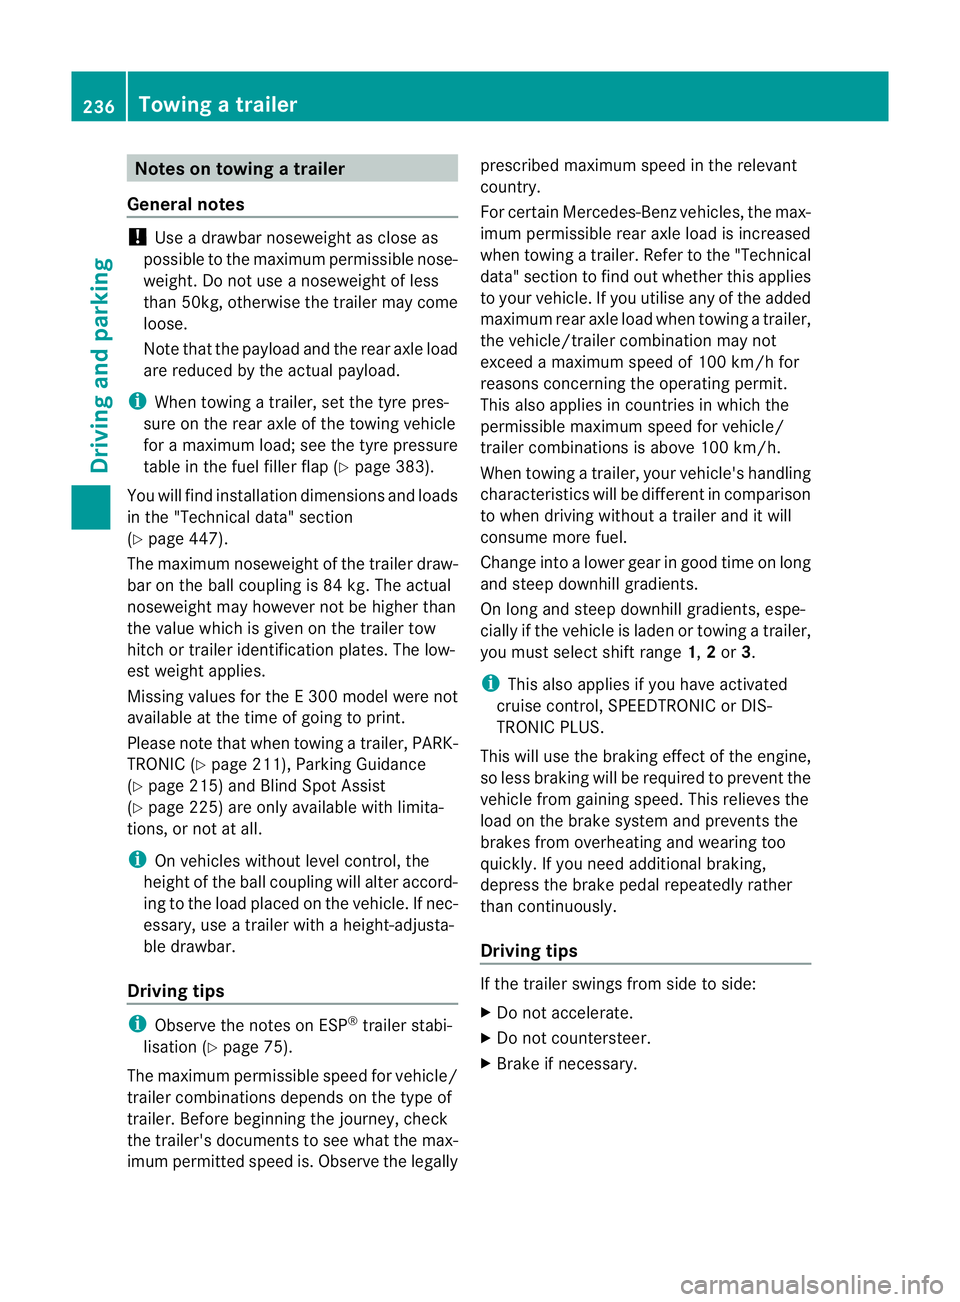
Notes on towing
atrailer
General notes !
Use a drawbar noseweigh tas close as
possible to the maximum permissible nose-
weight. Do not use a noseweight of less
than 50kg, otherwise the trailer may come
loose.
Note that the payload and the rear axle load
are reduced by the actual payload.
i When towing a trailer, set the tyre pres-
sure on the rear axle of the towing vehicle
for a maximum load; see the tyre pressure
table in the fuel filler flap (Y page 383).
You will find installation dimensions and loads
in the "Technical data" section
(Y page 447).
The maximum noseweight of the trailer draw-
bar on the ball coupling is 84 kg. The actual
noseweight may however not be higher than
the value which is given on the trailer tow
hitch or trailer identification plates. The low-
est weight applies.
Missing values for the E300 model were not
available at the time of going to print.
Please note that whe ntowing a trailer, PARK-
TRONIC (Y page 211), Parking Guidance
(Y page 215) and Blind Spot Assist
(Y page 225) are only available with limita-
tions, or not at all.
i On vehicles without level control, the
height of the ball coupling will alter accord-
ing to the load placed on the vehicle. If nec-
essary, use a trailer with a height-adjusta-
ble drawbar.
Driving tips i
Observe the notes on ESP ®
trailer stabi-
lisation (Y page 75).
The maximum permissible speed for vehicle/
trailer combinations depends on the type of
trailer. Before beginning the journey, check
the trailer's documents to see what the max-
imum permitted speed is. Observe the legally prescribed maximum speed in the relevant
country.
For certain Mercedes-Benz vehicles, the max-
imum permissible rear axle load is increased
when towing a trailer. Refer to the "Technical
data" section to find out whether this applies
to your vehicle. If you utilise any of the added
maximum rear axle load when towing a trailer,
the vehicle/trailer combination may not
exceed a maximum speed of 100 km/h for
reasons concerning the operating permit.
This also applies in countries in which the
permissible maximum speed for vehicle/
trailer combinations is above 100 km/h.
When towing a trailer, your vehicle's handling
characteristics will be different in comparison
to when driving without a trailer and it will
consume more fuel.
Change into a lower gear in good time on long
and steep downhill gradients.
On long and steep downhill gradients, espe-
cially if the vehicle is laden or towing a trailer,
you must select shift range
1,2or 3.
i This also applies if you have activated
cruise control, SPEEDTRONIC or DIS-
TRONIC PLUS.
This will use the braking effect of the engine,
so less braking will be required to prevent the
vehicle from gaining speed. This relieves the
load on the brake system and prevents the
brakes from overheating and wearing too
quickly. If you need additional braking,
depress the brake pedal repeatedly rather
than continuously.
Driving tips If the trailer swings from side to side:
X
Do not accelerate.
X Do not countersteer.
X Brake if necessary. 236
Towing
atrailerDriving an d parking
Page 325 of 457
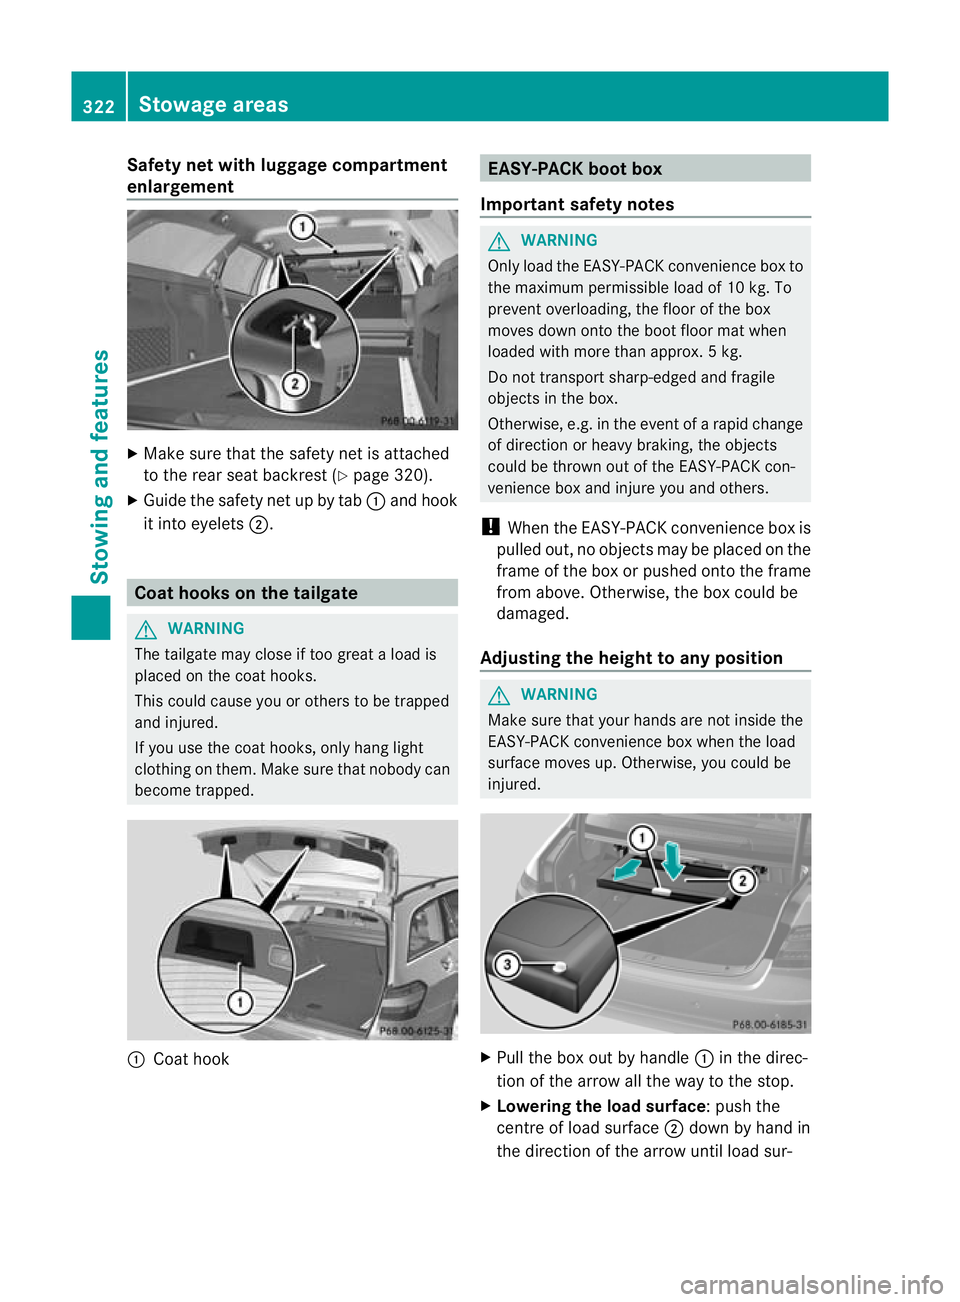
Safety net with luggage compartment
enlargement
X
Make sure that the safety net is attached
to the rear seat backrest (Y page 320).
X Guide the safety net up by tab :and hook
it into eyelets ;. Coat hooks on the tailgate
G
WARNING
The tailgate may close if too great a load is
placed on the coat hooks.
This could cause you or others to be trapped
and injured.
If you use the coat hooks, only hang light
clothing on them. Make sure that nobody can
become trapped. :
Coat hook EASY-PACK boot box
Important safety notes G
WARNING
Only load the EASY-PACK convenience box to
the maximum permissible load of 10 kg. To
prevent overloading, the floor of the box
moves down onto the boot floor mat when
loaded with more than approx. 5kg.
Do not transpor tsharp-edged and fragile
objects in the box.
Otherwise, e.g. in the event of a rapid change
of direction or heavy braking, the objects
could be thrown out of the EASY-PACK con-
venience box and injure you and others.
! When the EASY-PACK convenience box is
pulled out, no objects may be placed on the
frame of the box or pushed onto the frame
from above. Otherwise, the box could be
damaged.
Adjusting the height to any position G
WARNING
Make sure that your hands are not inside the
EASY-PACK convenience box when the load
surface moves up. Otherwise, you could be
injured. X
Pull the box out by handle :in the direc-
tion of the arrow all the way to the stop.
X Lowering the load surface:p ush the
centre of load surface ;down by hand in
the direction of the arrow until load sur- 322
Stowage areasStowing and featu
res
Page 349 of 457
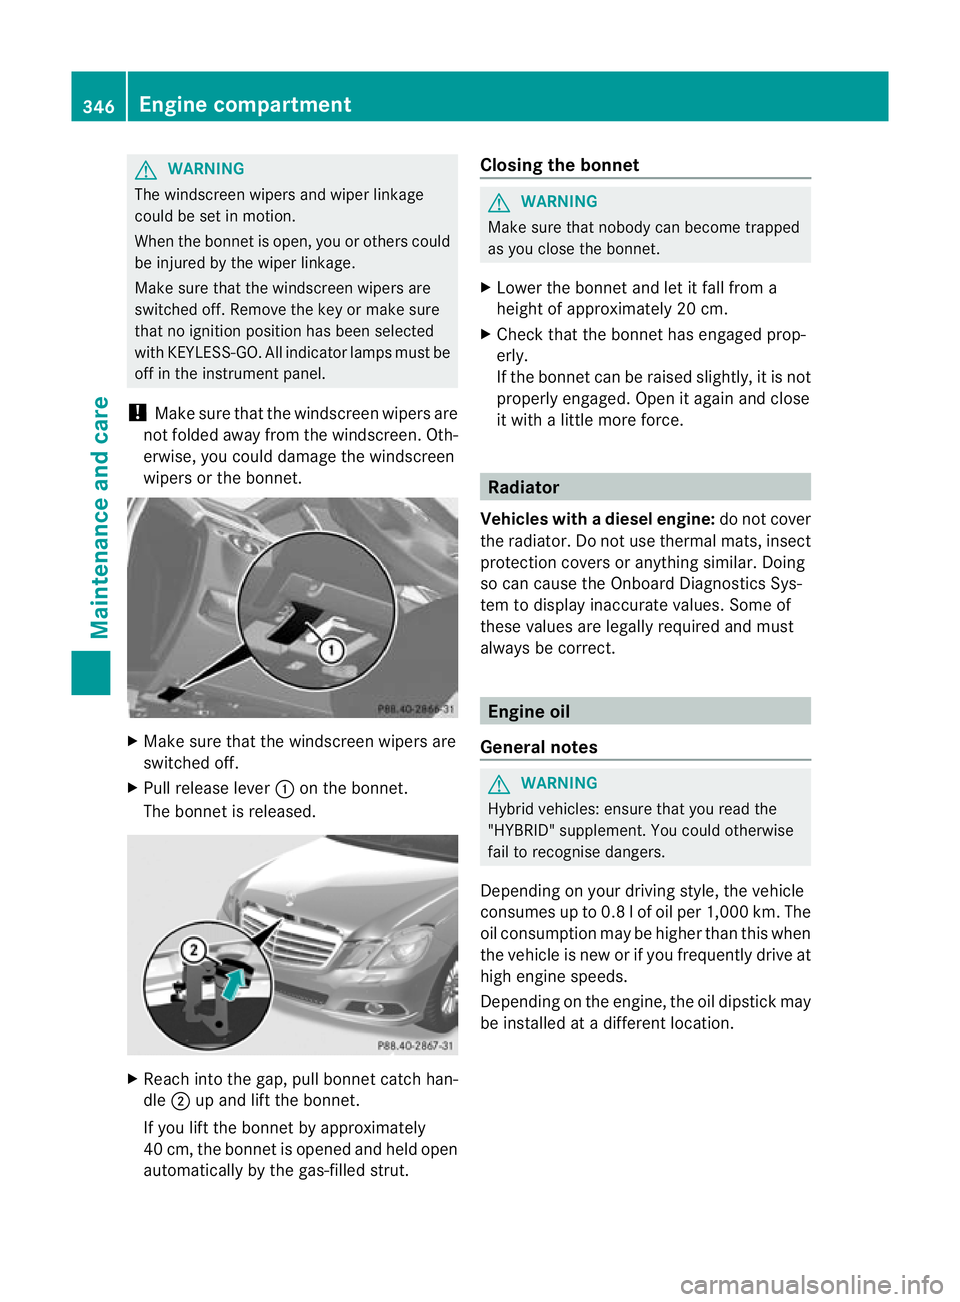
G
WARNING
The windscreen wipers and wiper linkage
could be set in motion.
When the bonnet is open, you or others could
be injured by the wiper linkage.
Make sure that the windscreen wipers are
switched off. Remove the key or make sure
that no ignitio nposition has been selected
with KEYLESS-GO. All indicator lamps must be
off in the instrument panel.
! Make sure that the windscreen wipers are
not folded away from the windscreen. Oth-
erwise, you could damage the windscreen
wipers or the bonnet. X
Make sure that the windscreen wipers are
switched off.
X Pull release lever :on the bonnet.
The bonnet is released. X
Reach into the gap, pull bonnet catch han-
dle ;up and lift the bonnet.
If you lift the bonnet by approximately
40 cm, the bonnet is opened and held open
automatically by the gas-filled strut. Closing the bonnet G
WARNING
Make sure that nobody can become trapped
as you close the bonnet.
X Lower the bonnet and let it fall from a
height of approximately 20 cm.
X Check that the bonnet has engaged prop-
erly.
If the bonnet can be raised slightly, it is not
properly engaged. Open it again and close
it with a little more force. Radiator
Vehicles with adiesel engine: do not cover
the radiator .Do not use thermal mats, insect
protection covers or anything similar. Doing
so can cause the Onboard Diagnostics Sys-
tem to display inaccurate values. Some of
these values are legally required and must
always be correct. Engine oil
General notes G
WARNING
Hybrid vehicles: ensure that you read the
"HYBRID" supplement. You could otherwise
fail to recognise dangers.
Depending on your driving style, the vehicle
consumes up to 0.8 l of oil per 1,000 km. The
oil consumption may be higher than this when
the vehicle is new or if you frequently drive at
high engine speeds.
Depending on the engine, the oil dipstick may
be installed at a different location. 346
Engine compartmentMaintenance and care