2012 MERCEDES-BENZ E-CLASS ESTATE turn signal
[x] Cancel search: turn signalPage 10 of 457
Car wash (care)
................................. 351
CD player/CD changer(on-board
computer) .......................................... 253
Central locking Automatic locking (on-board com-
puter) ............................................. 261
Locking/unlocking (key ).................. 83
Centre console
Lowe rsection .................................. 37
Uppe rsection .................................. 36
Changing bulbs
Dipped-bea mheadlamps ............... 136
Important safety notes ..................135
Infrared lamp ................................. 137
Main-beam headlamps ................... 136
Overview of bul btypes .................. 135
Parking lamps (front) .....................137
Standing lamps .............................. 137
Turn signals (front) ......................... 137
Child-proof locks
Important safety notes ....................69
Rea rdoors ....................................... 69
Children
Fastening seat belts ......................... 62
In the vehicle ................................... 55
Restraint systems ............................ 55
Child seat
Automatic recognition .....................57
Integrated ........................................ 61
Integrated, ICS padded pla ytable ....63
Integrated, side head restraints .......64
Integrated ,storing ........................... 65
ISOFIX .............................................. 58
On the front-passenger sea t............ 56
Problem (malfunction) .....................61
Recommendations ...........................67
Suitable positions ............................ 65
Top Tether ....................................... 59
Cigarette lighter ................................ 331
Cleaning Mirro rturn signal ........................... 354
Trailer tow hitch ............................. 355
Climate control
Auxiliary heating/ventilation .......... 151
Controlling automatically ...............146
Convenience opening/closing
(air-recirculatio nmode) ................. 150
Cooling with aird ehumidification..145 Demisting the windows .................. 149
Demisting the windscreen .............148
Important safety notes ..................142
Indicator lamp ................................ 146
Information on using
THERMOTRONIC automatic cli-
mate control .................................. 145
Notes on using THERMATIC auto-
matic climate control .....................143
Overview of systems ......................142
Problems with cooling with air
dehumidification ............................ 146
Problem with the rear window
heating .......................................... 149
Rea rcontrol panel ......................... 144
Setting the aird istribution.............147
Setting the airflow .........................148
Setting the airv ents...................... 155
Setting the climate mode .............. .146
Setting the temperature ................147
Switching air-recirculation mode
on/off ............................................ 149
Switching on/off ........................... 145
Switching residual hea ton/off ......150
Switching the rear window heat-
ing on/off ...................................... 149
Switching the ZONE function on/
off .................................................. 148
THERMATIC automatic climate
control (2-zone) ............................. 143
THERMOTRONIC (3-zone) auto-
matic climate control .....................144
Coat hooks ......................................... 322
Cockpit Overview .......................................... 30
see Instrument cluster
Collapsible emergency spare
wheel
see Emergency spare wheel
COMAND display
Cleaning ......................................... 355
COMAND Online
see separate operating instructions
Combination switch ..........................128
Combine dluggage cover and net ....320
Consumption statistics (on-board
computer) .......................................... 249
Convenience box ............................... 322 Index
7
Page 17 of 457
Switching the daytime driving
lights on/of
f(on-board computer) .259
Switching the exterio rlighting
delayed switch-off on/off (on-
board computer )............................ 260
Switching the surround lighting
on/off (on-board computer) ..........260
Turn signals ................................... 128
see Changing bulbs
see Interior lighting
Light sensor (display message) .......278
LIM indicator lamp Cruise control ................................ 190
DISTRONI CPLUS ........................... 196
Variabl eSPEEDTRONIC .................193
Limiting the speed
see SPEEDTRONIC
Loading guidelines ............................310
Loading sill protector ........................ 326
Locking see Centra llocking
Locking (doors)
Automatic ........................................ 90
Emergency locking ........................... 90
From inside (central locking but-
ton) .................................................. 89
Locking centrally
see Centra llocking
Locking verification signal (on-
board computer) ............................... 262
Luggage compartment cover ...........319
Luggage compartment enlarge-
ment ................................................... 317
Luggage compartment floor ............325
Luggage holde r(EASY-PACK load-
securing kit) ...................................... .324
Lumbar support Adjusting ....................................... 113
Adjusting the 4-way lumba rsup-
por t................................................ 113
Luxu ry head restraint .......................110 M
M+S tyres ........................................... 382
Main-beam headlamps Changing bulbs .............................. 136
Display message ............................ 277Switching Adaptive Highbeam
Assist on/off
................................. 132
Switching on/off ........................... 129
Manual transmission
Engaging neutral (ECO start/stop
function) ........................................ 170
Engaging revers egear ................... 170
Gea rlever ...................................... 169
Pulling away ................................... 163
Shifting to neutra l.......................... 170
Shift recommendatio n................... 170
Starting the engine ........................163
Massage function (PULSE) ...............112
Matt finish (cleaning instructions) ..353
Memory card (audio) .........................253
Memory function ............................... 121
Mercedes-Benz Service Centre see Qualified specialist workshop
Message memory (on-board com-
puter) ................................................. .268
Messages see Display messages
Mirror
see Vanity mirror (in sun visor)
Mirrors
see Exterior mirrors
see Rear-view mirror
Mobile phone
Frequencies ................................... 433
Installatio n..................................... 433
Menu (on-board computer) ............254
Notes/placing in the bracket ......... 333
Sliding adapter ............................... 335
Transmission output (maximum) .... 433
Mobile telephone
Pre-installe dbracket ...................... 334
Modifying the programming (key) .....84
MOExtended tyres .............................363
Motorway mode ................................ 131
MP3 Operating ...................................... .253
see Separate operating instructions
Multifunction display
Function/notes ............................. 248
Permanent displa y......................... 25914
Index
Page 23 of 457
Outside temperature ......................2
47
Setting (climate control) ................147
TEMPOMAT
Function/notes ............................. 189
Theft-deterrent system
ATA (Anti-Theft Alarm system) .........78
Immobiliser ...................................... 78
Through-loading ................................ 315
Through-loading feature ...................315
Time see Separate Owner' smanual
Timing (RACETIMER) .........................265
Tiredness Assist see ATTENTION ASSIST
TIREFIT kit .......................................... 364
Top Tether ............................................ 59
Total distance recorder ....................249
Tow-away protection ..........................79
Towing Important safety notes ..................372
With the rear axle raised ................373
Towing atrailer
Activ eBlind Spot Assist .................232
Active Lane Keeping Assist ............234
Axle load, permissible ....................450
Bulb failure indicator for LED
lamps ............................................. 241
ESP ®
(Electroni cStability Pro-
gram) ............................................... 75
Towing away
Fitting the towing eye. ...................373
Removing the towing eye. ..............373
With both axles on the ground .......374
Tow-starting
Emergency engine starting ............375
Important safety notes ..................372
Removing the towing eye. ..............373
Trailer
Display message ............................ 295
Trailer coupling
see Towing atrailer
Trailer towing
7-pin connector ............................. 241
Blind Spot Assist ............................ 227
Cleaning the trailer tow hitch ......... 355
Coupling up atrailer ...................... 238
Decoupling atrailer ....................... 239Driving tips
.................................... 236
Folding in the ball coupling ............239
Folding out the ball coupling ..........237
Important safety notes ..................234
Lights displa ymessage .................. 275
Mounting dimensions ....................447
Parking Guidance ........................... 218
Parktroni c...................................... 214
Power supply ................................. 240
Shift range ..................................... 174
Trailer loads ................................... 448
Transmission
see Automatic transmission
see Manual transmission
Transmission position display .........172
Transmission position display
(DIRECT SELECTl ever)...................... 172
Transporting the vehicle ..................374
Trim pieces (cleaning instructions) .356
Trip computer (on-board com-
puter) ................................................. .249
Trip meter Calling up ....................................... 249
Resetting (on-board computer) ......251
Turn signal
see Turn signals
Turn signals
Changing bulbs (front) ...................137
Switching on/off ........................... 128
TV
Operating (on-board computer) .....253
see Separate operating instructions
Two-way radio
Frequencies ................................... 433
Installatio n..................................... 433
Transmission output (maximum) .... 433
Type identification plate
see Vehicle identification plate
Tyre pressure
Calling up (on-board computer) .....386
Display message ............................ 289
Not reached (TIREFIT) ....................366
Reached (TIREFIT) ..........................366
Recommended ............................... 383
Tyre pressure loss warning
Important safety notes ..................385
Restarting ...................................... 38520
Index
Page 37 of 457
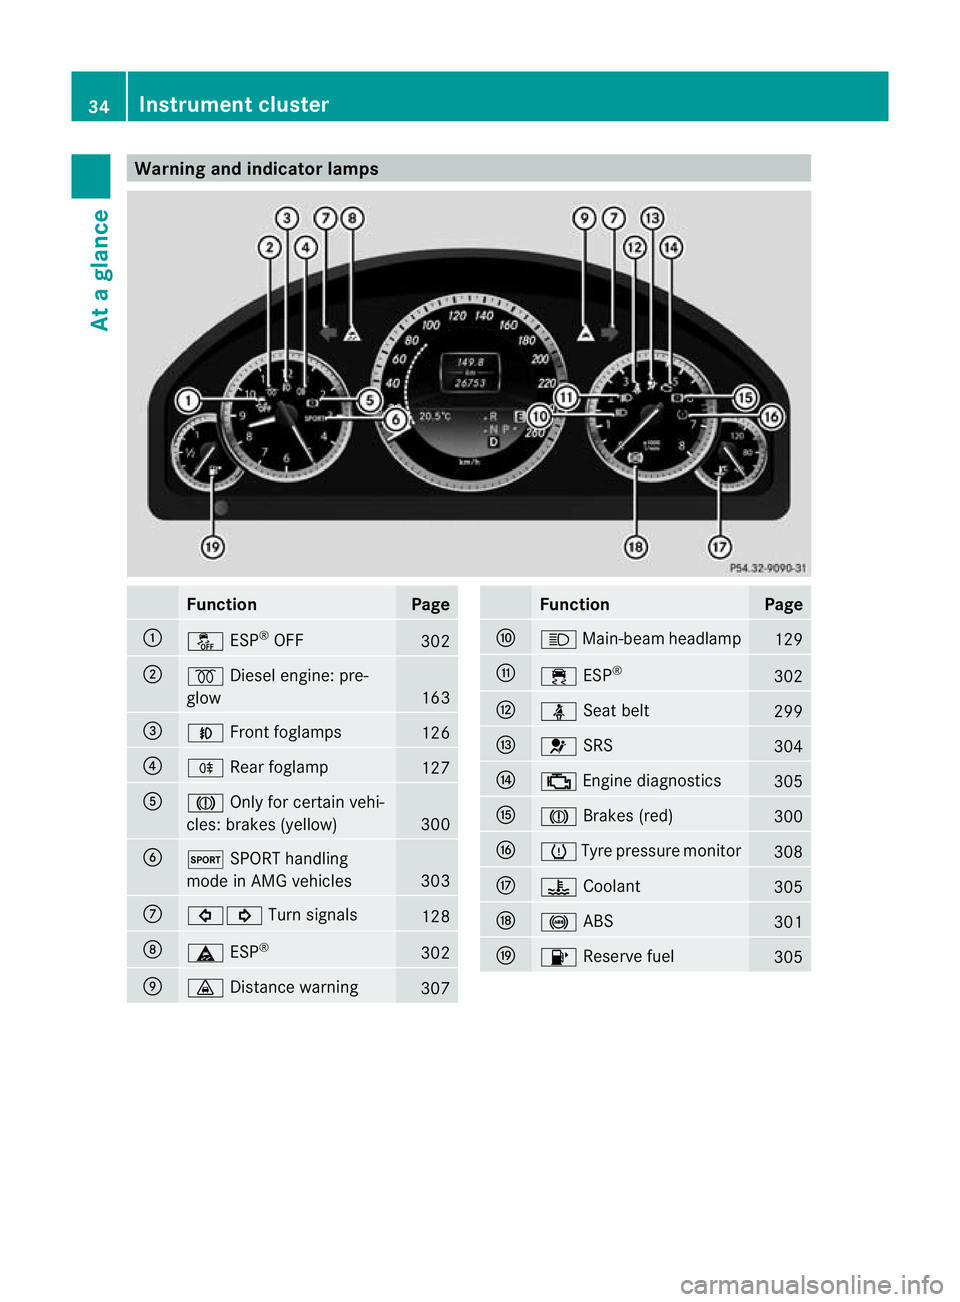
Warning and indicator lamps
Function Page
:
å
ESP®
OFF 302
;
%
Diesel engine: pre-
glow 163
=
N
Front foglamps 126
?
R
Rearfoglamp 127
A
J
Only for certain vehi-
cles: brakes (yellow) 300
B
M
SPORT handling
mode in AMG vehicles 303
C
#!
Turn signals 128
D
ä
ESP® 302
E
·
Distance warning 307 Function Page
F
K
Main-beam headlamp 129
G
÷
ESP® 302
H
ü
Seat belt 299
I
6
SRS 304
J
;
Engine diagnostics 305
K
J
Brakes (red) 300
L
h
Tyre pressure monitor 308
M
?
Coolant 305
N
!
ABS 301
O
8
Reserve fuel 30534
Instrument clusterAt a glance
Page 60 of 457
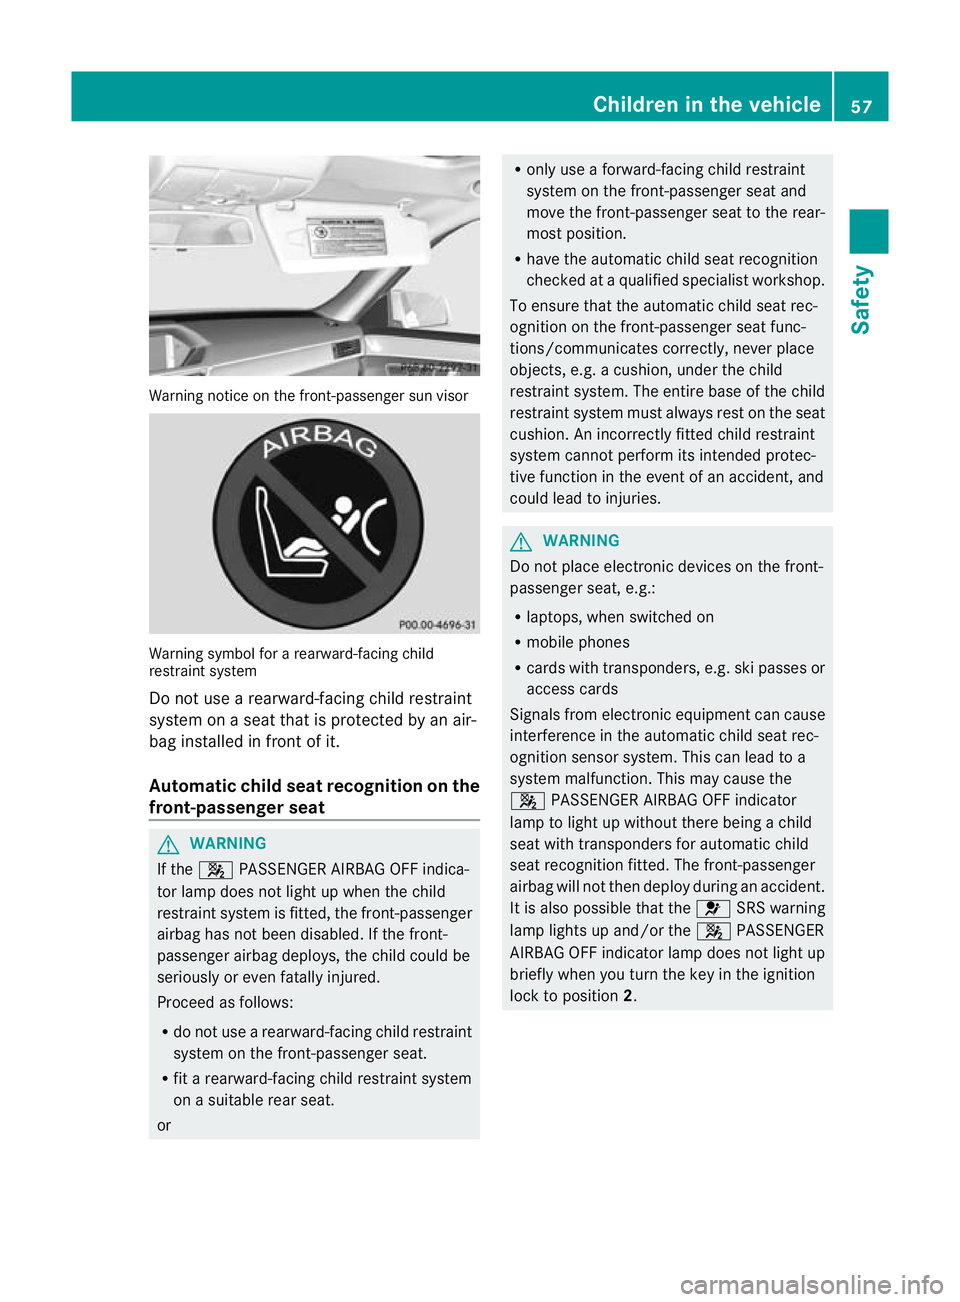
Warning notice on the front-passenger sun visor
Warning symbol for a rearward-facing child
restraint system
Do not use a rearward-facing child restraint
system on a seat that is protected by an air-
bag installed in fron tofit.
Automatic chil dseat recognition on the
front-passenger seat G
WARNING
If the 4 PASSENGER AIRBAG OFF indica-
to rlamp does no tlight up when the child
restraint system is fitted, the front-passenger
airbag has not been disabled. If the front-
passenger airbag deploys, the child could be
seriously or even fatally injured.
Proceed as follows:
R do not use a rearward-facing child restraint
system on the front-passenge rseat.
R fit a rearward-facing child restraint system
on a suitable rear seat.
or R
only use a forward-facing child restraint
system on the front-passenger seat and
move the front-passenger seat to the rear-
most position.
R have the automatic child seat recognition
checked at a qualified specialist workshop.
To ensure that the automatic child seat rec-
ognition on the front-passenger seat func-
tions/communicates correctly, never place
objects, e.g. a cushion, under the child
restraint system. The entire base of the child
restraint system must always rest on the seat
cushion. An incorrectly fitted child restraint
system cannot perform its intended protec-
tive function in the event of an accident, and
could lead to injuries. G
WARNING
Do not place electronic devices on the front-
passenger seat, e.g.:
R laptops, when switched on
R mobile phones
R cards with transponders, e.g. ski passes or
access cards
Signals from electronic equipment can cause
interference in the automatic child seat rec-
ognition sensor system. This can lead to a
system malfunction. This may cause the
4 PASSENGER AIRBAG OFF indicator
lamp to light up without there being a child
seat with transponders for automatic child
seat recognition fitted. The front-passenger
airbag will not then deploy during an accident.
It is also possible that the 6SRS warning
lamp lights up and/or the 4PASSENGER
AIRBAG OFF indicator lamp does not light up
briefly when you turn the key in the ignition
lock to position 2. Children in the vehicle
57Safety Z
Page 86 of 457
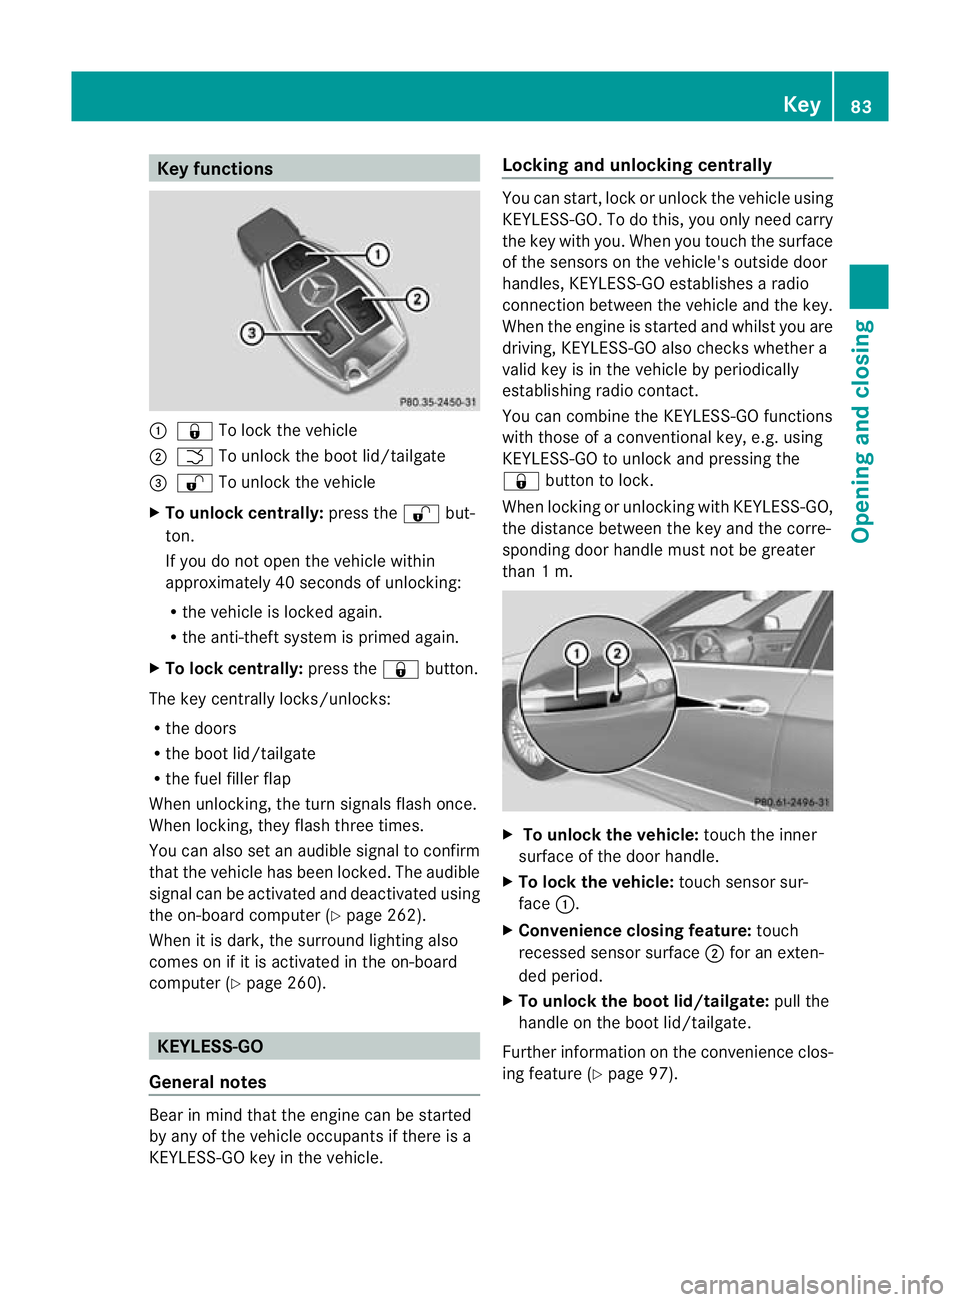
Key functions
:
& To loc kthe vehicle
; F To unlock the boot lid/tailgate
= % To unlock the vehicle
X To unlock centrally: press the%but-
ton.
If you do not open the vehicle within
approximately 40 seconds of unlocking:
R the vehicle is locked again.
R the anti-theft system is primed again.
X To lock centrally: press the&button.
The key centrally locks/unlocks:
R the doors
R the boot lid/tailgate
R the fuel filler flap
When unlocking, the turn signals flash once.
When locking, they flash three times.
You can also set an audible signal to confirm
that the vehicle has been locked. The audible
signal can be activated and deactivated using
the on-board computer (Y page 262).
When it is dark, the surround lighting also
comes on if it is activated in the on-board
computer (Y page 260). KEYLESS-GO
General notes Bear in mind that the engine can be started
by any of the vehicle occupants if there is a
KEYLESS-GO key in the vehicle. Locking and unlocking centrally You can start, lock or unlock the vehicle using
KEYLESS-GO. To do this, you only need carry
the key with you. When you touch the surface
of the sensors on the vehicle's outside door
handles, KEYLESS-GO establishes a radio
connection between the vehicle and the key.
When the engine is started and whilst you are
driving, KEYLESS-GO also checks whether a
valid key is in the vehicle by periodically
establishing radio contact.
You can combine the KEYLESS-GO functions
with those of a conventional key, e.g. using
KEYLESS-GO to unlock and pressing the
&
button to lock.
When locking or unlocking with KEYLESS-GO,
the distance between the key and the corre-
sponding door handle must not be greater
than 1 m. X
To unlock the vehicle: touch the inner
surface of the door handle.
X To lock the vehicle: touch sensor sur-
face :.
X Convenience closing feature: touch
recessed sensor surface ;for an exten-
ded period.
X To unlock the boot lid/tailgate: pull the
handle on the boot lid/tailgate.
Further information on the convenience clos-
ing feature (Y page 97). Key
83Opening and closing Z
Page 87 of 457
Changing the settings of the locking
system
You can change the settings of the locking
system. This means that only the driver's door
and the fuel fille rflap are unlocked when the
vehicle is unlocked. This is useful if you fre-
quently travel on your own.
X To change the setting: press and hold
down the %and& buttons on the
key simultaneously for approximately six
seconds until the battery chec klamp
flashes twice ( Ypage 85).
i If the setting of the locking system is
changed within the signal range of the vehi-
cle, pressing the &or% button:
R locks or
R unlocks the vehicle
The key now functions as follows:
X To unlock the driver's door: press the
% button once.
X To unlock centrally: press the%but-
ton twice.
X To lock centrally: press the&button.
The KEYLESS-GO function is changed as fol-
lows:
X To unlock the driver's door: touch the
inner surface of the door handle on the
driver's door.
X To unlock centrally: touch the inner sur-
face of the door handle on the front-
passenger door or the rear door.
X To lock centrally: touch the outer sensor
surface on one of the door handles.
X To restore the factory settings: press
and hold down the %and& buttons
simultaneously for approximately six sec-
onds until the battery check lamp flashes
twice (Y page 85). Emergency key element
General notes If the vehicle can no longer be locked or
unlocked with the key, use the emergency
key element.
If you use the emergenc
ykey element to
unlock and open the driver's door or the boot
lid/tailgate, the anti-thef talarm system will
be triggered (Y page 78).
There are several ways to tur noff the alarm:
X To turn the alarm off with the key: press
the % or& button on the key.
or
X Insert the key into the ignition lock.
or
X To deactivate the alarm with KEYLESS-
GO: press the Start/Stop button in the igni-
tion lock. The key must be in the vehicle.
or
X Lock or unlock the vehicle using KEYLESS-
GO. The key must be outside the vehicle.
If you unlock the vehicle using the emergency
key element, the fuel filler flap will not be
unlocked automatically.
X To unlock the fuel filler flap: insert the
key into the ignition lock.
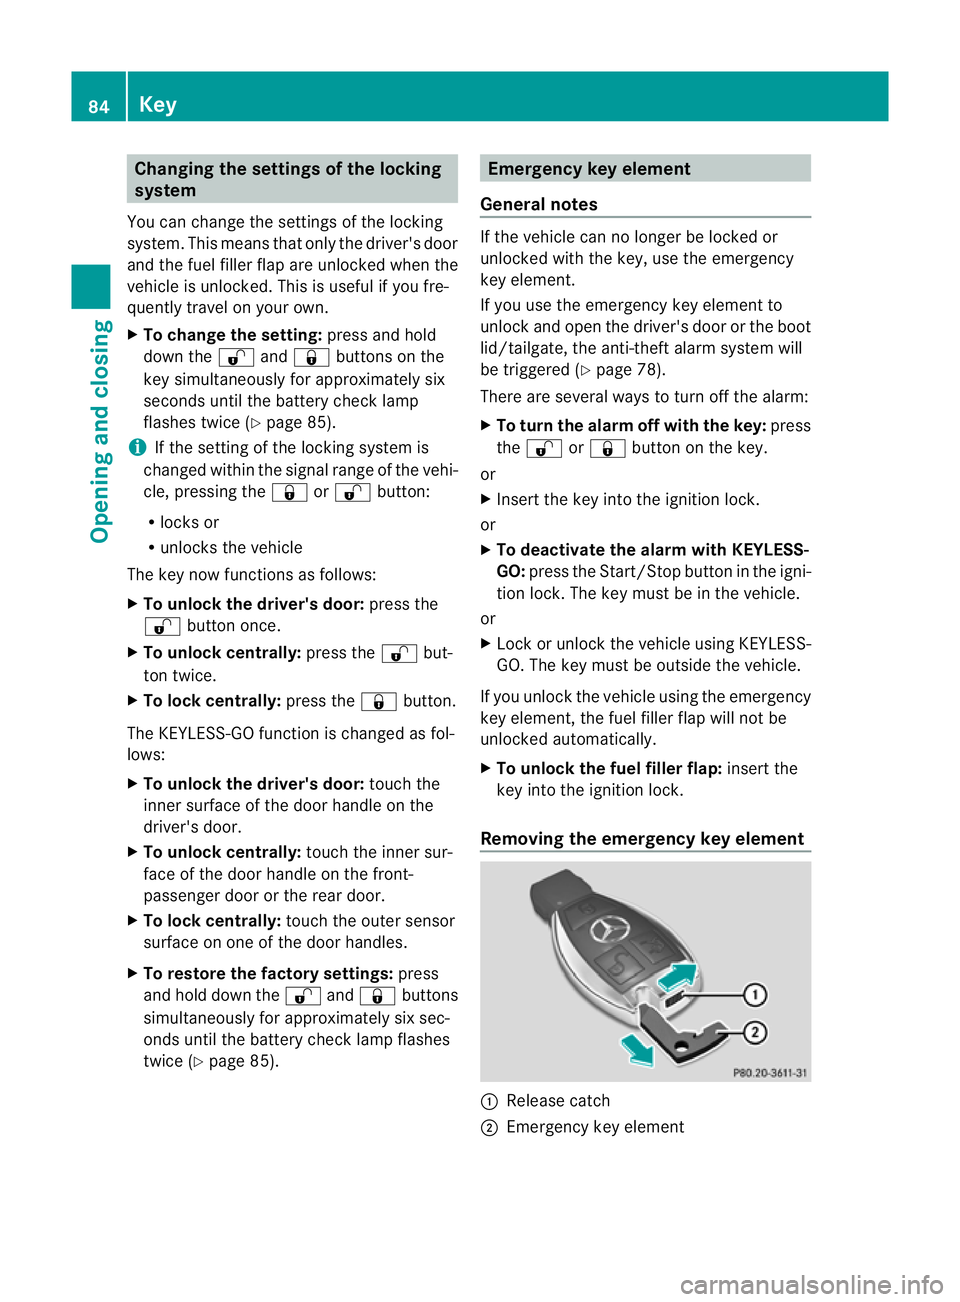
Removing the emergency key element :
Release catch
; Emergency key element 84
KeyOpening and closing
Page 131 of 457
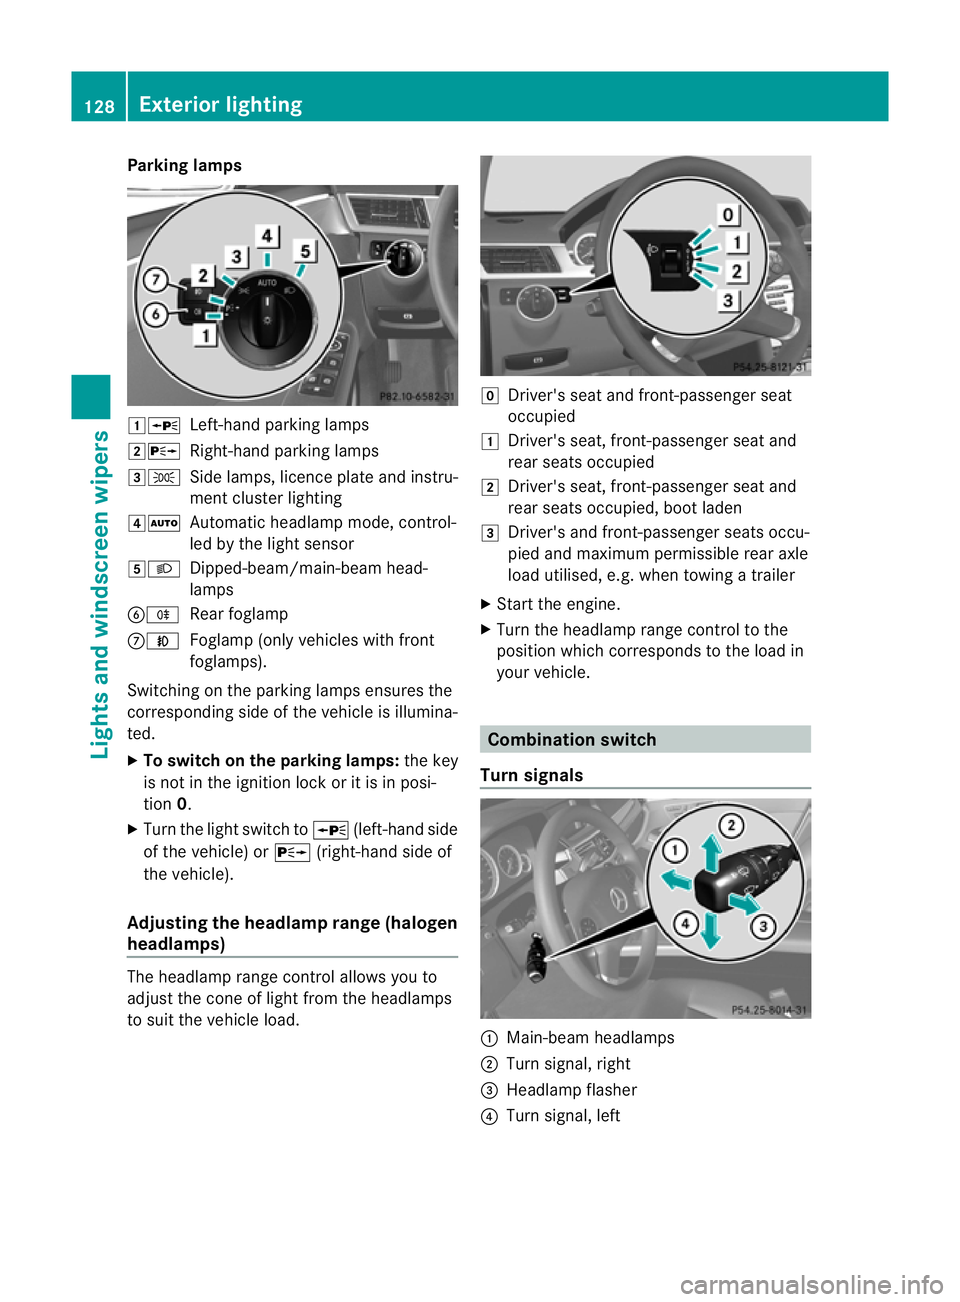
Parking lamps
1W
Left-hand parking lamps
2X Right-hand parking lamps
3T Side lamps, licence plate and instru-
ment cluster lighting
4Ã Automatic headlamp mode, control-
led by the light sensor
5L Dipped-beam/main-beam head-
lamps
BR Rear foglamp
CN Foglamp (only vehicles with front
foglamps).
Switching on the parking lamps ensures the
corresponding side of the vehicle is illumina-
ted.
X To switch on the parking lamps: the key
is not in the ignition lock or it is in posi-
tion 0.
X Turn the light switch to W(left-hand side
of the vehicle) or X(right-hand side of
the vehicle).
Adjusting the headlampr ange (halogen
headlamps) The headlamp range control allows you to
adjust the cone of light from the headlamps
to sui tthe vehicle load. g
Driver's seat and front-passenger seat
occupied
1 Driver's seat, front-passenger seat and
rear seats occupied
2 Driver's seat, front-passenger seat and
rear seats occupied, boot laden
3 Driver's and front-passenger seats occu-
pied and maximum permissible rear axle
load utilised, e.g. when towing a trailer
X Start the engine.
X Turn the headlamp range control to the
position which corresponds to the load in
your vehicle. Combination switch
Turn signals :
Main-beam headlamps
; Turn signal, right
= Headlamp flasher
? Turn signal, left 128
Exterior lightingLights and windscreen wipers