2012 MERCEDES-BENZ E-CLASS ESTATE bonnet
[x] Cancel search: bonnetPage 9 of 457
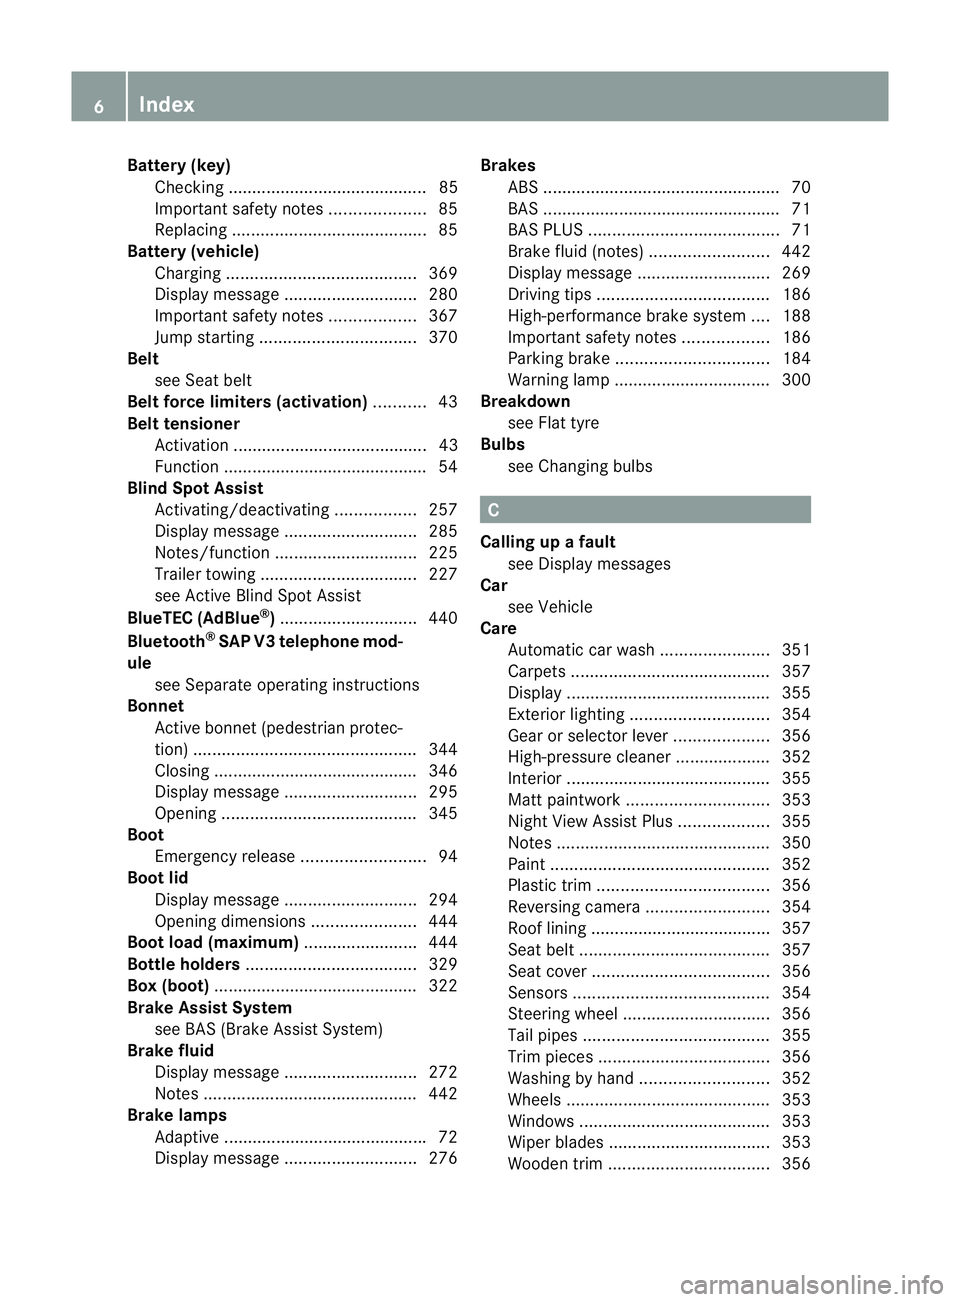
Battery (key)
Checking .......................................... 85
Important safety notes ....................85
Replacing ......................................... 85
Battery (vehicle)
Charging ........................................ 369
Display message ............................ 280
Important safety notes ..................367
Jump starting ................................. 370
Belt
see Seat belt
Belt force limiters (activation) ...........43
Belt tensioner Activation ......................................... 43
Function .......................................... .54
Blind Spo tAssist
Activating/deactivating .................257
Display message ............................ 285
Notes/function .............................. 225
Trailer towing ................................. 227
see Active Blind Spot Assist
BlueTEC (AdBlue ®
) ............................. 440
Bluetooth ®
SAP V3 telephone mod-
ule see Separate operating instructions
Bonnet
Active bonnet (pedestrian protec-
tion) ............................................... 344
Closing .......................................... .346
Display message ............................ 295
Opening ......................................... 345
Boot
Emergency release ..........................94
Boot lid
Display message ............................ 294
Opening dimensions ......................444
Boot load (maximum) ........................ 444
Bottle holders .................................... 329
Box (boot) .......................................... .322
Brake Assist System see BAS (Brake Assist System)
Brake fluid
Display message ............................ 272
Notes ............................................. 442
Brake lamps
Adaptive .......................................... .72
Display message ............................ 276Brakes
ABS .................................................. 70
BAS .................................................. 71
BAS PLUS ........................................ 71
Brake fluid (notes) .........................442
Display message ............................ 269
Driving tips .................................... 186
High-performance brake system ....188
Important safety notes ..................186
Parking brake ................................ 184
Warning lamp ................................. 300
Breakdown
see Flat tyre
Bulbs
see Changing bulbs C
Calling up a fault see Display messages
Car
see Vehicle
Care
Automatic car wash .......................351
Carpets .......................................... 357
Display ........................................... 355
Exterior lighting ............................. 354
Gea rors electo rlever .................... 356
High-pressure cleaner .................... 352
Interior ........................................... 355
Matt paintwork .............................. 353
Nigh tView Assist Plus ...................355
Notes ............................................. 350
Paint .............................................. 352
Plastic trim .................................... 356
Reversing camera ..........................354
Roof lining ...................................... 357
Seat bel t........................................ 357
Seat cover ..................................... 356
Sensors ......................................... 354
Steering wheel ............................... 356
Tai lpipes ....................................... 355
Trim pieces .................................... 356
Washing by hand ........................... 352
Wheels ........................................... 353
Windows ........................................ 353
Wiper blades .................................. 353
Wooden trim .................................. 3566
Index
Page 33 of 457
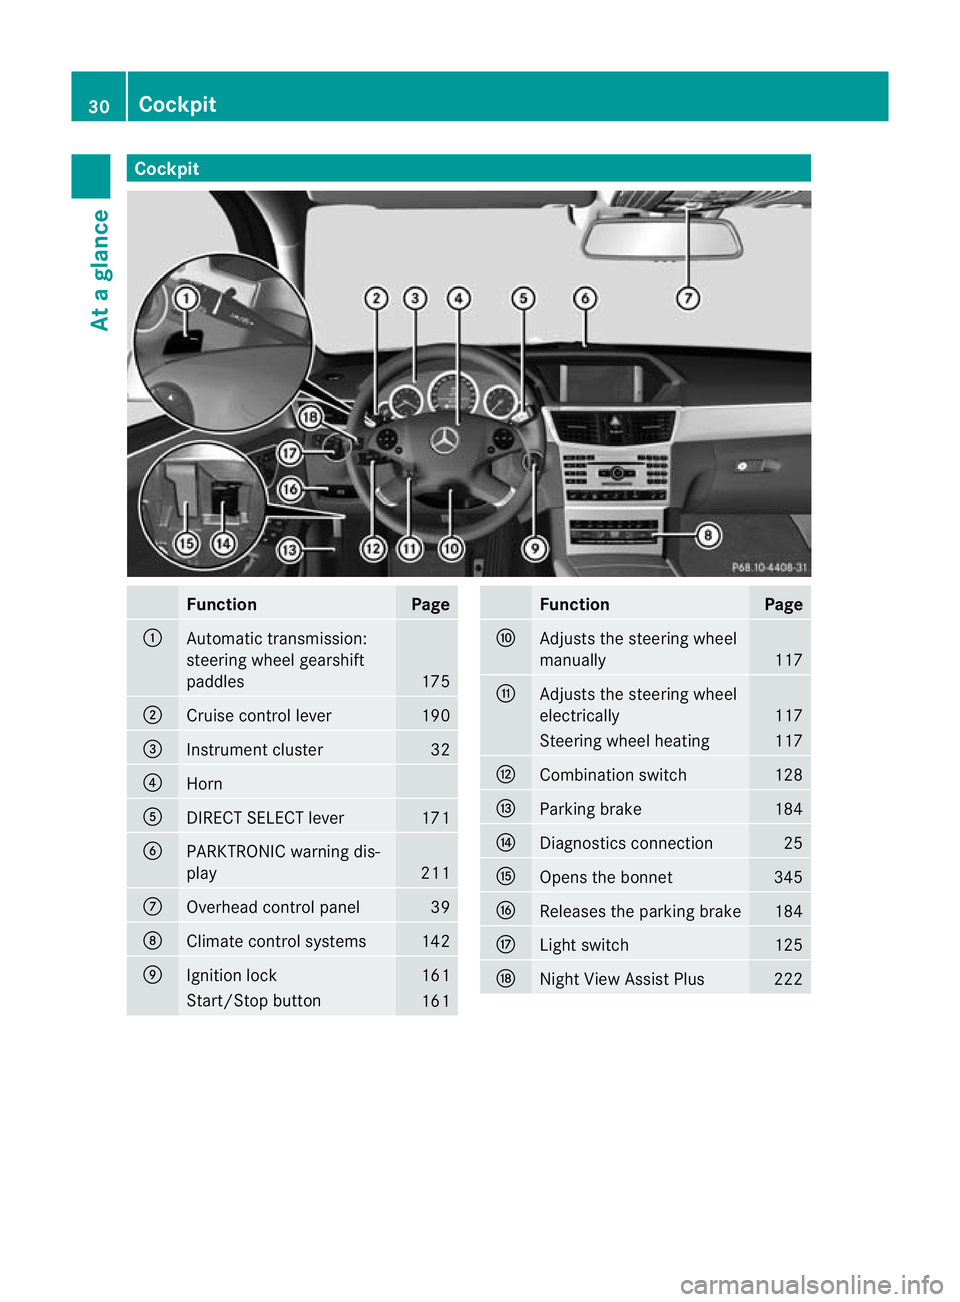
Cockpit
Function Page
:
Automatic transmission:
steering wheel gearshift
paddles
175
;
Cruise control lever 190
=
Instrument cluster 32
?
Horn
A
DIRECT SELECT lever 171
B
PARKTRONIC warning dis-
play
211
C
Overhead control panel 39
D
Climate control systems 142
E
Ignition lock 161
Start/Stop button
161 Function Page
F
Adjusts the steering wheel
manually 117
G
Adjusts the steering wheel
electrically 117
Steering wheel heating 117
H
Combination switch 128
I
Parking brake 184
J
Diagnostics connection 25
K
Opens the bonnet 345
L
Releases the parking brake 184
M
Ligh
tswitch 125
N
Night View Assist Plus 22230
CockpitAt a glance
Page 34 of 457
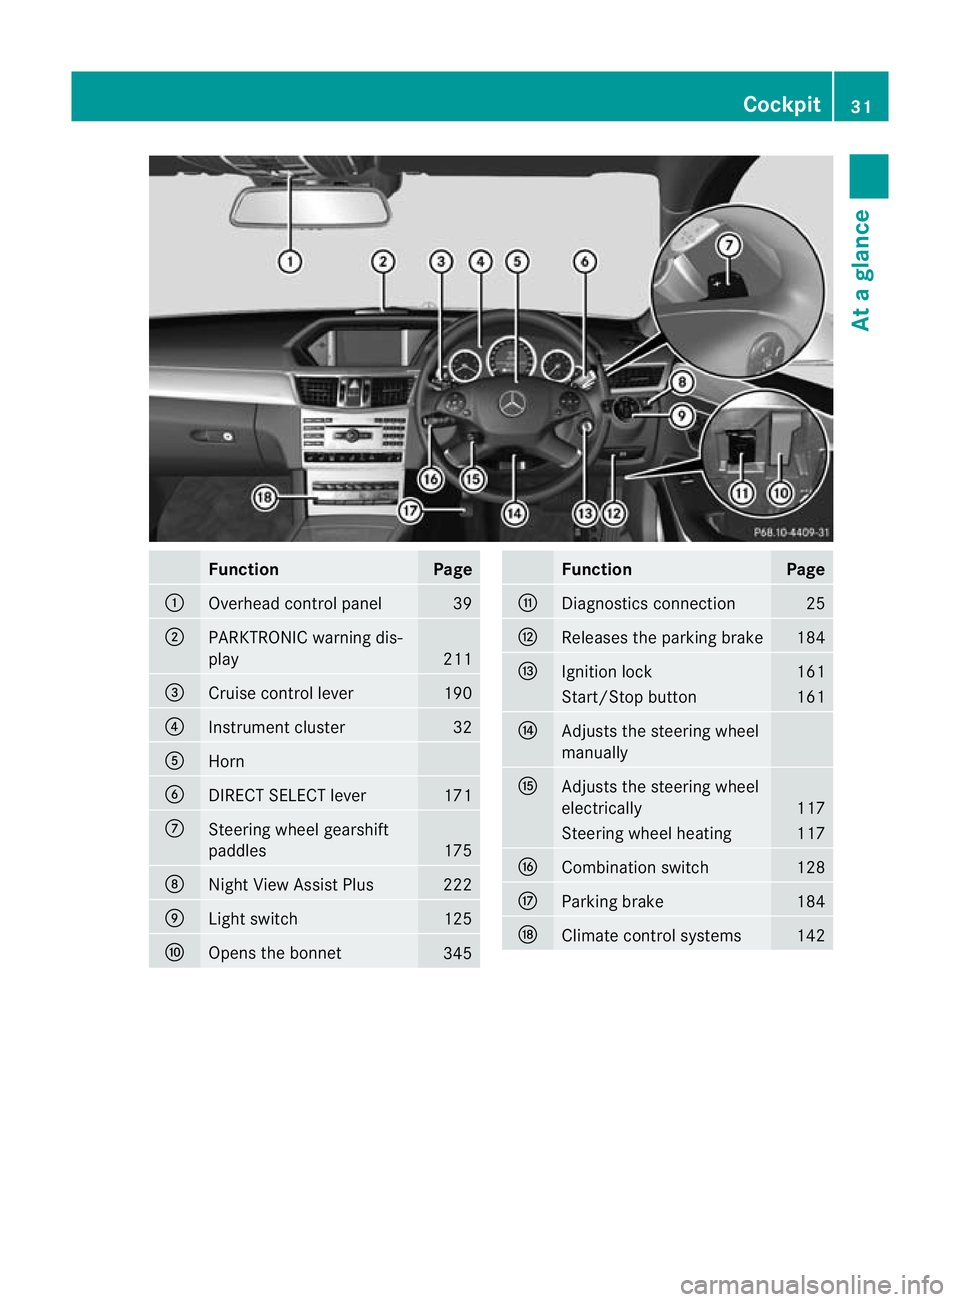
Function Page
:
Overhead control panel 39
;
PARKTRONIC warning dis-
play
211
=
Cruise control lever 190
?
Instrument cluster 32
A
Horn
B
DIRECT SELECT lever 171
C
Steering wheel gearshift
paddles
175
D
Nigh
tView Assist Plus 222
E
Light switch 125
F
Opens the bonnet
345 Function Page
G
Diagnostics connection 25
H
Releases the parking brake 184
I
Ignition lock 161
Start/Stop button 161
J
Adjusts the steering wheel
manually
K
Adjusts the steering wheel
electrically
117
Steering wheel heating 117
L
Combination switch 128
M
Parking brake 184
N
Climate control systems 142Cockpit
31At a glance
Page 47 of 457
If there is an even higherr
ate of vehicle decel-
eration or acceleratio ninalongitudinal direc-
tion, the front airbags are also deployed.
Your vehicle has adaptive, two-stage front air-
bags. The airbag control unit evaluates vehi-
cle deceleration or acceleration in the event
of a collision. In the firs tdeployment stage,
the fron tairbag is filled with enough propel-
lant gas to reduce the risk of injuries. The
front airbag is fully deployed if a second
deploymen tthreshold is reached within a few
milliseconds.
The belt tensioner and airbag triggering
thresholds are variable and are adapted to the
rate of deceleration or acceleration of the
vehicle. This process is pre-emptive in nature.
The triggering process must take place in
good time at the start of the collision.
The rate of vehicle deceleration or accelera-
tion and the direction of the force are essen-
tially determined by:
R the distribution of forces during the colli-
sion
R the collision angle
R the deformation characteristics of the vehi-
cle
R the characteristics of the object with which
the vehicle has collided
Factors which can only be seen and measured
after a collision has occurred do not play a
decisive role in the deployment of an airbag,
nor do they provide an indication of airbag
deployment.
The vehicle may be deformed significantly,
e.g. the bonnet or the wing, without an airbag
being deployed. This is the case if only parts
which are relatively easily deformed are affec-
ted and the rate of deceleration is not high.
Conversely, airbags may be deployed even
though the vehicle suffers only minor defor-
mation. This is the case if, for example, very
rigid vehicle parts such as longitudinal body
members are hit, and sufficient deceleration
occurs as a result. i
The front belt tensioners can only be trig-
gered if the seat belt tongues on the front
seats are correctly engaged in the seat belt
buckles.
i Not all airbags are deployed in an acci-
dent. The different airbag systems work
independently of each other.
How the airbag system works is deter-
mined by the severity of the accident detec-
ted, especially the vehicle deceleration or
acceleration, and the apparent type of acci-
dent:
R head-on collision
R side impact
R overturn Airbags
Important safety notes G
WARNING
Airbags provide additional protection; they
are not, however, a substitute for seat belts.
Observe the following notes to reduce the risk
of serious or even fatal injury caused by airbag
deployment:
R all vehicle occupants –inparticular, preg-
nant women – must wear their seat belt
correctly at all times and lean back against
the backrest, which should be positioned
as close to the vertical as possible. The
head restraint must support the back of the
head at about eye level.
R always secure childre nless than
1.50mt all or unde r12years of age in suit-
able child restraint systems.
R all vehicle occupants must select a seat
position that is as far away from the airbag
as possible. The driver's seat position must
allow the vehicle to be driven safely. The
driver's chest should be as far away from
the centre of the driver's airbag cover as
possible. 44
Occupant safetySafety
Page 81 of 457
X
To activate/deactivate: activate or deac-
tivate PRE-SAFE ®
Brake in the on-board
computer (Y page 256).
When PRE-SAFE ®
Brake is activated, the
Ä symbol appears in multifunctio ndis-
play, as long as the HOL Dfunction is deac-
tivated (Y page 205). On vehicles with the
Active Parking Assist driving system, the
Ä symbol is displayed when position P
is engaged or you are driving faste rthan
35 km/h.
For PRE-SAFE ®
Brake to assist you when driv-
ing, the radar sensor system must be
switched on (Y page 262) and be opera-
tional.
The radar sensor system is switched off auto-
matically in the vicinity of radio telescope
facilities in the following vehicles:
R vehicles with COMAND Online and naviga-
tion
R vehicles with Audio 20 and Becker ®
MAP
PILOT
Becker ®
MAP PILOT must be connected;
see the separate operating instructions.
The radar sensor system must be switched off
using the on-board computer in the vicinity of
radio telescope facilities in the following vehi-
cles:
R vehicles without COMAND Online and nav-
igation
R vehicles without Audio 20 and Becker ®
MAP PILOT
R vehicles for Australia
For information on switching off the radar
sensor system using the on-board computer,
see (Y page 262).
Following damage to the front end of the vehi-
cle, have the configuration and operation of
the radar sensors checked at a qualified spe-
cialist workshop. This also applies to colli-
sions at slow speeds where there is no visible
damage to the front of the vehicle. Anti-theft systems
Immobiliser
X To activate with the key: remove the key
from the ignition lock.
X To activate with KEYLESS-GO: switch the
ignition off and open the driver's door.
X To deactivate: switch on the ignition.
The immobiliser prevents your vehicle from
being started without the correct key.
When leaving the vehicle, always take the key
with you and lock the vehicle. Anyone can
start the engine if a valid key has been left
inside the vehicle.
i The immobiliser is always deactivated
when you start the engine. ATA (Anti-Theft Alarm system)
X
To prime: lock the vehicle with the key or
KEYLESS-GO.
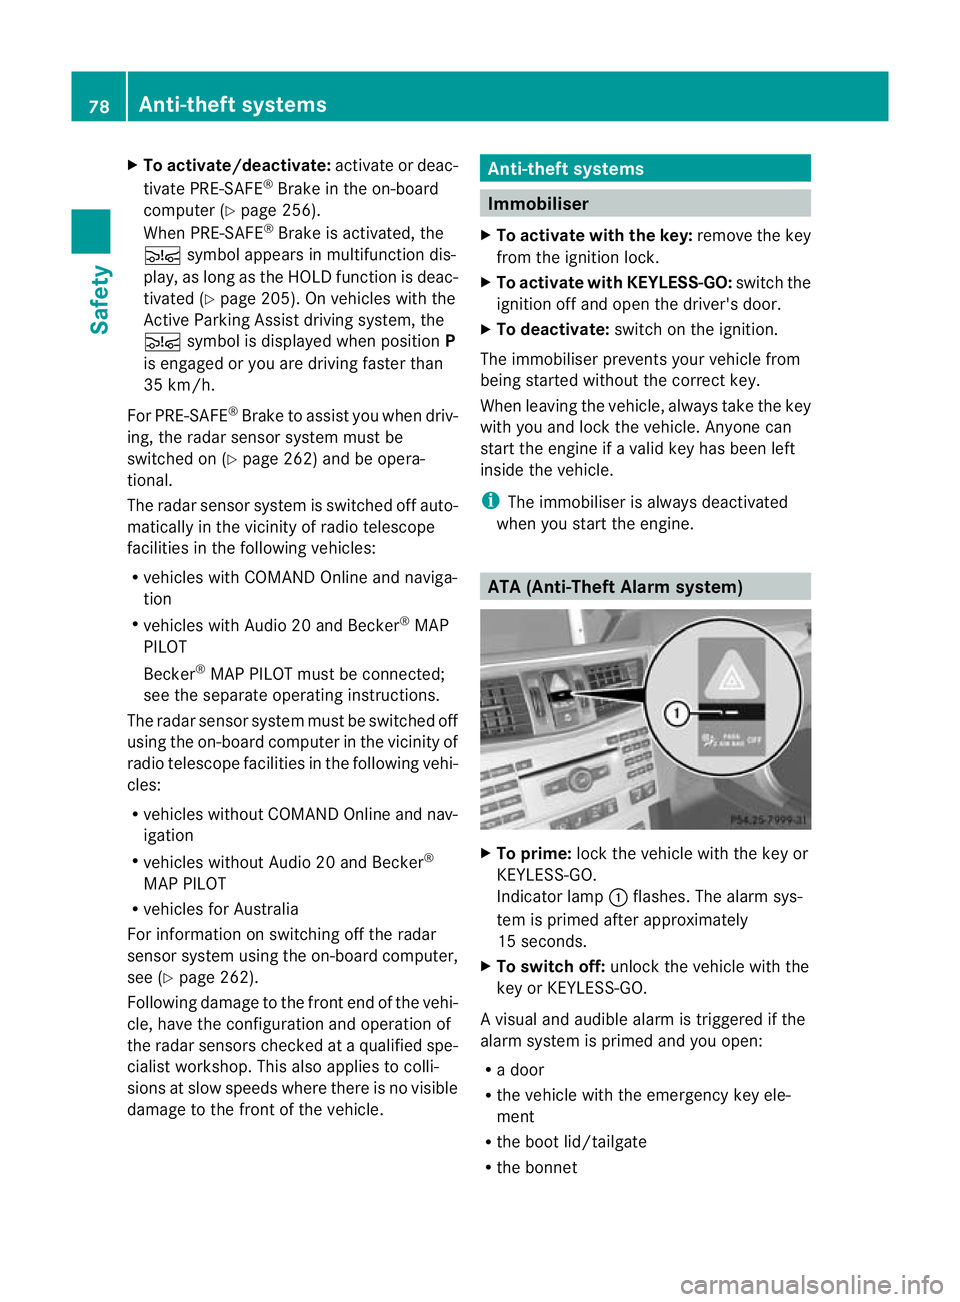
Indicator lamp :flashes. The alarm sys-
tem is primed after approximately
15 seconds.
X To switch off: unlock the vehicle with the
key or KEYLESS-GO.
Av isual and audible alarm is triggered if the
alarm system is primed and you open:
R a door
R the vehicle with the emergency key ele-
ment
R the boot lid/tailgate
R the bonnet 78
Anti-theft systemsSafety
Page 127 of 457
Useful information
i This Owner's Manual describes all mod-
els, series and optional equipment for your
vehicle that were available at the time of
going to press. National variations are pos-
sible. Note that your vehicle may not be
equipped with all of the functions descri-
bed. This is also the case for systems and
functions relevant to safety.
i Read the information on qualified special-
ist workshops: (Y page 25). Exterior lighting
Important safety notes
For reasons of safety, Mercedes-Benz recom-
mends that you drive with the lights switched
on even during the daytime. In some coun-
tries, operation of the headlamps varies due
to legal requirements and self-imposed obli-
gations. Driving abroad
General notes If your journey takes you to countries where
vehicles are driven on the opposite side of the
road to the country in which the vehicle is
registered, your headlamps must be switched
to symmetrical dipped beam as soon as pos-
sible after crossing the border. This prevents
oncoming traffic from being dazzled. Sym-
metrical lights do not illuminate as large an
area of the edge of the carriageway. Vehicles with halogen headlamps X
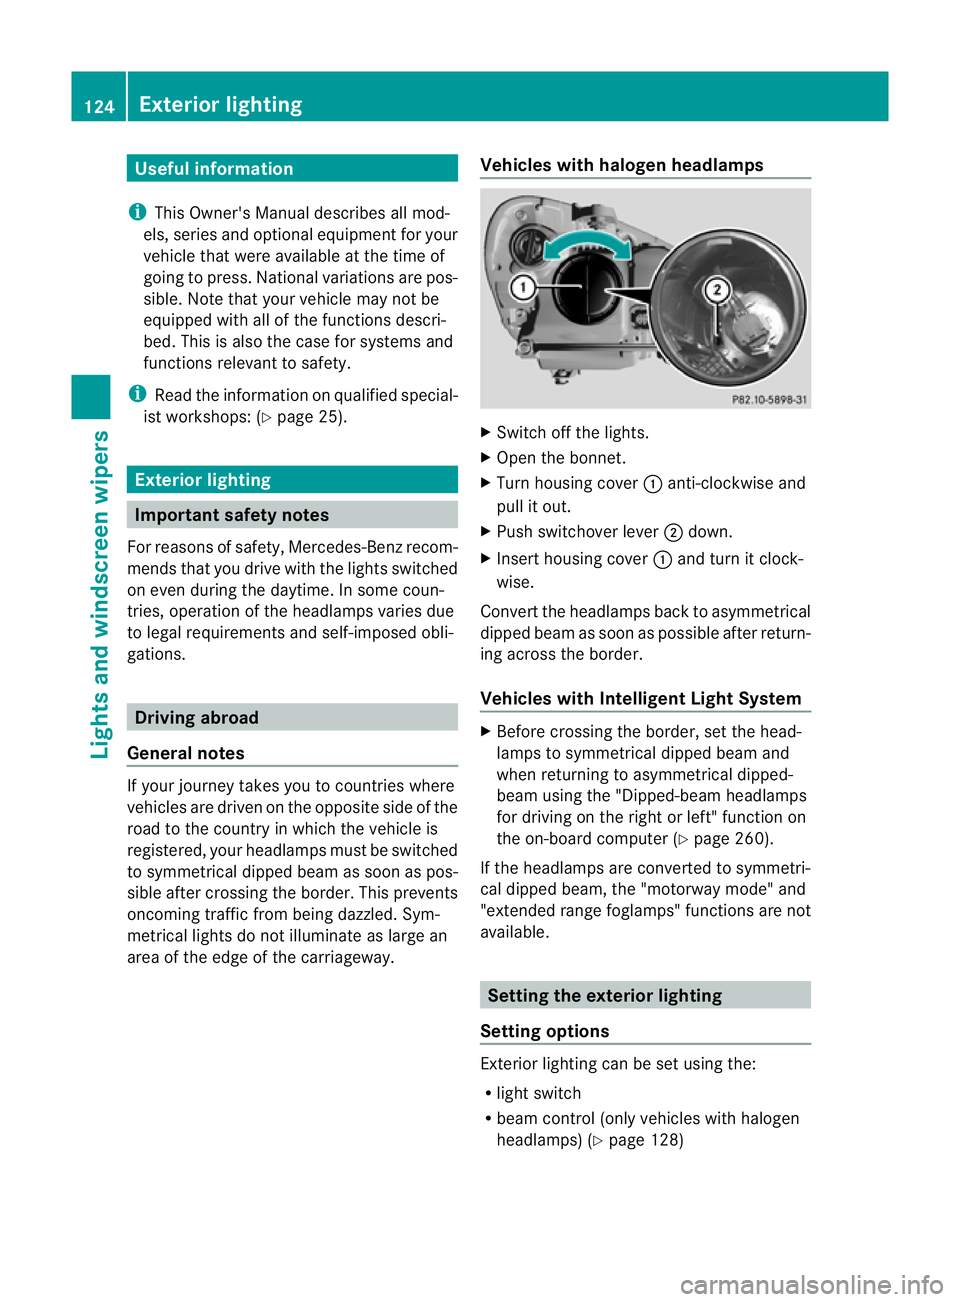
Switch off the lights.
X Open the bonnet.
X Turn housing cover :anti-clockwise and
pull it out.
X Push switchover lever ;down.
X Insert housing cover :and turn it clock-
wise.
Conver tthe headlamps back to asymmetrical
dipped beam as soon as possible after return-
ing across the border.
Vehicles with Intelligent Light System X
Before crossing the border, set the head-
lamps to symmetrical dipped beam and
when returning to asymmetrical dipped-
beam using the "Dipped-beam headlamps
for driving on the right or left" function on
the on-board computer (Y page 260).
If the headlamps are converted to symmetri-
cal dipped beam, the "motorway mode" and
"extended range foglamps" functions are not
available. Setting the exterior lighting
Setting options Exterior lighting can be set using the:
R
light switch
R beam control (only vehicles with halogen
headlamps) (Y page 128)124
Exterior lightingLights and windscreen wipers
Page 139 of 457
Bi-xeno
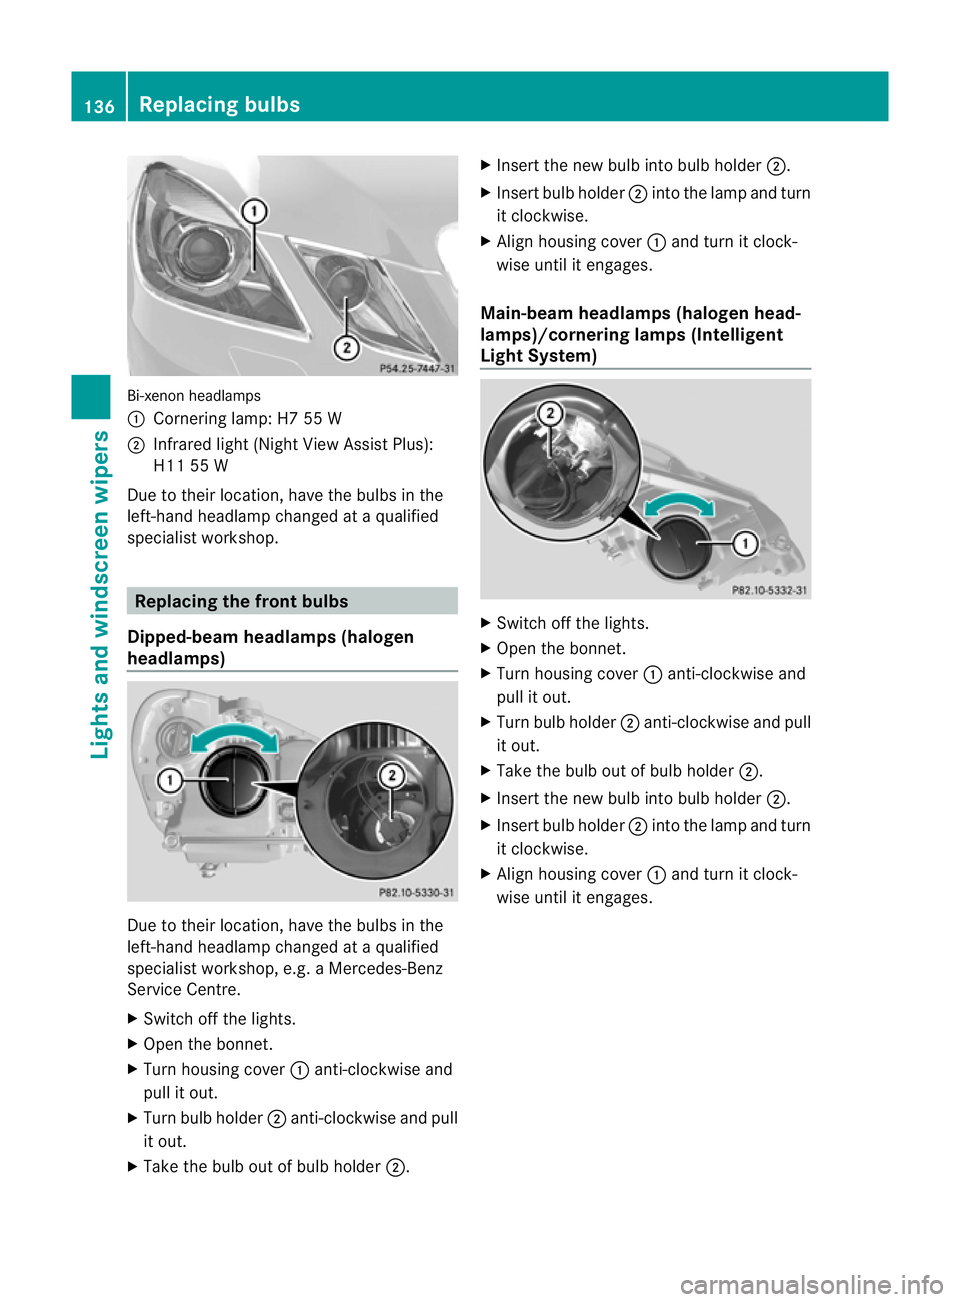
nheadlamps
: Cornering lamp: H7 55 W
; Infrared light (Night View Assist Plus):
H11 55 W
Due to their location, have the bulbs in the
left-hand headlamp changed at a qualified
specialist workshop. Replacing the front bulbs
Dipped-beam headlamps (halogen
headlamps) Due to their location, have the bulbs in the
left-hand headlamp changed at a qualified
specialist workshop, e.g. aMercedes-Benz
Service Centre.
X Switch off the lights.
X Open the bonnet.
X Turn housing cover :anti-clockwise and
pull it out.
X Turn bulb holder ;anti-clockwise and pull
it out.
X Take the bulb out of bulb holder ;.X
Inser tthe new bulb into bulb holder ;.
X Insert bulb holder ;into the lamp and turn
it clockwise.
X Align housing cover :and turn it clock-
wise until it engages.
Main-beam headlamps (halogen head-
lamps)/cornering lamps (Intelligent
Light System) X
Switch off the lights.
X Open the bonnet.
X Turn housing cover :anti-clockwise and
pull it out.
X Turn bulb holder ;anti-clockwise and pull
it out.
X Take the bulb out of bulb holder ;.
X Insert the new bulb into bulb holder ;.
X Insert bulb holder ;into the lamp and turn
it clockwise.
X Align housing cover :and turn it clock-
wise until it engages. 136
Replacing bulbsLights and windscreen wipers
Page 140 of 457
Side lamps/parking lamps(
halogen
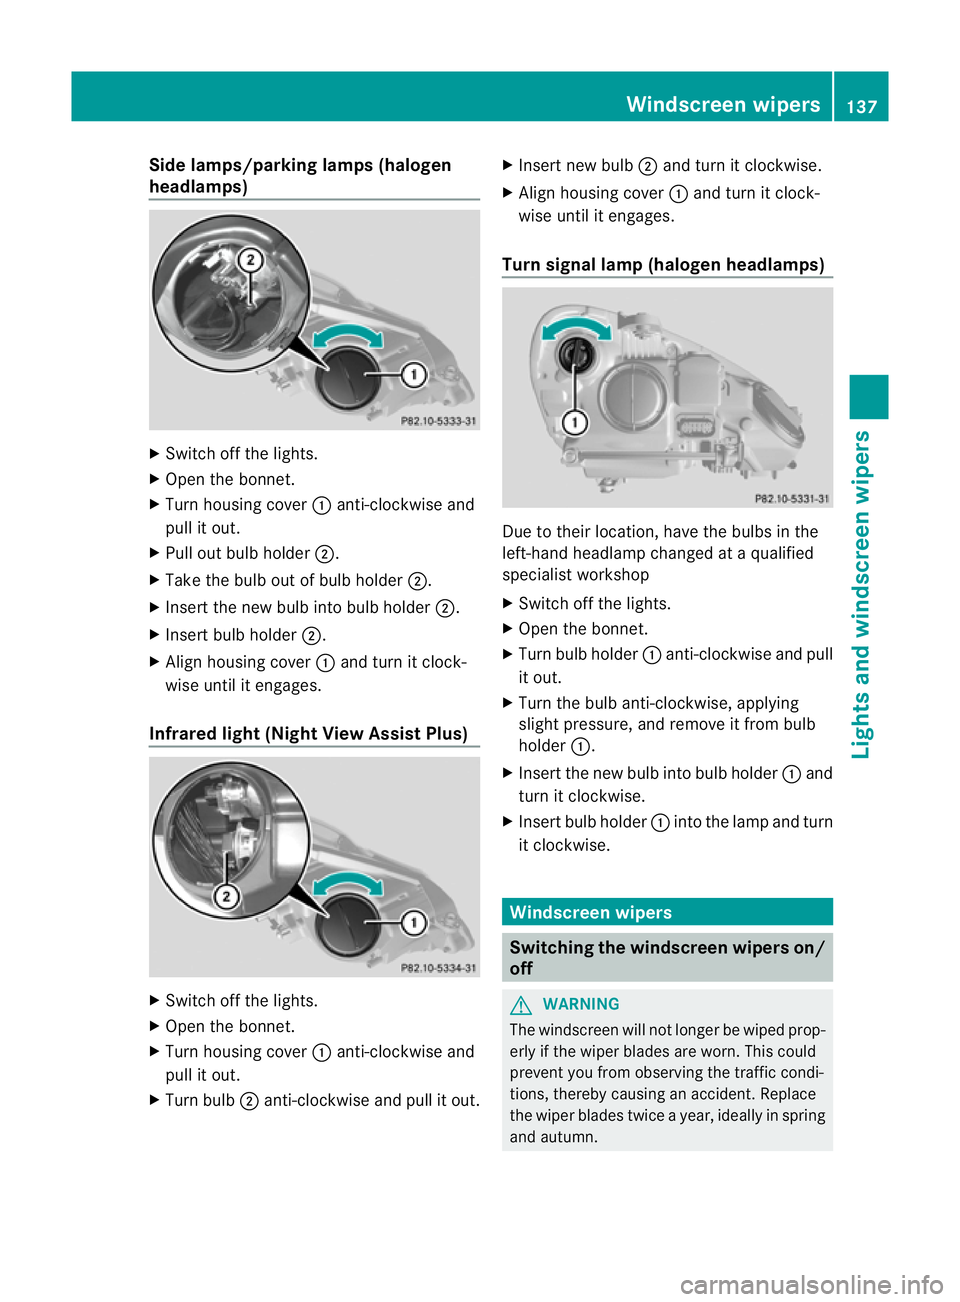
headlamps) X
Switch off the lights.
X Open the bonnet.
X Turn housing cover :anti-clockwise and
pull it out.
X Pull out bulb holder ;.
X Take the bulb out of bulb holder ;.
X Insert the new bulb into bulb holder ;.
X Insert bulb holder ;.
X Align housing cover :and turn it clock-
wise until it engages.
Infrared light (Night View Assist Plus) X
Switch off the lights.
X Open the bonnet.
X Turn housing cover :anti-clockwise and
pull it out.
X Turn bulb ;anti-clockwise and pull it out. X
Insert new bulb ;and turn it clockwise.
X Align housing cover :and turn it clock-
wise until it engages.
Turn signal lamp (halogen headlamps) Due to their location, have the bulbs in the
left-hand headlamp changed at a qualified
specialist workshop
X
Switch off the lights.
X Open the bonnet.
X Turn bulb holder :anti-clockwise and pull
it out.
X Turn the bulb anti-clockwise, applying
slight pressure, and remove it from bulb
holder :.
X Insert the new bulb into bulb holder :and
turn it clockwise.
X Insert bulb holder :into the lamp and turn
it clockwise. Windscreen wipers
Switching the windscreen wipers on/
off
G
WARNING
The windscreen will not longe rbe wiped prop-
erly if the wiper blades are worn. This could
prevent you from observing the traffic condi-
tions, thereby causing an accident. Replace
the wiper blades twice a year, ideally in spring
and autumn. Windscreen wipers
137Lights and windscreen wipers Z