2012 MERCEDES-BENZ E-CLASS ESTATE checking oil
[x] Cancel search: checking oilPage 13 of 457

E
EASY-ENTRY feature Activating/deactivating .................263
Function/notes ............................. 118
EASY-EXIT feature
Crash-responsive ........................... 118
Function/notes ............................. 118
Switching on/off ........................... 263
EASY-PACK convenience box ...........322
EASY-PACK folding floor Important safety notes ..................325
EASY-PACK folding luggage-com-
partment floor
Opening and closing ......................326
EASY-PACK loading sill protector ....326
EASY-PACK load-securing kit Components and storag e.............. 323
Inserting the brackets into the
loading rai l..................................... 323
EASY-PACK luggage compartment
management system ........................323
EBD (electronic brake force distri-
bution)
Display message ............................ 271
Function/notes ................................ 76
ECO display
Function/notes ............................. 185
On-board computer .......................250
ECO start/stop function
Deactivating/activating .................165
General information .......................165
Electrical fuses
see Fuses
Electronic Stability Program
see ESP ®
(Electroni cStability Program)
Electronic Traction System
see ETS/4ETS (Electronic Trac-
tionS ystem)
Emergency key
Unlocking the driver's door ..............90
Emergency key element
Function/notes ................................ 84
Locking vehicle ................................ 90
Emergency release
Driver's door .................................... 90
Fuel filler fla p................................. 181Emergency spare wheel
Important safety notes ..................425
Inflating the collapsible spare
wheel ............................................. 427
Points to remember .......................425
Removing ....................................... 426
Storage location ............................ 426
Stowing .......................................... 427
Technical data ............................... 429
Emergency unlocking
Tailgate ............................................ 95
Vehicle ............................................. 90
Engine
Display message ............................ 279
ECO start/stop function ................164
Engine number ............................... 435
Jump-starting ................................. 370
Running irregularl y......................... 168
Starting problems ..........................168
Starting the engine with the key ....163
Starting with KEYLESS GO .............163
Stopping ........................................ 184
Tow-starting (vehicle) ..................... 375
Warning lamp (engine diagnos-
tics) ............................................... 305
Engine electronics
Notes ............................................. 433
Problem (fault) ............................... 168
Engine oil
Additives ........................................ 442
Checking the oil level ..................... 346
Checking the oil level using the
dipstick .......................................... 347
Display message ............................ 280
Filling capacity ............................... 441
Notes about oil grades ................... 440
Notes on oil level/consumption ....346
Temperature (on-board computer) .264
Topping up ..................................... 347
Viscosity ........................................ 442
Environmental protection
Returning an end-of-life vehicle .......23
ESP ®
(Electronic Stability Pro-
gram) AMG menu (on-board computer) ...265
Deactivating/activating (AMG
vehicles) .......................................... 7410
Index
Page 350 of 457

When checking the oil level:
R
park the vehicle on a level surface.
R the engine should be switched off for
approximately five minutes if the engine is
at normal operating temperature.
R if the engine is not at normal operating
temperature, e.g. if the engine was only
started briefly: wait about 30 minutes
before carrying out the measurement.
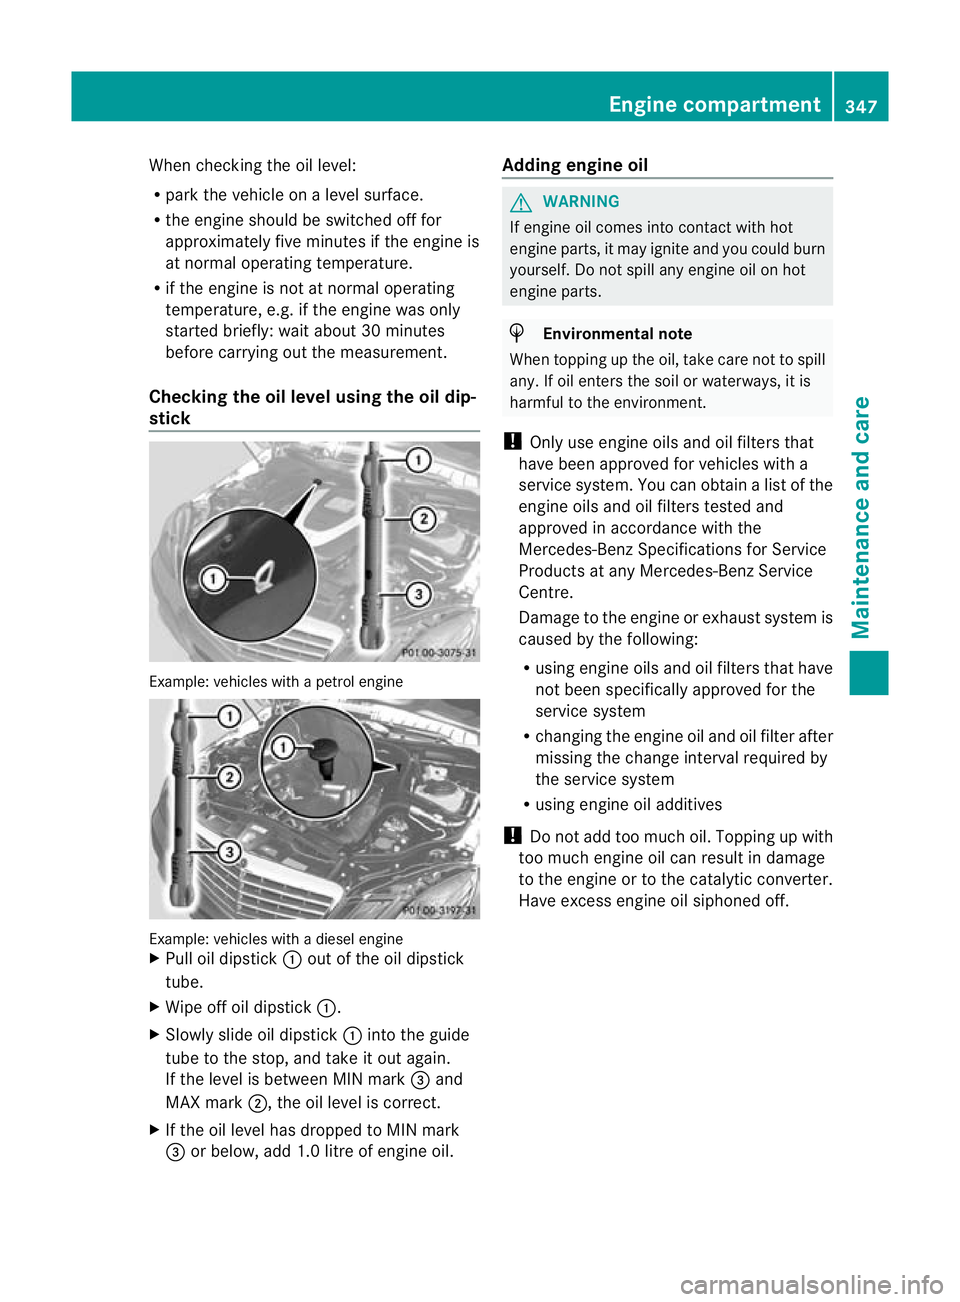
Checking the oil level using the oil dip-
stick Example: vehicles with a petrol engine
Example: vehicles with a diesel engine
X
Pull oil dipstick :out of the oil dipstick
tube.
X Wipe off oil dipstick :.
X Slowly slide oil dipstick :into the guide
tube to the stop, and take it out again.
If the level is between MIN mark =and
MAX mark ;, the oil level is correct.
X If the oil level has dropped to MIN mark
= or below, add 1.0 litre of engine oil. Adding engine oil G
WARNING
If engine oil comes into contact with hot
engine parts, it may ignite and you could burn
yourself. Do not spill any engine oil on hot
engine parts. H
Environmental note
When topping up the oil, take care not to spill
any. If oil enters the soil or waterways, it is
harmful to the environment.
! Only use engine oils and oil filters that
have been approved for vehicles with a
service system. You can obtain a list of the
engine oils and oil filters tested and
approved in accordance with the
Mercedes-Benz Specifications for Service
Products at any Mercedes-Benz Service
Centre.
Damage to the engine or exhaust system is
caused by the following:
R using engine oils and oil filters that have
not been specifically approved for the
service system
R changing the engine oil and oil filter after
missing the change interval required by
the service system
R using engine oil additives
! Do not add too much oil. Topping up with
too much engine oil can result in damage
to the engine or to the catalytic converter.
Have excess engine oil siphoned off. Engine compartment
347Maintenance and care Z
Page 351 of 457

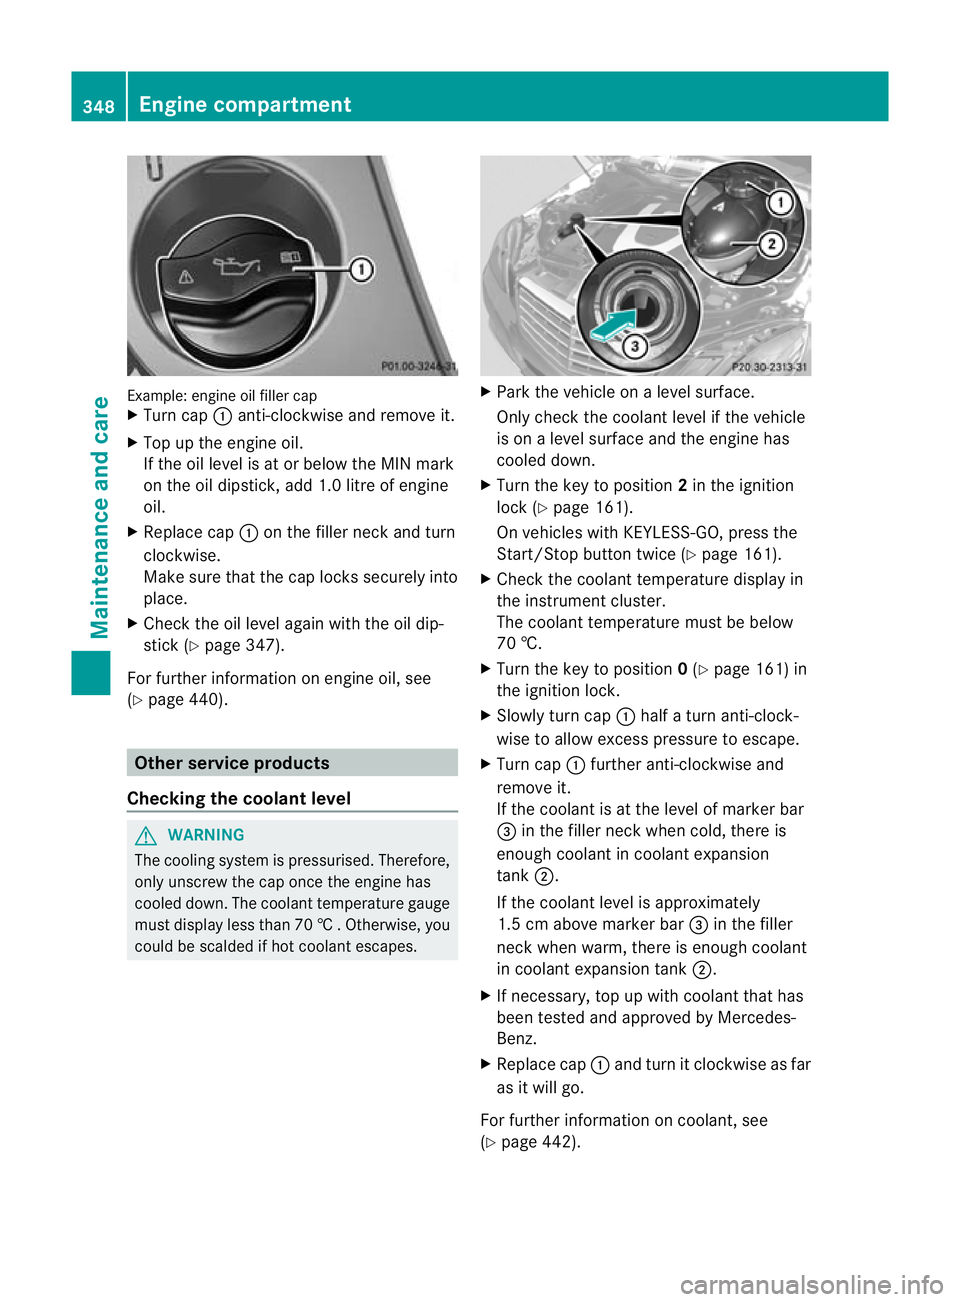
Example: engine oil fille
rcap
X Turn cap :anti-clockwise and remove it.
X Top up the engine oil.
If the oil level is at or below the MIN mark
on the oil dipstick, add 1. 0litre of engine
oil.
X Replace cap :on the filler neck and turn
clockwise.
Make sure that the cap locks securely into
place.
X Check the oil level again with the oil dip-
stick (Y page 347).
For further information on engine oil, see
(Y page 440). Other service products
Checking the coolant level G
WARNING
The cooling system is pressurised. Therefore,
only unscrew the cap once the engine has
cooled down. The coolan ttemperature gauge
must display less than 70 †.Otherwise, you
could be scalded if hot coolant escapes. X
Park the vehicle on a level surface.
Only check the coolant level if the vehicle
is on a level surface and the engine has
cooled down.
X Turn the key to position 2in the ignition
lock (Y page 161).
On vehicles with KEYLESS-GO, press the
Start/Stop button twice (Y page 161).
X Check the coolant temperature display in
the instrument cluster.
The coolant temperature must be below
70 †.
X Turn the key to position 0(Y page 161) in
the ignition lock.
X Slowly tur ncap : half a turn anti-clock-
wise to allow excess pressure to escape.
X Turn cap :further anti-clockwise and
remove it.
If the coolant is at the level of marker bar
= in the fille rneck when cold, there is
enough coolant in coolant expansion
tank ;.
If the coolant level is approximately
1.5 cm above marker bar =in the filler
neckw hen warm, there is enough coolant
in coolant expansion tank ;.
X If necessary, top up with coolant that has
been tested and approved by Mercedes-
Benz.
X Replace cap :and turn it clockwise as far
as it will go.
For further information on coolant, see
(Y page 442). 348
Engine compartmentMaintenance and care