2012 MERCEDES-BENZ E-CLASS ESTATE garage door opener
[x] Cancel search: garage door openerPage 15 of 457
Fuses
Allocatio nchart ............................. 376
Before changing ............................. 376
Fuse box in the boot ......................376
Fuse box in the engine compart-
ment .............................................. 376
Fuse box in the luggage compart-
ment .............................................. 377
Important safety notes ..................375 G
Garage door opener Clearing the memory .....................337
Frequencies ................................... 338
Important safety notes ..................335
Opening/closing the garage door ..337
Programming (button in the rear-
view mirror) ................................... 336
Gear indicator (on-board com-
puter) ................................................. .264
Gearshift program SETUP (on-board computer) ..........265
Genuine Mercedes-Benz parts .........432
Glove compartment ..........................311H
Handbrake see Parking brake
Hazard warning lamps ......................129
Headbag Display message ............................ 275
Headlamp
Cleaning system (function) ............130
Cleaning system (notes) ................443
Headlamps
Misting up ...................................... 133
Topping up the cleaning system ....349
see Automatic headlamp mode
Head restraints
Adjusting ....................................... 109
Adjusting (electrically). ..................110
Adjusting (manually). .....................109
Adjusting (rear) .............................. 110
Fitting/removing (rear) ..................111
Luxury ............................................ 110 Heating
see Climate control
High-pressure cleaners ....................352
Hill start assist .................................. 164
HOLD function Display message ............................ 283
Function/notes ............................. 205 I
ICS padded play table .........................63
Ignition lock see Key positions
Immobiliser .......................................... 78
In-car hotspot see Separate operating instructions
Indicator and warning lamps
Coolant .......................................... 305
DISTRONI CPLUS ........................... 307
Engine diagnostics .........................305
Fuel tank ........................................ 305
SPORT handling mode ...................303
Indicator lamps
Display message ............................ 276
see Warning and indicator lamps
Infrared lamps (changing bulbs) ......137
Insectp rotection on the radiator ....346
Inspection see ASSYST PLUS
Instrument cluster
Overview .................................. 32, 245
Settings ......................................... 258
Warning and indicator
lamps ...................................... .34, 298
Instrument cluster lighting ..............246
Integrated child seat ICS padded pla ytable ...................... 63
Important safety guidelines .............61
Side hea drestraints ...................... ...64
Storing, ICS padded play table and
sid eh ead restraint s......................... 65
Intelligen tLight System
Activating/deactivatin g................. 259
Display message ............................ 278
Overview ........................................ 130
Setting the dipped-bea mhead-
lamps for driving on the right/left .260 12
Index
Page 20 of 457
Notes for AMG vehicles
.................437
Refuelling proces s......................... 180
see Fuel
Releasing the parking loc kman-
ually (automatic transmission) ........179
Remote control Auxiliary heating/ventilation .......... 152
Changing the batteries (auxiliary
heating) ......................................... 154
Garage door opene r....................... 335
Programming (garage door
opener) .......................................... 336
Replacing the battery (auxiliary
heating remote control) .................... 154
Reserve (fuel tank) see Fuel
Reserve fuel
Display message ............................ 280
Warning lamp ................................. 305
Residual heat (climate control) ........150
Restraint system see SRS (Supplemental Restraint
System)
Rev counter ........................................ 247
Reverse gear Engaging (automatic transmis-
sion) ............................................... 171
Engaging (manual transmission) ....170
Reversing camera
Cleaning instructions .....................354
Function/notes ............................. 218
Switching on/off ........................... 219
Reversing lamp (display message) ..277
Roller sunblind Panorama sliding sunroo f.............. 101
Rea rwindow .................................. 330
Roof carrier ........................................ 327
Roof lining and carpets (cleaning
instructions) ...................................... 357
Roof load (maximum) ........................444 S
Safety Childre ninthe vehicle ..................... 55
Child restraint systems ....................55
Safety net
Attaching ....................................... 321
Important safety information .........321
Safety system
see Driving safety system
Seat
Folding the backres t(rear com-
partment) forwards/back ..............317
Seat belt
Adjusting the driver's and front-
passenger sea tbelt ......................... 52
Adjusting the height ......................... 52
Belt force limiter .............................. 54
Belt tensione r.................................. 54
Centre rear-compartment sea t........ 53
Cleaning ......................................... 357
Display message ............................ 273
Fastening ......................................... 52
Important safety guidelines .............51
Rea rseat belt status indicator .........54
Releasing ......................................... 53
Switching belt adjustment on/off
(on-board computer) ......................263
Warning lamp ................................. 299
Warning lamp (function) ................... 53
Seats
Adjusting (electrically). ..................108
Adjusting (manually and electri-
cally) .............................................. 108
Adjusting lumba rsuppor t.............. 113
Adjusting the 4-way lumba rsup-
por t................................................ 113
Adjusting the head restraint ..........109
Cleaning the cover .........................356
Correct driver's sea tposition ........106
Important safety notes ..................107
Overview ........................................ 107
Seat heating problem ....................116
Seat ventilation problem ................116
Storing settings (memory func-
tion) ............................................... 121 Index
17
Page 42 of 457
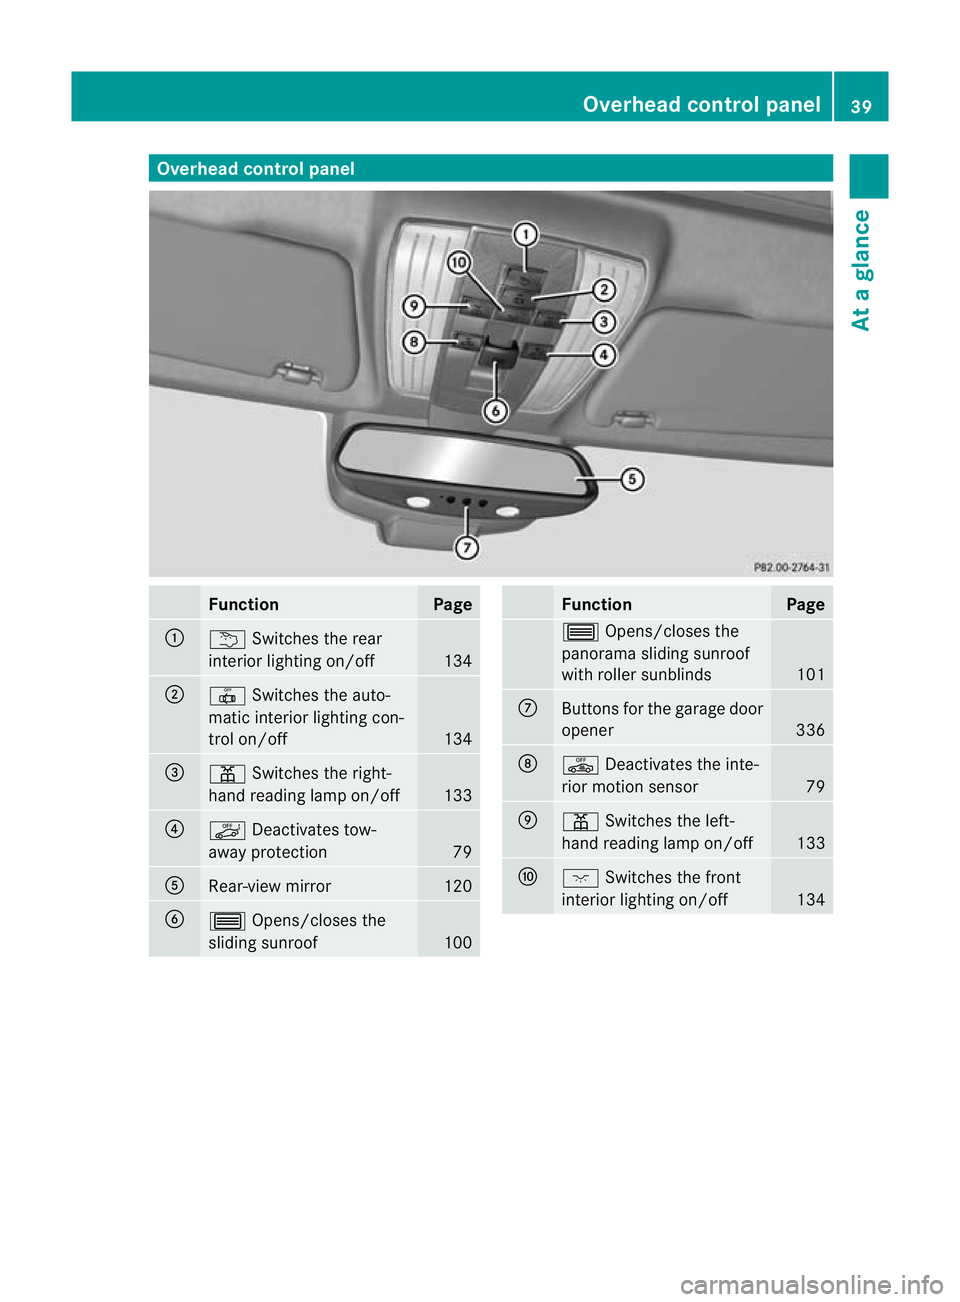
Overhea
dcontrol panel Function Page
:
u
Switches the rear
interio rlighting on/off 134
;
|
Switches the auto-
matic interior lighting con-
trol on/off 134
=
p
Switches the right-
hand reading lamp on/off 133
?
ë
Deactivates tow-
away protection 79
A
Rear-view mirror 120
B
3
Opens/closes the
sliding sunroof 100 Function Page
3
Opens/closes the
panorama sliding sunroof
with roller sunblinds 101
C
Buttons for the garage door
opener
336
D
ê
Deactivates the inte-
rior motion sensor 79
E
p
Switches the left-
hand reading lamp on/off 133
F
c
Switches the front
interior lighting on/off 134Overhead control panel
39At a glance
Page 338 of 457
Sliding adapter for the mobile phone
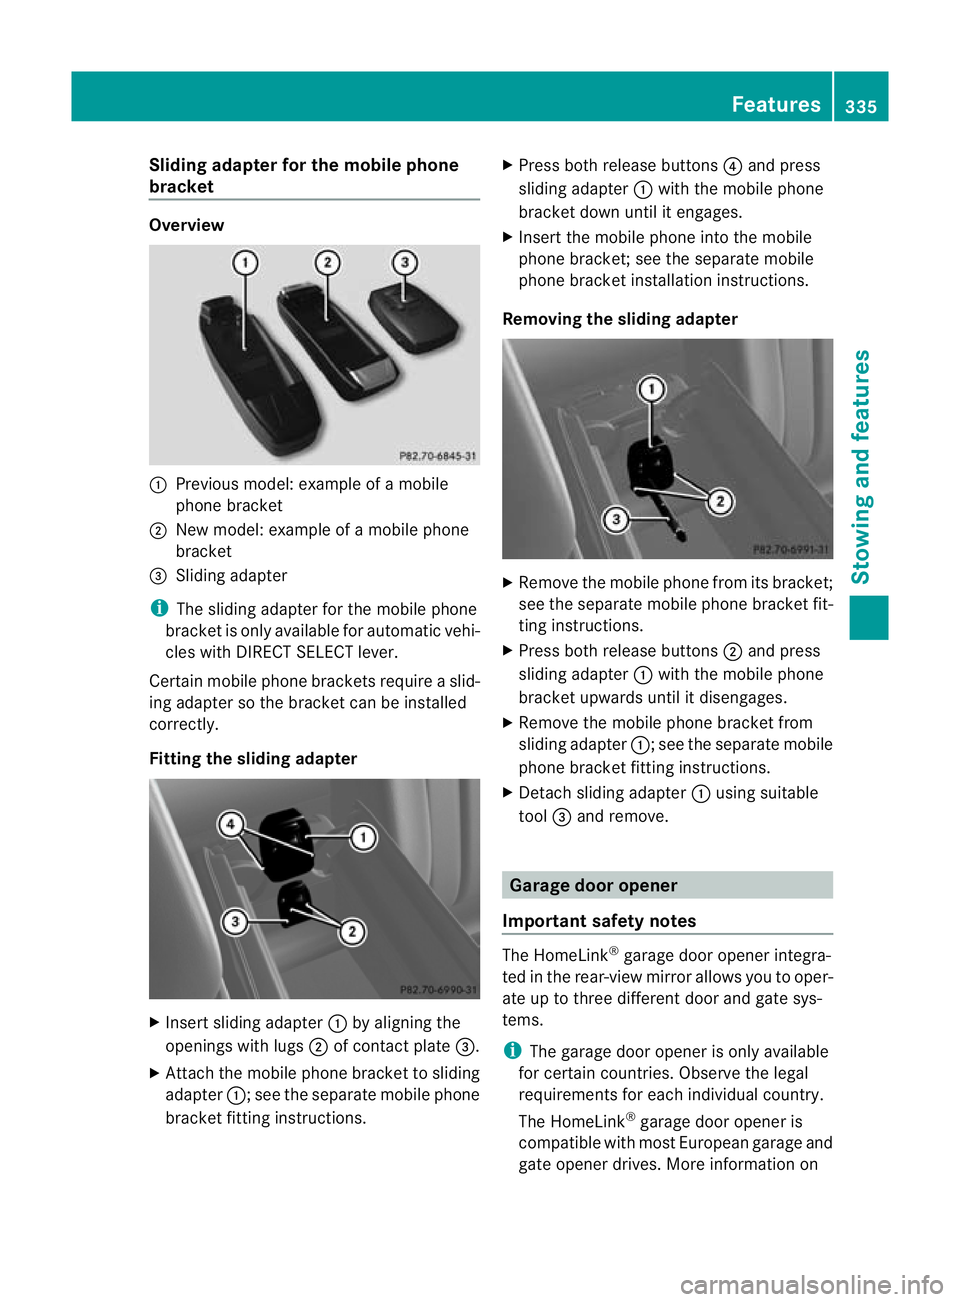
bracket Overview
:
Previous model: example of a mobile
phone bracket
; New model: example of a mobile phone
bracket
= Sliding adapter
i The sliding adapter for the mobile phone
bracket is only available for automatic vehi-
cles with DIRECT SELECT lever.
Certain mobile phone brackets require a slid-
ing adapter so the bracket can be installed
correctly.
Fitting the sliding adapter X
Insert sliding adapter :by aligning the
openings with lugs ;of contact plate =.
X Attach the mobile phone bracket to sliding
adapter :; see the separate mobile phone
bracket fitting instructions. X
Press both release buttons ?and press
sliding adapter :with the mobile phone
bracket down until it engages.
X Insert the mobile phone into the mobile
phone bracket; see the separate mobile
phone bracket installation instructions.
Removing the sliding adapter X
Remove the mobile phone from its bracket;
see the separate mobile phone bracket fit-
ting instructions.
X Press both release buttons ;and press
sliding adapter :with the mobile phone
bracket upwards until it disengages.
X Remove the mobile phone bracket from
sliding adapter :; see the separate mobile
phone bracket fitting instructions.
X Detach sliding adapter :using suitable
tool =and remove. Garage door opener
Important safety notes The HomeLink
®
garage door opener integra-
ted in the rear-view mirror allows you to oper-
ate up to three different door and gate sys-
tems.
i The garage door opener is only available
for certain countries. Observe the legal
requirements for each individual country.
The HomeLink ®
garage door opener is
compatible with most European garage and
gate opener drives. More information on Features
335Stowing and features Z
Page 339 of 457
HomeLink
®
and/o rcompatible products is
available from:
R at a qualified specialised workshop
R the HomeLink ®
hotline
(0) 08000 466 354 65 (free of charge) or
+49 (0) 6838 907 277 (charges apply)
R on the Internet at:
http://www.homelink.com
Programming Programming buttons
G
WARNING
Only press the button on the integrated
garage door opener if there are no persons or
objects present within the sweep of the
garage door. Persons could otherwise be
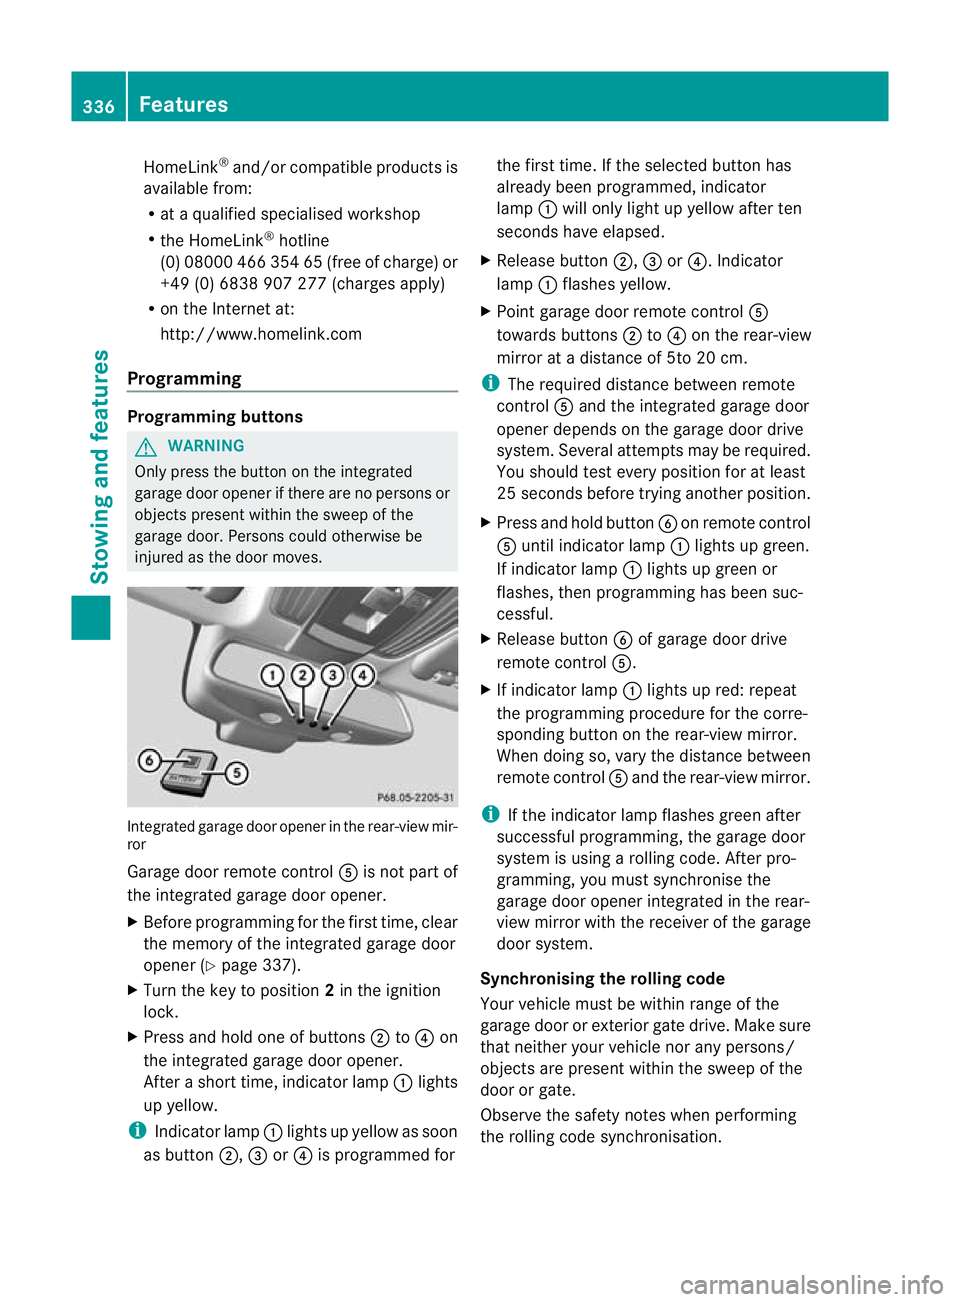
injured as the door moves. Integrated garage door opener in the rear-view mir-
ror
Garage door remote control
Ais not part of
the integrated garage door opener.
X Before programming for the first time, clear
the memory of the integrated garage door
opener (Y page 337).
X Turn the key to position 2in the ignition
lock.
X Press and hold one of buttons ;to? on
the integrated garage door opener.
After a short time, indicator lamp :lights
up yellow.
i Indicator lamp :lights up yellow as soon
as button ;,=or? is programmed for the first time. If the selected button has
already been programmed, indicator
lamp
:will only light up yellow after ten
seconds have elapsed.
X Release button ;,=or?. Indicator
lamp :flashes yellow.
X Point garage door remote control A
towards buttons ;to? on the rear-view
mirror at a distance of 5to 20 cm.
i The required distance between remote
control Aand the integrated garage door
opener depends on the garage door drive
system. Several attempt smay be required.
You should test every positio nfor at least
25 seconds before trying another position.
X Press and hold button Bon remote control
A until indicator lamp :lights up green.
If indicator lamp :lights up green or
flashes, then programming has been suc-
cessful.
X Release button Bof garage door drive
remote control A.
X If indicator lamp :lights up red: repeat
the programming procedure for the corre-
sponding button on the rear-view mirror.
When doing so, vary the distance between
remote control Aand the rear-view mirror.
i If the indicator lamp flashes green after
successful programming, the garage door
system is using a rolling code. After pro-
gramming, you must synchronise the
garage door opener integrated in the rear-
view mirror with the receiver of the garage
door system.
Synchronising the rolling code
Your vehicle must be within range of the
garage door or exterior gate drive. Make sure
that neither your vehicle nor any persons/
objects are present within the sweep of the
door or gate.
Observe the safety notes when performing
the rolling code synchronisation. 336
FeaturesStowing and features
Page 340 of 457
X
Turn the key to position 2in the ignition
lock.
X Press the programming button of the door
or gate drive (see the door or gate drive
operating instructions, e.g. under "Pro-
gramming of additional remote controls").
i Usually, you now have 30seconds to ini-
tiate the next step.
X Press previously programmed button ;,
= or? of the integrated garage door
opener until the door closes.
The rolling code synchronisation is then
complete.
Problems when programming
If you have problems when programming the
integrated garage door opener, please note
the following:
R Check the transmitter frequency of garage
door drive remote control A.This can usu-
ally be found on the back of the remote
control.
R Replace the batteries in garage door
remote control A.This increases the like-
lihood that garage door remote control A
will transmit a strong and precise signal to
the integrated garage door opener in the
rear-view mirror.
R When programming, hold remote control
A at varying distances and angles from the
button which you are programming. Try var-
ious angles at a distance between 5and
30 cm or at the same angle but at varying
distances.
R If there is another remote control for the
same garage door drive, perform the pro-
gramming steps again using this remote
control. Before performing these steps,
make sure that new batteries have been
fitted in garage door drive remote control
A.
R Note that some remote controls transmit
only for a limited period (the indicator lamp
on the remote control goes out). Press but- ton
Bon remote control Aagain before
transmission ends.
R Align the aerial cable of the garage door
opener unit. This can improve signal recep-
tion/transmission.
Opening or closing the garage door Once programmed, the integrated garage
door opener will assume the function of the
garage door system's remote control. Please
also read the operating instructions for the
garage door system.
X
Turn the key to position 2in the ignition
lock.
X Press button ;,=or? which you have
programmed to operate the garage door.
Garage door system with a fixed code: indi-
cator lamp :lights up green.
Garage door system with a rolling code:
indicator lamp :flashes green.
i The transmitter will transmit a signal for
as long as the button is pressed. The trans-
mission is halted after a maximum of ten
seconds and indicator lamp :lights up
yellow. Press button ;,=or? again if
necessary.
Clearing the memory X
Turn the key to position 2in the ignition
lock.
X Press buttons ;and ?.
The indicator lamp lights up yellow.
X Press and hold buttons ;and ?until the
indicator lamp turns green.
i Make sure that you clear the memory of
the integrated garage door opener before
selling the vehicle. Features
337Stowing and features Z