2012 MERCEDES-BENZ E-CLASS ESTATE length
[x] Cancel search: lengthPage 115 of 457
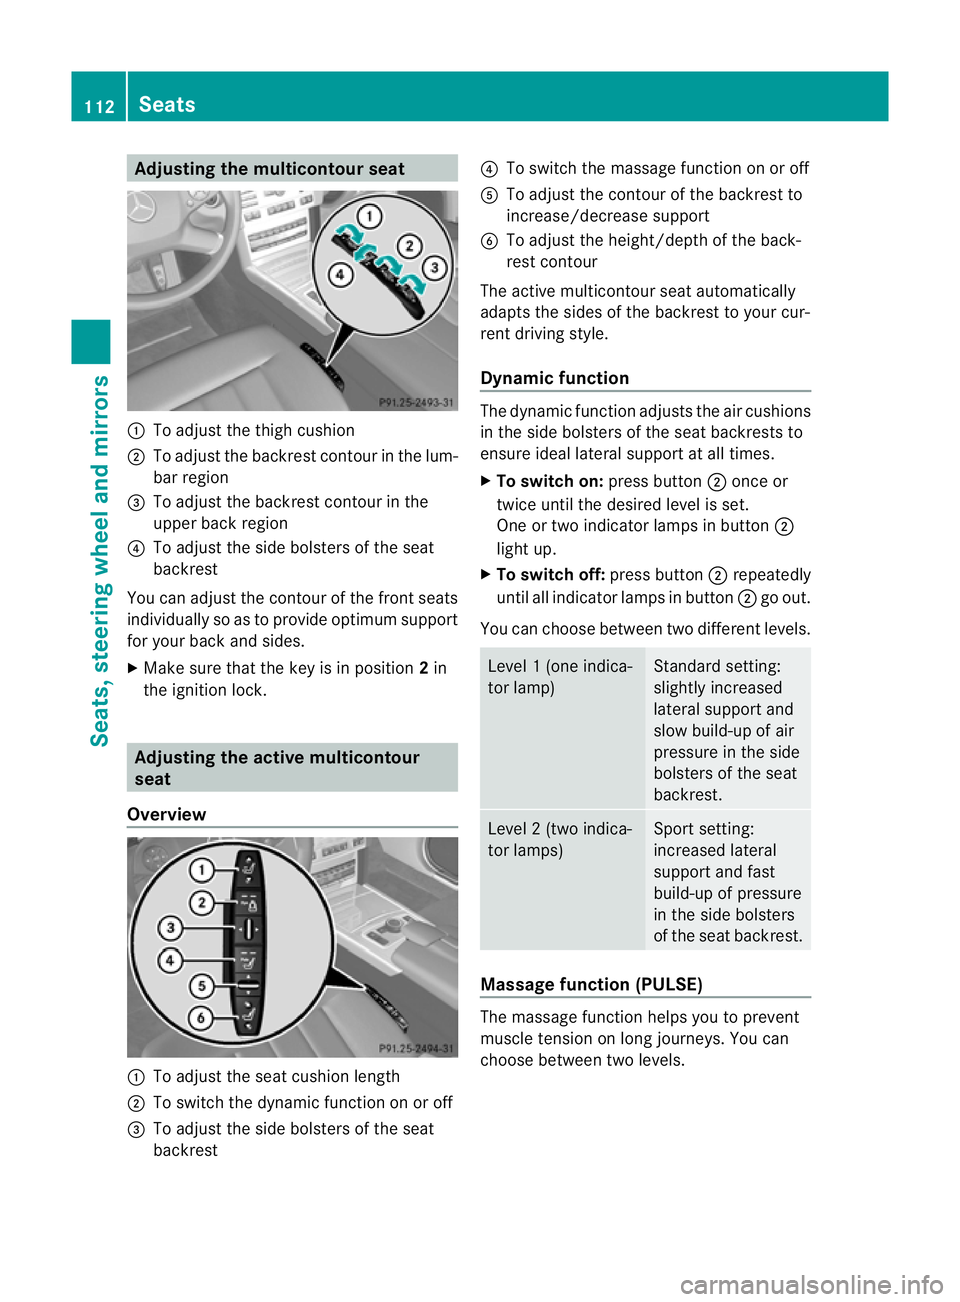
Adjusting the multicontour seat
:
To adjust the thigh cushion
; To adjust the backrest contour in the lum-
bar region
= To adjust the backrest contour in the
upper bac kregion
? To adjust the side bolsters of the seat
backrest
You can adjust the contour of the fron tseats
individually so as to provide optimum support
for your back and sides.
X Make sure that the key is in position 2in
the ignition lock. Adjusting the active multicontour
seat
Overview :
To adjust the seat cushion length
; To switch the dynamic function on or off
= To adjust the side bolsters of the seat
backrest ?
To switch the massage function on or off
A To adjust the contour of the backrest to
increase/decrease support
B To adjust the height/depth of the back-
rest contour
The active multicontour seat automatically
adapts the sides of the backrest to your cur-
rent driving style.
Dynamic function The dynamic function adjusts the air cushions
in the side bolsters of the seat backrests to
ensure ideal lateral support at all times.
X To switch on: press button;once or
twice until the desired level is set.
One or two indicator lamps in button ;
light up.
X To switch off: press button;repeatedly
until all indicator lamps in button ;go out.
You can choose between two differen tlevels. Level
1(one indica-
tor lamp) Standard setting:
slightly increased
lateral support and
slow build-up of air
pressure in the side
bolsters of the seat
backrest.
Level
2(two indica-
tor lamps) Sport setting:
increased lateral
support and fast
build-up of pressure
in the side bolsters
of the seat backrest.
Massage function (PULSE)
The massage functio
nhelps you to prevent
muscle tension on long journeys. You can
choose between two levels. 112
SeatsSeats, steering wheel and mirrors
Page 136 of 457
indicator lamp in the multifunction display
remains lit.
X To deactivate: move the combination
switch back to its normal position.
The _ indicator lamp in the instrument
cluster goes out. Headlamps misted up on the inside
The headlamps may mist up on the inside if
there is high atmospheric humidity.
X Switch on the lights and drive off.
The level of moisture diminishes, depend-
ing on the length of the journey and the
weathe rconditions (humidity and temper-
ature).
If the level of moisture does not diminish:
X Have the headlamps checked at a qualified
specialist workshop. Interior lighting
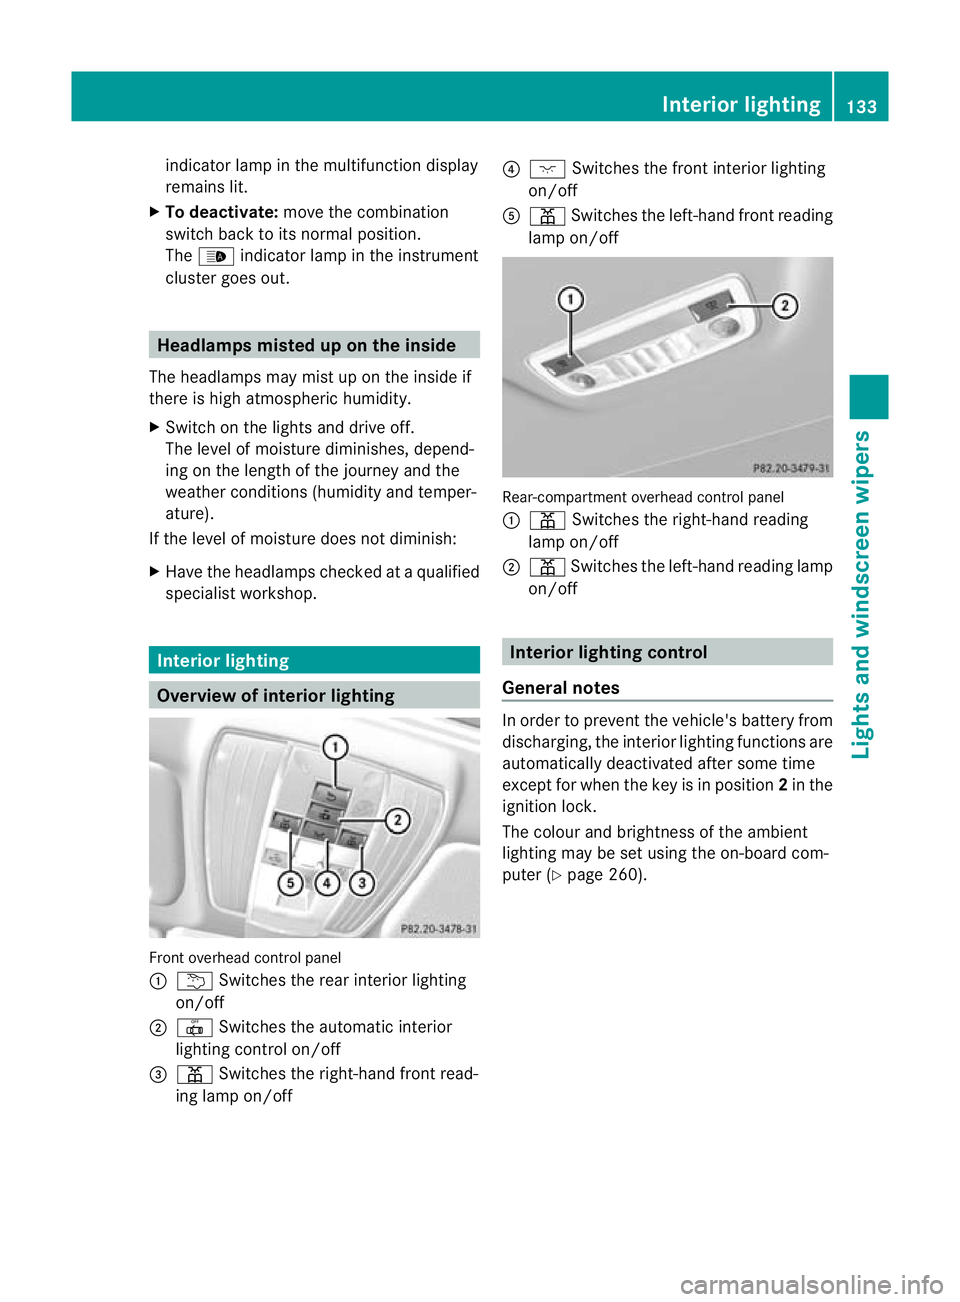
Overview of interior lighting
Front overhead control panel
:
u Switches the rear interior lighting
on/off
; | Switches the automatic interior
lighting control on/off
= p Switches the right-hand front read-
ing lamp on/off ?
c Switches the front interior lighting
on/off
A p Switches the left-hand front reading
lamp on/off Rear-compartment overhead control panel
:
p Switches the right-hand reading
lamp on/off
; p Switches the left-hand reading lamp
on/off Interior lighting control
General notes In order to prevent the vehicle's battery from
discharging, the interior lighting functions are
automatically deactivated after some time
except for when the key is in position
2in the
ignition lock.
The colour and brightness of the ambient
lighting may be set using the on-board com-
puter (Y page 260). Interior lighting
133Lights and windscreen wipers Z
Page 163 of 457
Useful information
i This Owner's Manual describes all mod-
els, series and optional equipment for your
vehicle that were available at the time of
going to press. National variations are pos-
sible. Note that your vehicle may not be
equipped with all of the functions descri-
bed. This is also the case for systems and
functions relevant to safety.
i Read the information on qualified special-
ist workshops: (Y page 25). Running-in notes
Important safety notes
New and replaced brake pads and discs only
reach their optimum braking effec tafter sev-
eral hundred kilometres of driving. Compen-
sate for this by applying greater force to the
brake pedal. The first 1,500 km
If you treat the engine with sufficient care
from the very start, you will be rewarded with
excellent performance for the remainder of
the engine's life.
R Drive at varying vehicle speeds and engine
speeds for the first 1,500 km.
R Avoid overstraining the vehicle during this
period, e.g. driving at full throttle.
R Change gea ringood time, before the rev
counter needle is Ôof the way to the red
area of the rev counter.
R Do not shift down a gear manually in order
to brake.
Vehicles with automatic transmission:
R Try to avoid depressing the accelerator
pedal beyond the point of resistance (kick-
down).
R The shift ranges 3,2or 1should only be
engaged when driving slowly, e.g. when
driving in mountainous terrain. After 1500 km, you may gradually accelerate
the vehicle to full road and engine speeds.
Additional running-in notes for AMG vehicles:
R
Do not drive at speeds above 140 km/h for
the first 1500 km.
R Only allow the engine to reach a maximum
engine speed of 4500 rpm briefly.
i You should also observe these notes on
running in if the engine or parts of the drive
train on your vehicle have been replaced. AMG vehicles with rear axle differen-
tial lock
Your vehicle is equipped with aself-locking
differential on the rear axle. Change the oil
after a running-in period of 3000 km to
improve protection of the rear axle differen-
tial. This oil change will lengthen the service
life of the differential. Have the oil change
carried out at a qualified specialist workshop. Driving
Important safety notes
G
WARNING
Objects in the driver's footwell can restrict the
pedal travel or obstruct adepressed pedal.
The operating and road safety of the vehicle
is jeopardised. There is a risk of an accident.
Make sure that all objects in the vehicle are
stowed correctly, and that they cannot enter
the driver's footwell. Fit the floormats
securely and as specified in order to ensure
sufficien tclearance for the pedals. Do not use
loose floormats. G
WARNING
Unsuitable footwear can hinde rcorrect usage
of the pedals, e.g.:
R shoes with thick soles
R shoes with high heels
R slippers 160
DrivingDriving and parking
Page 221 of 457
X
Countersteering: while the vehicle is sta-
tionary, tur nthe steering wheel in the
specified direction until the arrow is white
and a warning tone sounds.
X To reverse into the parking space: main-
tain the steering wheel angle and reverse
carefully.
X Stop as soon as you hear a warning tone,
at the latest when PARKTRONIC sounds the
continuous warning tone.
The Parking Guidance finished mes-
sage appears in the multifunction display
and a tone sounds. You may be asked to
steer in a different direction and then
change gear. In this case, further displays
in the multifunction display will direct you
to the final position.
X Manoeuvre if necessary.
X Always observe the warning messages dis-
played by PARKTRONIC (Y page 213).
Cancelling Parking Guidance X
Press the PARKTRONIC button on the
centre console (Y page 213).
Parking Guidance is cancelled immediately
and PARKTRONIC is deactivated.
Parking Guidance is cancelled automatically
if it is no longer possible to guide you into the
parking space or if a malfunction occurs.
The parking space symbol goes out and a
warning tone sounds. The Parking Guid‐ance cancelled message appears in the
multifunction display.
Towing atrailer For vehicles with a trailer tow hitch, the min-
imum length for parking spaces is slightly
increased.
If you have attached a trailer to your vehicle,
you should not use Parking Guidance. When
the electrical connectio
nis established
between your vehicle and the trailer, Parking
Guidance ceases to be available. PARK-
TRONIC is deactivated for the rear area. Reversing camera
Important safety notes G
WARNING
Make sure that no persons or animals are in
the manoeuvring range. Otherwise, they
could be injured.
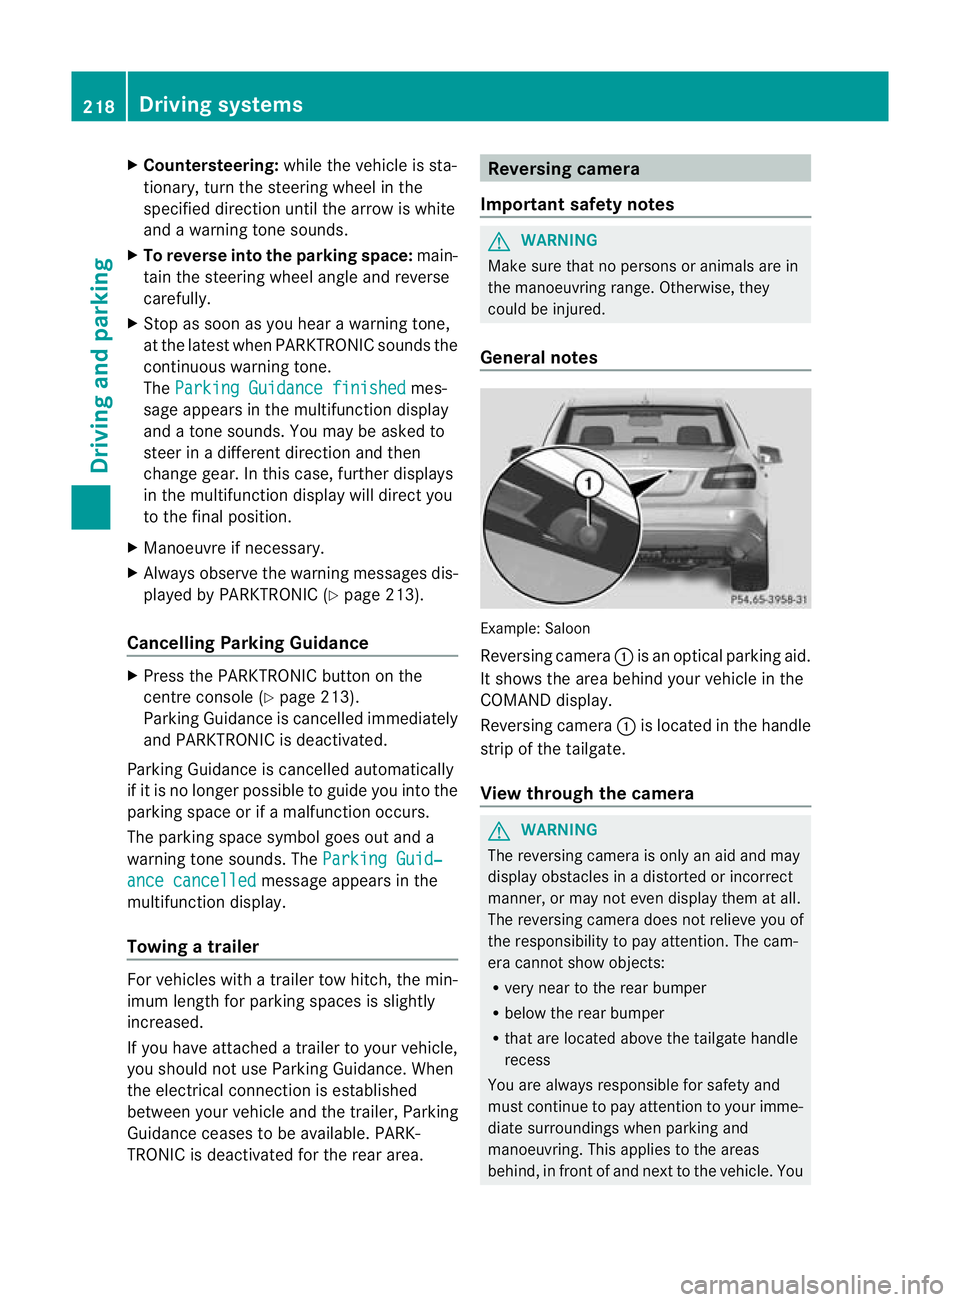
General notes Example: Saloon
Reversing camera
:is an optical parking aid.
It shows the area behind your vehicle in the
COMAND display.
Reversing camera :is located in the handle
strip of the tailgate.
View through the camera G
WARNING
The reversing camera is only an aid and may
display obstacles in a distorted or incorrect
manner, or may not even display them at all.
The reversing camera does not relieve you of
the responsibility to pay attention. The cam-
era cannot show objects:
R very near to the rear bumper
R below the rear bumper
R that are located above the tailgate handle
recess
You are always responsible for safety and
must continue to pay attention to your imme-
diate surroundings when parking and
manoeuvring. This applies to the areas
behind, in front of and next to the vehicle. You 218
Driving systemsDriving and parking
Page 223 of 457
for the vehicle. They are used to align the
vehicle with the edge of the carriageway, e.g.
the kerb.
ATTENTIO
NASSIST
Important safety notes G
WARNING
ATTENTION ASSIST is only an aid and may
detect your tiredness or lapses in concentra-
tion too late or not at all. It is not asubstitute
for a well rested and attentive driver.
Fatigue may cause you to recognise hazard-
ous situations too late, misjudge a situation
or react slower. For this reason, make sure
you feel rested before you begin driving and
during your journey. Always take breaks in
good time and regularly, especially during
long journeys. Otherwise, you may fail to rec-
ognise dangers in time, cause an acciden tand
injure yoursel fand others.
General notes ATTENTIO
NASSIST helps you during long,
monotonous journeys such as on motorways
and trunk roads. It is active in the 80 km/h
to 180 km/h range.
If ATTENTION ASSIST detects typical indica-
tors of fatigue or increasing lapses in con-
centration on the part of the driver, it sug-
gests taking a break.
ATTENTIO NASSIST assesses your level of
fatigue or lapses in concentration by taking
the following criteria into account:
R your personal driving style, e.g. steering
characteristics
R journey-related parameters, e.g. time of
day, length of journey
The functionality of ATTENTION ASSIST is
restricted, and warnings may be delayed or
not occur at all:
R if the road condition is poor, e.g. if the sur-
face is uneven or if there are potholes
R if there is a strong sid ewind R
if you have adopted a sporty driving style
with high cornering speeds or high rates of
acceleration
R if you are predominantly driving slower
than 80 km/h or faster than 180 km/h
R if you are currently using COMAND APS or
making a telephone call with COMAND APS
R if the time has been set incorrectly
R in active driving situations, such as when
you change lanes or change your speed
Warning and display messages in the
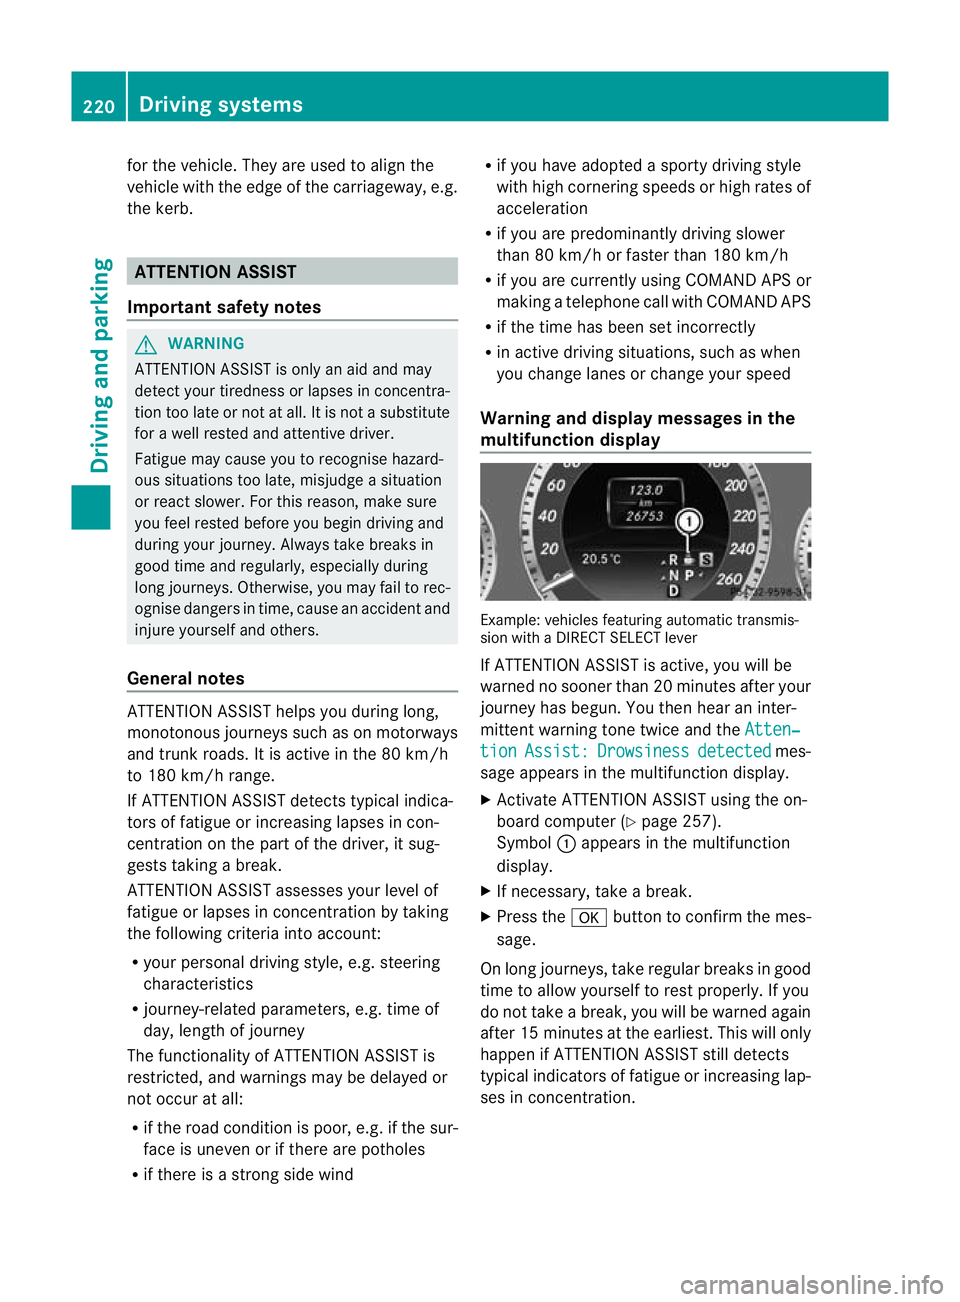
multifunction display Example: vehicles featuring automatic transmis-
sion with a DIRECT SELECT lever
If ATTENTION ASSIST is active, you will be
warned no sooner than 20 minutes after your
journey has begun. You the
nhear an inter-
mittent warning tone twice and the Atten‐ tion Assist: Drowsiness detected mes-
sage appears in the multifunction display.
X Activate ATTENTION ASSIST using the on-
board computer (Y page 257).
Symbol :appears in the multifunction
display.
X If necessary, take a break.
X Press the abutton to confirm the mes-
sage.
On long journeys, take regular breaks in good
time to allow yourself to rest properly. If you
do not take a break, you will be warned again
after 15 minutes at the earliest. This will only
happen if ATTENTION ASSIST still detects
typical indicators of fatigue or increasing lap-
ses in concentration. 220
Driving systemsDriving and parking
Page 270 of 457
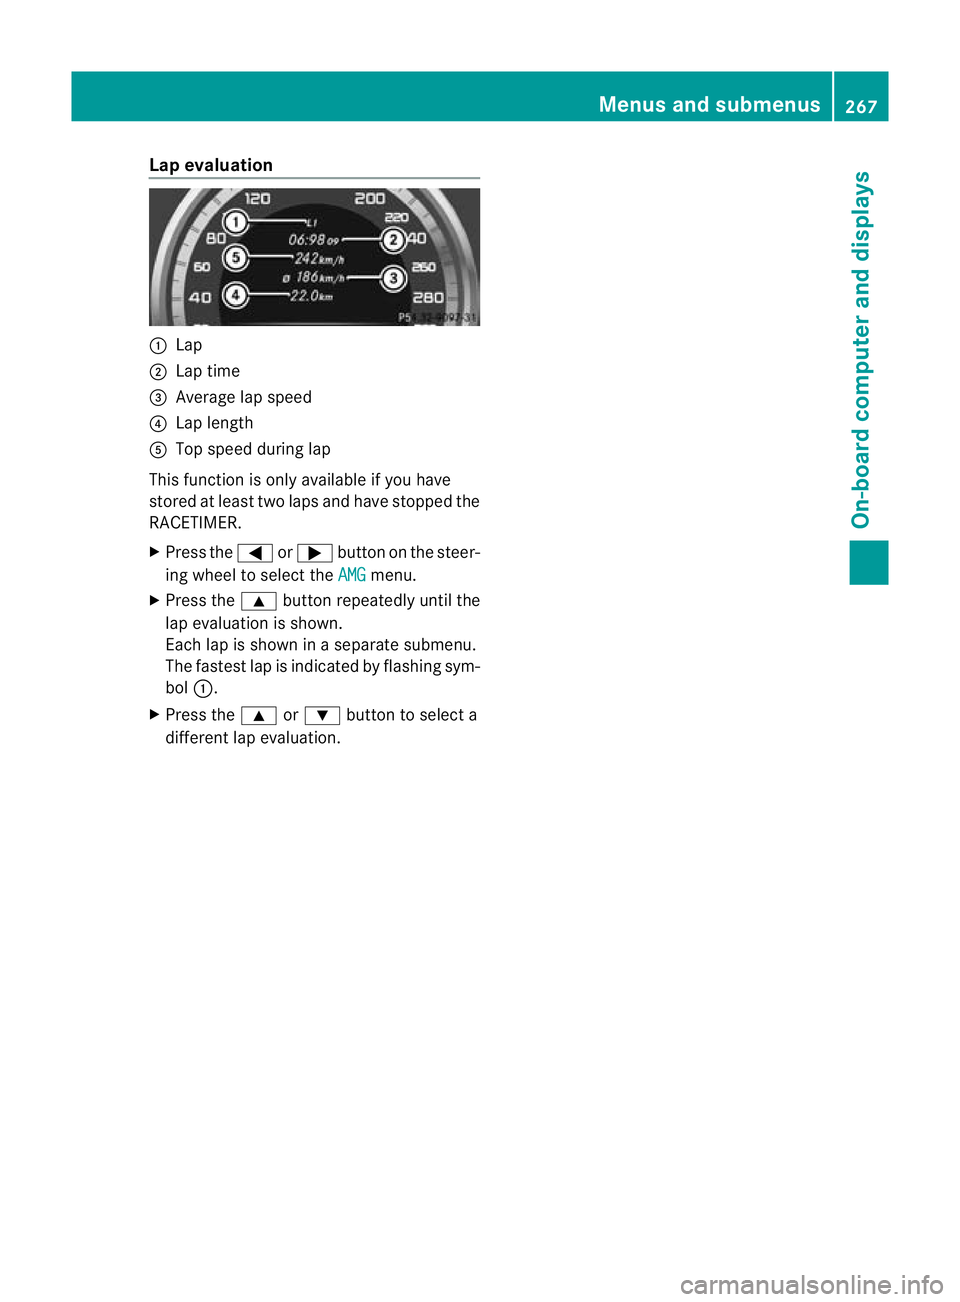
Lap evaluation
:
Lap
; Lap time
= Average lap speed
? Lap length
A Top speed during lap
This function is only available if you have
stored at least two laps and have stopped the
RACETIMER.
X Press the =or; button on the steer-
ing wheel to selec tthe AMG menu.
X Press the 9button repeatedly until the
lap evaluation is shown.
Each lap is shown in a separate submenu.
The fastest lap is indicated by flashing sym-
bol :.
X Press the 9or: button to select a
different lap evaluation. Menus and submenus
267On-board computer and displays Z
Page 372 of 457
In order for the battery to achieve the maxi-
mum possible service life, it must always be
sufficiently charged.
The vehicle battery, like other batteries, can
discharge over time if you do not use the
vehicle .Insuch cases, have the battery dis-
connected at a qualified specialist workshop.
You can also charge the battery with a
charge rrecommended by Mercedes-Benz.
For more information, please contact a quali-
fied specialist workshop.
Have the battery charge checked more fre-
quently if you use the vehicle mainly for short
trips or if you leave it standing idle for a
lengthy period. Consult a qualified specialist
workshop if you wish to leave your vehicle
parked up for a long period of time.
i When you park the vehicle, remove the
key if you do not require any electrical con-
sumers. The vehicle will then use very little
energy, thus conserving battery power.
i After an interruption of the power supply,
e.g. the battery was discharged, you have
to:
R set the clock. Information on setting the
clock can be found in the separate oper-
ating instructions.
On vehicles with COMAND Online and a
navigation system, the clock is set auto-
matically.
R reset the function for folding the exterior
mirrors in/out automatically, by folding
the mirrors out once (Y page 120).Charging the battery
G
WARNING
Only charge the battery in a well-ventilated
area. As the battery is being charged, gases
can escape and generate minor explosions.
This could injure you and other persons or
cause damage to the paintwork or acid cor-
rosion on the vehicle. You can obtain information on battery charg-
ers which allow the batter
yto be charged
while still installed from a qualified specialist
workshop. G
WARNING
There is a risk of acid burns during the charg-
ing process due to the gases which escape
from the battery. Do not lean over the battery
during the charging process. G
WARNING
Battery acid is caustic. Avoid contact with the
skin, eyes or clothing.
! Only charge the installed battery with a
battery charger which has been tested and
approved by Mercedes-Benz. These battery
chargers allow the battery to be charged
while still installed in the vehicle.
! Only use battery chargers with a maxi-
mum charging voltage of 14.8 V.
! Only charge the battery using the jump-
start connection point.
The jump-starting connection point is in the
engine compartment (Y page 370).
Read the battery charger's operating instruc-
tions before charging the battery.
X Open the bonnet (Y page 345).
X Connect the battery charger to the positive
terminal and earth point in the same order
as when connecting the donor battery in
the jump-starting procedure
(Y page 370). Battery (vehicle)
369Breakdown assistance Z
Page 373 of 457
Jump-starting
G
WARNING
Hybrid vehicles: it is imperative that you read the "HYBRID" supplement. Otherwise, you may not
recognise dangers. G
WARNING
There is a risk of acid burns when jump-starting a vehicle due to the gases which escape from
the battery. Do not lean over the battery while the engine is being jump-started. G
WARNING
Gases escaping from the battery during jump-starting may cause minor explosions. Avoid cre-
ating sparks. Keep naked flames away from the battery, and do not smoke.
Comply with the important safety precautions when handling batteries. You will find these under
"Battery (vehicle) -important safety notes" in the index. G
WARNING
Non-combusted fuel can collect in the exhaust system and ignite. There is a risk of fire. Avoid
repeated and lengthy starting attempts.
! Vehicles with apetrol engine: avoid repeated and lengthy starting attempts. Otherwise,
the non-combusted fuel may damage the catalytic converter.
Do not use a rapid charging device to start th evehicle. If your vehicle's battery is discharged,
the engine can be jump-started from another vehicle or from a second battery using jump
leads. Observe the following points:
R The battery is not accessible in all vehicles. If the other vehicle's batter yis not accessible,
jump-start the vehicle using a second battery or ajump-starting device.
R vehicles with apetrol engine: only jump-star tthe vehicle when the engine and exhaust
system are cold.
R do not start the engine if the battery is frozen. Let the battery thaw first.
R jump-starting may only be performed from batteries with a nominal voltage of 12 V.
R only use jump leads that have a sufficient cross-section and insulated terminal clamps.
R if the battery is fully discharged, leave the battery that is being used to jump-start connected
for a few minutes before attempting to start. This charges the empty battery a little.
R make sure that the two vehicles do not touch.
Make sure that:
R The jump leads are not damaged.
R Non-insulated parts of the terminal clamps do not come into contact with other metal parts
while the jump leads are connected to the battery.
R the jump leads cannot come into contact with parts such as the V-belt pulley or the fan.
These parts move when the engine is started and while it is running.
X Firmly depress the parking brake.
X Manual transmission: engage neutral.370
Jump-startingBreakdown assistance