2012 MERCEDES-BENZ E-CLASS ESTATE service reset
[x] Cancel search: service resetPage 8 of 457
Assistance men
u(on-board com-
puter) .................................................. 255
ASSYST PLUS Displaying a service message ........349
Hiding a service message ..............349
Notes ............................................. 349
Resetting the service interval dis-
pla y................................................ 350
Service message ............................ 349
Special service requirements ......... 350
ATA (Anti-Theft Alarm system)
Activating/deactivating ...................78
Function .......................................... .78
Interior motion sensor .....................79
Switching off the alarm ....................78
Tow-away protection ........................ 79
ATTENTIO NASSIST
Activating/deactivating .................257
Display message ............................ 282
Function/notes ............................. 220
Authorised workshop
see Qualified specialist workshop
AUTO lights
Display message ............................ 278
see Lights
Automatic engine start (ECO start/
stop function) .................................... 167
Automatic engine switch-off (ECO
start/stop function) ..........................166
Automatic headlamp mode ..............125
Automatic transmission Accelerator pedal position .............174
Automatic drive program ...............175
Changing gea r............................... 173
DIRECT SELECT leve r..................... 171
Display message ............................ 293
Drive position (ECO start/stop
function) ........................................ 172
Drive program displa y.................... 172
Driving tips .................................... 174
Emergency running mode ..............179
Engaging drive position .................. 173
Engaging neutra l............................ 172
Engaging revers egear ................... 172
Engaging the par kposition ............ 172
Kickdow n....................................... 174
Manual drive program ....................177
Neutral (ECO start/stop function) .172 Overview
........................................ 170
Problem (fault) ............................... 179
Progra mselecto rbutton ................ 174
Pulling away ................................... 164
Releasing the parking lock man-
ually ............................................... 179
Selector leve r................................ 171
Shift range s................................... 176
Starting the engine ........................163
Steering wheel gearshift paddle s... 175
Trailer towing ................................. 174
Transmissio nposition display ........171
Transmission position display
(DIRECT SELECT lever) ................... 172
Transmission positions ..................173
Automatic transmission emer-
gency running mode .........................179
Auxiliary heating Activating/deactivating .................151
Activating/deactivating (on the
centre console ).............................. 152
Display message ............................ 295
Important safety notes ..................151
Problem (display message) ............155
Remote control .............................. 152
Setting ........................................... 262
Setting the departur etime ............ .153
Auxiliary ventilation
Activating/deactivating .................151
Activating/deactivating (on the
centre console ).............................. 152
Problem (display message) ............155
Remote control .............................. 152
Axle load, permissible (traile rtow-
ing) ...................................................... 450 B
Bag hook ............................................ 319
Ball coupling Folding in ....................................... 239
Folding out ..................................... 237
BAS (Brake Assist System) .................71
BAS PLUS (Brake Assist System
PLUS) .................................................... 71 Index
5
Page 18 of 457
Multifunction steering wheel
Operating the on-board computer .247
Overview .......................................... 35N
Navigation Menu (on-board computer) ............251
NECK-PRO head restraints
Operation ........................................ .48
Resetting after being triggered ........49
NECK-PRO luxury head restraints
Operation ........................................ .48
Resetting after being triggered ........50
Night View Assist Plus
Activating/deactivating .................223
Cleaning ......................................... 355
Function/notes ............................. 222
Problem (fault) ............................... 225
Notes on running in anew vehicle ..160 O
Occupant safety Childre ninthe vehicle ..................... 55
Important safety notes ....................42
Odometer
see Total distance recorder
see Trip meter
Oil
see Engine oil
On-board computer
AMG menu ..................................... 264
Assistance menu ........................... 255
Audi omenu ................................... 252
Convenience submenu ..................263
Displaying a service message ........349
Display messages ..........................268
DISTRONI CPLUS ........................... 202
Factory setting submenu ...............264
Heating submenu ........................... 262
Important safety notes ..................244
Instrument cluster submenu ..........258
Ligh tsubmenu ............................... 259
Menu overview .............................. 249
Message memory .......................... 268
Navigation menu ............................ 251
Operating the TV ............................ 253 Operating vide
oDVD ..................... 253
Operation ....................................... 247
RACETIMER ................................... 265
Service menu ................................. 257
Settings menu ............................... 258
Standard displa y............................ 249
Telephone menu ............................ 254
Trip menu ...................................... 249
Vehicle submenu ........................... 261
Operating system
see On-board computer
Outside temperature display ...........247
Overhead control panel ......................39
Override feature Rea rside windows ........................... 69 P
Pain tcode .......................................... 435
Paintwork (cleaning instructions) ...352
Panic alarm .......................................... 42
Panorama sliding sunroof Important safety information ...........99
Opening/closing ............................ 101
Opening/closing the roller sun-
blind ............................................... 101
Problem (malfunction) ...................103
Rain closing feature .......................101
Resetting ....................................... 102
Park Assist
Parking Guidance ........................... 215
Parking ............................................... 183
Important safety notes ..................183
Parking brake ................................ 184
Position of exterior mirror, front-
passenger side ............................... 120
Reversing camera ..........................218
see PARKTRONIC
Parking aid
see Exterior mirrors
see PARKTRONIC
Parking brake
Display message ............................ 271
Notes/function .............................. 184
Warning lamp ................................. 304 Index
15
Page 21 of 457
Switching sea
theating on/off .......115
Switching the sea tventilation on/
off .................................................. 116
Selector lever
Cleaning ......................................... 356
Sensors (cleaning instructions) .......354
Service see ASSYST PLUS
Service Centre
see Qualified specialist workshop
Service menu (on-board computer) .257
Service products
AdBlue ®
special additive s.............. 440
Brake fluid ..................................... 442
Coolant (engine) ............................ 442
Engine oil ....................................... 440
Fuel ................................................ 436
Important safety notes ..................435
Washer fluid .................................. .443
Settings
Factory (on-board computer) .........264
On-board computer .......................258
Setting the air distribution ...............147
Setting the airflow ............................148
SETUP (on-board computer) .............265
Shifting to neutral (manual trans-
mission) ............................................. 170
Short journeys (diesel particle fil-
ter) ...................................................... 186
Sidebag ................................................ 47
Side lamps Switching on/off ........................... 127
Side marker lamp Display mes-
sage .................................................... 277
Side windows Convenience closing ........................97
Convenience opening ......................96
Important safety notes ....................95
Opening/closing .............................. 96
Problem (malfunction) .....................99
resetting .......................................... 98
Skibag ................................................ 314
Sliding sunroof Important safety information ...........99
Opening/closing ............................ 100
Problem (malfunction) ...................103Rain closing feature
.......................100
Resetting ....................................... 100
see Panorama sliding sunroof
Snow chains ...................................... 383
Socket Centre console .............................. 332
Luggage compartment ...................333
Rea rcompartmen t......................... 332
Sockets
General notes ................................ 332
Spare wheel
Storing ........................................... 427
Specialist workshop ............................ 25
Spectacles compartment .................311
Speed, controlling see Cruise control
Spee dLimit Assist
Activating/deactivating the warn-
ing function .................................... 255
Displayin g...................................... 255
Display message ............................ 283
Display message in the multifunc-
tion displa y.................................... 221
Important safety notes ..................221
Speedometer
Activating/deactivating the addi-
tional speedometer ........................258
Digita l............................................ 250
In the Instrument cluster .........32, 245
Segments ...................................... 247
Selecting the unit of measure-
ment .............................................. 258
see Instrument cluster
SPEEDTRONIC
Deactivating variabl e..................... 194
Display message ............................ 287
Function/notes ............................. 192
Important safety notes ..................192
LIM indicator lamp .........................193
Permanent ..................................... 195
Selecting ........................................ 193
Storing the current spee d.............. 193
Variabl e......................................... 193
SPORT handling mode
Activating/deactivating (AMG
vehicles) .......................................... 74
Warning lamp ................................. 303 18
Index
Page 28 of 457
fore be carried out at
aqualified specialist
workshop. G
WARNING
If work on electronic equipment and its soft-
ware is carried out incorrectly, this equipment
could stop working .The electronic systems
are networked via interfaces. Tampering with
these electronic systems could cause mal-
functions in systems which have not been
modified. Malfunctions such as these can
seriously jeopardise the vehicle's operating
safety and therefore your own safety.
You should therefore have all work and mod-
ifications to electronic components carried
out at a qualified specialist workshop. Declarations of conformity
Wireless vehicle components The following information applies to all com-
ponents of the vehicle and the COMAND sys-
tem which receive and/or transmit radio
waves:
The components of this vehicle which receive
and/or transmit radio waves are compliant
with the basic requirements and other rele-
vant provisions of Directive 1999/5/EC. You
can obtain further information from any
Mercedes-Benz Service Centre.
Electromagnetic compatibility The electromagnetic compatibility of the vehi-
cle components has been checked and certi-
fied according to the currently valid version
of Directive 72/245/EEC or the equivalent
ECE Regulation ECE-R 10. Diagnostics connection
G
WARNING
If you connect equipment to a diagnostics
connection, it can affect the operation of the
vehicle systems. This could compromise the operating safety of your vehicle while driving.
There is a risk of an accident.
Do not connect any equipment to a diagnos-
tics connection.
G
WARNING
Loose equipment or cables hanging from a
device which are connected to a diagnostic
connection could impede pedal clearance.
The equipment or cables could get caught
between the pedals when driving and braking
suddenly. This could impair the function of the
pedals. There is a risk of accident.
Do not attach any equipment or cables in the
driver's footwell.
! If the engine is switched off and equip-
ment on the diagnostics connection is
used, the starter battery may discharge.
The diagnostics connection is only intended
for the connection of diagnostic equipment at
a qualified specialist workshop.
Connecting equipment to the diagnostics
connection can lead to emissions monitoring
information being reset, for example. This
may lead to the vehicle failing to meet the
requirements of the next emissions test dur-
ing the main inspection. Qualified specialist workshop
Aq ualified specialist workshop has the nec-
essary special skills, tools and qualifications
to correctly carry out any necessary work on
your vehicle. This particularly applies to work
relevan tto safety.
Observe the notes in the Service Booklet.
Always have the following work carried out at
a qualified specialist workshop:
R work relevant to safety
R service and maintenance work
R repair work
R modifications, installations and conver-
sions
R work on electronic components Introduction
25 Z
Page 52 of 457
The use of non-approved head restraint cov-
ers may prevent NECK-PRO head restraints/
NECK-PRO luxury head restraints from trig-
gering properly. The NECK-PRO head
restraints/NECK-PRO luxury head restraints
can therefore not provide the intended pro-
tection.
Consult a Mercedes-Benz Service Centre
regarding availability.
NECK-PRO head restraints/NECK-PRO luxury
head restraints increase protection of the
driver's and front-passenger's head and
neck.Int he event of a rear collision of a cer-
tain severity, the NECK-PRO head restraints/
NECK-PRO luxury head restraints on the driv-
er's and front-passenger seats are moved for-
wards and upwards. This provides better
head support.
If the NECK-PRO head restraints/NECK-PRO
luxury head restraints have been triggered in
an accident, reset the NECK-PRO head
restraints/NECK-PRO luxury head restraints
on the driver's and front-passenger seats
(Y page 50). Otherwise, the additional pro-
tection will not be available in the event of
another rear-end collision. NECK-PRO head
restraints/NECK-PRO luxury head restraints
that have been triggered are moved forwards
and can no longer be adjusted.
Mercedes-Ben zrecommends having the
NECK-PRO head restraints/NECK-PRO head
restraints checked at a qualified specialist
workshop after a rear-en dcollision. Resetting
atriggered NECK-PRO head
restraint/NECK-PRO luxury head
restraint NECK-PRO head restraints
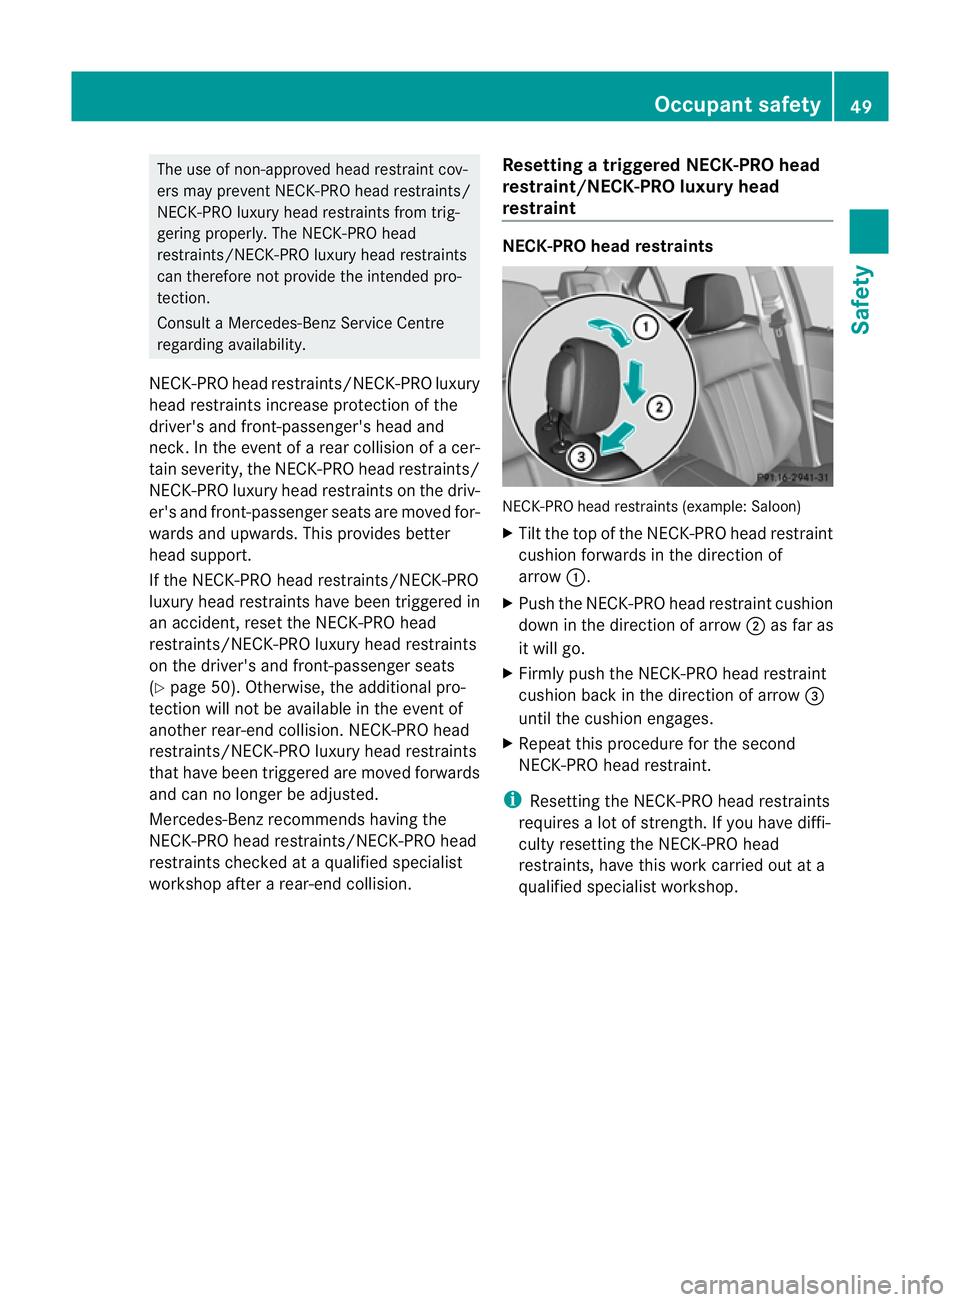
NECK-PRO head restraints (example: Saloon)
X
Tilt the top of the NECK-PRO head restraint
cushion forwards in the directio nof
arrow :.
X Push the NECK-PRO head restraint cushion
down in the direction of arrow ;as far as
it will go.
X Firmly push the NECK-PRO head restraint
cushion back in the direction of arrow =
until the cushion engages.
X Repeat this procedure for the second
NECK-PRO head restraint.
i Resetting the NECK-PRO head restraints
requires a lot of strength. If you have diffi-
culty resetting the NECK-PRO head
restraints, have this work carried out at a
qualified specialist workshop. Occupant safety
49Safety Z
Page 353 of 457
Information abou
tService Resetting the ASSYST PLUS service inter-
val display
!
If the ASSYST PLUS service interval dis-
play has been inadvertently reset, this set-
ting can be corrected at a qualified special-
ist workshop.
Have service work carried out as described
in the Service Booklet. This may otherwise
lead to increased wear and damage to the
major assemblies or the vehicle.
Aq ualified specialist workshop, e.g. a
Mercedes-Ben zService Centre, will reset the
ASSYST PLUS service interval display after
the service work has been carried out. You
can also obtain further information on main-
tenance work, for example.
Special service requirements
Arduous operating conditions or increased
loads on the vehicle will require some service
work to be performed more often than for a
vehicle in normal use. Such arduous condi-
tions include regular city driving with frequent
intermediate stops and use in mountainous
terrain or on poor road surfaces.
For example, if the vehicle is used under ardu-
ous operating conditions, have air filters,
engine oil and oil filters changed frequently
and chec kthe wheels often.F urther informa-
tion can be obtained at a qualified specialist
workshop, e.g. a Mercedes-Ben zService
Centre.
Driving abroad
An extensive Mercedes-Benz Service network
is also available in other countries. The
Service Hotline's curren ttelephone numbers
for use when you are abroad are to be found
in the "Mercedes-Benz Service24h" section
of the Service Booklet. AdBlue
®
service indicator
i For BlueTEC vehicles only. To function properly, BlueTEC exhaust gas
aftertreatment must be operated with the
reducing agent AdBlue
®
. AdBlue ®
is topped
up as part of the service. Under normal oper-
ating conditions, a full tank of AdBlue ®
should
last until the nexts ervice due date.
Depending on how and where the vehicle is
used, there may be an increase in the
AdBlue ®
consumption, resulting in the next
service due date being brought forward.
Certain display messages show that
AdBlue ®
must be topped up, e.g.
Refill AdBlue at workshop See Own‐ er's Manual
Refill AdBlue at workshop No start
in .. km
Aw
arning tone also sounds.
You can no longer start the engine when the
AdBlue ®
supply has been used up
(Y page 281).
! Have the AdBlue ®
tank topped up at a
qualified specialist workshop only. The
vehicle may otherwise be damaged or
soiled.
Before taking a trip with your vehicle outside
Europe, have the AdBlue ®
supply checked at
a qualified specialist workshop. If necessary,
have AdBlue ®
topped up. Before a longer stay
outside of Europe, consult a qualified special-
ist workshop.
Observe the notes on AdBlue ®
(Y page 440).
You can obtain further informatio nabout
BlueTEC exhaust gas aftertreatment and
AdBlue ®
from any Mercedes-Benz Service
Centre. Care
General notes
H
Environmental note
Dispose of empty packaging and cleaning
cloths in an environmentally responsible man-
ner. 350
CareMaintenance and care
Page 372 of 457
In order for the battery to achieve the maxi-
mum possible service life, it must always be
sufficiently charged.
The vehicle battery, like other batteries, can
discharge over time if you do not use the
vehicle .Insuch cases, have the battery dis-
connected at a qualified specialist workshop.
You can also charge the battery with a
charge rrecommended by Mercedes-Benz.
For more information, please contact a quali-
fied specialist workshop.
Have the battery charge checked more fre-
quently if you use the vehicle mainly for short
trips or if you leave it standing idle for a
lengthy period. Consult a qualified specialist
workshop if you wish to leave your vehicle
parked up for a long period of time.
i When you park the vehicle, remove the
key if you do not require any electrical con-
sumers. The vehicle will then use very little
energy, thus conserving battery power.
i After an interruption of the power supply,
e.g. the battery was discharged, you have
to:
R set the clock. Information on setting the
clock can be found in the separate oper-
ating instructions.
On vehicles with COMAND Online and a
navigation system, the clock is set auto-
matically.
R reset the function for folding the exterior
mirrors in/out automatically, by folding
the mirrors out once (Y page 120).Charging the battery
G
WARNING
Only charge the battery in a well-ventilated
area. As the battery is being charged, gases
can escape and generate minor explosions.
This could injure you and other persons or
cause damage to the paintwork or acid cor-
rosion on the vehicle. You can obtain information on battery charg-
ers which allow the batter
yto be charged
while still installed from a qualified specialist
workshop. G
WARNING
There is a risk of acid burns during the charg-
ing process due to the gases which escape
from the battery. Do not lean over the battery
during the charging process. G
WARNING
Battery acid is caustic. Avoid contact with the
skin, eyes or clothing.
! Only charge the installed battery with a
battery charger which has been tested and
approved by Mercedes-Benz. These battery
chargers allow the battery to be charged
while still installed in the vehicle.
! Only use battery chargers with a maxi-
mum charging voltage of 14.8 V.
! Only charge the battery using the jump-
start connection point.
The jump-starting connection point is in the
engine compartment (Y page 370).
Read the battery charger's operating instruc-
tions before charging the battery.
X Open the bonnet (Y page 345).
X Connect the battery charger to the positive
terminal and earth point in the same order
as when connecting the donor battery in
the jump-starting procedure
(Y page 370). Battery (vehicle)
369Breakdown assistance Z