2012 MERCEDES-BENZ E-CLASS ESTATE height
[x] Cancel search: heightPage 20 of 457
Notes for AMG vehicles
.................437
Refuelling proces s......................... 180
see Fuel
Releasing the parking loc kman-
ually (automatic transmission) ........179
Remote control Auxiliary heating/ventilation .......... 152
Changing the batteries (auxiliary
heating) ......................................... 154
Garage door opene r....................... 335
Programming (garage door
opener) .......................................... 336
Replacing the battery (auxiliary
heating remote control) .................... 154
Reserve (fuel tank) see Fuel
Reserve fuel
Display message ............................ 280
Warning lamp ................................. 305
Residual heat (climate control) ........150
Restraint system see SRS (Supplemental Restraint
System)
Rev counter ........................................ 247
Reverse gear Engaging (automatic transmis-
sion) ............................................... 171
Engaging (manual transmission) ....170
Reversing camera
Cleaning instructions .....................354
Function/notes ............................. 218
Switching on/off ........................... 219
Reversing lamp (display message) ..277
Roller sunblind Panorama sliding sunroo f.............. 101
Rea rwindow .................................. 330
Roof carrier ........................................ 327
Roof lining and carpets (cleaning
instructions) ...................................... 357
Roof load (maximum) ........................444 S
Safety Childre ninthe vehicle ..................... 55
Child restraint systems ....................55
Safety net
Attaching ....................................... 321
Important safety information .........321
Safety system
see Driving safety system
Seat
Folding the backres t(rear com-
partment) forwards/back ..............317
Seat belt
Adjusting the driver's and front-
passenger sea tbelt ......................... 52
Adjusting the height ......................... 52
Belt force limiter .............................. 54
Belt tensione r.................................. 54
Centre rear-compartment sea t........ 53
Cleaning ......................................... 357
Display message ............................ 273
Fastening ......................................... 52
Important safety guidelines .............51
Rea rseat belt status indicator .........54
Releasing ......................................... 53
Switching belt adjustment on/off
(on-board computer) ......................263
Warning lamp ................................. 299
Warning lamp (function) ................... 53
Seats
Adjusting (electrically). ..................108
Adjusting (manually and electri-
cally) .............................................. 108
Adjusting lumba rsuppor t.............. 113
Adjusting the 4-way lumba rsup-
por t................................................ 113
Adjusting the head restraint ..........109
Cleaning the cover .........................356
Correct driver's sea tposition ........106
Important safety notes ..................107
Overview ........................................ 107
Seat heating problem ....................116
Seat ventilation problem ................116
Storing settings (memory func-
tion) ............................................... 121 Index
17
Page 55 of 457
been approved by Mercedes-Benz for your
vehicle.
Seat belts are the most effective means of
restraining the movement of vehicle occu-
pants in the event of an accident. This
reduces the risk of vehicle occupants coming
into contact with parts of the vehicle interior.
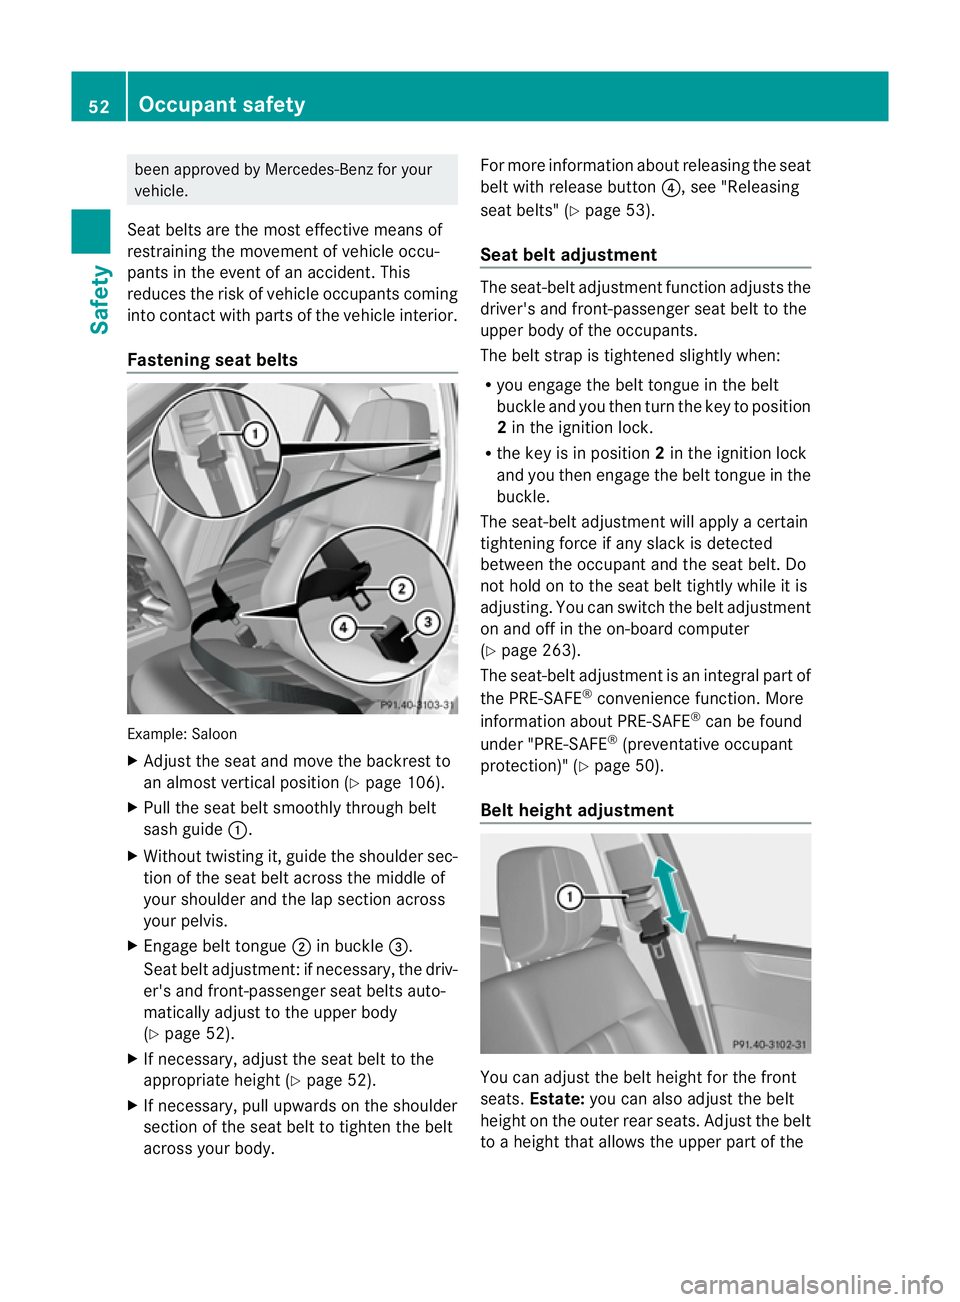
Fastening seat belts Example: Saloon
X
Adjust the seat and move the backrest to
an almost vertical position (Y page 106).
X Pull the seat belt smoothly through belt
sash guide :.
X Without twisting it, guide the shoulder sec-
tion of the seat belt across the middle of
your shoulder and the lap section across
your pelvis.
X Engage belt tongue ;in buckle =.
Seat belt adjustment :ifnecessary, the driv-
er's and front-passenger seat belts auto-
matically adjust to the upper body
(Y page 52).
X If necessary, adjust the seat belt to the
appropriate height (Y page 52).
X If necessary, pull upwards on the shoulder
section of the seat belt to tighten the belt
across your body. For more information about releasing the seat
belt with release button
?, see "Releasing
seat belts" (Y page 53).
Seat belt adjustment The seat-belt adjustment function adjusts the
driver's and front-passenger seat belt to the
upper body of the occupants.
The belt strap is tightened slightly when:
R
you engage the belt tongue in the belt
buckle and you then turn the key to position
2in the ignition lock.
R the key is in position 2in the ignition lock
and you then engage the belt tongue in the
buckle.
The seat-belt adjustment will apply a certain
tightening force if any slack is detected
between the occupant and the seat belt. Do
not hold on to the seat belt tightly while it is
adjusting. You can switch the belt adjustment
on and off in the on-board computer
(Y page 263).
The seat-belt adjustment is an integral part of
the PRE-SAFE ®
convenience function. More
information about PRE-SAFE ®
can be found
under "PRE-SAFE ®
(preventative occupant
protection)" (Y page 50).
Belt height adjustment You can adjust the belt height for the front
seats.
Estate: you can also adjust the belt
height on the outer rear seats. Adjust the belt
to a height that allows the upper part of the 52
Occupant safetySafety
Page 68 of 457
Fitting side head restraints
X
Slide head restraint ;upwards and posi-
tio nitu pright.
X Slide side head restraints Bfrom the front
to the centre of both head restraint bars
until they engage.
The right -and left-hand lock verification
indicators =must be folded in. The red
surfaces are no longe rvisible.
X Make sure that side head restraint Bis
engaged in both head restraint bars.
X Slide head restraint ;downwards
(Y page 110) until it rests on the upper
edge of side head restraints B.
X Guide the seat belt through seat belt guide
A on the door side on side head restraint
B.
X Secure the child (Y page 62).
Removing the side head restraints
X Take the seat belt out of seat belt guide
A.
X Move head restraint ;upwards.
X Press left or right release button ?and pull
side head restraint Bforward to remove
it.
The left and right lock verification indica-
tors :fold out briefly.
X Adjust head restraint ;(Ypage 110).
i Should a side head restraint be required
for the second integrated child seat, this
can be ordered at any Mercedes-Benz
Service Centre.
Storing the ICS padded play table and
the side head restraint G
WARNING
Secure the ICS padded play table and the side
head restraints in the vehicle as specified;
otherwise, they may com eloose. In the event
of an accident, sudden braking or abrupt
change in direction, they could injure vehicle
occupants or cause damage to the vehicle. When you are not using the ICS padded play
table and the side head restraints, store these
in a suitable place, such as the boot.
For example, on vehicles with TIREFIT, you
can store the side head restraints in the stow-
age compartment under the boot/luggage
compartment floor (Y page 325)/
(Y page 325).
Suitable positioning of the child
restraint systems X
To install a child restraint system on
the front-passenger seat: move the front-
passenger seat to the rearmost and lowest
position and the belt outlet height to the
lowest position.
Key to the letters used in the following table:
XS eat which is unsuitable for children in
this weight category.
US uitable for child restraint systems in the
"Universal" category that are approved
for use in this weigh tcategory.
LS uitable for child restraint systems as rec-
ommended, see the following table of
"Recommended child restraint systems"
(Y page 67).
Front-passenger seat Weight cat-
egories Front-
passenger
airbag is
not disa-
bled: Front-
passenger
front air-
bag is disa-
bled.
Categor
y0:
up to 10 kg X L
Category
0+: up to
13 kg
X L
Category I:
9 to 18 kg
L LChildren in the vehicle
65Safety Z
Page 110 of 457
settings with the memory function
(Y
page 121). Seats
Important safety notes
G
WARNING
The seats can still be adjusted when there is
no key in the ignition lock. For this reason,
children should never be left unsupervised in
the vehicle. They could adjust the seats and
become trapped. G
WARNING
Only adjust the driver's seat when the vehicle
is stationary. You will otherwise be distracted
from the road and traffic conditions and you
could lose control of the vehicle as a result of
the seat moving. This could cause an acci-
dent. G
WARNING
If you adjust the seat height carelessly, you or
others could be trapped and thereby injured.
Children in particular could unintentionally
press the buttons to electrically adjust the
seats and become trapped.
Take care that:
R while moving the seats, your hands do not
get under the lever assembly of the seat
adjustment system.
R children in the vehicle do not slide their
hands under the levers. G
WARNING
Make sure that nobody can become trapped
when adjusting the seats.
Observe the notes on airbags.
Secure children as recommended; see the
"Children in the vehicle" section. G
WARNING
Make sure that the back of your head is sup-
ported at eye level by the central area of the head restraint. If your head is not supported
correctly by the head restraint, you could suf-
fer a severe neck injury in the event of an
accident. Never drive if the head restraints are
not engaged and set correctly.
G
WARNING
As eat belt can only offer its intended degree
of protection when the backrest is almost ver-
tical and the occupant is sitting upright. Avoid
seat positions that do not allow the seat belt
to be routed correctly. Adjust the backrest so
that it is as upright as possible. Never travel
with the backrest reclined too far backwards.
You could otherwise be seriously or even
fatally injured in the event of an accident or
sudden braking.
! To avoid damage to the seats and the seat
heating, observe the following information:
R do not spill any liquids on the seats. If
liquid is spilled on the seats, dry them as
soon as possible.
R if the seat covers are damp or wet, do not
switch on the seat heating. The seat
heating should also not be used to dry
the seats.
R clean the seat covers as recommended;
see the "Interior care" section.
R do not transport heavy loads on the
seats. Do not place sharp objects on the
seat cushions, e.g. knives, nails or tools.
The seats should only be occupied by
passengers, if possible.
R when the seat heating is in operation, do
not cover the seats with insulating mate-
rials, e.g. blankets, coats, bags, seat cov-
ers, child seats or booster seats.
! To avoid damage to the seats and the seat
heating, observe the following information:
R do not spill any liquids on the seats. If
liquid is spilled on the seats, dry them as
soon as possible.
R if the seat covers are damp or wet, do not
switch on the seat heating. The seat Seats
107Seats, steering wheel and mirrors Z
Page 111 of 457
heating should also not be used to dry
the seats.
R clean the seat covers as recommended;
see "Interior care".
R do not transport heavy loads on the
seats. Do not place sharp objects on the
seat cushions, e.g. knives, nails or tools.
The seats should only be occupied by
passengers, if possible.
R when the seat heating is in operation, do
not cover the seats with insulating mate-
rials, e.g. blankets, coats, bags, seat cov-
ers, child seats or booster seats.
! Make sure that there are no objects in the
footwell or behind the seats when moving
the seat back. There is a risk that the seats
and/or the objects could be damaged.
i The head restraints in the front seats are
fitted with the NECK-PRO system
(Y page 48). For this reason, it is not pos-
sible to remove the head restraints from
the front seats.
Vehicles without the through-loading fea-
ture: the head restraints cannot be
removed from the rear compartments eats.
For more information, contact a qualified
specialist workshop.
i Further related subjects:
R Through-loading feature in the rear
bench seat (Saloon) (Y page 315)
R EASY-PACK through-loading feature in
the rear bench seat (Estate)
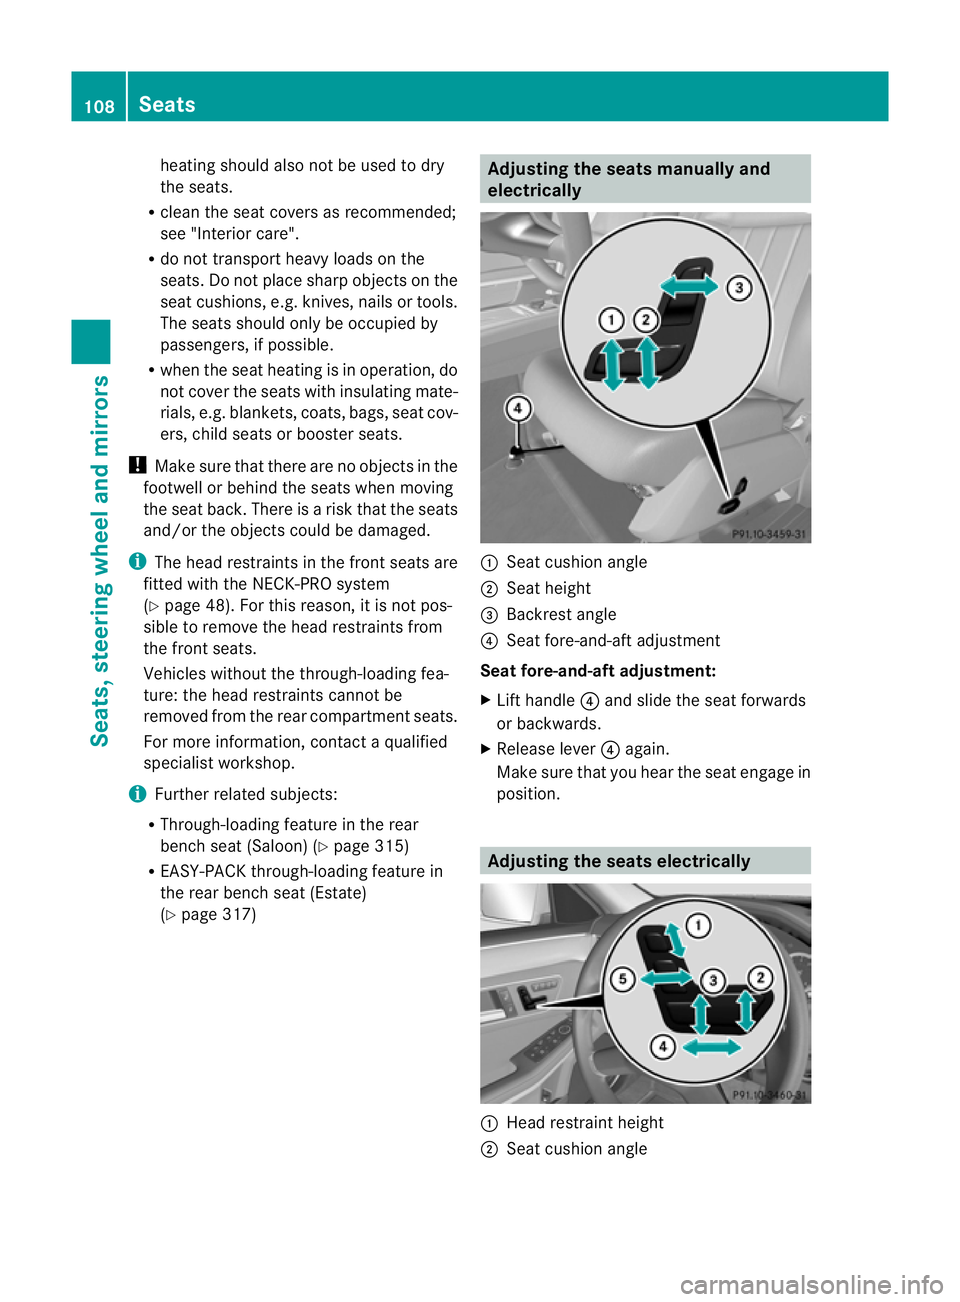
(Y page 317) Adjusting the seats manually and
electrically
:
Seat cushion angle
; Seat height
= Backrest angle
? Seat fore-and-aft adjustment
Seat fore-and-aft adjustment:
X Lift handle ?and slide the seat forwards
or backwards.
X Release lever ?again.
Make sure that you hear the seat engage in
position. Adjusting the seats electrically
:
Head restraint height
; Seat cushion angle 108
SeatsSeats, steering wheel and mirrors
Page 112 of 457
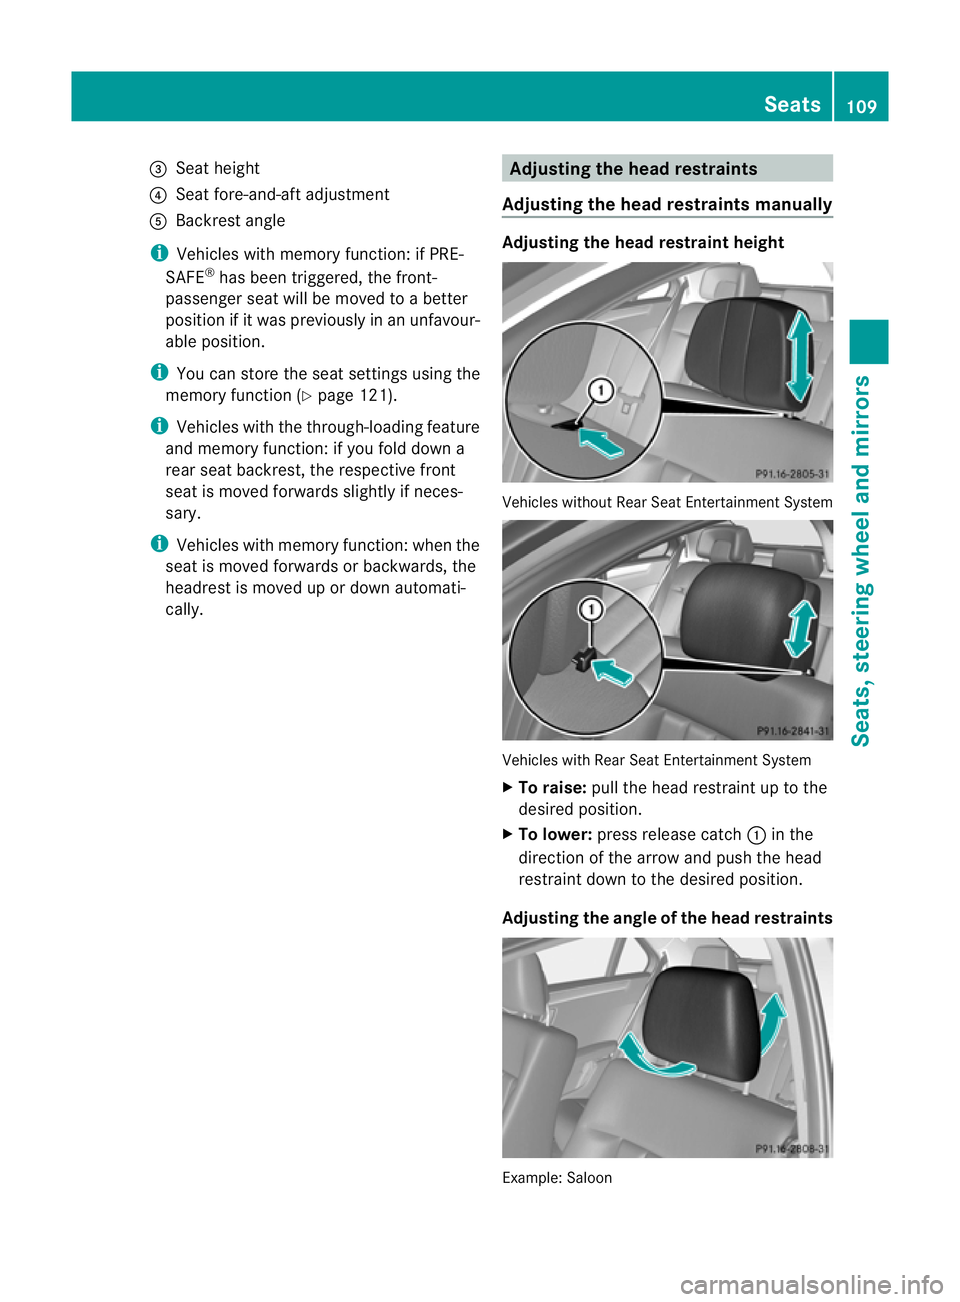
=
Sea theight
? Seat fore-and-aft adjustment
A Backrest angle
i Vehicles with memory function: if PRE-
SAFE ®
has been triggered, the front-
passenger seat will be moved to a better
position if it was previously in an unfavour-
able position.
i You can store the seat settings using the
memory function (Y page 121).
i Vehicles with the through-loading feature
and memory function: if you fold down a
rear seat backrest, the respective front
seat is moved forwards slightly if neces-
sary.
i Vehicles with memory function :when the
seat is moved forwards or backwards, the
headrest is moved up or down automati-
cally. Adjusting the head restraints
Adjusting the head restraints manually Adjusting the head restraint height
Vehicles without Rear Seat Entertainment System
Vehicles with Rear Seat Entertainment System
X
To raise: pull the head restraint up to the
desired position.
X To lower: press release catch :in the
direction of the arrow and push the head
restraint down to the desired position.
Adjusting the angle of the head restraints Example: Saloon Seats
109Seats, steering wheel and mirrors Z
Page 113 of 457
X
Push or pull the lower edge of the head
restraint in the direction of the arrow.
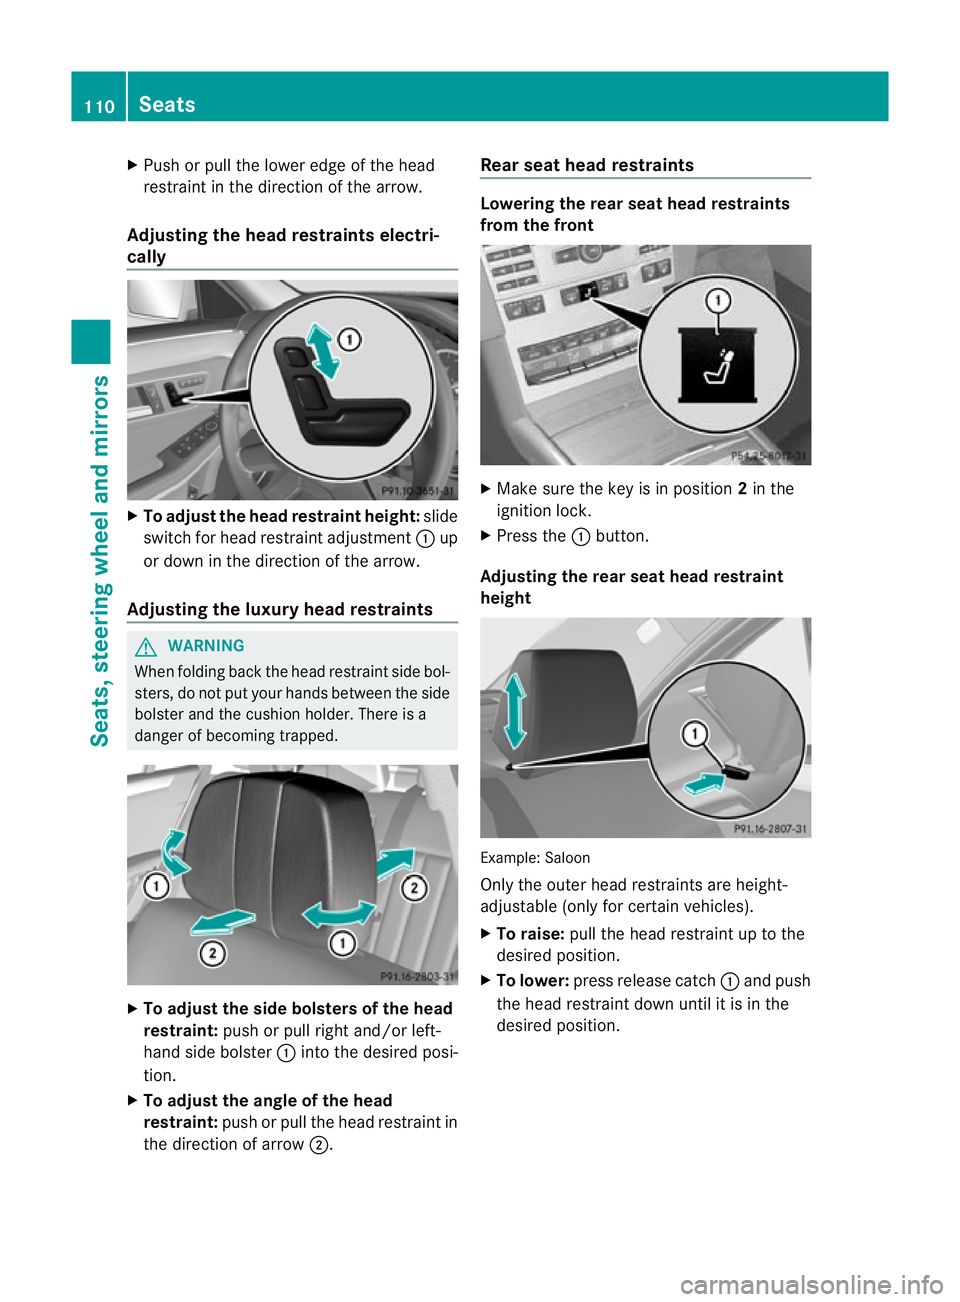
Adjusting the head restraints electri-
cally X
To adjust the head restraint height: slide
switch for head restraint adjustment :up
or down in the direction of the arrow.
Adjusting the luxury head restraints G
WARNING
When folding back the head restraint side bol-
sters, do not put your hands between the side
bolster and the cushion holder. There is a
danger of becoming trapped. X
To adjust the side bolsters of the head
restraint: push or pull right and/or left-
hand side bolster :into the desired posi-
tion.
X To adjust the angle of the head
restraint: push or pull the head restraint in
the direction of arrow ;. Rear seat head restraints Lowering the rear seat head restraints
from the front
X
Make sure the key is in position 2in the
ignition lock.
X Press the :button.
Adjusting the rear seat head restraint
height Example: Saloon
Only the outer head restraints are height-
adjustable (only for certain vehicles).
X To raise: pull the head restraint up to the
desired position.
X To lower: press release catch :and push
the head restraint down until it is in the
desired position. 110
SeatsSeats, steering wheel and mirrors
Page 114 of 457
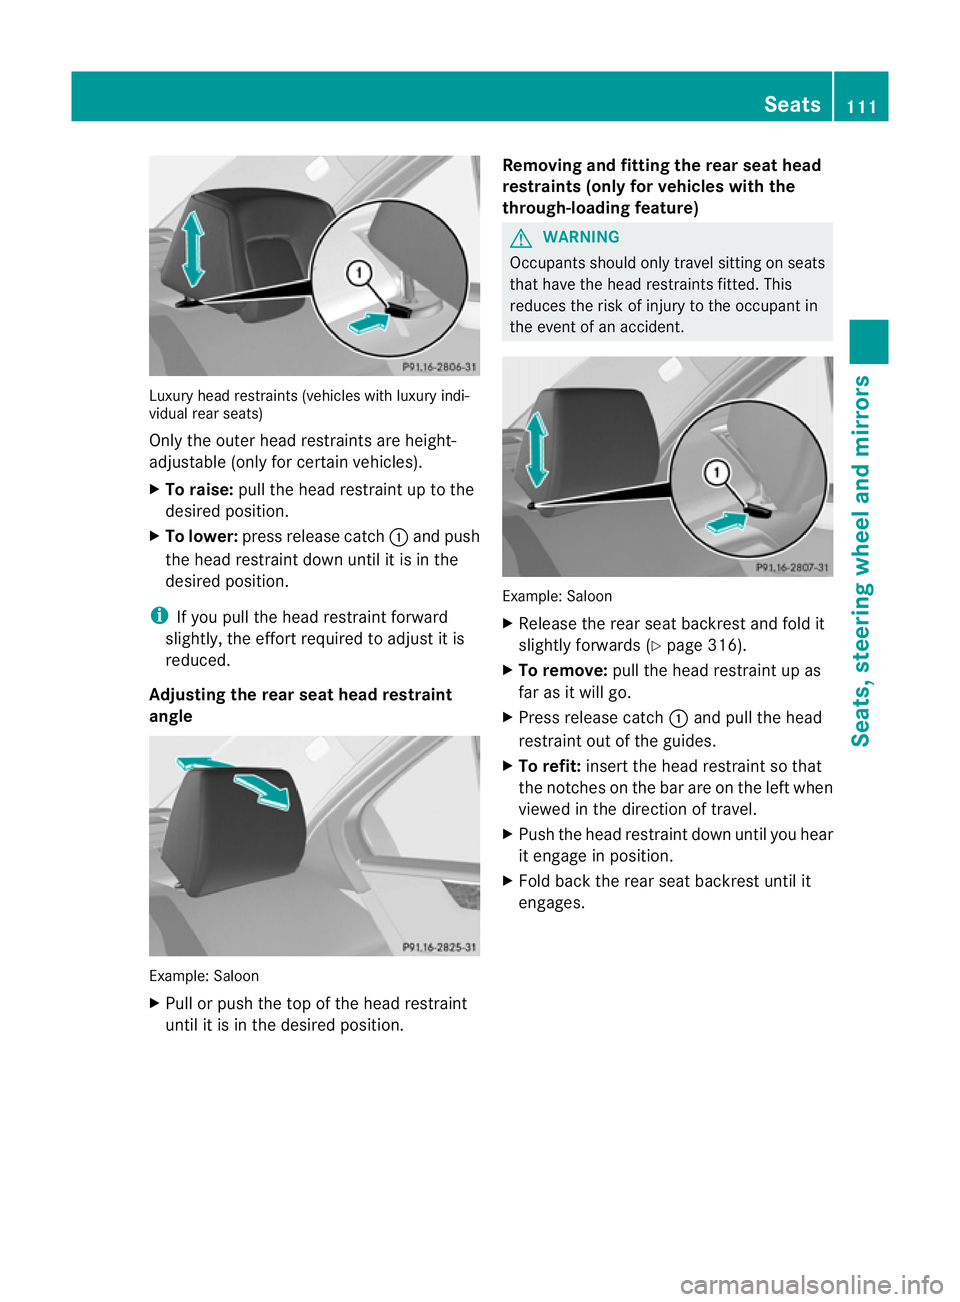
Luxury head restraints (vehicles with luxury indi-
vidual rear seats)
Only the outer head restraints are height-
adjustable (only for certain vehicles).
X To raise: pull the head restraint up to the
desired position.
X To lower: press release catch :and push
the head restraint down until it is in the
desired position.
i If you pull the head restraint forward
slightly, the effort required to adjust it is
reduced.
Adjusting the rear seat head restraint
angle Example: Saloon
X
Pull or push the top of the head restraint
until it is in the desire dposition. Removing and fitting the rear seat head
restraints (only for vehicles with the
through-loading feature) G
WARNING
Occupants should only travel sitting on seats
that have the head restraints fitted. This
reduces the risk of injury to the occupant in
the event of an accident. Example: Saloon
X
Release the rear seat backrest and fold it
slightly forwards (Y page 316).
X To remove: pull the head restraint up as
far as it will go.
X Press release catch :and pull the head
restraint out of the guides.
X To refit: insert the head restraint so that
the notches on the bar are on the left when
viewed in the direction of travel.
X Push the head restraint down until you hear
it engage in position.
X Fold back the rear seat backrest until it
engages. Seats
111Seats, steering wheel and mirrors Z