2012 MERCEDES-BENZ CLS SHOOTING BRAKE wiper fluid
[x] Cancel search: wiper fluidPage 9 of 405

Important safety notes
..................340
Jump starting ................................. 344
Belt
see Seat belt
Belt force limiters (activation) ...........41
Belt tensioner Activation ......................................... 41
Function .......................................... .52
Blind Spo tAssist
Activating/deactivating .................238
Display message ............................ 264
Notes/function .............................. 208
Trailer towing ................................. 210
see Active Blind Spot Assist
Bluetooth ®
SAP V3 telephone mod-
ule see Separate operating instructions
Bonnet
Closing .......................................... .321
Display message ............................ 273
Opening ......................................... 320
Boot
Emergency release ..........................88
Boot lid
Display message ............................ 272
Opening dimensions ......................394
Boot load (maximum) ........................ 394
Bottle holders .................................... 304
Box (boot) .......................................... .299
Brake Assist System see BAS (Brake Assist System)
Brake fluid
Display message ............................ 252
Notes ............................................. 392
Brake lamps
Adaptive .......................................... .66
Display message ............................ 256
Brakes
ABS .................................................. 64
BAS .................................................. 64
BAS PLUS ........................................ 65
Brake fluid (notes) .........................392
Display message ............................ 250
Driving tips .................................... 168
High-performance brake system ....169
Important safety notes ..................168Parking brake
................................ 166
Warning lamp ................................. 278
Breakdown
see Flat tyre
see Towing away
Bulbs
see Changing bulbs C
Calling up a fault see Display messages
Car
see Vehicle
Care
Automatic car wash .......................325
Carpets .......................................... 332
Display ........................................... 330
Exhaust pip e.................................. 329
Exterior lighting ............................. 328
Gea rors electo rlever .................... 331
High-pressure cleaner .................... 326
Interior ........................................... 330
Matt paintwork .............................. 327
Nigh tView Assist Plus ...................330
Notes ............................................. 325
Paint .............................................. 327
Plastic trim .................................... 330
Reversing camera ..........................329
Roof lining ...................................... 332
Seat bel t........................................ 331
Seat cover ..................................... 331
Sensors ......................................... 328
Steering wheel ............................... 331
Trim pieces .................................... 331
Washing by hand ........................... 326
Wheels ........................................... 327
Windows ........................................ 328
Wiper blades .................................. 328
Wooden trim .................................. 331
Car wash (care) ................................. 325
CD player/CD changer(on-board
computer) .......................................... 234
Central locking Automatic locking (on-board com-
puter) ............................................. 243
Locking/unlocking (key ).................. 77 6
Index
Page 24 of 405

Wheels
Changing/replacing .......................362
Changing awheel .......................... 362
Checking ........................................ 355
Cleaning ......................................... 327
Cleaning (warning) .........................363
Emergency spare wheel .................377
Fitting anew wheel ........................ 366
Fitting awheel ............................... 363
Important safety notes ..................354
Removing awheel .......................... 365
Storing ........................................... 363
Tightening torque ........................... 366
Whee lsize/tyre size ...................... 367
Windowbag
Operation ........................................ .46
Windows
Cleaning ......................................... 328
see Side windows
Windscreen
Demisting ...................................... 136
Windscreen washe rfluid
see Windscreen washer system
Windscreen washer system
Notes ............................................. 393
Topping up ..................................... 323
Windscreen wipers
Problem (malfunction) ...................128
Rea rwindow wiper ........................ 126
Replacing the wiper blades ............126
Switching on/off ........................... 125
Winter operation
Important safety notes ..................356
Radiator cover ............................... 321
Slippery road surfaces ...................171
Snow chains .................................. 357
Winter tyres
Limiting the speed (on-board com-
puter) ............................................. 242
M+S tyres ...................................... 356
Wiper blades
Cleaning ......................................... 328
Important safety notes ..................126
Replacing ....................................... 126
Replacing (on the rear window) .....127
Replacing (windscreen) ..................126
Wooden trim (cleaning instruc-
tions) .................................................. 331Workshop
see Qualified specialist workshop Index
21
Page 121 of 405

X
To switch on the main-beam head-
lamps: turn the key in the ignition lock to
position 2or start the engine.
X Turn the light switch to LorÃ.
X Press the combinatio nswitc hbeyond the
pressure point in the direction of
arrow :.
In the Ãposition, the main-beam head-
lamps are only switched on when it is dark
and the engine is running.
The blue Kindicator lamp in the instru-
ment cluster lights up when the main-beam
headlamps are switched on.
X To switch off the main-beam head-
lamps: move the combination switch back
to its normal position.
The blue Kindicator lamp in the instru-
ment cluster goes out.
i Vehicles with Adaptive Highbeam Assist:
when Adaptive Highbeam Assist is active,
it controls activation of the main-beam
headlamps (Y page 120).
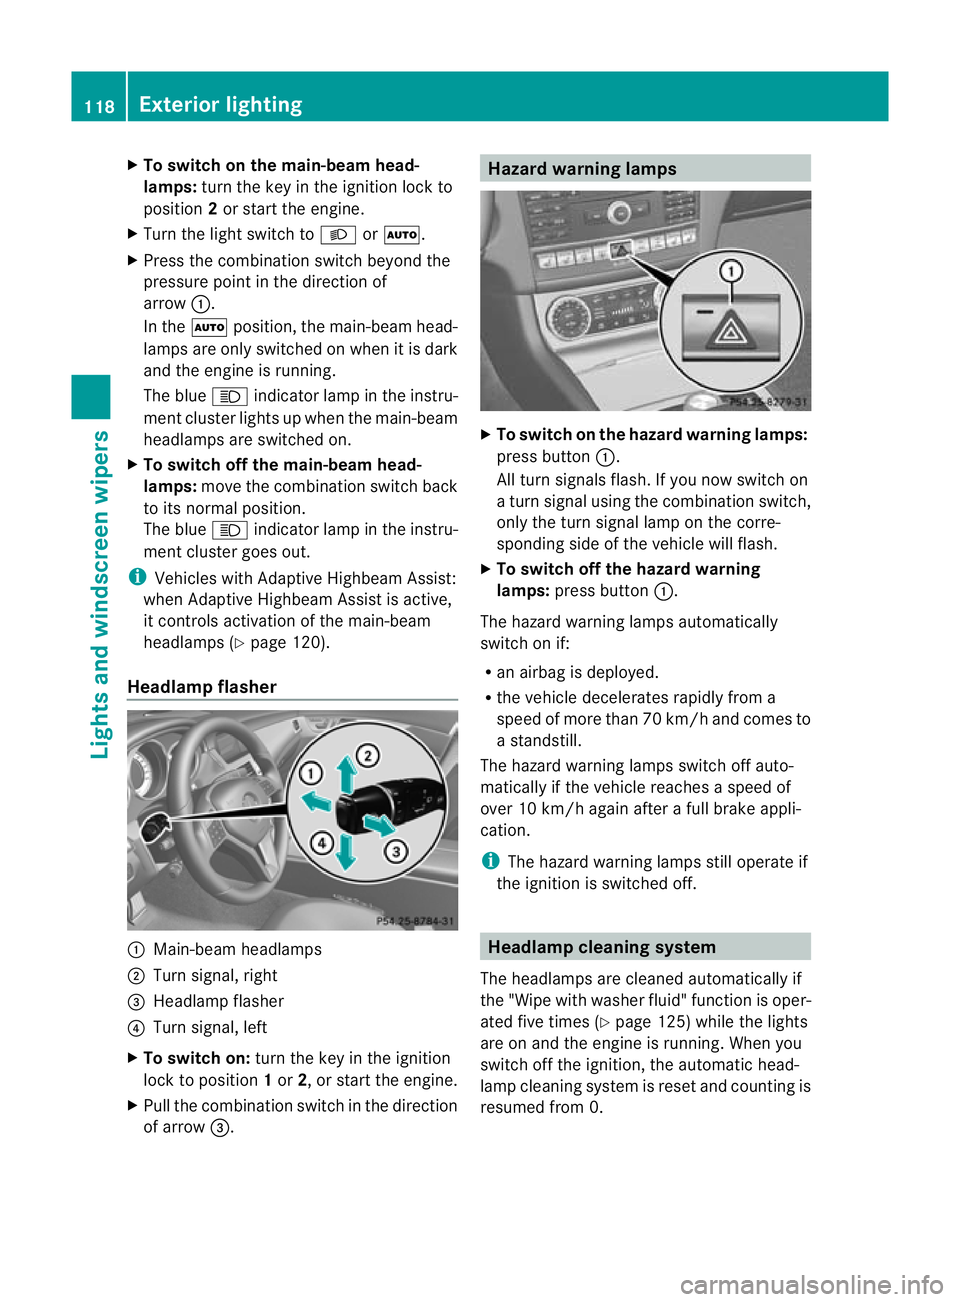
Headlamp flasher :
Main-beam headlamps
; Turn signal, right
= Headlamp flasher
? Turn signal, left
X To switch on: turn the key in the ignition
lock to position 1or 2, or start the engine.
X Pull the combination switch in the direction
of arrow =. Hazard warning lamps
X
To switch on the hazard warning lamps:
press button :.
All turn signals flash. If you now switch on
a turn signal using the combination switch,
only the turn signal lamp on the corre-
sponding side of the vehicle will flash.
X To switch off the hazard warning
lamps: press button :.
The hazard warning lamps automatically
switch on if:
R an airbag is deployed.
R the vehicle decelerates rapidly from a
speed of more than 70 km/ha nd comes to
a standstill.
The hazard warning lamps switch off auto-
matically if the vehicle reaches a speed of
over 10 km/h again after a full brake appli-
cation.
i The hazard warning lamps still operate if
the ignition is switched off. Headlamp cleaning system
The headlamps are cleaned automatically if
the "Wipe with washe rfluid" function is oper-
ated five times (Y page 125) while the lights
are on and the engine is running. When you
switch off the ignition, the automatic head-
lamp cleaning system is reset and counting is
resumed from 0. 118
Exterior lightingLights and windscreen wipers
Page 128 of 405

X
Insert bulb holder =into the lamp and turn
it clockwise.
X Reinsert the lamp cluster.
X Tighten four nuts :.
X Push in connector ;until it engages.
X Insert the side panelling. Windscreen wipers
Switching the windscreen wipers on/
off G
WARNING
The windscree nwill not longer be wiped prop-
erly if the wiper blades are worn .This could
prevent you from observing the traffic condi-
tions, thereby causing an accident. Replace
the wiper blades twice a year, ideally in spring
and autumn.
! Do not operate the windscreen wipers
when the windscreen is dry, as this could
damage the wiper blades. Moreover, dust
that has collected on the windscreen can
scratch the glass if wiping takes place when
the windscreen is dry.
If it is necessary to switch on the wind-
screen wipers in dry weather conditions,
always operate them using washer fluid.
! If the windscreen wipers leave smears on
the windscreen after the vehicle has been
washed in an automatic car wash, this may
be due to wax or other residue. Cleant he
windscreen with washer fluid after an auto-
matic car wash.
! Intermittent wiping with rain sensor: due
to optical influences and the windscreen
becoming dirty in dry weather conditions,
the windscreen wipers may be activated
inadvertently. This could damage the wind-
screen wiper blades or scratch the wind-
screen.
For this reason, you should always switch
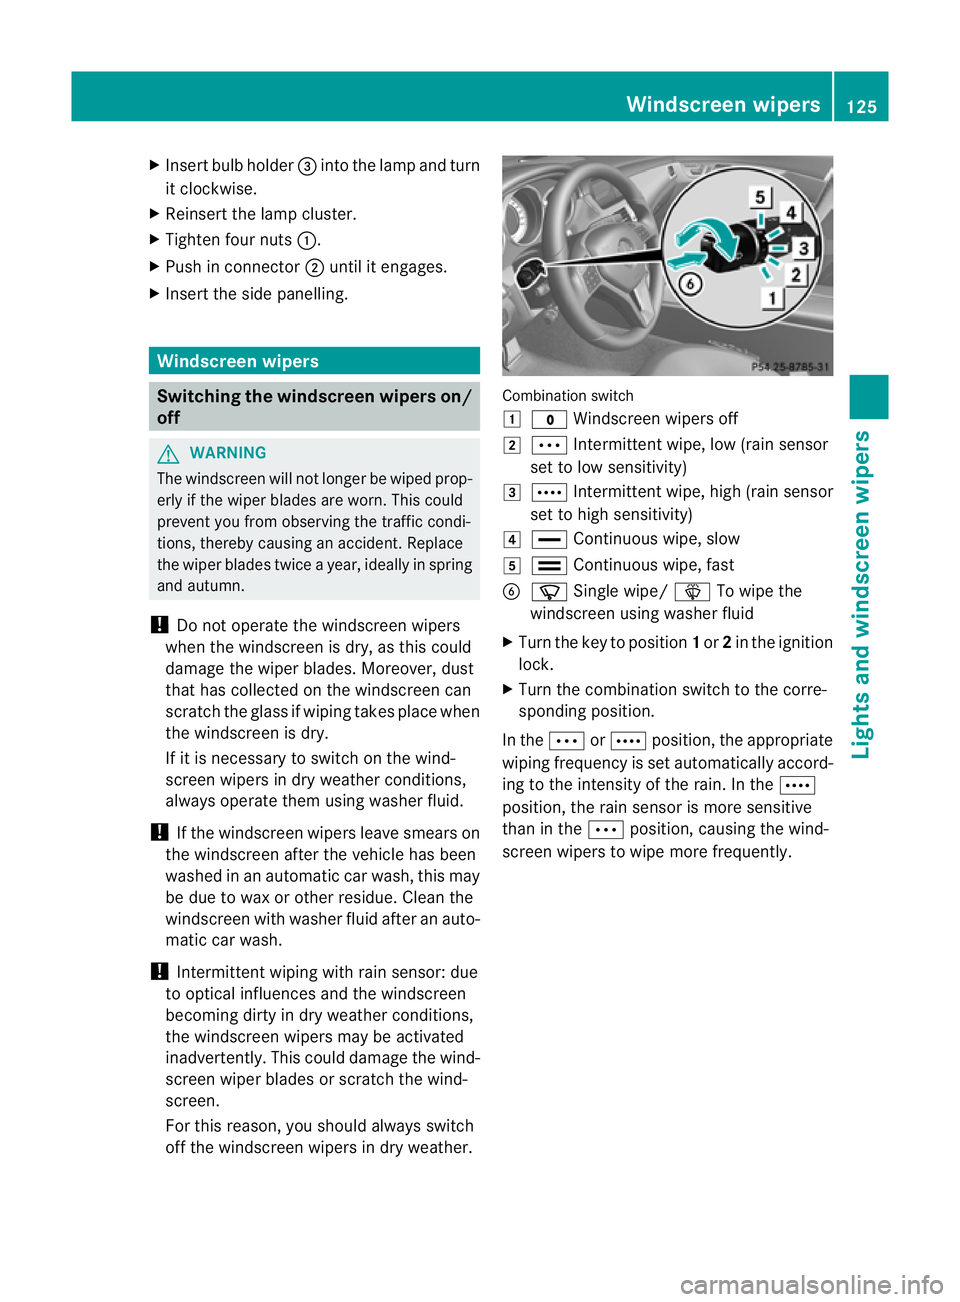
off the windscreen wipers in dry weather. Combination switch
1
$ Windscreen wipers off
2 Ä Intermittent wipe, low (rain sensor
set to low sensitivity)
3 Å Intermittent wipe, high (rain sensor
set to high sensitivity)
4 ° Continuous wipe, slow
5 ¯ Continuous wipe, fast
B í Single wipe/ îTo wipe the
windscreen using washer fluid
X Turn the key to position 1or 2in the ignition
lock.
X Turn the combination switch to the corre-
sponding position.
In the ÄorÅ position, the appropriate
wiping frequency is set automatically accord-
ing to the intensity of the rain. In the Å
position, the rain sensor is more sensitive
than in the Äposition, causing the wind-
screen wipers to wipe more frequently. Windscreen wipers
125Lights and windscreen wipers Z
Page 129 of 405

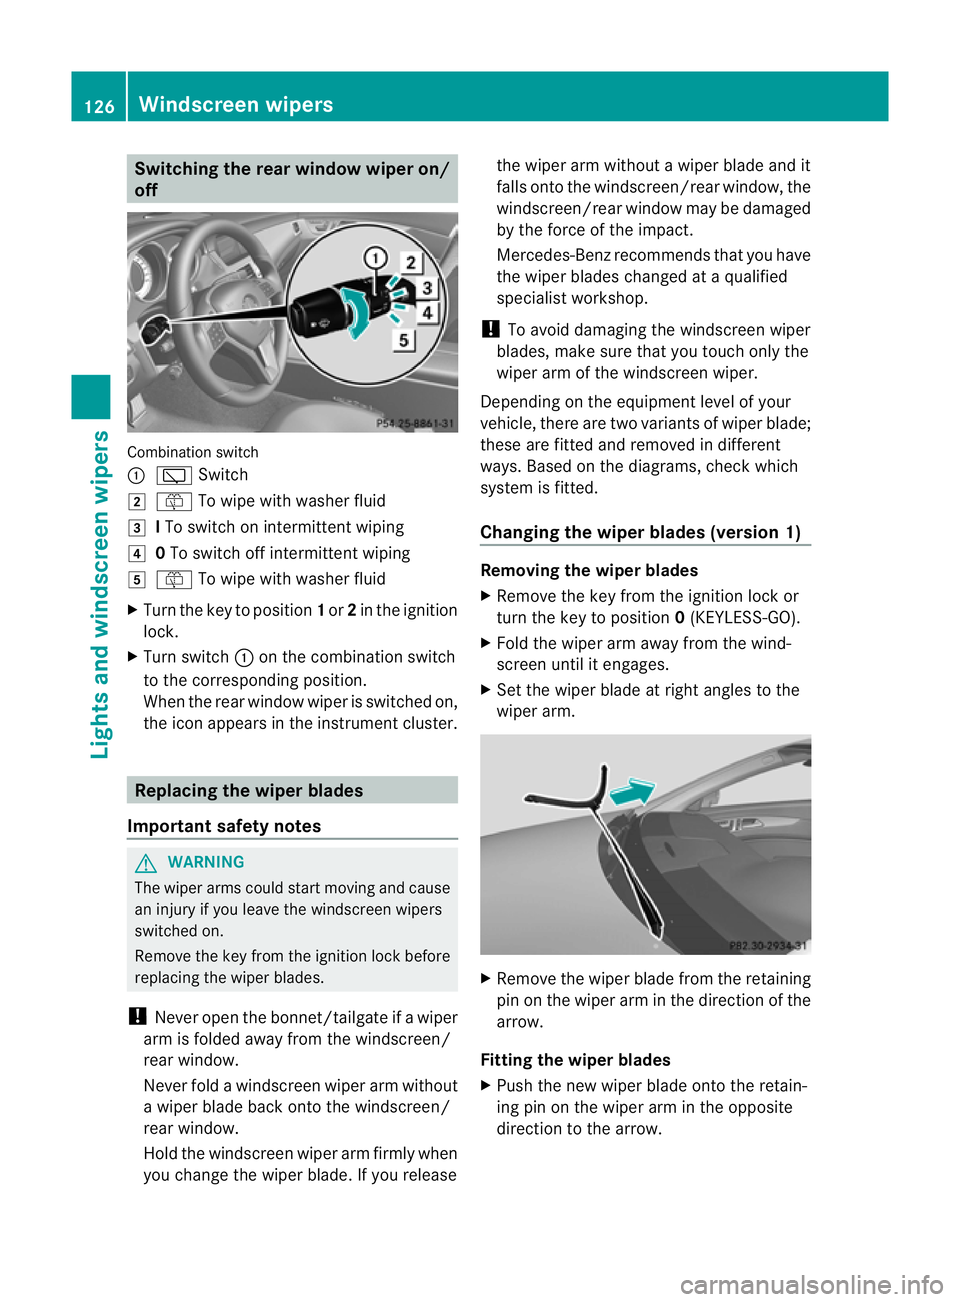
Switching the rear window wiper on/
off
Combination switch
:
è Switch
2 ô To wipe with washer fluid
3 ITo switch on intermittent wiping
4 0To switch off intermittent wiping
5 ô To wipe with washer fluid
X Turn the key to position 1or 2in the ignition
lock.
X Turn switch :on the combination switch
to the corresponding position.
When the rear window wiper is switched on,
the icon appears in the instrumen tcluster. Replacing the wiper blades
Important safety notes G
WARNING
The wiper arms could star tmoving and cause
an injury if you leave the windscreen wipers
switched on.
Remove the key from the ignition lock before
replacing the wiper blades.
! Never open the bonnet/tailgate if a wiper
arm is folded away from the windscreen/
rear window.
Never fold a windscreen wiper arm without
a wiper blade back onto the windscreen/
rear window.
Hold the windscreen wiper arm firmly when
you change the wiper blade. If you release the wiper arm without a wiper blade and it
falls onto the windscreen/rear window, the
windscreen/rear window may be damaged
by the force of the impact.
Mercedes-Benz recommends that you have
the wiper blades changed at
aqualified
specialist workshop.
! To avoid damaging the windscree nwiper
blades, make sure that you touch only the
wiper arm of the windscreen wiper.
Depending on the equipmen tlevel of your
vehicle, there are two variants of wiper blade;
these are fitted and removed in different
ways. Based on the diagrams, chec kwhich
system is fitted.
Changing the wiper blades (version 1) Removing the wiper blades
X
Remove the key from the ignition lock or
turn the key to position 0(KEYLESS-GO).
X Fold the wiper arm away from the wind-
screen until it engages.
X Set the wiper blade at right angles to the
wiper arm. X
Remove the wiper blade from the retaining
pin on the wiper arm in the direction of the
arrow.
Fitting the wiper blades
X Push the new wiper blade onto the retain-
ing pin on the wiper arm in the opposite
direction to the arrow. 126
Windscreen wipersLights and windscreen wipers