2012 MERCEDES-BENZ CLS SHOOTING BRAKE instrument cluster
[x] Cancel search: instrument clusterPage 72 of 405
X
To deactivate: press button:until the
å ESP®
OFF warning lamp lights up in
the instrument cluster.
The ÷OFF message appears in the mul-
tifunctio ndisplay.
Deactivate ESP ®
when driving on designa-
ted roads when the vehicle's own over-
steering and understeering characteristics
are desired. Driving without ESP ®
requires
an extremely qualified and experienced
drive rwho is able to cope with these critical
driving conditions.
X To activate: briefly press button :.
The å ESP®
OFF warning lamp in the
instrumentc luster goes out. The ÷ON message appears in the multifunction dis-
play.
ESP ®
is activated automatically when the
engine is started.
If ESP ®
is deactivated and one or more wheels
start to spin, the ÷ESP®
warning lamp in
the instrumen tcluster does not flash. In such
situations, ESP ®
will not stabilise the vehicle.
It may be best to deactivate ESP ®
in the fol-
lowing situations:
R when using snow chains
R in deep snow
R on sand or gravel
If you deactivate ESP ®
:
R ESP ®
no longer improves driving stability.
R traction control is still activated.
R PRE-SAFE ®
is no longer available; nor is it
activated if you brake firmly and ESP ®
inter-
venes.
R PRE-SAFE ®
Brake is no longer available; it
is also not activated if you brake firmly and
ESP ®
intervenes.
R ESP ®
still provides support when you
brake.
R engine torque is no longer limited and the
drive wheels are able to spin .The spinning
of the wheels results in a cutting action for
better traction. Vehicles with ECO start/stop function: the
ECO start/stop function switches the engine
off automatically when the vehicle comes to
a stop. When pulling away again, the engine
starts automatically
.ESP ®
remains in its pre-
viously selected status. Example :ifESP®
was
deactivated before the engine was switched
off, ESP ®
remains deactivated when the
engine is switched on again.
ESP ®
trailer stabilisation G
WARNING
If road and weather conditions are poor,
traile rstabilisation will not be able to prevent
the vehicle/trailer combination from swerv-
ing .Trailers with a high centre of gravity can
tip over before ESP ®
can detect this. There is
a risk of an accident.
Always adapt yourd riving style to the prevail-
ing road and weather conditions.
If yourv ehicle/trailer combination begins to
lurch, you can only stabilise the vehicle/
trailer combination by depressing the brake
firmly.
In this situation, ESP ®
assists you and can
detec tifthe vehicle/trailer combination
begins to lurch. ESP ®
slows the vehicle down
by braking and limiting the engine output until
the vehicle/trailer combination has stabi-
lised.
Trailer stabilisation is active above speeds of
about 65 km/h.
Trailer stabilisation does not work if ESP ®
is
deactivated or disabled because of a mal-
function. EBD (electronic brake force distribu-
tion)
i Observe the "Important safety notes" sec-
tion (Y page 64). Driving safety systems
69Safety Z
Page 73 of 405
G
WARNING
If EBD has malfunctioned, the rear wheels can
still lock, e.g. under full braking. This increa-
ses the risk of skidding and an accident.
You should therefore adapt yourd riving style
to the different handling characteristics. Have
the brake system checked at a qualified spe-
cialist workshop.
Observe informatio nregarding indicator and
warning lamps ( Ypage 279) as well as dis-
play messages (Y page 252).
EBD monitors and controls the brake pres-
sure on the rear wheels to improve driving
stability while braking. ADAPTIVE BRAKE
ADAPTIVE BRAKE enhances braking safety
and offers increased braking comfort. In addi-
tion to the brakin gfunction ,ADAPTIVE BRAKE
also has the HOLD functio n(Ypage 186 )and
hill start assist (Y page 150). PRE-SAFE
®
Brake
i Observe the "Important safety notes" sec-
tion (Y page 64).
PRE-SAFE ®
Brake is only available in vehicles
with DISTRONIC PLUS.
PRE-SAFE ®
Brake can help you to minimise
the ris kofacollisio nwith a vehicle ahead or
reduce the effects of such a collision. If PRE-
SAFE ®
Brake detects a risk of collision, you
will be warned visually and acoustically as
well as by automatic braking. PRE-SAFE ®
Brake cannot prevent a collision without your
intervention.
This function will issue a warning if:
R at speeds of around 30 km/h or more, over
several seconds, the distanc emaintained
to the vehicle travelling in front is insuffi-
cient. The
· distance warning lamp then lights
up in the instrument cluster.
R at a speed of approximately 7km/h or
higher, you very quickly approach a vehicle
in front.
An intermittent warning tone will then
sound and the ·distance warning lamp
will light up in the instrument cluster.
X Brake immediately in order to increase the
distance from the vehicle in front.
or
X Take evasive action provided it is safe to do
so.
From a speed of approximately 7km/h, if the
driver and passengers have fastened their
seat belts, PRE-SAFE ®
Brake can brake the
vehicle automatically at speeds up to approx-
imatel y200 km/h.
Due to the nature of the system, particularly
complicated driving conditions may cause
unnecessary warnings or the unnecessary
intervention of PRE-SAFE ®
Brake.
You can prevent the intervention of the PRE-
SAFE ®
Brake at any time by:
R depressing the accelerato rpedal further
R activating kickdown
R releasing the brake pedal.
The braking action of PRE-SAFE ®
Brake is
ended automatically if:
R you manoeuvre to avoid the obstacle.
R there is no longer any danger of a rear-end
collision.
R there is no longer an obstacle detected in
front of your vehicle.
With the help of the radar sensor system,
PRE-SAFE ®
Brake can detect obstacles that
are in front of your vehicle for an extended
period of time.
At speeds up to approximately 70 km/h, PRE-
SAFE ®
Brake can also detect stationary
obstacles such as stopped or parked vehi-
cles. 70
Driving safet
ysystemsSafety
Page 118 of 405
Automatic headlamp mode
G
WARNING
If the ligh tswitch is set to Ãand it is foggy,
snowing or there is poor visibility, the dipped-
beam headlamps will not come on automati-
cally. This could endange ryou and others. In
such situations turn the light switch to L.
The automatic headlamp feature is only an
aid. The driver is responsible for the vehicle's
lighting at all times. 1W
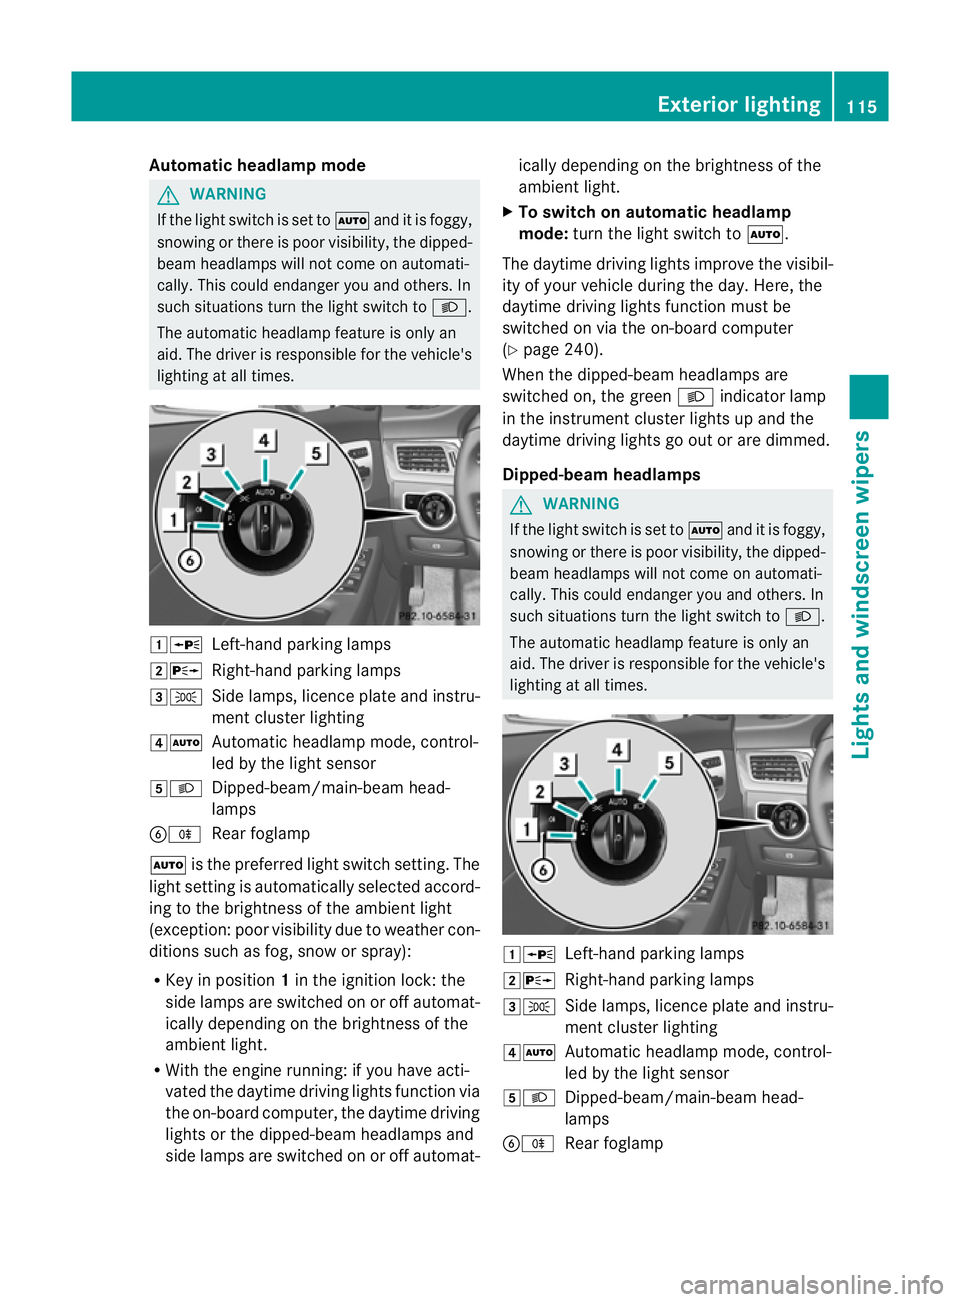
Left-hand parking lamps
2X Right-hand parking lamps
3T Side lamps, licence plate and instru-
ment cluster lighting
4Ã Automatic headlamp mode, control-
led by the light sensor
5L Dipped-beam/main-beam head-
lamps
BR Rear foglamp
à is the preferred light switch setting. The
light setting is automatically selected accord-
ing to the brightness of the ambient light
(exception: poor visibility due to weather con-
ditions such as fog, snow or spray):
R Key in position 1in the ignition lock: the
side lamps are switched on or off automat-
ically depending on the brightness of the
ambient light.
R With the engine running: if you have acti-
vated the daytime driving lights function via
the on-board computer, the daytime driving
lights or the dipped-beam headlamps and
side lamps are switched on or off automat- ically depending on the brightness of the
ambient light.
X To switch on automatic headlamp
mode: turn the light switch to Ã.
The daytime driving lights improve the visibil-
ity of your vehicle during the day. Here, the
daytime driving lights function must be
switched on via the on-board computer
(Y page 240).
When the dipped-beam headlamps are
switched on, the green Lindicator lamp
in the instrument cluster lights up and the
daytime driving lights go out or are dimmed.
Dipped-beam headlamps G
WARNING
If the light switch is set to Ãand it is foggy,
snowing or there is poor visibility, the dipped-
beam headlamps will not come on automati-
cally. This could endanger you and others. In
such situations turn the light switch to L.
The automatic headlamp feature is only an
aid. The driver is responsible for the vehicle's
lighting at all times. 1W
Left-hand parking lamps
2X Right-hand parking lamps
3T Side lamps, licence plate and instru-
ment cluster lighting
4Ã Automatic headlamp mode, control-
led by the light sensor
5L Dipped-beam/main-beam head-
lamps
BR Rear foglamp Exterior lighting
115Lights and windscreen wipers Z
Page 119 of 405
Even if the ligh
tsensor does not detec tthat
is dark, the side lamps and dipped-beam
headlamps switch on when the key is inserted
into the ignition lock and the light switch is
set to the Lposition. This is a particularly
useful function in the event of rain and fog.
X To switch on the dipped-beam head-
lamps: turn the key in the ignition lock to
position 2or start the engine.
X Turn the light switch to L.
The green Lindicator lamp in the instru-
ment cluster lights up.
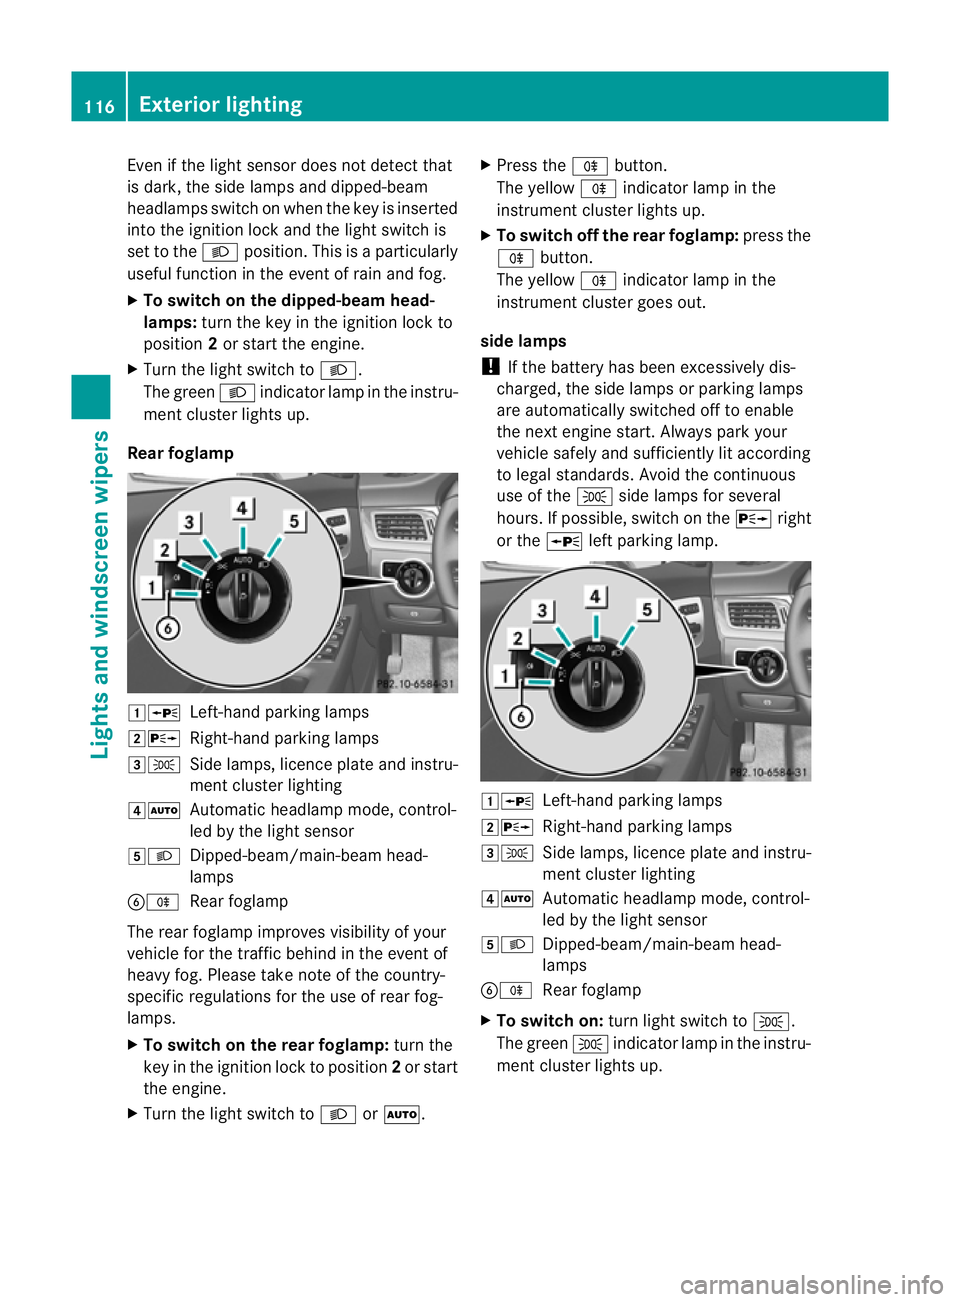
Rear foglamp 1W
Left-hand parking lamps
2X Right-hand parking lamps
3T Side lamps, licence plate and instru-
ment cluster lighting
4Ã Automatic headlamp mode, control-
led by the light sensor
5L Dipped-beam/main-beam head-
lamps
BR Rear foglamp
The rear foglamp improves visibility of your
vehicle for the traffic behind in the event of
heavy fog. Please take note of the country-
specific regulations for the use of rear fog-
lamps.
X To switch on the rear foglamp: turn the
key in the ignition lock to position 2or start
the engine.
X Turn the light switch to LorÃ. X
Press the Rbutton.
The yellow Rindicator lamp in the
instrumentc luster lights up.
X To switch off th erear foglamp: press the
R button.
The yellow Rindicator lamp in the
instrumen tcluster goes out.
side lamps
! If the battery has been excessively dis-
charged, the side lamps or parking lamps
are automatically switched off to enable
the nex tengine start. Always park your
vehicle safely and sufficiently li taccording
to legal standards. Avoid the continuous
use of the Tside lamps for several
hours. If possible, switch on the Xright
or the Wleft parking lamp. 1W
Left-hand parking lamps
2X Right-hand parking lamps
3T Side lamps, licence plate and instru-
ment cluster lighting
4Ã Automati cheadlamp mode, control-
led by the light sensor
5L Dipped-beam/main-beam head-
lamps
BR Rear foglamp
X To switch on: turn light switch to T.
The green Tindicator lamp in the instru-
ment cluster lights up. 116
Exterior lightingLights and windscreen wipers
Page 124 of 405
tance to the other vehicle. Once the system
no longe rdetects any other vehicles, it reac-
tivates the main-beam headlamps.
The system's optical sensor is located behind
the windscreen near the overhead control
panel.
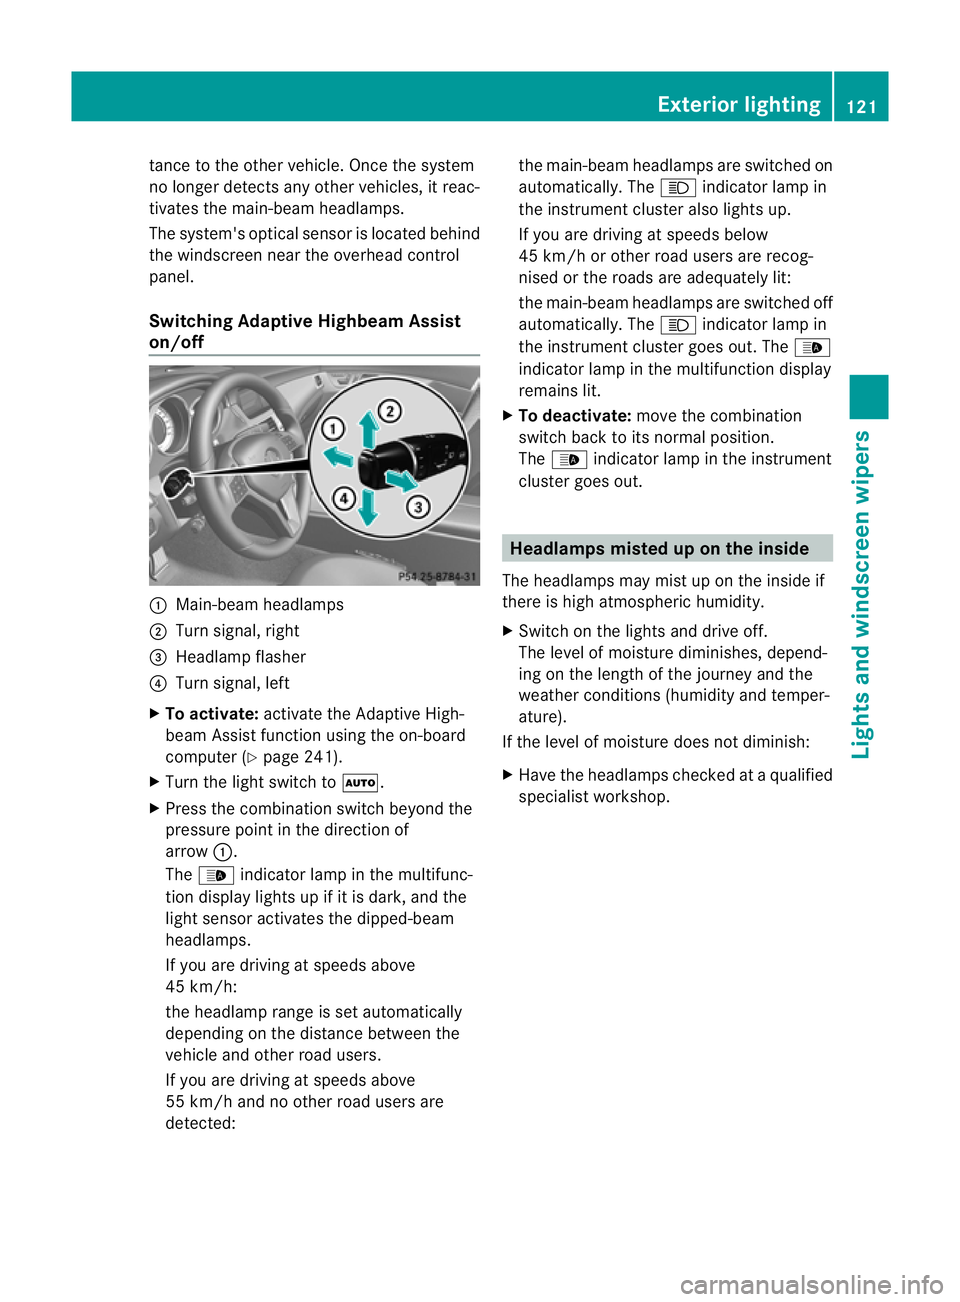
Switching Adaptive Highbeam Assist
on/off :
Main-beam headlamps
; Turn signal, right
= Headlamp flasher
? Turn signal, left
X To activate: activate the Adaptive High-
beam Assist function using the on-board
computer (Y page 241).
X Turn the light switch to Ã.
X Press the combination switch beyond the
pressure point in the direction of
arrow :.
The _ indicator lamp in the multifunc-
tion display lights up if it is dark, and the
light sensor activates the dipped-beam
headlamps.
If you are driving at speeds above
45 km/h:
the headlamp range is set automatically
depending on the distance between the
vehicle and other road users.
If you are driving at speeds above
55 km/h and no other road users are
detected: the main-beam headlamps are switched on
automatically. The
Kindicator lamp in
the instrument cluster also lights up.
If you are driving at speeds below
45 km/h or other road users are recog-
nised or the roads are adequately lit:
the main-beam headlamps are switched off
automatically. The Kindicator lamp in
the instrument cluster goes out. The _
indicator lamp in the multifunction display
remains lit.
X To deactivate: move the combination
switch back to its normal position.
The _ indicator lamp in the instrument
cluster goes out. Headlamps misted up on the inside
The headlamps may mist up on the inside if
there is high atmospheric humidity.
X Switch on the lights and drive off.
The level of moisture diminishes, depend-
ing on the length of the journey and the
weather conditions (humidity and temper-
ature).
If the level of moisture does not diminish:
X Have the headlamps checked at a qualified
specialist workshop. Exterior lighting
121Lights and windscreen wipers Z
Page 165 of 405
G
WARNING
Electrostatic charge can lead to the creation
of sparks and to fuel vapours igniting. There
is a risk of fire and explosion.
Touch the vehicle bodywork just before open-
ing the fuel filler cap. This will discharge a
possible electrostatic charge.
! Do not use petrol to refuel vehicles with a
diesel engine. Do not use diesel to refuel
vehicles with a petrol engine. Do not switch
on the ignitio nifyou accidentally refuel
with the wrong fuel. Otherwise, the fuel will
enter the fuel system. Even small amounts
of the wrong fuel could result in damage to
the fuel system and the engine. The repair
costs are high. Notify aqualified specialist
workshop and have the fuel tan kand fuel
lines drained completely.
! Overfilling the fuel tank could damage the
fuel system.
! Take care not to spill any fuel on painted
surfaces .You could otherwise damage the
paintwork.
! Use a filter when adding fuel from a fuel
can. The fuel lines and/or the diesel injec-
tion system could otherwise be blocked by
particles from the fuel can.
If you overfill the fuel tank, fuel may spray out
when the fuel pump nozzle is removed.
Further information on fuel and on fuel grades
can be found in the "Fuel" section
(Y page 386). Refuelling
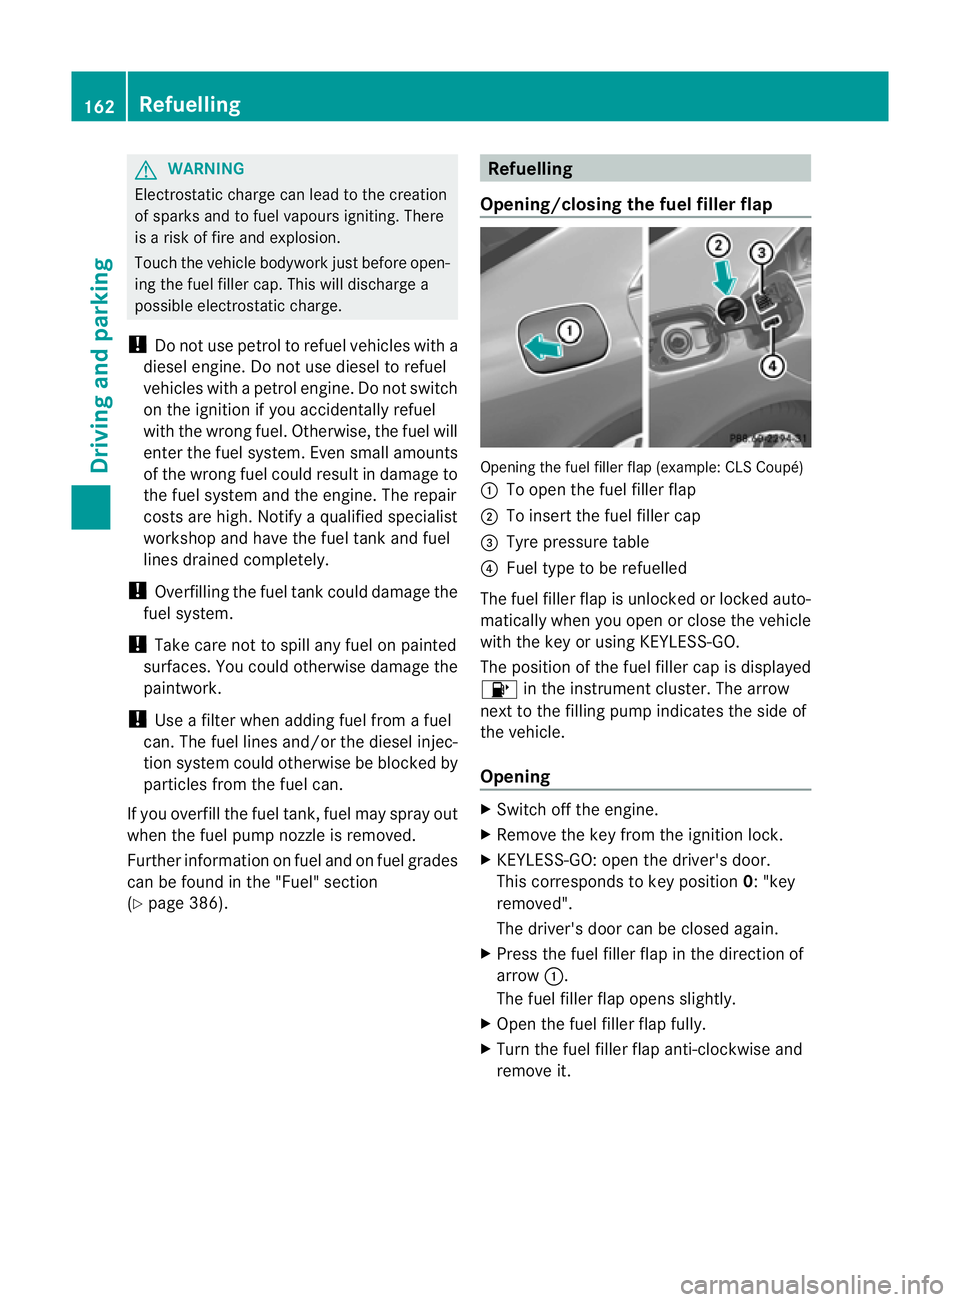
Opening/closing the fuel filler flap Opening the fuel filler flap (example: CLS Coupé)
:
To open the fuel filler flap
; To insert the fuel filler cap
= Tyre pressure table
? Fuel type to be refuelled
The fuel filler flap is unlocked or locked auto-
matically when you open or close the vehicle
with the key or using KEYLESS-GO.
The position of the fuel filler cap is displayed
8 in the instrument cluster. The arrow
next to the filling pump indicates the side of
the vehicle.
Opening X
Switch off the engine.
X Remove the key from the ignition lock.
X KEYLESS-GO: open the driver's door.
This corresponds to key position 0: "key
removed".
The driver's door can be closed again.
X Press the fuel filler flap in the direction of
arrow :.
The fuel filler flap opens slightly.
X Open the fuel filler flap fully.
X Turn the fuel filler flap anti-clockwise and
remove it. 162
RefuellingDriving and parking
Page 170 of 405
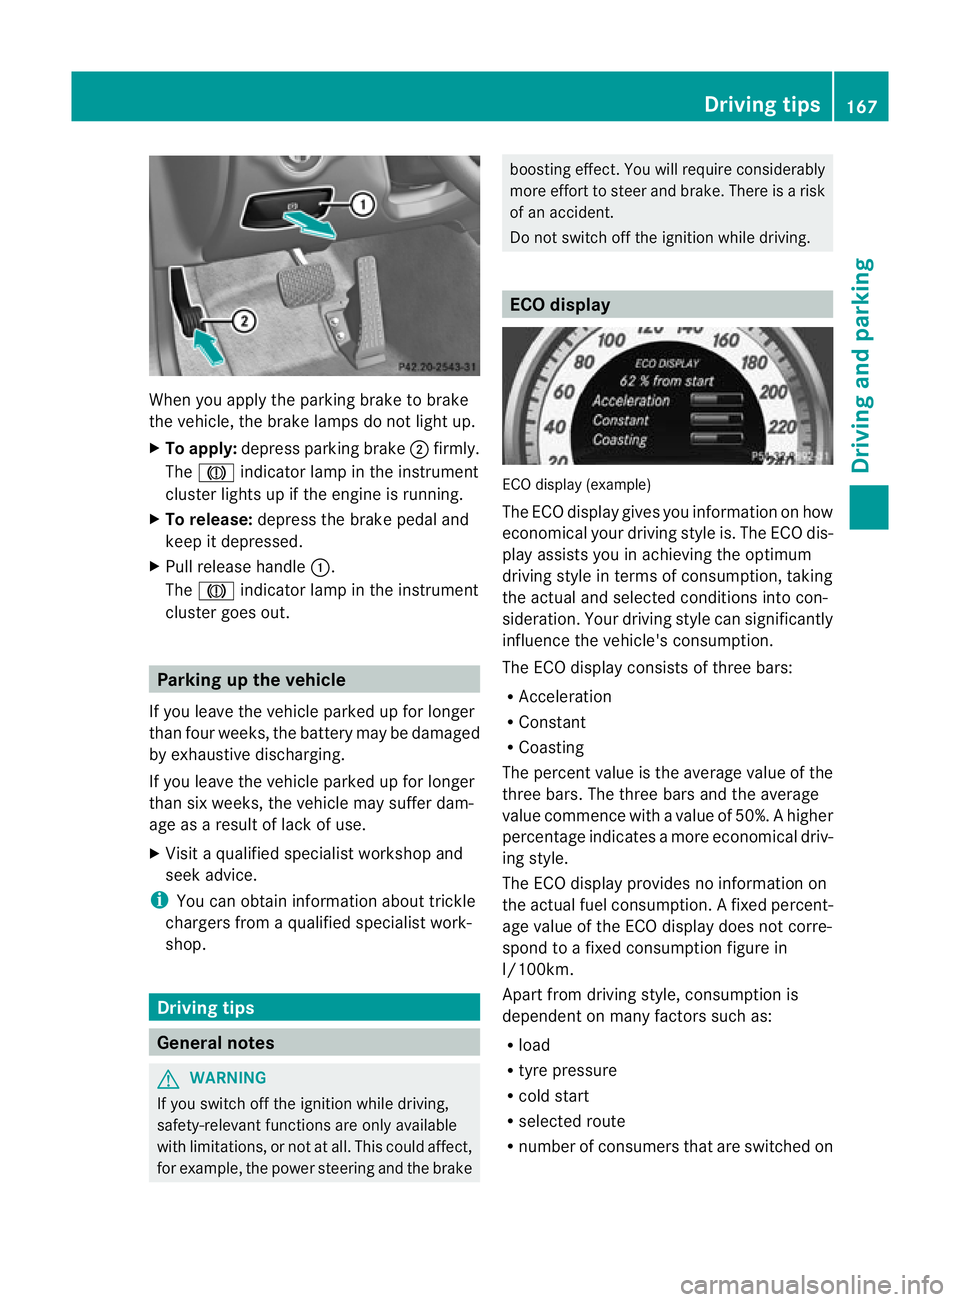
When you apply the parking brake to brake
the vehicle, the brake lamps do not light up.
X To apply: depress parking brake ;firmly.
The J indicator lamp in the instrument
cluster lights up if the engine is running.
X To release: depress the brake pedal and
keep it depressed.
X Pull release handle :.
The J indicator lamp in the instrument
cluster goes out. Parking up the vehicle
If you leave the vehicle parked up for longer
than four weeks, the battery may be damaged
by exhaustive discharging.
If you leave the vehicle parked up for longer
than six weeks, the vehicle may suffer dam-
age as a result of lack of use.
X Visit a qualified specialist workshop and
seek advice.
i You can obtain information about trickle
chargers from a qualified specialist work-
shop. Driving tips
General notes
G
WARNING
If you switch off the ignition while driving,
safety-relevant functions are only available
with limitations, or not at all. This could affect,
for example, the power steering and the brake boosting effect. You will require considerably
more effort to steer and brake. There is a risk
of an accident.
Do not switch off the ignition while driving.
ECO display
ECO display (example)
The ECO display gives you information on how
economical your driving style is. The ECO dis-
play assists you in achieving the optimum
driving style in terms of consumption, taking
the actual and selected conditions into con-
sideration. Your driving style can significantly
influence the vehicle's consumption.
The ECO display consists of three bars:
R
Acceleration
R Constant
R Coasting
The percen tvalue is the average value of the
three bars .The three bars and the average
value commence with a value of 50%. Ahigher
percentage indicates a mor eeconomical driv-
ing style.
The ECO display provides no information on
the actual fuel consumption. Afixed percent-
age value of the ECO display does not corre-
spond to a fixed consumption figure in
l/100km.
Apart from driving style, consumption is
dependent on many factors such as:
R load
R tyre pressure
R cold start
R selected route
R number of consumers that are switched on Driving tips
167Driving and parking Z
Page 173 of 405
The wear of individual components of the
brake system, such as the brake pads/linings
or brake discs, depends on the individual driv-
ing style and operating conditions.
For this reason, it is impossible to state a
mileage (service life) that will be valid under
all circumstances. An aggressive driving style
will lead to high wear. You can obtain further
information about this from your Mercedes-
Benz Service Centre.
New brake pads/brake pads and discs that
have been replaced only achieve optimum
braking effect after several hundred kilome-
tres of driving. Compensate for the reduced
braking effect by applying greater force to the
brake pedal. Always be aware of this and
adapt your driving and braking accordingly
during the running-in period.
Excessive heavy braking results in corre-
spondingly high brake wear. Observe the
# brake pad wear warning lamp in the
instrument cluster and note any brake status
messages in the multifunction display .Ifyou
regularly drive at high speeds, it is particularly
important to have the brake system checked
and maintained regularly. Driving on wet roads
Aquaplaning If water has accumulated to a certain depth
on the road surface, there is a danger of aqua-
planing occurring, even if:
R
you are driving at low speeds.
R the tyres have adequate tread depth.
For this reason, do not drive in tyre ruts and
brake carefully.
Driving on flooded roads !
Bear in mind that vehicles travelling in
front or in the opposite direction create
waves. This may cause the maximum per-
missible water depth to be exceeded. These notes must be observed under all
circumstances. You could otherwise dam-
age the engine, the electronics or the trans-
mission.
If you have to drive on stretches of road on
which water has collected, please bear in
mind that:
R the maximum permissible still water depth
is 25 cm.
R you should drive no faster than at walking
pace. Winter driving
Important safety notes G
WARNING
If you shift down on a slippery road surface in
an attempt to increase the engine's braking
effect, the drive wheels could lose their grip.
This increases the risk of skidding and having
an accident.
Do not shift down for additional engine brak-
ing on a slippery road surface. G
DANGER
If the exhaust pipe is blocked or adequate
ventilation is not possible, poisonous gases
such as carbon monoxide (CO) may enter the
vehicle. This is the case, e.g. if the vehicle
becomes trapped in snow. There is a risk of
fatal injury.
If you leave the engine or the auxiliary heating
running, make sure the exhaust pipe and area
around the vehicle are clear of snow. To
ensure an adequate supply of fresh air, open
a window on the side of the vehicle that is not
facing into the wind.
Have your vehicle winterproofed at a qualified
specialist workshop at the onset of winter.
Observe the notes in the "Winter operation"
section (Y page 356). 170
Driving tipsDriving and parking