2012 MERCEDES-BENZ CLS SHOOTING BRAKE instrument cluster
[x] Cancel search: instrument clusterPage 287 of 405
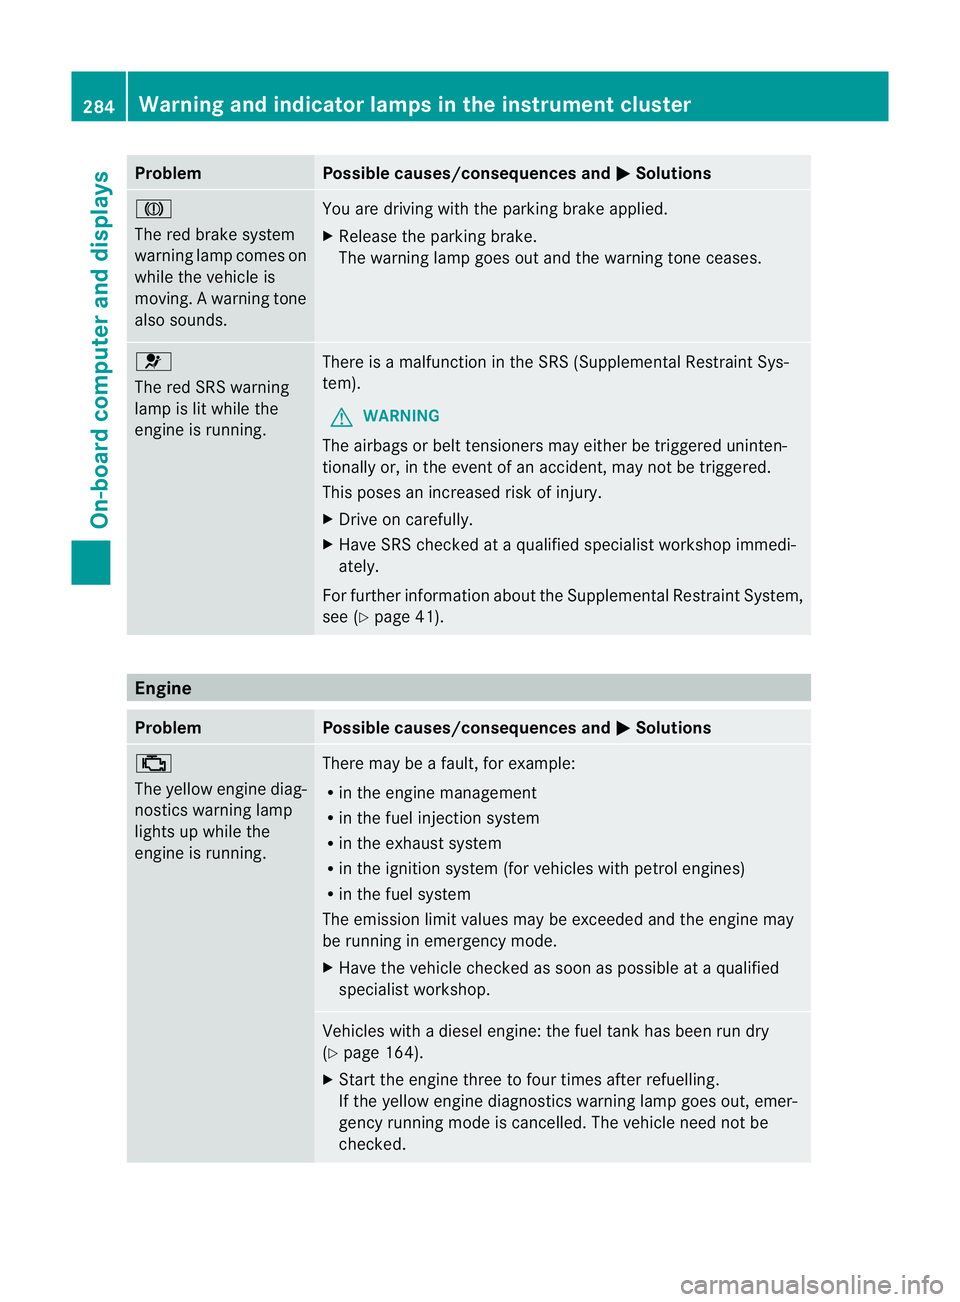
Problem Possible causes/consequences and
M Solutions
J
The red brake system
warning lamp comes on
while the vehicle is
moving. A warning tone
also sounds.
You are driving with the parking brake applied.
X
Release the parking brake.
The warning lamp goes out and the warning tone ceases. 6
The red SRS warning
lamp is lit while the
engine is running.
There is a malfunction in the SRS (Supplemental Restraint Sys-
tem).
G WARNING
The airbags or belt tensioners may either be triggered uninten-
tionally or, in the event of an accident, may not be triggered.
This poses an increased risk of injury.
X Drive on carefully.
X Have SRS checked at a qualified specialist workshop immedi-
ately.
For further information about the Supplemental Restraint System,
see (Y page 41). Engine
Problem Possible causes/consequences and
M Solutions
;
The yellow engine diag-
nostics warning lamp
lights up while the
engine is running. There may be a fault, for example:
R
in the engine management
R in the fuel injection system
R in the exhaust system
R in the ignition system (for vehicles with petrol engines)
R in the fuel system
The emission limit values may be exceeded and the engine may
be running in emergency mode.
X Have the vehicle checked as soon as possible at a qualified
specialist workshop. Vehicles with a diesel engine: the fuel tank has been run dry
(Y
page 164).
X Start the engine three to four times after refuelling.
If the yellow engine diagnostics warning lamp goes out, emer-
gency running mode is cancelled. The vehicle need not be
checked. 284
Warning and indicator lamps in the instrument clusterOn-board computer and displays
Page 288 of 405
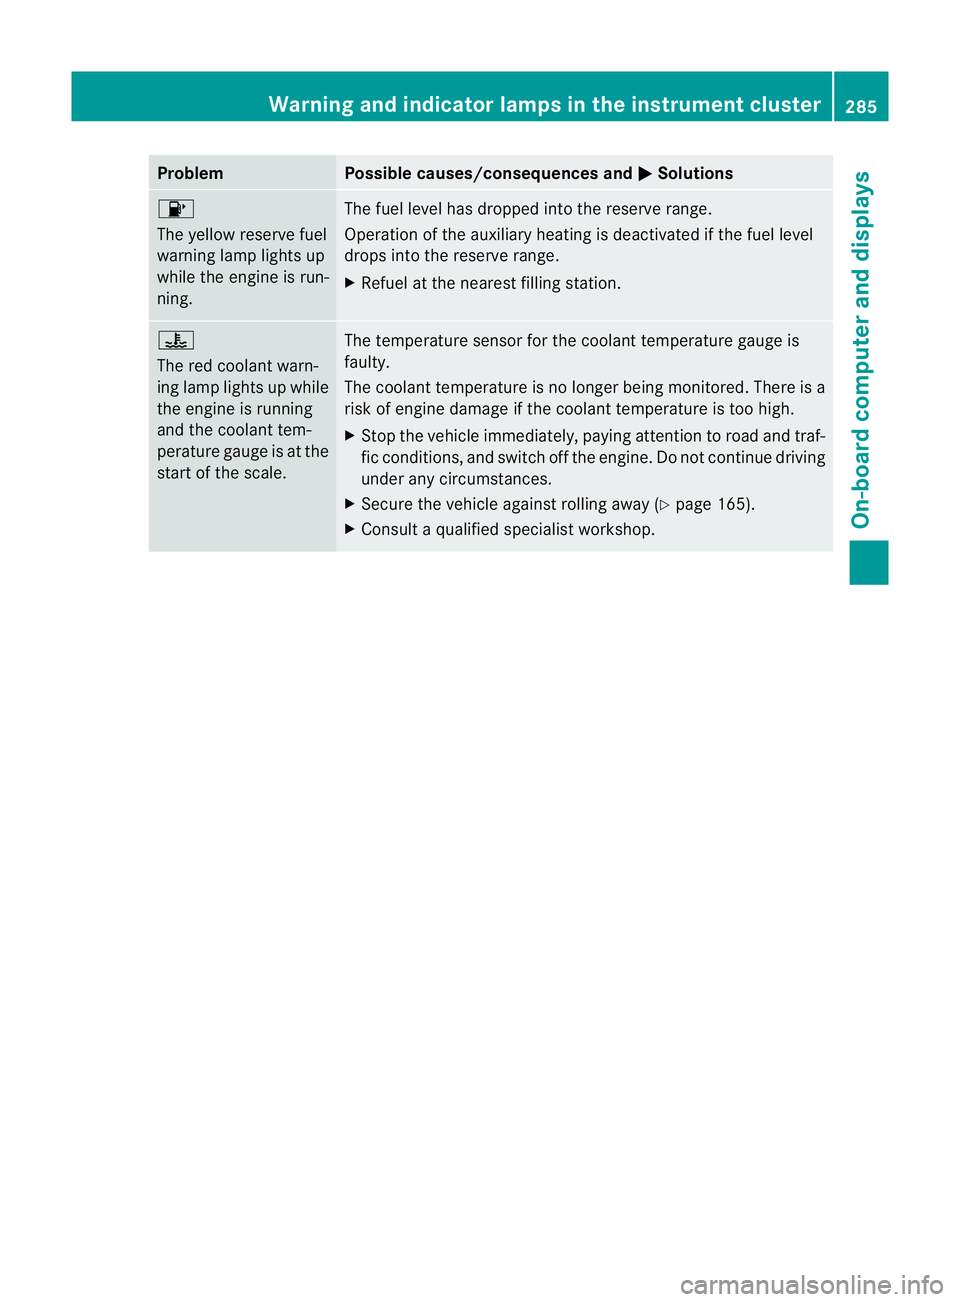
Problem Possible causes/consequences and
M Solutions
8
The yellow reserve fuel
warning lamp lights up
while the engine is run-
ning.
The fuel level has dropped into the reserve range.
Operation of the auxiliary heating is deactivated if the fuel level
drops into the reserve range.
X
Refuel at the nearest filling station. ?
The red coolant warn-
ing lamp lights up while
the engine is running
and the coolant tem-
perature gauge is at the
start of the scale.
The temperature sensor for the coolant temperature gauge is
faulty.
The coolant temperature is no longer being monitored. There is a
risk of engine damage if the coolant temperature is too high.
X
Stop the vehicle immediately, paying attention to road and traf-
fic conditions, and switch off the engine. Do not continue driving
under any circumstances.
X Secure the vehicle against rolling away (Y page 165).
X Consult a qualified specialist workshop. Warning and indicator lamps in the instrument cluster
285On-board computer and displays Z
Page 289 of 405
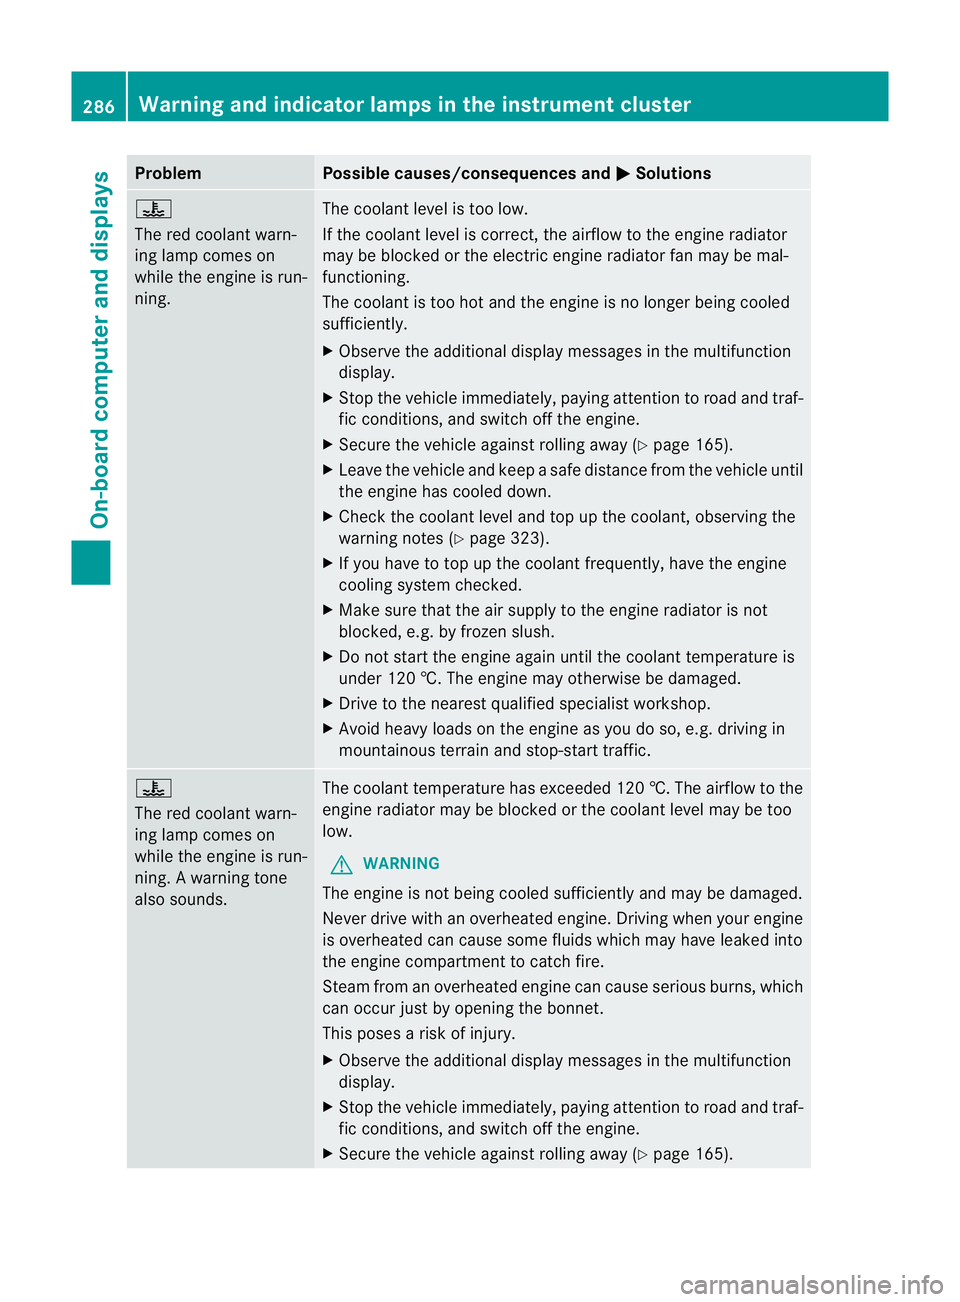
Problem Possible causes/consequences and
M Solutions
?
The red coolant warn-
ing lamp comes on
while the engine is run-
ning.
The coolant level is too low.
If the coolant level is correct, the airflow to the engine radiator
may be blocked or the electric engine radiator fan may be mal-
functioning.
The coolant is too hot and the engine is no longer being cooled
sufficiently.
X
Observe the additional display messages in the multifunction
display.
X Stop the vehicle immediately, paying attention to road and traf-
fic conditions, and switch off the engine.
X Secure the vehicle against rolling away (Y page 165).
X Leave the vehicle and keep a safe distance from the vehicle until
the engine has cooled down.
X Check the coolant level and top up the coolant, observing the
warning notes (Y page 323).
X If you have to top up the coolant frequently, have the engine
cooling system checked.
X Make sure that the air supply to the engine radiator is not
blocked, e.g. by frozen slush.
X Do not start the engine again until the coolant temperature is
under 120 †. The engine may otherwise be damaged.
X Drive to the nearest qualified specialist workshop.
X Avoid heavy loads on the engine as you do so, e.g. driving in
mountainous terrain and stop-start traffic. ?
The red coolant warn-
ing lamp comes on
while the engine is run-
ning. A warning tone
also sounds.
The coolant temperature has exceeded 120 †. The airflow to the
engine radiator may be blocked or the coolant level may be too
low.
G WARNING
The engine is not being cooled sufficiently and may be damaged.
Never drive with an overheated engine. Driving when your engine
is overheated can cause some fluids which may have leaked into
the engine compartment to catch fire.
Steam from an overheated engine can cause serious burns, which
can occur just by opening the bonnet.
This poses a risk of injury.
X Observe the additional display messages in the multifunction
display.
X Stop the vehicle immediately, paying attention to road and traf-
fic conditions, and switch off the engine.
X Secure the vehicle against rolling away (Y page 165).286
Warning and indicator lamps in the instrument clusterOn-board computer and displays
Page 290 of 405
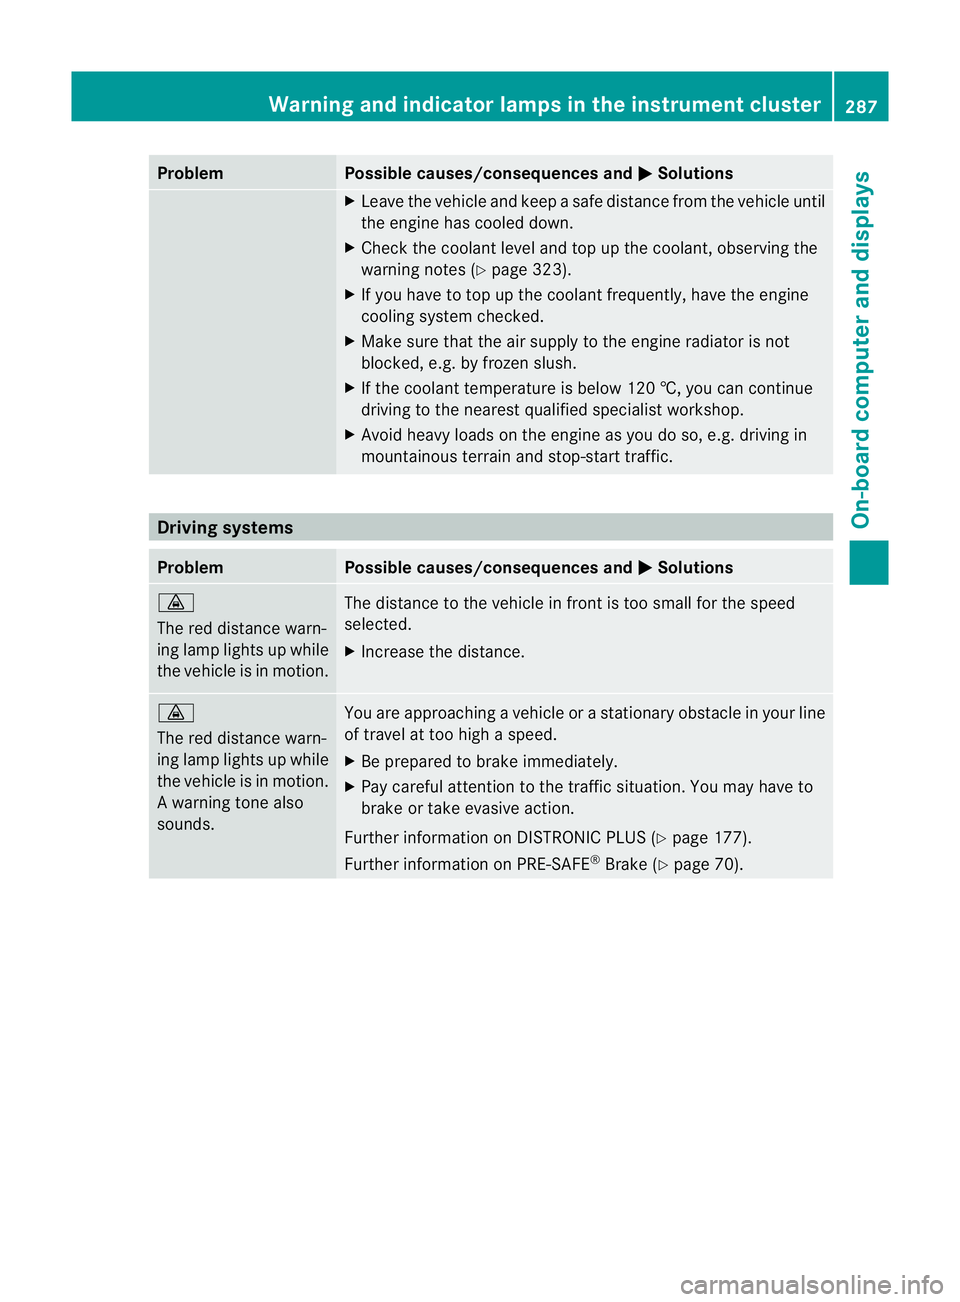
Problem Possible causes/consequences and
M Solutions
X
Leave the vehicle and keep a safe distance from the vehicle until
the engine has cooled down.
X Check the coolant level and top up the coolant, observing the
warning notes (Y page 323).
X If you have to top up the coolant frequently, have the engine
cooling system checked.
X Make sure that the air supply to the engine radiator is not
blocked, e.g. by frozen slush.
X If the coolant temperature is below 120 †, you can continue
driving to the nearest qualified specialist workshop.
X Avoid heavy loads on the engine as you do so, e.g. driving in
mountainous terrain and stop-start traffic. Driving systems
Problem Possible causes/consequences and
M Solutions
·
The red distance warn-
ing lamp lights up while
the vehicle is in motion.
The distance to the vehicle in front is too small for the speed
selected.
X Increase the distance. ·
The red distance warn-
ing lamp lights up while
the vehicle is in motion.
Aw
arning tone also
sounds. You are approaching a vehicle or a stationary obstacle in your line
of travel at too high a speed.
X
Be prepared to brake immediately.
X Pay careful attention to the traffic situation. You may have to
brake or take evasive action.
Further information on DISTRONIC PLUS (Y page 177).
Further information on PRE-SAFE ®
Brake (Y page 70). Warning and indicator lamps in the instrument cluster
287On-board computer and displays Z
Page 291 of 405
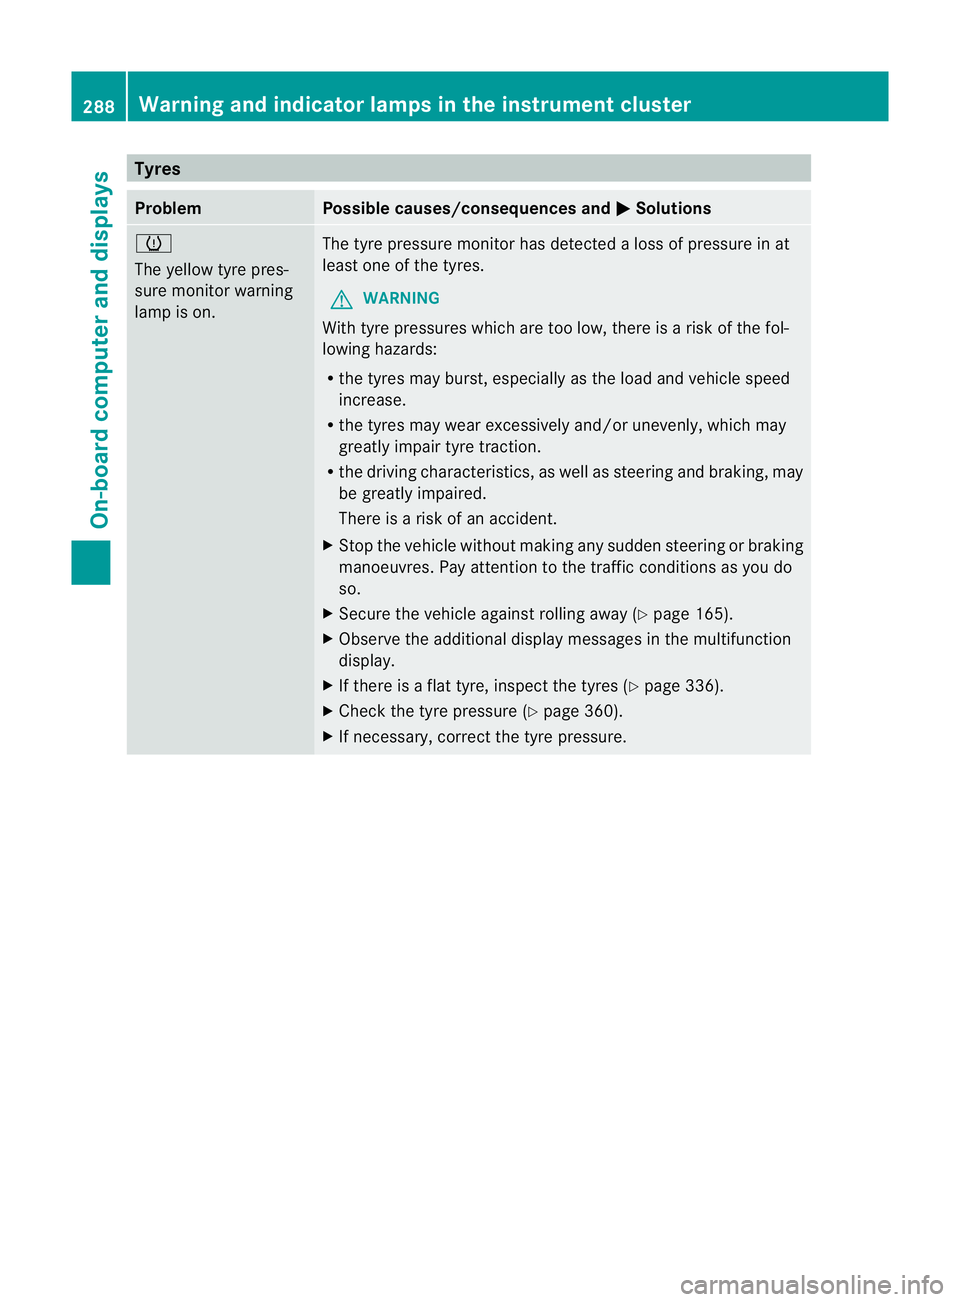
Tyres
Problem Possible causes/consequences and
M Solutions
h
The yellow tyre pres-
sure monitor warning
lamp is on. The tyre pressure monitor has detected a loss of pressure in at
leas
tone of the tyres.
G WARNING
With tyre pressures which are too low, there is a ris kofthe fol-
lowing hazards:
R the tyres may burst, especially as the load and vehicle speed
increase.
R the tyres may wear excessively and/or unevenly, which may
greatly impair tyre traction.
R the driving characteristics, as well as steering and braking, may
be greatly impaired.
There is a risk of an accident.
X Stop the vehicle without making any sudden steering or braking
manoeuvres. Pay attention to the traffic conditions as you do
so.
X Secure the vehicle against rolling away (Y page 165).
X Observe the additional display messages in the multifunction
display.
X If there is a flat tyre, inspect the tyres (Y page 336).
X Check the tyre pressure (Y page 360).
X If necessary, correct the tyre pressure. 288
Warning and indicator lamps in the instrument clusterOn-board computer and displays
Page 297 of 405
X
Vehicles without memory function: if nec-
essary, move the driver's or front-
passenger seat forwards.
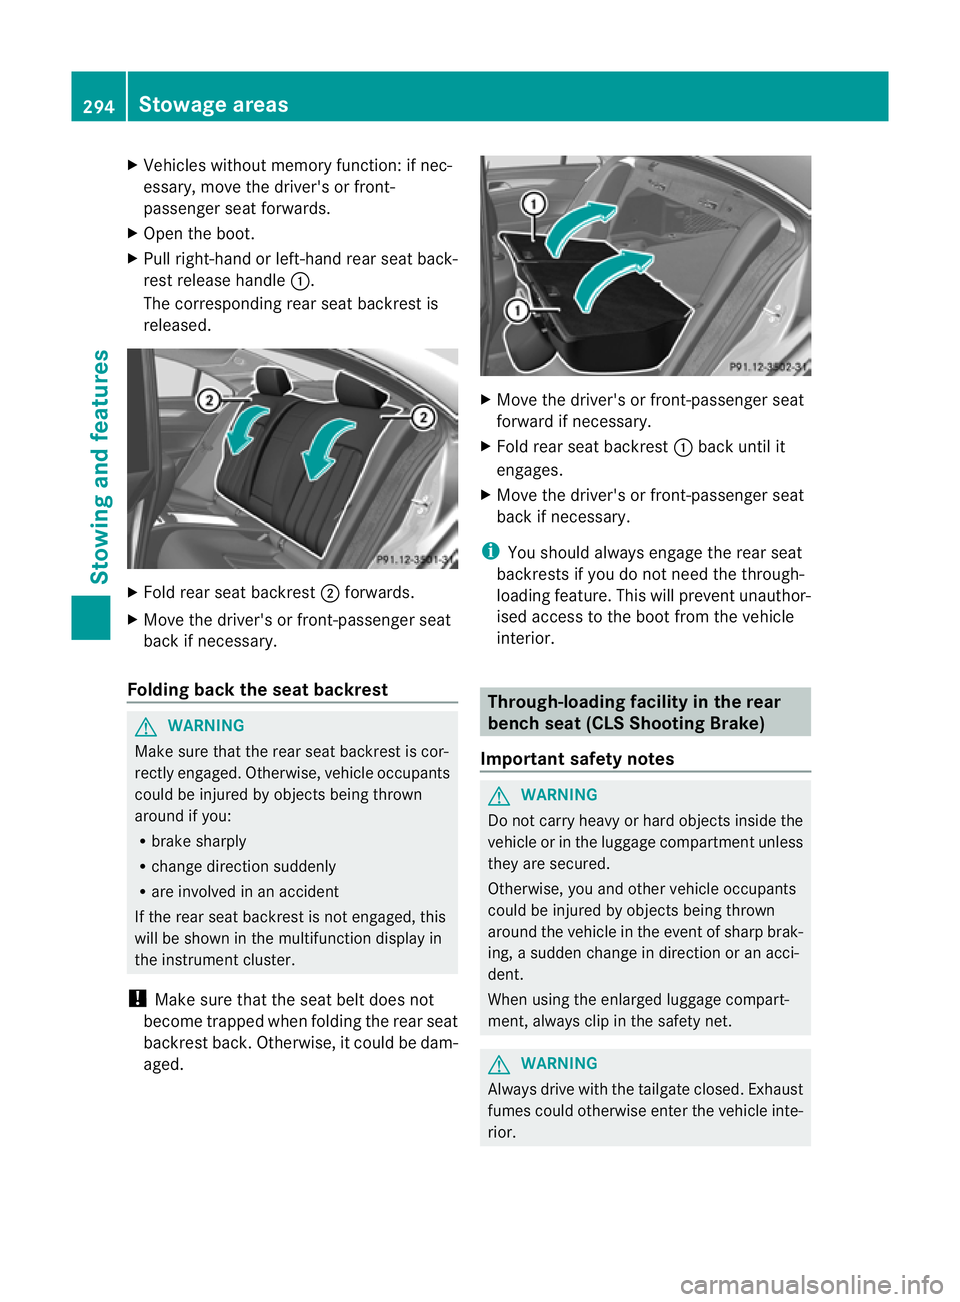
X Open the boot.
X Pull right-hand or left-hand rear seat back-
rest release handle :.
The corresponding rear seat backrest is
released. X
Fold rear seat backrest ;forwards.
X Move the driver's or front-passenger seat
back if necessary.
Folding back the seat backrest G
WARNING
Make sure that the rear seat backrest is cor-
rectly engaged. Otherwise, vehicle occupants
could be injured by objects being thrown
around if you:
R brake sharply
R change direction suddenly
R are involved in an accident
If the rear seat backrest is not engaged, this
will be shown in the multifunction display in
the instrument cluster.
! Make sure that the seat belt does not
become trapped when folding the rear seat
backrest back. Otherwise, it could be dam-
aged. X
Move the driver's or front-passenger seat
forward if necessary.
X Fold rear seat backrest :back until it
engages.
X Move the driver's or front-passenger seat
back if necessary.
i You should always engage the rear seat
backrests if you do not need the through-
loading feature. This will prevent unauthor-
ised access to the boot from the vehicle
interior. Through-loading facility in the rear
benchs
eat (CLS Shooting Brake)
Important safety notes G
WARNING
Do not carry heavy or hard objects inside the
vehicle or in the luggage compartmen tunless
they are secured.
Otherwise, you and othe rvehicle occupants
could be injured by objects being thrown
around the vehicle in the event of sharp brak-
ing, a sudden change in direction or an acci-
dent.
When using the enlarged luggage compart-
ment, always clip in the safety net. G
WARNING
Always drive with the tailgate closed. Exhaust
fumes could otherwise enter the vehicle inte-
rior. 294
Stowage areasStowing and features
Page 298 of 405
Folding the seat backrest forwards
!
When folding the rear seat backrest for-
wards, ensure that there are no items lying
on the seat cushions. Thes eitems could
otherwise be damaged or could themselves
damage the rea rseats. The left-hand and right-hand rear seat backr-
ests can be folded forwards separately to
increase the luggage compartment capacity.
i When you fold one or both parts of the
rear seat backrests forwards, the headr-
ests are also lowered if necessary. In the
case of vehicles with memory function, the
respective fron tseat is moved forwards
slightly to avoid contact with the seat
behind it.
X Vehicles without memory function: if nec-
essary, move the driver's or front-
passenger seat forwards.
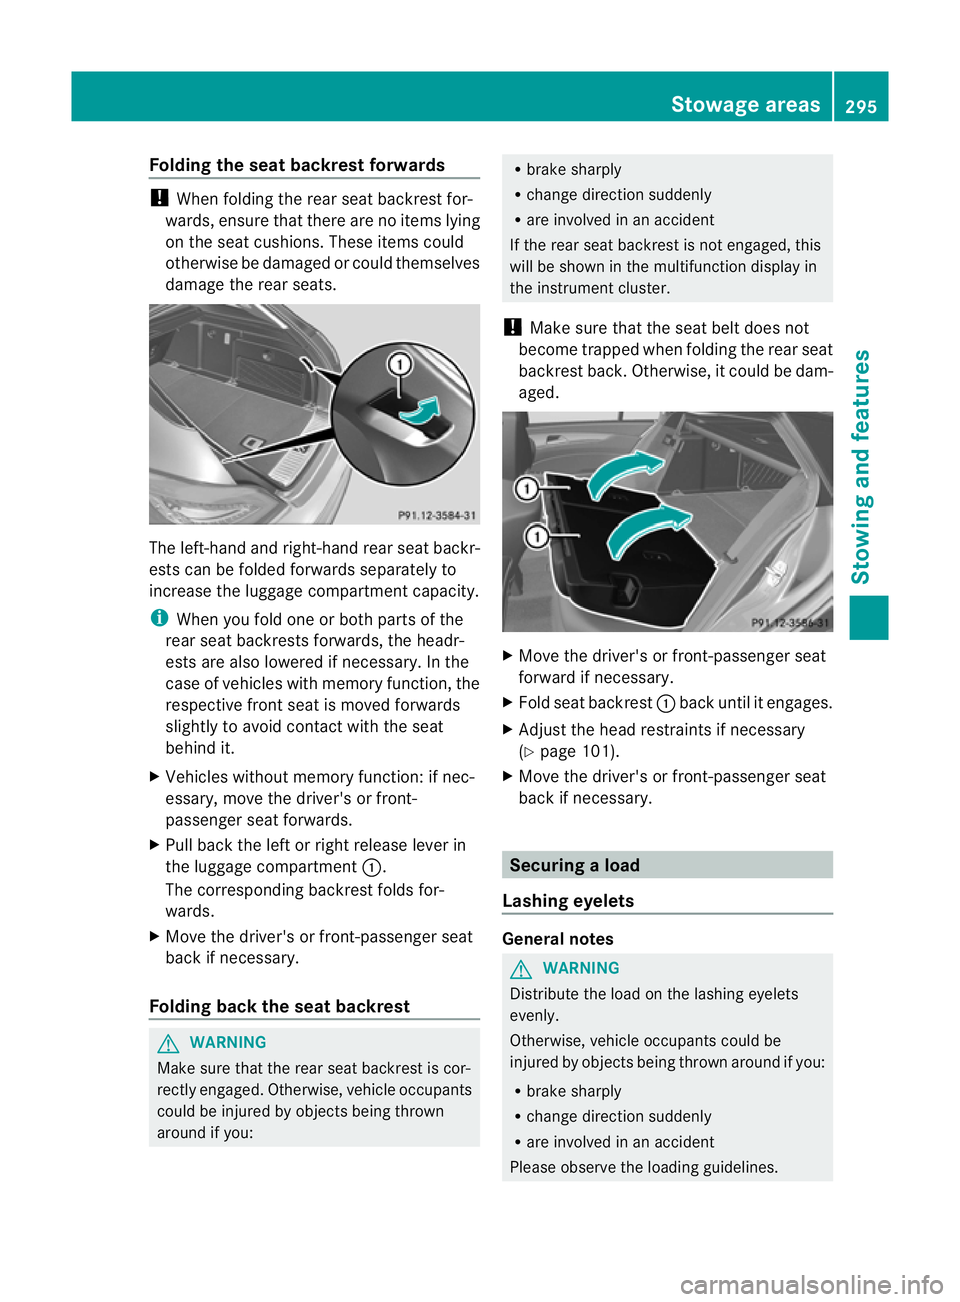
X Pull back the left or right release lever in
the luggage compartment :.
The corresponding backrest folds for-
wards.
X Move the driver's or front-passenger seat
back if necessary.
Folding back the seat backrest G
WARNING
Make sure that the rear seat backrest is cor-
rectly engaged. Otherwise, vehicle occupants
could be injured by objects being thrown
around if you: R
brake sharply
R change direction suddenly
R are involved in an accident
If the rear seat backrest is not engaged, this
will be shown in the multifunction display in
the instrument cluster.
! Make sure that the seat belt does not
become trapped when folding the rear seat
backrest back. Otherwise, it could be dam-
aged. X
Move the driver's or front-passenger seat
forward if necessary.
X Fold seat backrest :back until it engages.
X Adjust the head restraints if necessary
(Y page 101).
X Move the driver's or front-passenger seat
back if necessary. Securing
aload
Lashing eyelets General notes
G
WARNING
Distribute the load on the lashing eyelets
evenly.
Otherwise, vehicle occupants could be
injured by objects being thrown around if you:
R brake sharply
R change directio nsuddenly
R are involved in an accident
Please observe the loading guidelines. Stowage areas
295Stowing and featu res Z
Page 326 of 405
X
Replace cap :on the filler neck and turn
clockwise.
Make sure that the cap locks securely into
place.
X Chec kthe oil level again with the oil dip-
stick (Y page 322).
For further information on engine oil, see
(Y page 391). Other service products
Checking the coolant level G
WARNING
The cooling system is pressurised. Therefore,
only unscrew the cap once the engine has
cooled down. The coolant temperature gauge
must display less than 70 †.Otherwise, you
could be scalded if hot coolant escapes. X
Park the vehicle on a level surface.
Only check the coolant level if the vehicle
is on a level surface and the engine has
cooled down.
X Turn the key to position 2in the ignition
lock (Y page 147).
On vehicles with KEYLESS-GO, press the
Start/Stop button twice (Y page 147).
X Check the coolant temperature display in
the instrument cluster.
The coolant temperature must be below
70 †.
X Turn the key to position 0(Y page 147) in
the ignition lock. X
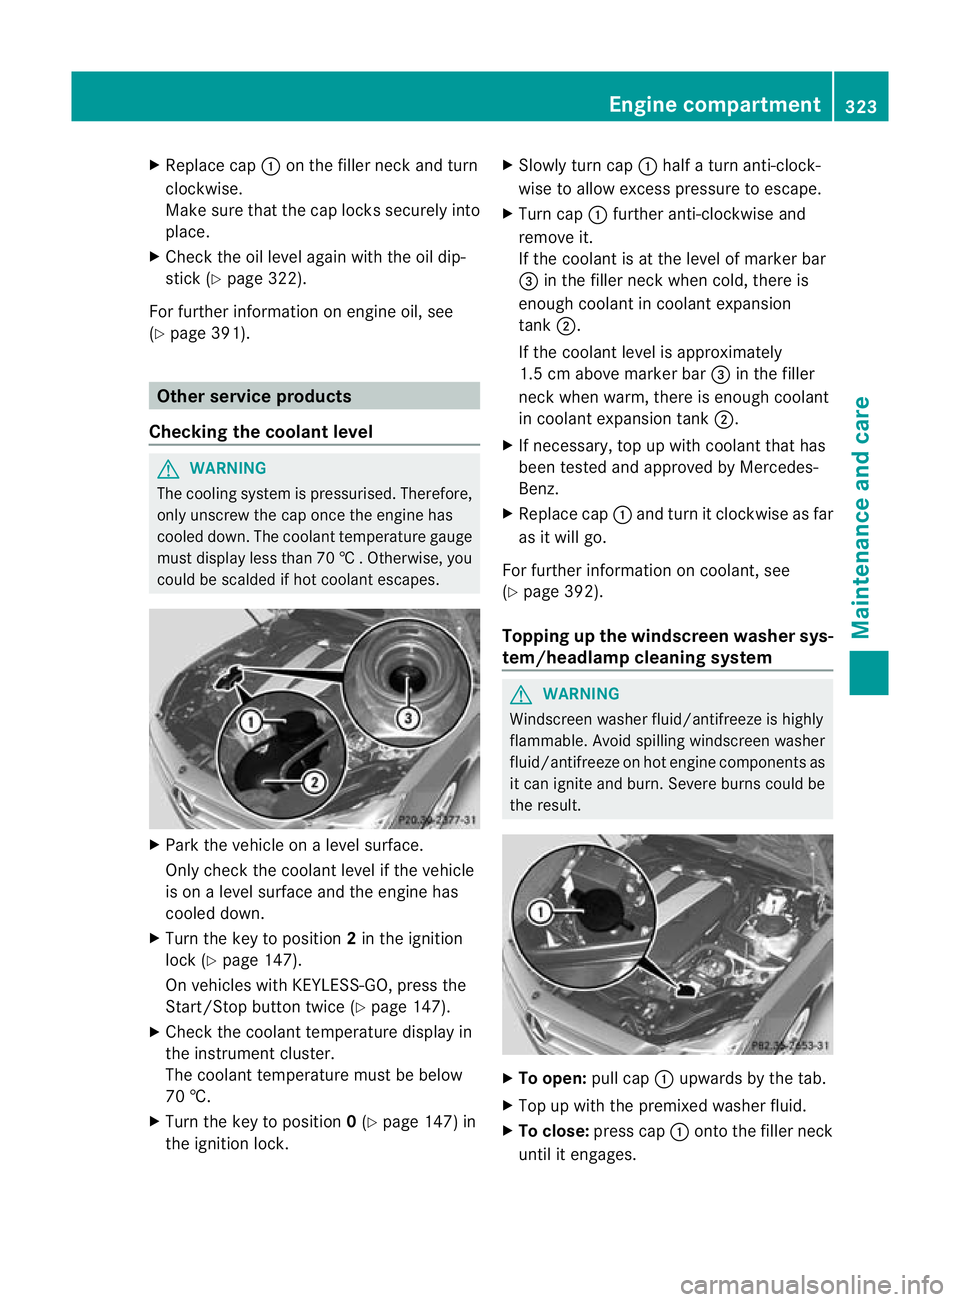
Slowly tur ncap : half a turn anti-clock-
wise to allow excess pressure to escape.
X Turn cap :further anti-clockwise and
remove it.
If the coolant is at the level of marker bar
= in the fille rneck when cold, there is
enough coolant in coolant expansion
tank ;.
If the coolant level is approximately
1.5 cm above marker bar =in the filler
neckw hen warm, there is enough coolant
in coolant expansion tank ;.
X If necessary, top up with coolant that has
been tested and approved by Mercedes-
Benz.
X Replace cap :and turn it clockwise as far
as it will go.
For further information on coolant, see
(Y page 392).
Topping up the windscreen washer sys-
tem/headlampc leaning system G
WARNING
Windscreen washer fluid/antifreeze is highly
flammable. Avoid spilling windscreen washer
fluid/antifreeze on hot engine components as
it can ignite and burn. Severe burns could be
the result. X
To open: pull cap:upwards by the tab.
X Top up with the premixed washer fluid.
X To close: press cap :onto the filler neck
until it engages. Engine compartment
323Maintenance and care Z