2012 MERCEDES-BENZ CLS COUPE warning lights
[x] Cancel search: warning lightsPage 201 of 373
Monitoring range of the sensors
G
WARNING
Blind Spot Assist monitors certain area sinthe
immediate vicinity of yourv ehicle. Vehicles
that approach and drive past at high speeds
are not detected. There is no display and no
warning.
If the lanes are very wide, it may not be pos-
sible to monitor the complet ewidth of the
neighbourin glane. For this reason, vehicles in
the nextl ane may no tbedetected, especially
if they are driving in astaggered formation in
differen tlanes .This may be the case if vehi-
cles are driving at the edge of their lane that
is furthest away from your vehicle.
Always pay attention to traffic conditions and
your surroundings. Otherwise, you may fail to
recognise dangers in time, cause an accident
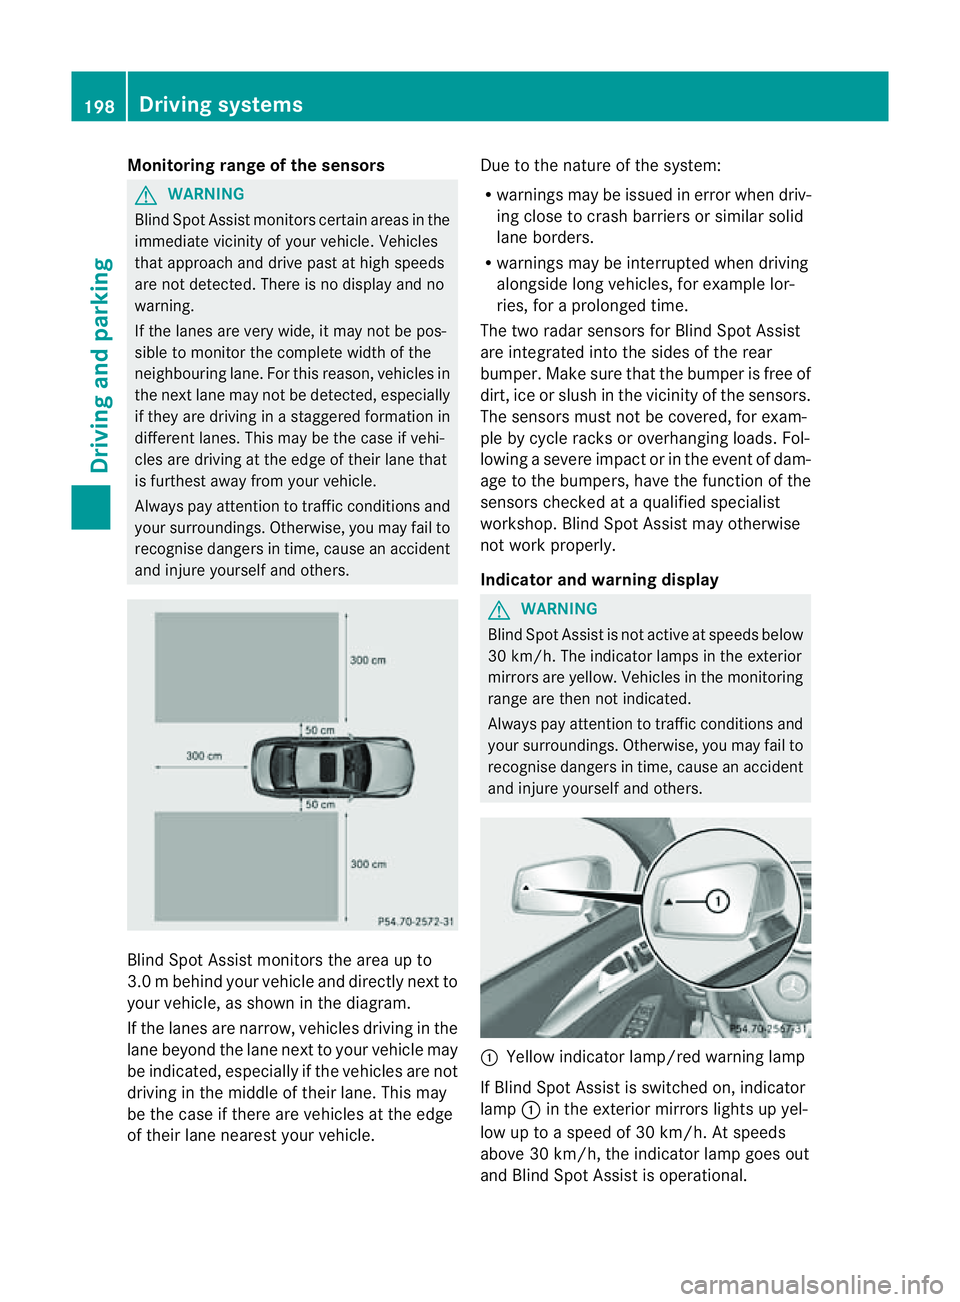
and injure yourself and others. Blind Spot Assist monitors the area up to
3.0 mbehind your vehicle and directly nextto
your vehicle, as shown in th ediagram.
If th elanes are narrow ,vehicles drivin ginthe
lan ebeyond th elan en exttoy our vehicl emay
be indicated, especially if th evehicles are not
drivin ginthemiddle of their lane. This may
be th ecaseift here are vehicles at th eedge
of their lan enearest your vehicle. Due to th
enature of th esystem:
R warnings may be issued in error when driv-
ingc lose to crash barrier sorsimilar solid
lane borders.
R warnings may be interrupted when driving
alongside long vehicles, for example lor-
ries, for aprolonged time.
The two radar sensors for Blin dSpot Assist
are integrated int othe sides of the rear
bumper .Make sure that th ebumpe risfree of
dirt, ice or slush in the vicinity of the sensors.
The sensors must not be covered, for exam-
ple by cycle racks or overhanging loads. Fol-
lowing asevere impact or in the event of dam-
age to the bumpers, have the function of the
sensors checked at aqualified specialist
workshop. Blind Spot Assist may otherwise
not work properly.
Indicator and warning display G
WARNING
Blind Spot Assist is not active at speeds below
30 km/h. The indicator lamps in the exterior
mirrors are yellow. Vehicles in the monitoring
range are then not indicated.
Always pay attention to traffic conditions and
your surroundings. Otherwise, you may fail to
recognise dangers in time, cause an accident
and injure yourselfa nd others. :
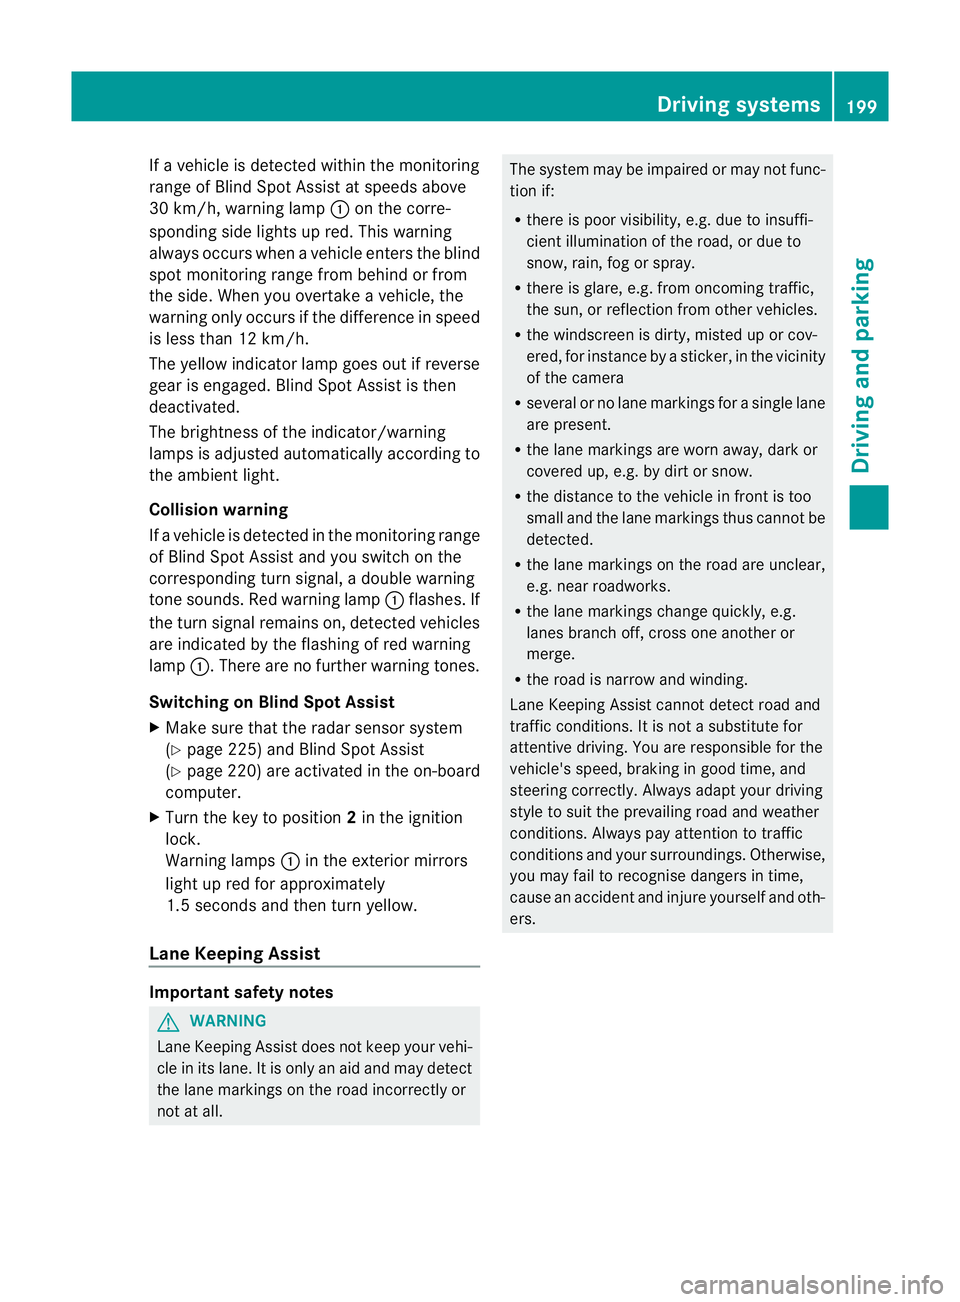
Yellow indicator lamp/red warning lamp
If Blind Spo tAssist is switched on, indicator
lamp :in the exterior mirrors lights up yel-
low up to aspeed of 30 km/h. At speeds
above 30 km/h, the indicator lamp goes out
and Blind Spot Assist is operational. 198
Driving systemsDriving and parking
Page 202 of 373
If
av ehicle is detected within the monitoring
range of Blind Spot Assist at speedsa bove
30 km/h, warning lamp :on the corre-
sponding side lights up red. This warning
alwayso ccurs when avehicle enters the blind
spot monitoring range from behind or from
the side. When you overtake avehicle ,the
warning only occurs if the difference in speed
is less than 12 km/h.
The yellow indicator lamp goes out if reverse
gear is engaged. Blind Spot Assist is then
deactivated.
The brightness of the indicator/warning
lampsisa djusted automaticall yaccording to
the ambient light.
Collision warning
If av ehicle is detected in the monitoring range
of Blind Spot Assist and you switch on the
corresponding turn signal ,adouble warning
tone sounds. Red warning lamp :flashes. If
the turn signal remains on, detected vehicles
are indicated by the flashing of red warning
lamp :.There are no further warning tones.
Switching on Blind Spot Assist
X Make sure that the radar sensor system
(Y page 225) and Blind Spot Assist
(Y page 220) are activated in the on-board
computer.
X Turn the key to position 2in the ignition
lock.
Warning lamps :in the exterior mirrors
light up red for approximately
1.5 seconds and then turn yellow.
Lane Keeping Assist Important safety notes
G
WARNING
Lane Keeping Assist does not keep your vehi-
cle in its lane. It is only an aid and may detect
the lane markings on the road incorrectly or
not at all. The system may be impaired or may not func-
tion if:
R
there is poor visibility, e.g. due to insuffi-
cient illumination of the road, or due to
snow, rain, fog or spray.
R there is glare, e.g. from oncomingt raffic,
the sun, or reflection from other vehicles.
R the windscreen is dirty, misted up or cov-
ered, for instancebyas ticker, in the vicinity
of the camera
R several or no lane markings for asingle lane
are present.
R the lane markings are worn away,d ark or
covered up, e.g. by dirt or snow.
R the distance to the vehicle in front is too
small and the lane markings thus cannot be
detected.
R the lane markings on the road are unclear,
e.g. near roadworks.
R the lane markings change quickly, e.g.
lanes branch off, cross one another or
merge.
R the road is narrow and winding.
Lane Keeping Assist cannot detect road and
traffic conditions. It is not asubstitute for
attentive driving. You are responsible for the
vehicle's speed, braking in good time, and
steering correctly. Always adapt your driving
style to suit the prevailing road and weather
conditions. Always pay attention to traffic
conditionsa nd your surroundings. Otherwise,
you may fail to recognise dangers in time,
cause an accident and injure yourself and oth-
ers. Driving systems
199Driving and parking Z
Page 205 of 373
Activ
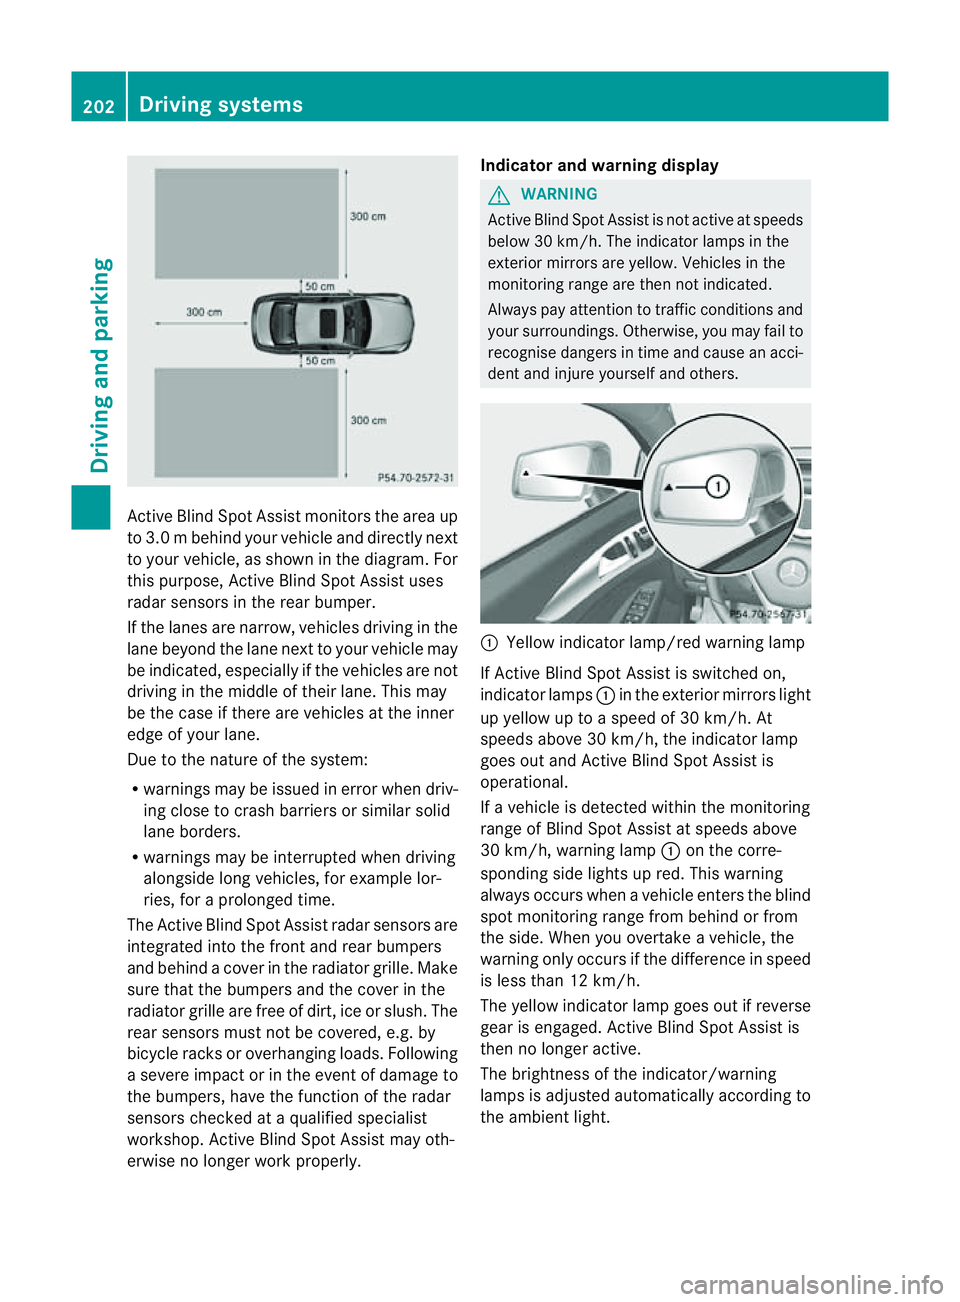
eBlind Spo tAssist monitors the area up
to 3.0 mbehind your vehicle and directly next
to your vehicle, as shown in the diagram. For
this purpose, Active Blind Spot Assist uses
radar sensors in the rear bumper.
If the lanes are narrow, vehicles driving in the
lane beyond the lane next to your vehicle may
be indicated, especially if the vehicles are not
driving in the middle of their lane. This may
be the case if there are vehicles at the inner
edge of your lane.
Due to the nature of the system:
R warnings may be issued in error when driv-
ing close to crash barriers or similars olid
lane borders.
R warnings may be interrupted when driving
alongside long vehicles, for example lor-
ries, for aprolonged time.
The Active Blind Spot Assist radar sensors are
integrated into the front and rear bumpers
and behind acover in the radiator grille. Make
sure that the bumpers and the cover in the
radiator grille are free of dirt, ice or slush. The
rear sensors must not be covered, e.g. by
bicycle racks or overhanging loads. Following
as evere impact or in the event of damage to
the bumpers, have the function of the radar
sensors checked at aqualified specialist
workshop. Active Blind Spot Assist may oth-
erwise no longer work properly. Indicator and warning display G
WARNING
Active Blind Spot Assist is not active at speeds
below 30 km/h. The indicator lamps in the
exterior mirrors are yellow .Vehicles in the
monitoring range are then not indicated.
Always pay attention to traffic conditions and
your surroundings. Otherwise, you may fail to
recognise dangers in time and cause an acci-
dent and injure yourself and others. :
Yellow indicator lamp/red warning lamp
If Active Blind Spot Assist is switched on,
indicator lamps :in the exterior mirror slight
up yellow up to aspeed of 30 km/h. At
speeds above 30 km/h, the indicator lamp
goes out and Active Blind Spot Assist is
operational.
If av ehicle is detected within the monitoring
range of Blind Spot Assist at speeds above
30 km/h, warning lamp :on the corre-
spondin gside lights up red. This warning
alway soccurs when avehicle enters the blind
spot monitoring range from behind or from
the side. When you overtake avehicle, the
warning only occurs if the difference in speed
is less than 12 km/h.
The yellow indicator lamp goes out if reverse
gear is engaged. Active Blind Spot Assist is
then no longer active.
The brightness of the indicator/warning
lamps is adjusted automatically according to
the ambient light. 202
Driving systemsDriving and parking
Page 222 of 373
X
Press the abutton.
The multifunction display shows Speed
Limit Assist.
X Press the :button.
The curren tselection is displayed.
X To activate or deactivate: pressa.
If the Speed Limit Assist message function
is activated, adetected speed limit is auto-
matically displayed for five seconds. Other
items in the multifunction display are not
shown during this time.
If Speed Limit Assist is operational and the
message function is activated, the multifunc-
tion display shows the Äsymbol when the
ignition is switched on.
Showing the distance display X
Press the =or; button on the steer-
ing wheel to select the Assist. menu.
X Press the 9or: button to select
Distanc edisplay .
X Press the abutton.
The DISTRONIC PLUS distanc edisplay
appears in the multifunction display
(Y page 176).
If the Sensors deactivated message
appears, the radar sensor system is deacti-
vated.
X Check whether or not the radar sensor sys-
tem is permitted to be activated
(Y page 368).
X Switc hont he radar sensor system
(Y page 225).
Deactivating/activating ESP ®G
WARNING
If you deactivat eESP®
,E SP ®
no longer sta-
bilises the vehicle. There is an increased risk
of skidding and an accident.
Only deactivat eESP®
in the situation sdescri-
bed in the following. Activating/deactivating ESP
®
on AMG vehi-
cles (Y page 66).
For further information about ESP ®
,s ee
(Y page 65).
X Start the engine.
X Press the =or; button on the steer-
ing wheel to select the Assist. menu.
X Press the 9or: button to select
ESP .
X Press the abutton.
The curren tselection is displayed.
X To activate/deactivate: press thea
button again.
ESP ®
is deactivated if the åwarning lamp
in the instrument cluster lights up continu-
ously when the engin eisrunning.
If the ÷ warning lamp and the åwarn-
ing lamp are lit continuously, ESP ®
is not
available due to amalfunction.
It may be best to deactivat eESP®
in the fol-
lowing situations:
R when using snow chains
R in deep snow
R on sand or gravel
Observe the information on warning lamps
(Y page 263).
Observe the information on display messages
(Y page 232).
Activating/deactivating PRE-SAFE ®
Brake PRE-SAFE
®
Brak eiso nly available in vehicles
with DISTRONIC PLUS.
X Press the =or; button on the steer-
ing wheel to select the Assist. menu.
X Press the 9or: button to select
PRE-SAF EBrake .
X Press the abutton.
The curren tselection is displayed.
X To activate/deactivate: press thea
button again. Menus and submenus
219On-boardcomputer and displays Z
Page 224 of 373
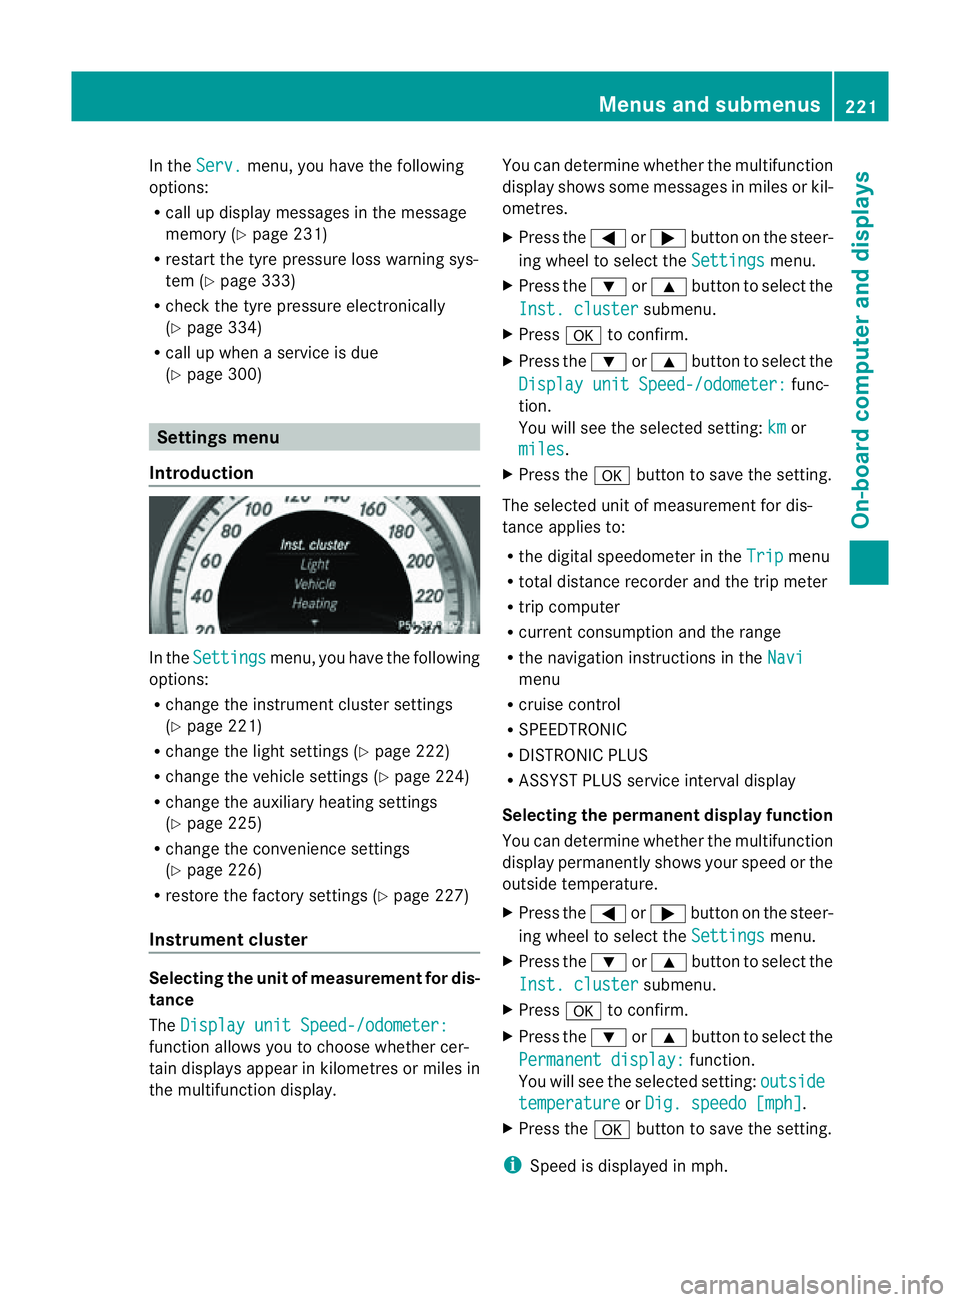
In the
Serv. menu, you have the following
options:
R call up display messages in the message
memory (Y page 231)
R restart the tyre pressure loss warning sys-
tem (Y page 333)
R check the tyre pressure electronically
(Y page 334)
R call up when aservice is due
(Y page 300) Settings menu
Introduction In the
Settings menu, you have the following
options:
R change the instrument cluster settings
(Y page 221)
R change the lights ettings (Ypage 222)
R change the vehicle settings (Y page 224)
R change the auxiliary heating settings
(Y page 225)
R change the convenience settings
(Y page 226)
R restore the factory settings (Y page 227)
Instrument cluster Selecting the unit of measurement for dis-
tance
The Display unit Speed-/odometer: function allows you to choose whether cer-
tain displays appear in kilometres or miles in
the multifunction display. You can determine whether the multifunction
display shows some messages in miles or kil-
ometres.
X
Press the =or; button on the steer-
ing wheel to select the Settings menu.
X Press the :or9 button to select the
Inst. cluster submenu.
X Press ato confirm.
X Press the :or9 button to select the
Display unit Speed-/odometer: func-
tion.
You will see the selected setting: km or
miles .
X Press the abutton to save the setting.
The selected unit of measuremen tfor dis-
tancea pplies to:
R the digital speedometer in the Trip menu
R total distance recorder and the trip meter
R trip computer
R current consumption and the range
R the navigation instructions in the Navi menu
R cruise control
R SPEEDTRONIC
R DISTRONIC PLUS
R ASSYST PLUS service interval display
Selecting the permanent display function
You can determin ewhether the multifunction
display permanently shows your speed or the
outside temperature.
X Press the =or; button on the steer-
ing wheel to select the Settings menu.
X Press the :or9 button to select the
Inst. cluster submenu.
X Press ato confirm.
X Press the :or9 button to select the
Permanent display: function.
You will see the selected setting: outside temperature or
Dig. speedo [mph] .
X Press the abutton to save the setting.
i Speed is displayed in mph. Menus and submenus
221On-board computer and displays Z
Page 228 of 373
Switching the automatic locking feature
on/off
X
Press the =or; button on the steer-
ing wheel to select the Settings menu.
X Press the :or9 button to select the
Vehicle submenu.
X Press ato confirm.
X Press the :or9 button to select the
Auto. door locks function.
When the Automatic door locks func-
tion is activated, the vehicle doors are dis-
played in red in the multifunction display.
X Press the abutton to save the setting.
If you activate the Automatic door locks function, the vehicle is centrally locked above
as
peed of around 15 km/h.
For further information on the automatic lock-
ing feature, see (Y page 84).
Activating/deactivating the acoustic
locking confirmation
If you switch on the Acoustic Lock function,
an acoustic signal sounds when you lock the
vehicle.
X Press the =or; button on the steer-
ing wheel to select the Settings menu.
X Press the :or9 button to select the
Vehicle submenu.
X Press ato confirm.
X Press the :or9 button to select the
Acoustic Lock function.
If the Acoustic Lock function is activated,
the & symbol in the multifunction dis-
play lights up red.
X Press the abutton to save the setting.
Activating/deactivating the radar sensor
system
X Press the =or; button on the steer-
ing wheel to select the Settings menu.
X Press the :or9button to select the
Vehicle submenu.
X Press ato confirm. X
Press the 9or: button to select
Radar sensor (See Owner's Man.): .
You will see the selected setting: on or
off .
X Press the abutton to save the setting.
i You must deactivate the radar sensor sys-
tem in certain countries and near radio
telescope facilities. For further informa-
tion, see (Y page 368).
When you are close to radio telescope facili-
ties, the radar sensor system will be deacti-
vated automatically.
The following systems are switched off when
the radar sensor system is deactivated:
R DISTRONIC PLUS (Y page 170)
R BAS PLUS (Y page 64)
R PRE-SAFE ®
Brake (Y page 68)
R Blind Spot Assist (Y page 197)
R Active Blind Spot Assist (Y page 201)
Heating Auxiliary heating departuret
ime G
WARNING
Exhaust fumes are produced when the auxili-
ary heating is in operation. Inhaling these
exhaust fumes can be poisonous. You should
therefore switch off the auxiliary heating in
confined spaces without an extraction sys-
tem, e.g. agarage. G
WARNING
When operating the auxiliary heating parts of
the vehicle can get very hot. Make sure that
the exhaust system does not under any cir-
cumstances come into contact with easily
ignitable material such as dry grass or fuels.
The material could otherwise ignite and set
the vehicle alight. Choose your parking spot
accordingly.
Operating the auxiliary heating is thus pro-
hibited at filling stations or when your vehicle
is being refuelled. You must therefore switch
off the auxiliary heating at filling stations. Menus and submenus
225On-board computer and displays Z
Page 229 of 373
!
Operating the auxiliary heating/ventila-
tion draws on the vehicle battery. After you
have heated or ventilated the vehicle a
maximum of two times, drive for alonger
distance.
This function is only available on vehicles with
auxiliary heating (Y page 132).
In the Heating submenu, you can select a
stored departure time or change adeparture
time.
The auxiliary heating timer function calcu-
lates the switch-on time according to the out-
side temperature so that the vehicle is pre-
heated by the departure time. When the
departure time is reached, the auxiliary heat-
ing continues to heat for afurther five
minutes and then switches off. The auxiliary
heating adopts the THERMATIC or
THERMOTRONIC temperature setting.
You can switch off the auxiliary heating by
using the remote control or the auxiliary heat-
ing button on the centre console.
i Switch the auxiliary heating on regularly
once amonth for aboutt en minutes.
Selecting the departure time or deactivat-
ing aselected departure time
X Press the =or; button on the steer-
ing wheel to select the Settings menu.
X Press the :or9 button to select the
Heating submenu.
X Press ato confirm.
You will see the selected setting.
X Press ato confirm.
X Press the :or9 button to select
one of the three departure times or Timeroff (no timer active).
X Press ato confirm.
If ad eparture time is selected, the yellow
indicator lamp lights up on the auxiliary
heating button. Changing the departure time
X
Press the =or; button on the steer-
ing wheel to select the Settings menu.
X Press the :or9 button to select the
Heating submenu.
X Press ato confirm.
You will see the selected setting.
X Press ato confirm.
X Press the :or9 button to select A ,
B or
Change C .
X Press ato confirm.
You can now change the departure time.
X Press the =or; button to select the
displaytobec hanged: hours, minutes.
X Press the :or9 button to set the
selected display.
X Press the abutton to store the entry.
The yellow indicator lamp on the auxiliary
heating button lights up.
Convenience Activating/deactivating the EASY-
ENTRY/EXIT feature
G
WARNING
The steering wheel moves when the EASY-
ENTRY/EXIT feature is active. There is arisk
of occupants becoming trapped. Before acti-
vating the EASY-ENTRY/EXIT feature, make
sure that nobody can become trapped.
Do not leave children unsupervised in the
vehicle, even if they are secured in achild
restraint system. The children could open the
driver's door and thereby unintentionally acti-
vate the EASY-ENTRY/EXIT feature and
become trapped.
X Press the =or; button on the steer-
ing wheel to select the Settings menu.
X Press the :or9 button to select the
Convenience submenu.
X Press ato confirm. 226
Menus and submenusOn-board computer and displays
Page 235 of 373
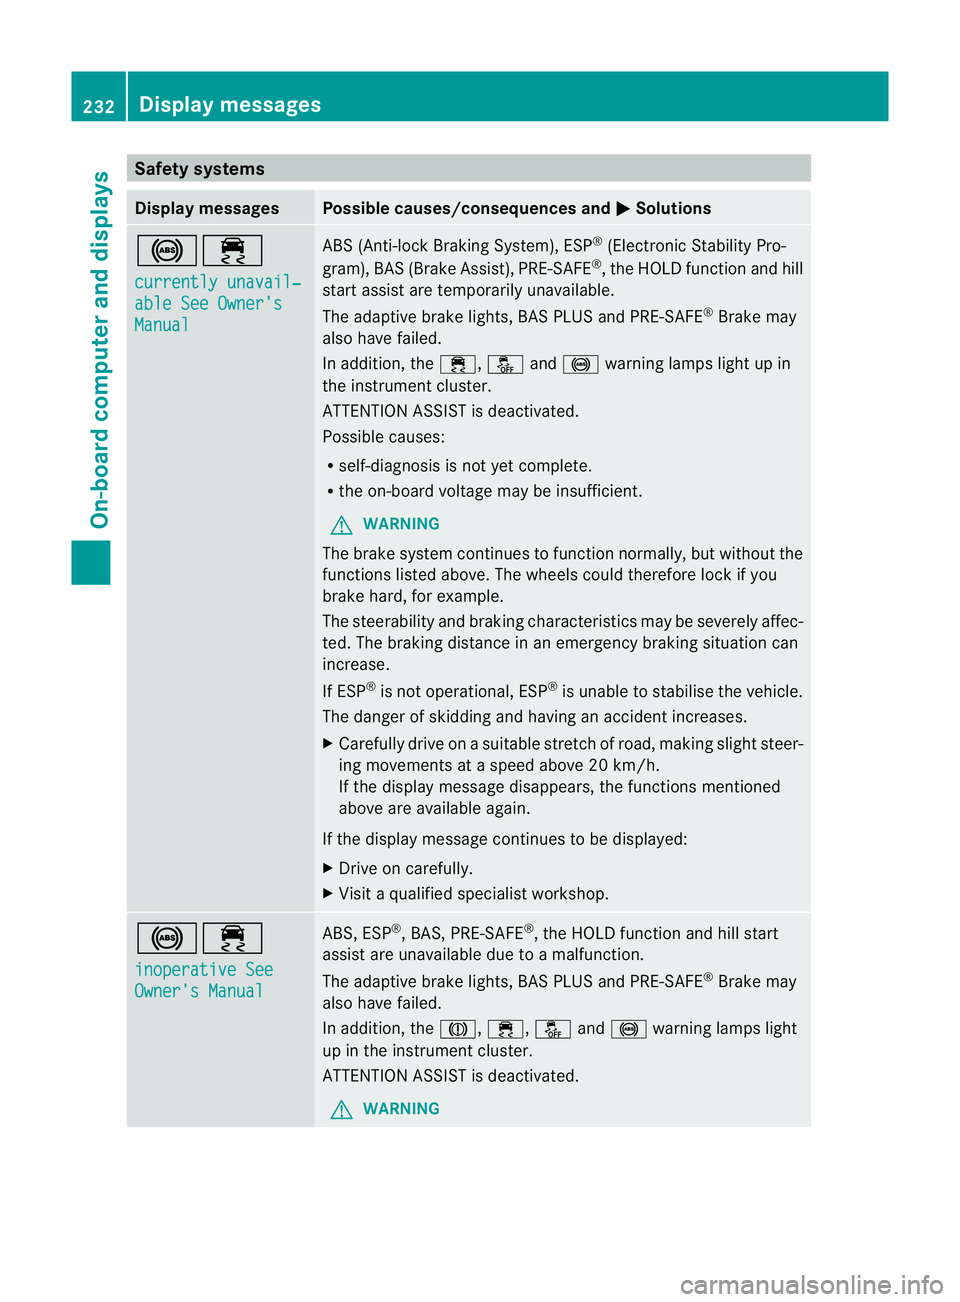
Safety systems
Display messages Possible causes/consequences and
M Solutions
!÷
currently unavail‐
able See Owner's
Manual ABS (Anti-lock Braking System), ESP
®
(Electronic Stability Pro-
gram), BAS (Brake Assist), PRE-SAFE ®
,t he HOLD function and hill
start assist are temporarily unavailable.
The adaptive brake lights, BAS PLUS and PRE-SAFE ®
Brake may
also have failed.
In addition, the ÷,åand! warning lamps light up in
the instrumen tcluster.
ATTENTION ASSIST is deactivated.
Possible causes:
R self-diagnosis is not yet complete.
R the on-board voltage may be insufficient.
G WARNING
The brake system continues to function normally, but without the
functions listed above. The wheels could therefore lock if you
brake hard, for example.
The steerability and braking characteristics may be severely affec-
ted. The braking distance in an emergency braking situation can
increase.
If ESP ®
is not operational, ESP ®
is unable to stabilise the vehicle.
The danger of skidding and having an accident increases.
X Carefullyd rive onasuitable stretch of road, making slight steer-
ing movementsatas peed above 20 km/h.
If the display message disappears, the functions mentioned
above are available again.
If the display message continues to be displayed:
X Drive on carefully.
X Visit aqualified specialist workshop. !÷
inoperative See
Owner's Manual ABS,E
SP®
,B AS ,PRE-SAFE ®
,t he HOLD function and hill start
assist are unavailable due to amalfunction.
The adaptive brake lights, BAS PLUS and PRE-SAFE ®
Brake may
also have failed.
In addition, the J,÷,åand! warning lamps light
up in the instrumen tcluster.
ATTENTION ASSIST is deactivated.
G WARNING 232
Display messagesOn-board computer and displays