2012 MERCEDES-BENZ CLS COUPE warning lights
[x] Cancel search: warning lightsPage 69 of 373
If ESP
®
intervenes:
X Do not deactivate ESP ®
under any circum-
stances.
X When pulling away, only depres sthe accel-
erator pedalasf ar as is necessary.
X Adapt yourd riving style to suitt he prevail-
ing road and weather conditions.
i Only use wheels with the recommended
tyre sizes. Only then will ESP ®
function
properly.
ETS/4ETS (Electronic Traction System) Traction control is part of ESP
®
.
Traction control brakes the drive wheels indi-
vidually if they spin. This enables you to pull
away and accelerate on slippery surfaces, for
example if the road surface is slippery on one
side. On vehicles with 4MATIC, more drive
torque is also transferred to the wheel or
wheels with traction.
Traction control remains active if you deacti-
vate ESP ®
.
Deactivating/activating ESP ®
(except
AMG vehicles) G
WARNING
If you deactivate ESP ®
,E SP ®
no longer sta-
bilises the vehicle. There is an increased risk
of skidding and an accident.
Only deactivate ESP ®
in the situations descri-
bed in the following.
X To deactivate: (Ypage 219).
The å ESP®
OFF warning lamp in the
instrumentc luster lightsup.
X To activate: (Ypage 219).
The å ESP®
OFF warnin glamp in the
instrumen tcluster goes out.
ESP ®
is activated automatically when the
engine is started.
The ECO start/stop function switches the
engine off automatically if the vehicle stops moving. When pulling away again, the engine
start
sautomatically. ESP ®
remain sinits pre-
viously selected status. Example: if ESP ®
was
deactivated befor ethe engine was switched
off ,ESP ®
remain sdeactivated when the
engine is switched on again.
If ESP ®
is deactivated and one or mor ewheels
start to spin ,the ÷ ESP®
warnin glamp in
the instrumen tcluster flashes .Insuch situa-
tions, ESP ®
will no tstabilis ethe vehicle.
It ma ybeb esttod eactivate ESP ®
in the fol-
lowing situations:
R when using sno wchains
R in deep snow
R on sand or gravel
If yo udeactivate ESP ®
:
R ESP ®
no longe rimproves driving stability.
R traction control is still activated.
R ESP ®
still provides support when you
brake.
R engine torque is not limited and the drive
wheels are abletos pin. The spinning of the
wheels results in acutting action for better
traction.
Deactivating/activating ESP ®
(AMG
vehicles) Activating/deactivating SPORT handling
mode
G
WARNING
When SPORT handling mode is activated,
there is agreater risk of skidding and acci-
dents.
Only activate SPORT handling mode in the sit-
uations described in the following. 66
Driving safety systemsSafety
Page 70 of 373
X
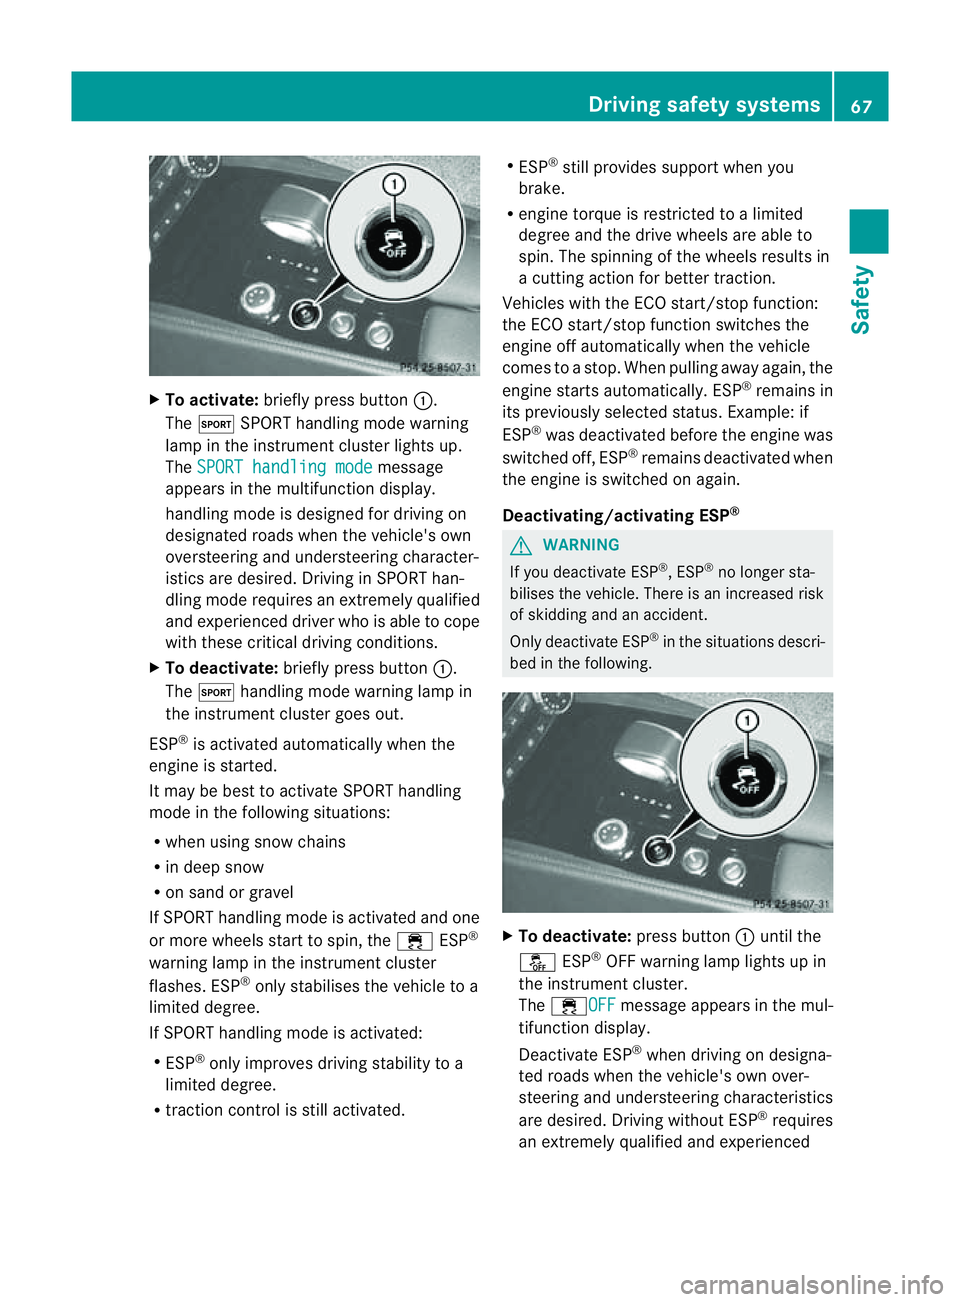
To activate: brieflypress button :.
The M SPORThandling mod ewarning
lamp in the instrument cluster lights up.
The SPORT handling mode message
appear sinthe multifunctio ndisplay.
handlin gmode is designed for drivin gon
designated roads when the vehicle's own
oversteerin gand understeerin gcharacter-
istics are desired. Driving in SPORT han-
dling mode requires an extremely qualified
and experienced driver who is able to cope
with these critical driving conditions.
X To deactivate: briefly press button :.
The M handling mode warning lamp in
the instrumentc luster goes out.
ESP ®
is activated automatically when the
engine is started.
It may be best to activat eSPORT handling
mode in the followin gsituations:
R when using sno wchains
R in deep snow
R on sand or gravel
If SPORT handlin gmode is activated and one
or mor ewheels start to spin ,the ÷ ESP®
warnin glamp in the instrumen tcluster
flashes .ESP ®
onl ystabilise sthe vehicl etoa
limite ddegree.
If SPOR Thandling mod eisactivated:
R ESP ®
onl yimprove sdriving stability to a
limite ddegree.
R traction control is stil lactivated. R
ESP ®
stil lprovides support when you
brake.
R engine torque is restricte dtoalimited
degree and the drive wheels are able to
spin. The spinnin gofthe wheels results in
ac utting action for better traction.
Vehicles with the ECO start/stop function:
the ECO start/stop function switches the
engine off automatically when the vehicle
comes to astop. When pulling away again, the
engine startsa utomatically. ESP ®
remains in
its previously selected status. Example: if
ESP ®
was deactivated before the engine was
switched off, ESP ®
remains deactivated when
the engine is switched on again.
Deactivating/activating ESP ® G
WARNING
If you deactivate ESP ®
,E SP ®
no longer sta-
bilises the vehicle. There is an increased risk
of skidding and an accident.
Only deactivate ESP ®
in the situations descri-
bed in the following. X
To deactivate: press button:until the
å ESP®
OFF warning lamp lights up in
the instrument cluster.
The ÷OFF message appears in the mul-
tifunction display.
Deactivate ESP ®
when driving on designa-
ted roads when the vehicle's own over-
steerin gand understeerin gcharacteristics
are desired. Drivin gwithout ESP ®
requires
an extremely qualified and experienced Driving safety systems
67Safety Z
Page 72 of 373
This function will issue
awarning if:
R at speeds of around 30 km/ho rmore, over
several seconds, the distance maintained
to the vehicle travelling in front is insuffi-
cient.
The · distance warning lamp then lights
up in the instrument cluster.
R at as peed of approximately 7km/h or
higher, you very quickly approach avehicle
in front.
An intermittent warning tone willt hen
sound and the ·distance warning lamp
willl ight up in the instrument cluster.
X Brake immediately in order to increase the
distance from the vehicl einfront.
or
X Take evasive action provided it is safe to do
so.
From aspee dofa pproximatel y7km/h,ifthe
driver and passengers have fastened their
seat belts, PRE-SAFE ®
Brake can brake the
vehicl eautomatically at speeds up to approx-
imatel y200 km/h.
Due to the nature of the system, particularly
complicate ddriving conditions may cause
unnecessary warnings or the unnecessary
interventio nofPRE-SAFE ®
Brake.
You can prevent the interventio nofthe PRE-
SAFE ®
Brake at any time by:
R depressing the accelerato rpedal further
R activating kickdown
R releasing the brake pedal.
The brakin gaction of PRE-SAFE ®
Brak eis
ended automatically if:
R you manoeuvre to avoid the obstacle.
R ther eisnol onger any danger of arear-end
collision.
R ther eisnol onger an obstacle detected in
fron tofy our vehicle.
With the help of the radar sensor system,
PRE-SAFE ®
Brak ecan detec tobstacles that
are in fron tofyour vehicle for an extended
period of time. At speeds up to approximately 70 km/h, PRE-
SAFE
®
Brak ecan also detec tstationary
obstacles such as stopped or parked vehi-
cles.
If you approach an obstacle and PRE-SAFE ®
Brak edetects arisk of acollision, the system
will alert you both visually and acoustically. If
you do not brake or take evasive action ,the
system will warn you by automatically braking
the vehicle gently. If ther eisanincreased risk
of collision, preventativ epassenger protec-
tion measures (PRE-SAFE ®
)a re activated
(Y page 48). If, at speeds over 30 km/h, arisk
of collision remains and you do not brake,
take evasive action or significantly acceler-
ate, automatic brakin gmay be performed up
to alevel of automatic emergency braking.
Automatic emergency brakin gisnot per-
formed until immediately prior to an accident
that can no longer be avoided. G
WARNING
PRE-SAFE ®
Brak ewill initially brake your vehi-
cle by apartial application of the brakes if a
danger of collision is detected. There may be
ac ollision unless you also brake. Automatic
emergency braking cannot preven tacolli-
sion. There is arisk of an accident.
Always apply the brakes yourself and try to
take evasive action. G
WARNING
PRE-SAFE ®
Brak ecannot alway sclearly iden-
tify objects and complex traffic conditions.
In these cases, PRE-SAFE ®
Brak emay:
R give an unnecessary warning and then
brake the vehicle
R neither give awarning nor intervene
There is arisk of an accident.
Always pay particular attention to the traffic
situation and be ready to brake, especially if
PRE-SAFE ®
Brak ewarns you. Terminate the
intervention in anon-critical driving situation. Driving safet
ysystems
69Safety Z
Page 82 of 373
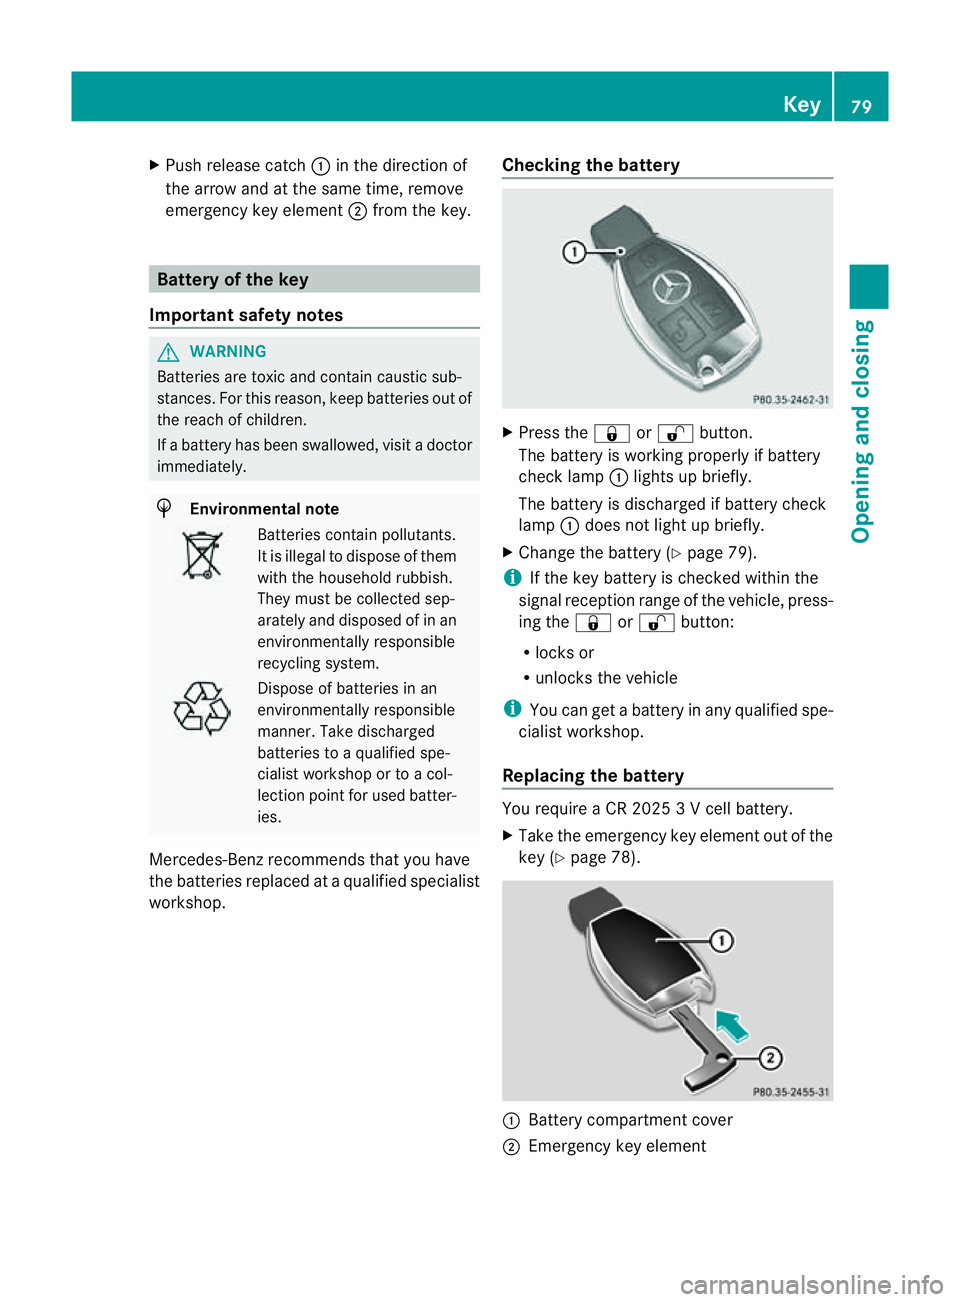
X
Push release catch :in the direction of
the arrow and at the same time, remove
emergenc ykey element ;from the key. Battery of the key
Important safety notes G
WARNING
Batteries are toxic and contain caustic sub-
stances. For this reason, keep batteries out of
the reach of children.
If ab attery has been swallowed, visit adoctor
immediately. H
Environmenta
lnote Batteries contain pollutants.
It is illegal to dispose of them
with the household rubbish.
They must be collected sep-
arately and disposed of in an
environmentally responsible
recycling system.
Dispose of batteries in an
environmentally responsible
manner
.Take discharged
batteries to aqualified spe-
cialis tworkshop or to acol-
lection point for used batter-
ies.
Mercedes-Benz recommends that you have
the batteries replaced at aqualified specialist
workshop. Checking the battery X
Press the &or% button.
The battery is working properly if battery
check lamp :lights up briefly.
The battery is discharged if battery check
lamp :does not light up briefly.
X Change the battery (Y page 79).
i If the key battery is checked within the
signal reception range of the vehicle, press-
ing the &or% button:
R locks or
R unlocks the vehicle
i You can get abattery in any qualified spe-
cialist workshop.
Replacing the battery You require
aCR20253Vc ell battery.
X Take the emergenc ykey element out of the
key (Y page 78). :
Battery compartment cover
; Emergency key element Key
79Opening and closing Z
Page 108 of 373
The crash-responsive EASY-EXIT feature is
only operational if the EASY-EXIT/ENTRY fea-
ture is activated in the on-board computer.
Mirrors
Rear-view mirror
X
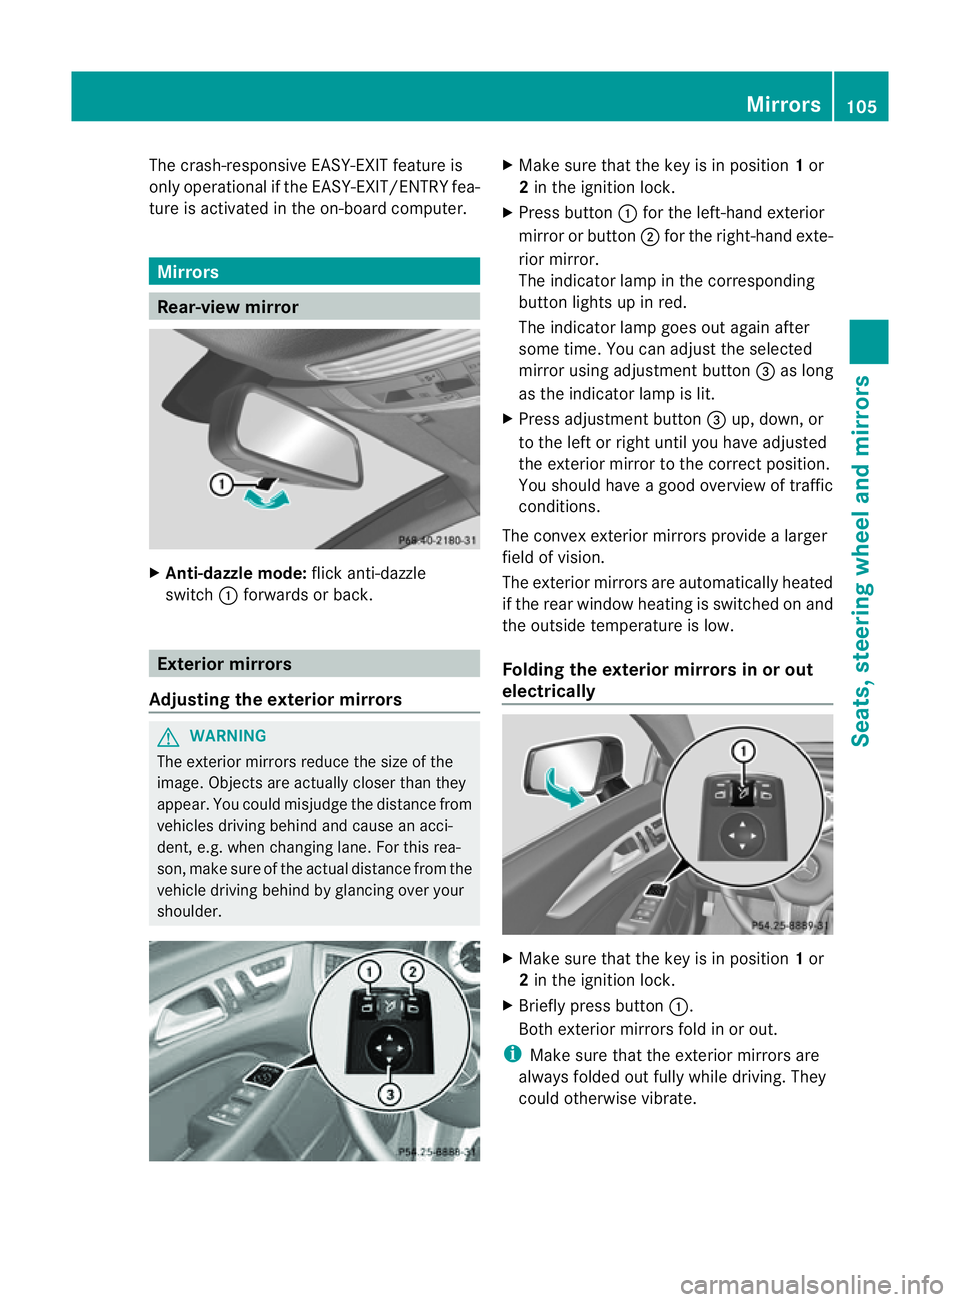
Anti-dazzle mode: flick anti-dazzle
switch :forwards or back. Exterior mirrors
Adjusting the exterior mirrors G
WARNING
The exterior mirrors reduce the size of the
image. Object sare actually closer than they
appear. You could misjudge the distanc efrom
vehicles driving behind and cause an acci-
dent, e.g. when changin glane. For this rea-
son ,makes ure of th eactual distanc efromt he
vehicle driving behin dbyglancingovery our
shoulder. X
Make sure that the key is in position 1or
2 in the ignition lock.
X Press button :for the left-hand exterior
mirror or button ;for the right-hand exte-
rior mirror.
The indicator lamp in the corresponding
button lights up in red.
The indicator lamp goes out again after
some time. You can adjust the selected
mirror using adjustmen tbutton =as long
as the indicator lamp is lit.
X Press adjustmen tbutton =up, down ,or
to th eleft or right until you have adjusted
th ee xterior mirror to th ecorre ct position.
You should have agood overview of traffic
conditions.
The convex exterio rmirrors provide alarger
field of vision.
The exterior mirrors are automatically heated
if the rear window heatin gisswitched on and
the outside temperature is low.
Foldingt he exterior mirrors in or out
electrically X
Make sure that the key is in position 1or
2 in the ignition lock.
X Briefly press button :.
Both exterior mirrors fold in or out.
i Make sure that the exterior mirrors are
always folded out fully while driving. They
could otherwise vibrate. Mirrors
105Seats, steering wheela nd mirrors Z
Page 113 of 373
Useful information
i This Owner's Manual describes all mod-
els, series and optional equipment for your
vehicle that were available at the time of
going to press. National variation sare pos-
sible. Not ethat your vehicle may not be
equipped with all of the function sdescri-
bed. This is also the case for system sand
function srelevan ttosafety.
i Read the information on qualified special-
ist workshops: (Y page 23). Exterior lighting
Important safet
ynotes
For reason sofsafety, Mercedes-Benz recom-
mends that you drive with the lights switched
on even during the daytime. In some coun-
tries ,operation of the headlamps varies due
to legal requirements and self-imposed obli-
gations. Driving abroad
Symmetrical dipped-beam headlamps If your journey takes you to countries where
vehicles are driven on the opposite side of the
road to the country in which the vehicle is
registered, your headlamps must be switched
to symmetrical dipped beam. This prevents
oncoming traffic from being dazzled. Sym-
metrical lights do not illuminate as large an
area of the edge of the carriageway.
Conver tthe headlamps as close to the border
as possible before driving in these countries
(Y page 223).
Asymmetrical dipped beam Convert the headlamps back to asymmetrical
dipped beam as soon as possible after cross-
ing the border (Y page 223).
If the headlamps are converted to symmetri-
cal dipped beam, the "motorway mode" and "extended range foglamps" functions (Intelli-
gent Light System) are not available. Setting the exterior lighting
Setting options Exterior lighting can be set using the:
R
light switch
R combination switch (Y page 113)
R on-board computer (Y page 222)
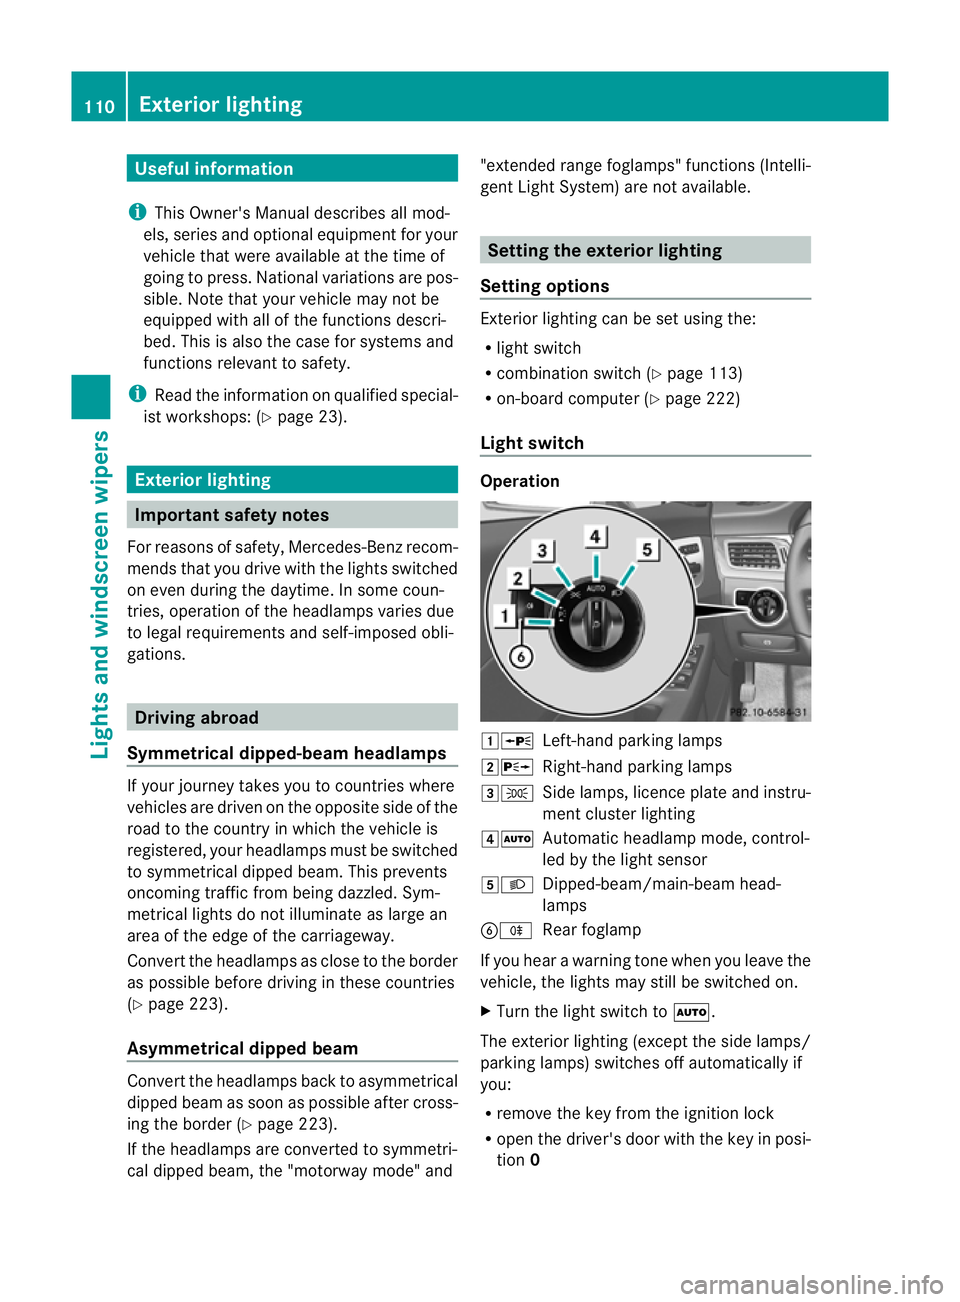
Light switch Operation
1W
Left-hand parking lamps
2X Right-hand parking lamps
3T Side lamps, licence plate and instru-
ment cluster lighting
4Ã Automatic headlamp mode, control-
led by the light sensor
5L Dipped-beam/main-beam head-
lamps
BR Rear foglamp
If you hear awarning tone when you leave the
vehicle, the lights may still be switched on.
X Turn the light switch to Ã.
The exterior lighting (except the side lamps/
parking lamps) switches off automatically if
you:
R remove the key from the ignition lock
R open the driver's door with the key in posi-
tion 0 110
Exterior lightingLights and windscreen wipers
Page 114 of 373
Automatic headlamp mode
G
WARNING
If th eligh tswitc hiss et to à and it is foggy,
snowing or there is poor visibility, th edipped-
beam headlamp swill not com eonautomati-
cally. This could endange ryou and others. In
such situations turn the light switch to L.
The automatic headlamp feature is only an
aid. The driver is responsible for the vehicle's
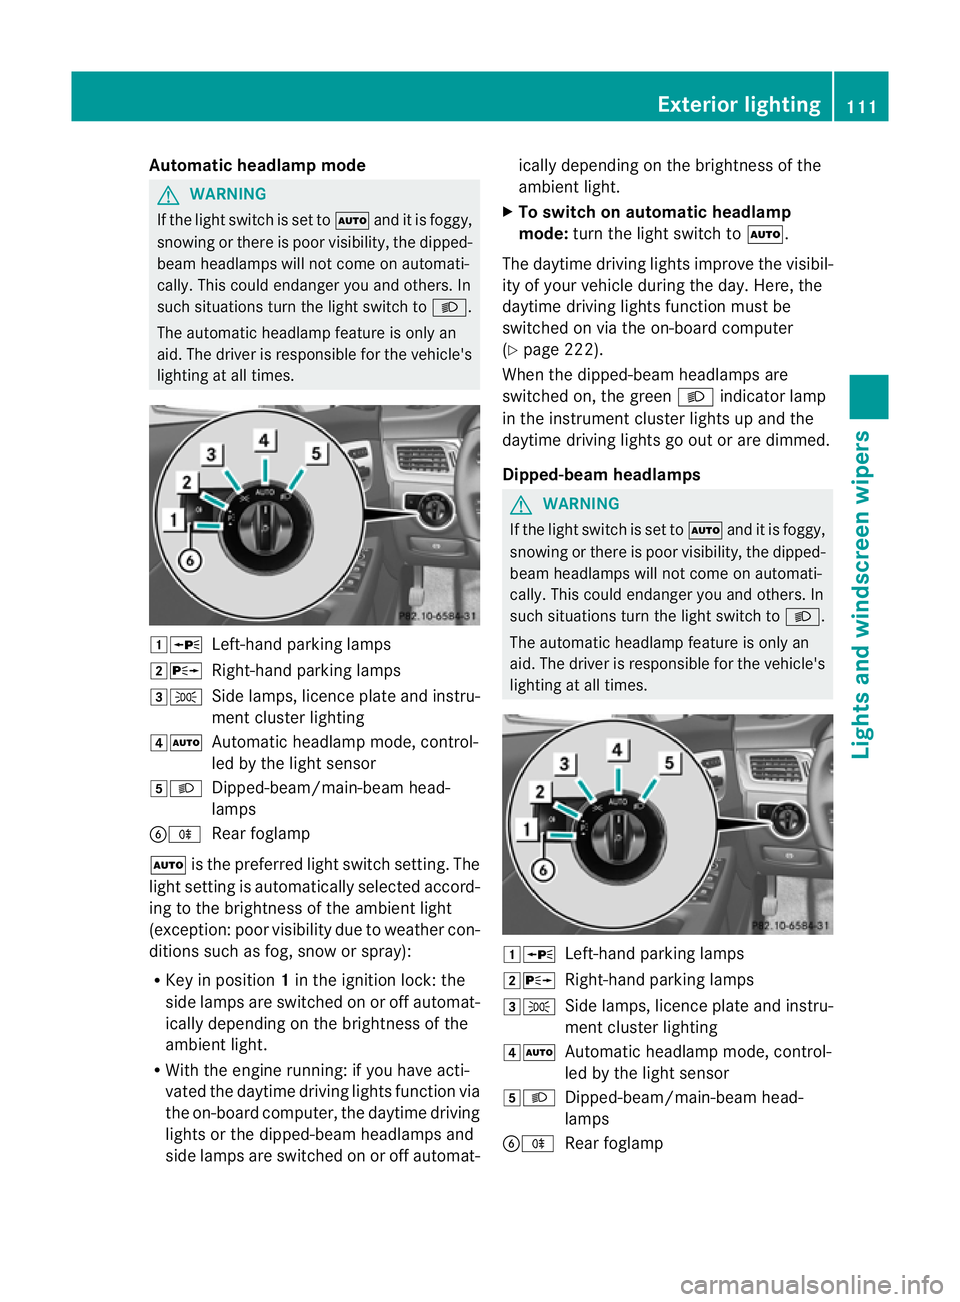
lighting at all times. 1W
Left-hand parking lamps
2X Right-hand parking lamps
3T Side lamps, licence plate and instru-
ment cluster lighting
4Ã Automatic headlamp mode, control-
led by the light sensor
5L Dipped-beam/main-beam head-
lamps
BR Rear foglamp
à is the preferred light switch setting. The
light setting is automatically selected accord-
ing to the brightnes softhe ambient light
(exception: poor visibility due to weather con-
ditions such as fog, snow or spray):
R Key in position 1in the ignition lock: the
side lamps are switched on or off automat-
ically depending on the brightnes softhe
ambient light.
R With the engine running: if you have acti-
vated the daytime driving lights function via
the on-board computer, the daytime driving
lights or the dipped-beam headlamps and
side lamps are switched on or off automat- ically depending on the brightness of the
ambient light.
X To switch on automatic headlamp
mode: turn the light switch to Ã.
The daytime driving lights improve the visibil-
ity of your vehicle during the day. Here, the
daytime driving lights function must be
switched on via the on-board computer
(Y page 222).
When the dipped-beam headlamps are
switched on, the green Lindicator lamp
in the instrument cluster lights up and the
daytime driving lights go out or are dimmed.
Dipped-beam headlamps G
WARNING
If the light switch is set to Ãand it is foggy,
snowing or there is poor visibility, the dipped-
beam headlamps will not come on automati-
cally. This could endanger you and others. In
such situations turn the light switch to L.
The automatic headlamp feature is only an
aid. The driver is responsible for the vehicle's
lighting at all times. 1W
Left-hand parking lamps
2X Right-hand parking lamps
3T Side lamps, licence plate and instru-
ment cluster lighting
4Ã Automatic headlamp mode, control-
led by the light sensor
5L Dipped-beam/main-beam head-
lamps
BR Rear foglamp Exterior lighting
111Lights and windscreen wipers Z
Page 117 of 373
X
To switc honthe main-beam head-
lamps: turnthe key in the ignition lock to
position 2or start the engine.
X Turn the light switch to LorÃ.
X Press the combinatio nswitc hbeyond the
pressure point in the direction of
arrow :.
In the Ãposition ,the main-beam head-
lamps are only switched on when it is dark
and the engin eisrunning.
The blue Kindicator lamp in the instru-
ment cluster lights up when the main-beam
headlamps are switched on.
X To switch off the main-beam head-
lamps: move the combination switch back
to its normal position.
The blue Kindicator lamp in the instru-
ment cluster goes out.
i Vehicles with Adaptiv eHighbeam Assist:
when Adaptiv eHighbeam Assist is active,
it controls activation of the main-beam
headlamps (Y page 116).
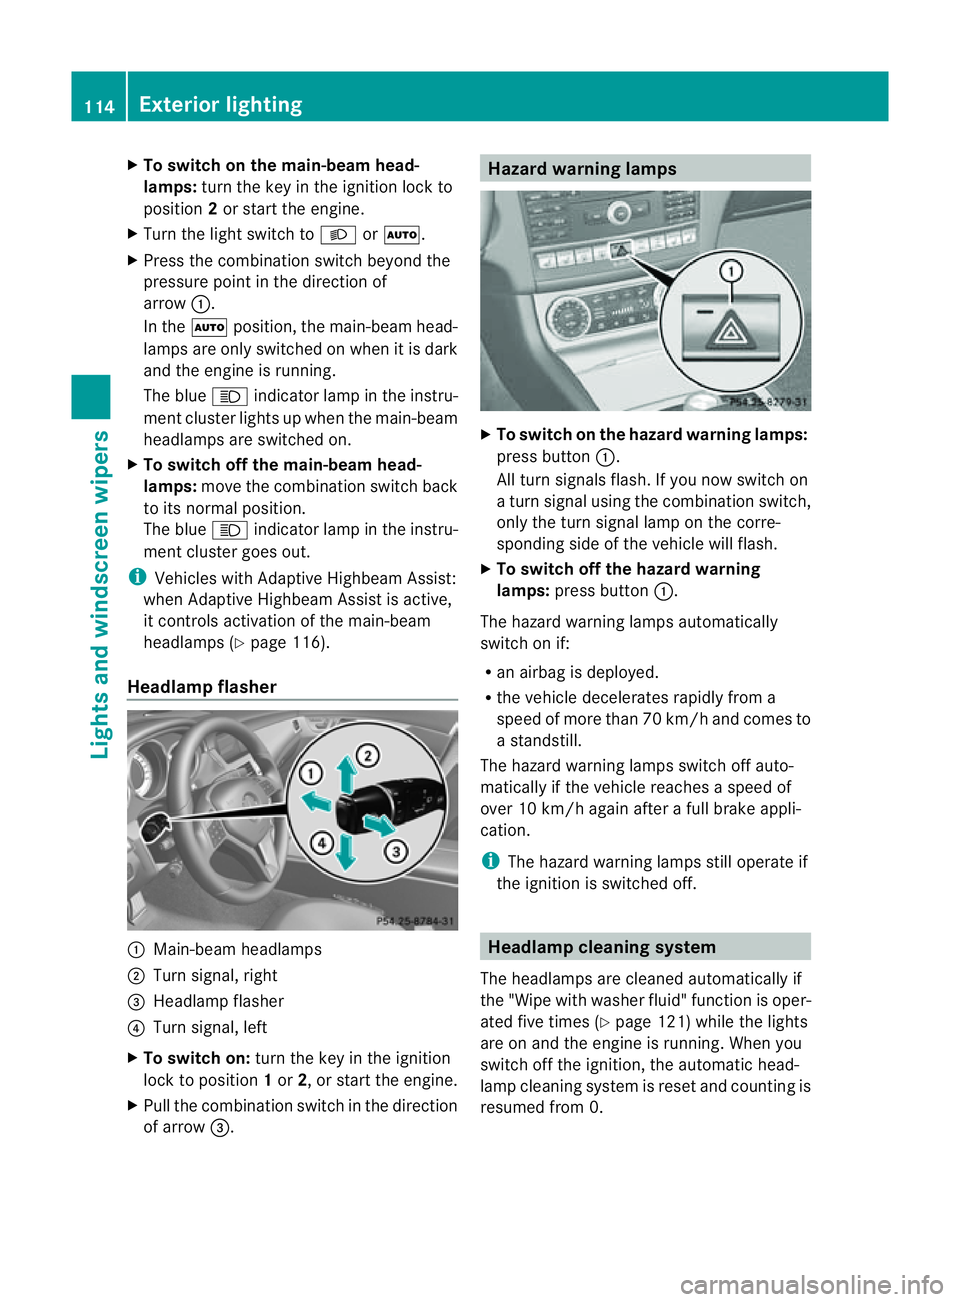
Headlamp flasher :
Main-beam headlamps
; Turn signal, right
= Headlamp flasher
? Turn signal, left
X To switch on: turn the key in the ignition
lock to position 1or 2,ors tart the engine.
X Pull the combination switch in the direction
of arrow =. Hazard warning lamps
X
To switch on the hazard warning lamps:
press button :.
All turn signals flash. If you now switch on
at urn signal using the combination switch,
only the turn signal lamp on the corre-
spondin gside of the vehicle will flash.
X To switch off the hazard warning
lamps: press button :.
The hazard warning lamps automatically
switch on if:
R an airbag is deployed.
R the vehicle decelerates rapidly from a
speed of more than 70 km/ha nd comesto
as tandstill.
The hazar dwarning lamps switch off auto-
maticall yifthe vehicl ereache saspeed of
ove r10k m/h agai nafter afullb rake appli-
cation.
i The hazar dwarning lamps still operate if
the ignition is switched off. Headlamp cleanin
gsystem
The headlamps ar ecleane dautomaticall yif
the "Wip ewithw ashe rfluid" function is oper-
ated five times (Y page 121)while the lights
are on and the engine is running. When you
switc hoff the ignition, the automatic head-
lamp cleaning system is reset and countin gis
resumed fro m0.114
Exterior lightingLight
sand windscreen wipers