2012 MERCEDES-BENZ CLS COUPE spare wheel
[x] Cancel search: spare wheelPage 331 of 373
Useful information
i This Owner's Manual describes all mod-
els, series and optional equipment for your
vehicle that were available at the time of
going to press. National variation sare pos-
sible. Not ethat your vehicle may not be
equipped with all of the function sdescri-
bed. This is also the case for system sand
function srelevan ttosafety.
i Read the information on qualified special-
ist workshops: (Y page 23). Important safet
ynotes G
WARNING
If wheels and tyres of the wrong size are used,
the wheel brakes or suspension components
may be damaged. There is arisk of accident.
Always replac ewheels and tyre swith those
that fulfil the specifications of the original part
(designation ,manufacturer, model). G
WARNING
Af lat tyre severely impairs the driving, steer-
ing and braking characteristics of the vehicle.
There is arisk of accident.
Tyres without run-flat characteristics:
R do not drive with aflat tyre.
R immediately replac ethe flat tyre with your
emergenc yspare wheel or spare wheel, or
consult aqualified specialist workshop.
Tyres with run-flat characteristics:
R pay attention to the information and warn-
ing notices on MOExtended tyre s(tyres
with run-flat characteristics).
Accessories that are not approved for your
vehicle by Mercedes-Ben zorare not being
usedc orrectly can impair the operating
safety. Before purchasing and using non-approved
accessories, visit aqualified specialist work-
shop and enquire about:
R suitability
R lega lstipulations
R factory recommendations
Information on the dimensions and types of
wheels and tyres for yourv ehicle can be
found under "Wheel/tyre combinations"
(Y page 341).
Information on air pressure for the tyres on
your vehicle can be found:
R on the tyre pressure label on the fuel filler
flap (Y page 157)
R under "Tyre pressure" (Y page 331)
R in the "Tyre pressure" section
Modification work on the brake system and
wheels is not permitted. The use of wheel
spacers or brake dust shields is not permit-
ted. This invalidates the general operating
permit for the vehicle.
i Further information on wheels and tyres
can be obtained at any qualified specialist
workshop. Operation
Information on driving
Check the tyre pressures when the vehicle is
heavily laden and, if necessary, adjust.
While driving, pay attention to vibrations,
noises and unusual handling characteristics,
e.g. pulling to one side. This may indicat ethat
the wheels or tyres are damaged. If you sus-
pect that atyre is defective, reduce your
speed immediately. Stop the vehicle as soon
as possible to chec kthe wheels and tyres for
damage. Hidden tyre damage could also be
causing the unusual handling characteristics.
If you find no signs of damage, have the tyres
and wheels checked at aqualified specialist
workshop.
When parking your vehicle, make sure that
the tyres do not get deformed by the kerb or 328
OperationWheels and tyres
Page 332 of 373
other obstacles. If it is necessary to drive over
kerbs, speed humps or similar elevations, try
to do so slowly and at an obtuse angle. Oth-
erwise, the tyres, particularly the sidewalls,
may be damaged. Regular checking of wheels and tyres
G
WARNING
Damaged tyres can cause tyre inflation pres-
sure loss. As aresult, you could lose control
of your vehicle. There is arisk of accident.
Check the tyres regularly for signs of damage
and replace any damaged tyres immediately.
Regularly check the wheels and tyres of your
vehicle for damage at least once amonth, as
well as after driving off-road or on rough
roads. Damaged wheels can cause aloss of
tyre pressure. Pay particular attention to
damage such as:
R cuts in the tyres
R punctures
R tears in the tyres
R bulges on tyres
R deformation or severe corrosion on wheels
Regularly check the tyre tread depth and the
condition of the tread across the whole width
of the tyre (Y page 329). If necessary, turn
the front wheels to full lock in order to inspect
the inner side of the tyre surface.
All wheels must have avalve cap to protect
the valve against dirt and moisture. Do not fit
anything ontot he valve other than the stand-
ard valve cap or other valve caps approved by
Mercedes-Benz for your vehicle. Do not fit any
other valve caps or systems, e.g. tyre pres-
sure monitoring systems.
Regularly check the pressure of all the tyres,
particularly prior to long trips. Adjust the tyre
pressure as necessary (Y page 331).
Observe the notes on the emergenc yspare
wheel (Y page 351). The service life of tyres depends on various
factors, including the following:
R
driving style
R tyre pressure
R tyre mileage Tyret
read G
WARNING
Insufficient tyre tread will reduce tyre trac-
tion. The tyre is no longer able to dissipate
water. This means that on wet road surfaces,
the risk of aquaplaning increases, in particular
where speed is not adapted to suit the driving
conditions. There is arisk of accident.
If the tyre pressure is too high or too low, tyres
may exhibit different levels of wear at differ-
ent locations on the tyre tread. Thus, you
should regularly check the tread depth and
the condition of the tread across the entire
width of all tyres.
Minimum tyre tread depth for:
R summer tyres: 3mm
R M+S tyres: 4mm
For safety reasons, replace the tyres before
the legally prescribed limit for the minimum
tyre tread depth is reached.. Selecting, fitting and replacing tyres
R Only fit tyres and wheels of the same type
and make.
R Only fit tyres of the correc tsize ontot he
wheels.
R Run in new tyres at moderate speeds for
the first 100 km. They only reach their full
performanc eafter this distance.
R Do not drive with tyres which have too little
tread depth. This otherwise significantly
reduces the traction on wet roads (aqua-
planing).
R Replace the tyres after six years at the lat-
est, regardless of wear. Operation
329Wheels and tyres Z
Page 333 of 373
Observe the notes on the emergency spare
wheel (Y
page 351). MOExtended tyres (tyres with run-flat
characteristics)
With MOExtended tyres (tyres with run-flat
characteristics), you can continue to drive
your vehicle even if there is atotal loss of
pressure in one or more tyres.
MOExtended tyres may only be used in con-
junction with an active tyre pressure loss
warning system or with an active tyre pres-
sure monitor and on wheels specificallyt es-
ted by Mercedes-Benz.
Notes on driving with MOExtended tyres with
af lat tyre (Y page 313).
i Vehicles with MOExtended tyres are not
equipped with aTIREFIT kit at the factory.
It is therefore recommended that you addi-
tionally equipy our vehicle with aTIREFIT kit
if you fit tyres that do not feature run-flat
characteristics, e.g. winter tyres. ATIREFIT
kit can be obtained from aqualified spe-
cialist workshop. Winter operation
General notes
Have your vehicle winterproofed at aqualified
specialist workshop at the onset of winter.
Observe the notes in the "Changing awheel"
section (Y page 336). Driving with summer tyres
At temperatures below +7 †, summer tyres
lose elasticity and therefore traction and
braking power. Change the tyres on your vehi-
cle to M+S tyres .Using summer tyres at very
cold temperatures could cause tears to form,
thereby damaging the tyres permanently.
Mercedes-Benz cannot accept responsibility
for this type of damage. M+S tyres
G
WARNING
M+S tyres with atyre tread depth of less than
4mma re not suitable for use in winter as they
do not provid esufficient traction. There is a
risk of accident.
M+S tyres with atread depth of less than
4mmm ust be replaced.
At temperatures below +7 †, use winter tyres
or all-seaso ntyres .Both types of tyre are
identified by the M+S marking.
Only winter tyres bearing the isnowflake
symbol in addition to the M+S marking pro-
vide the best possible grip in wintry road con-
ditions.
Only these tyres will allow driving safety sys-
tems such as ABS and ESP ®
to function opti-
mally in winter. These tyres have been devel-
oped specifically for driving in snow.
Use M+S tyres of the same make and tread
on all wheels to maintain safe handling char-
acteristics.
Always observe the maximum permissible
speed specified for the M+S tyres you have
fitted.
If you fit M+S tyres that have alower maxi-
mum permissible speed than that of the vehi-
cle, affix acorresponding warning label in the
driver's field of vision. This can be obtained
at aq ualified specialist workshop.
Under these circumstances, you should also
restrict the maximum speed of the vehicle
using permanent SPEEDTRONIC so that it
does not exceed the maximum permissible
speed for the M+S tyres (Y page 170).
When you have fitted the M+S tyres:
X Check the tyre pressures (Y page 331).
X Restart the tyre pressure loss warning sys-
tem (Y page 333).
X Restart the tyre pressure monitor
(Y page 335).
For more information on driving with an emer-
gency spare wheel, see (Y page 351).330
Winter operationWheels and tyres
Page 334 of 373
Snow chains
G
WARNING
If you have fitted snow chains to the front
wheels, they may scrape against the vehicle
body or chassis components. This could
cause damage to the vehicle or the tyres.
There is arisk of an accident.
To avoid hazardous situations:
R never fit snow chains on the front wheels
R fit snow chains to the rear wheels in pairs.
For safety reasons, Mercedes-Benz recom-
mends that you only use snow chains that
have been specially approved for your vehicle
by Mercedes-Benz, or that are of acorre-
sponding standard of quality.
If you intendtof it snow chains, please bear
the following points in mind:
R snow chains cannot be fitted to all wheel-
tyre combinations. Permissible wheel-tyre
combination s(Ypage 341).
R only use snow chains when the road sur-
face is completely snow-covered. Remove
the snow chains as soon as possible when
you come to aroad that is not snow-cov-
ered.
R local regulations may restrictt he use of
snow chains. Observe the appropriate reg-
ulations if you wish to fit snow chains.
R do not exceed the maximum permissible
speed of 50 km/h.
R on vehicles with AIRMATIC, you must drive
at raised vehicle level if snow chains have
been fitted (Y page 181).
i You may wish to deactivate ESP ®
when
pulling away with snow chains fitted
(Y page 66). This way you can allow the
wheels to spin in acontrolled manner, ach-
ieving an increased driving force (cutting
action).
For more information on driving with an emer-
gency spare wheel, see (Y page 351). Tyrep
ressure Tyrep
ressur especifications G
WARNING
Tyres with too low or too high tyre pressure
contain the following hazards:
R they can burst, in particular if the vehicle is
heavily laden or when driven at high
speeds.
R the tyres can wear excessively and/or
unevenly, which can severely impair tyre
traction.
R the driving, steering and braking character-
istics may be severely impaired.
There is arisk of accident.
Follow recommended tyre inflation pressures
and check the pressure of all the tyres includ-
ing the spare wheel:
R at least every two weeks
R if the load changes
R before beginning along journey
R for changed operating conditions, e.g. off-
road driving
If necessary, correct the tyre pressure. G
WARNING
If you fit unsuitable accessories onto tyre
valves, the tyre valves may be overloaded and
malfunction, which can cause tyre pressure
loss. Due to their design, retrofitted tyre pres-
sure monitors keep the tyre valve open. This
can also result in tyre pressure loss. There is
ar isk of accident.
Only screw standard valve caps or valve caps
specifically provided by Mercedes-Ben zfor
your vehicle onto the tyre valve. G
WARNING
If the tyre pressure drops repeatedly, the
wheel, valve or tyre may be damaged. Tyre
pressure that is too low may result in atyre
blow-out. There is arisk of accident. Tyrep
ressure
331Wheels and tyres
Z
Page 335 of 373
R
Chec kthe tyrefor foreign objects.
R Chec kwhether the wheel is losing air or the
valve is leaking.
If you are unable to rectify the damage, con-
tact aqualified specialist workshop. H
Environmental note
Check the tyre pressure regularly,atl east
every 14 days.
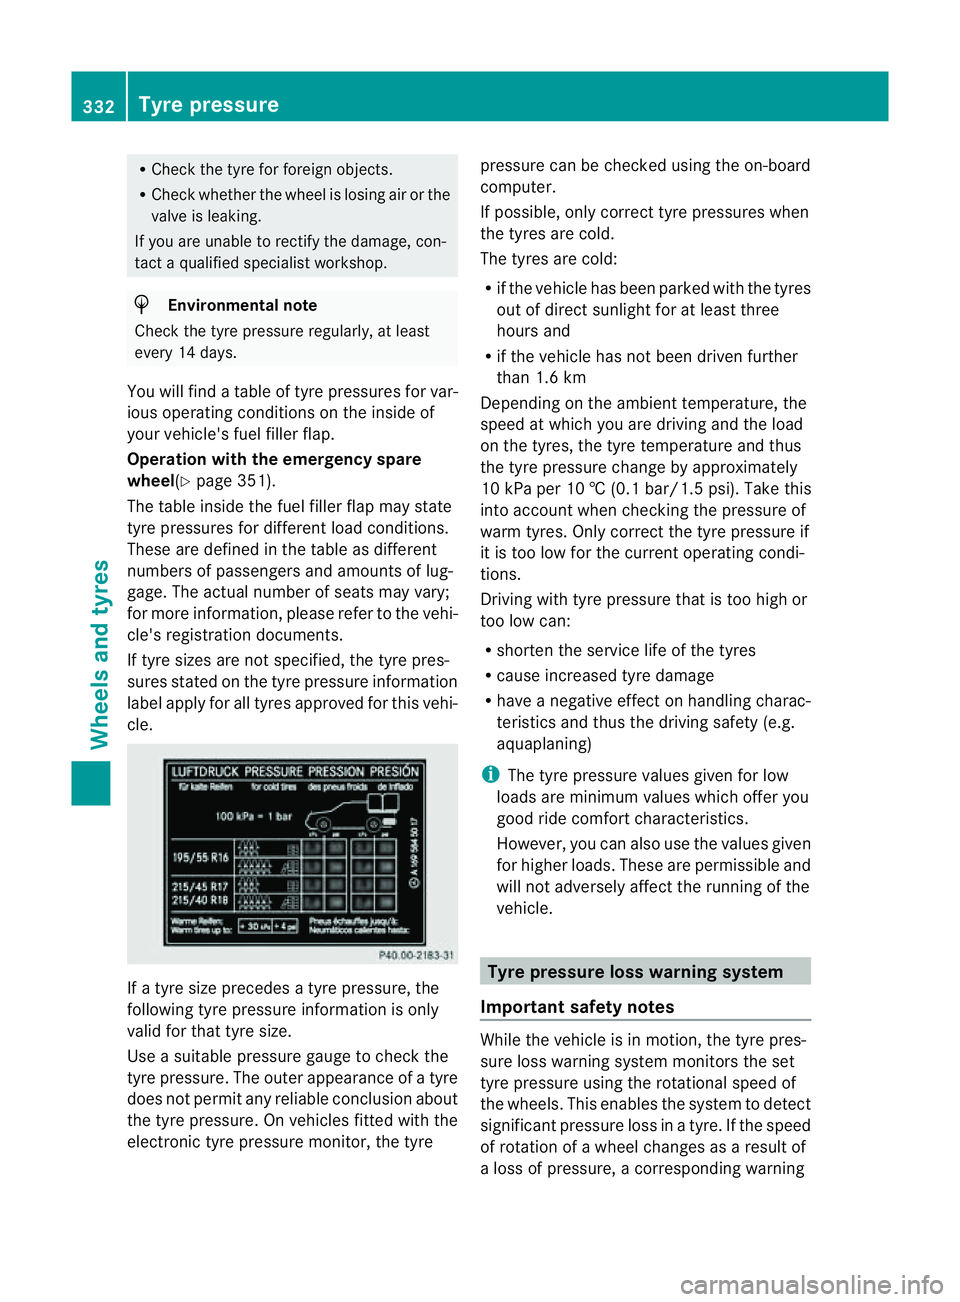
You will find atable of tyre pressures for var-
ious operating conditionsont he inside of
your vehicle's fuel filler flap.
Operation with the emergency spare
wheel(Y page 351).
The table inside the fuel filler flap may state
tyre pressures for different load conditions.
These are defined in the table as different
numbers of passengers and amounts of lug-
gage. The actual number of seats may vary;
for more information,p lease refer to the vehi-
cle's registration documents.
If tyre sizes are not specified, the tyre pres-
sures stated on the tyre pressure information
label apply for all tyres approved for this vehi-
cle. If
at yre size precedes atyre pressure, the
following tyre pressure information is only
valid for that tyre size.
Use asuitable pressure gauge to check the
tyre pressure. The outer appearance of atyre
does not permit any reliablec onclusion about
the tyre pressure. On vehicles fitted with the
electronic tyre pressure monitor, the tyre pressure can be checked using the on-board
computer.
If possible, only correct tyre pressures when
the tyres are cold.
The tyres are cold:
R
if the vehicle has been parked with the tyres
out of direct sunlight for at least three
hours and
R if the vehicle has not been driven further
than 1.6 km
Depending on the ambient temperature, the
speed at which you are driving and the load
on the tyres, the tyre temperature and thus
the tyre pressure change by approximately
10 kPa per 10 †(0.1 bar/1.5 psi). Take this
into account whe nchecking the pressure of
warm tyres. Only correct the tyre pressure if
it is too low for the current operating condi-
tions.
Driving with tyre pressure that is too high or
too low can:
R shorten the service life of the tyres
R cause increased tyre damage
R have anegative effect on handling charac-
teristics and thus the driving safety (e.g.
aquaplaning)
i The tyre pressure values given for low
loads are minimum values which offer you
good ride comfort characteristics.
However, you can also use the values given
for higher loads. These are permissible and
will not adversely affect the running of the
vehicle. Tyrep
ressur eloss warning system
Important safety notes While the vehicle is in motion, the tyre pres-
sure loss warning system monitors the set
tyre pressure using the rotational speed of
the wheels. This enables the system to detect
significant pressure loss in
atyre. If the speed
of rotation of awheel changes as aresult of
al oss of pressure, acorresponding warning 332
Tyrep
ressureWheels and tyres
Page 337 of 373
Tyre pressure monitor
Important safety notes It is the driver's responsibility to set the tyre
pressure to the recommende dcold tyre pres-
sure suitable for the operating situation
(Y page 331). Note that the correc ttyre pres-
sur efor the curren toperating situation must
first be taught-in to the tyre pressure monitor.
If there is asubstantial loss of pressure, the
warning threshold for the warning message is
aligned to the referencev alues taught-in.
Restart the tyre pressure monitor after
adjusting to the cold tyre pressure
(Y page 335). The current pressures are
saved as new referencev alues. This will
ensure that awarning message will only
appearift he tyre pressure drops significantly.
The tyre pressure monitor does not warn you
of an incorrectly set tyre pressure. Observe
the notes on the recommended tyre pressure
(Y page 331).
The tyre pressure monitor is not able to warn
you of asudden loss of pressure, e.g. if the
tyre is penetrated by aforeign object.Int he
event of asudden loss of pressure, bring the
vehicle to ahalt by braking carefully. Avoid
abrupt steering manoeuvres.
If at yre pressure monitor system is fitted, the
vehicle's wheels have sensors fitted that
monitor the tyre pressures in all four tyres.
The tyre pressure monitor warns you if the
pressure drops in one or more of the tyres.
The tyre pressure monitor only functions if
the corresponding sensors are fitted to all
wheels.
Information on tyre pressures is displayed in
the multifunction display. After afew minutes
of driving, the current tyre pressure of each
tyre is shown in the multifunction display.
The tyre pressure values indicated by the on-
board computer may differ from those meas-
ured at afilling station using apressure
gauge. The tyre pressures shown by the on-
board computer refer to those measured at
sea level. At high altitudes, the tyre pressure values indicated by
apressure gauge are
higher than those shown by the on-board
computer. In this case, do not reduce the tyre
pressures.
The operation of the tyre pressure monitor
can be affected by interference from radio
transmitting equipment (e.g. radio head-
phones, two-way radios) that may be being
operated in or near the vehicle.
Checking tyrep ressureelectronically X
Make sure that the key is in position
2(Y page 141) in the ignition lock.
X Press the =or; button on the steer-
ing wheel to select the Serv. menu.
X Press the 9or: button to select
Tyre pressure .
X Press the abutton.
The current tyre pressure for each wheel
will be displayed in the multifunction dis-
play.
If the vehicle was parked for longer than
20 minutes the Tyre pressures will be displayed after
afew minutes of driving message is shown.
After ateach-in period, the tyre pressure
monitor automatically recognises new
wheels or new sensors. If aclear allocation of
the tyre pressure values to the individual
wheels is not possible, the Tyre pressure monitor active message is shown instead
of the tyre pressure display. The tyre pres-
sures are already being monitored.
i If an emergency spare wheel is fitted, the
system may continue to show the tyre pres-
sure of the wheel that has been removed
for afew minutes. If this occurs, note that
the value displayed for the position where
the spare wheel is fitted is not the same as
the current tyre pressure of the emergency
spare wheel. 334
Tyrep
ressureWheels and tyres
Page 343 of 373
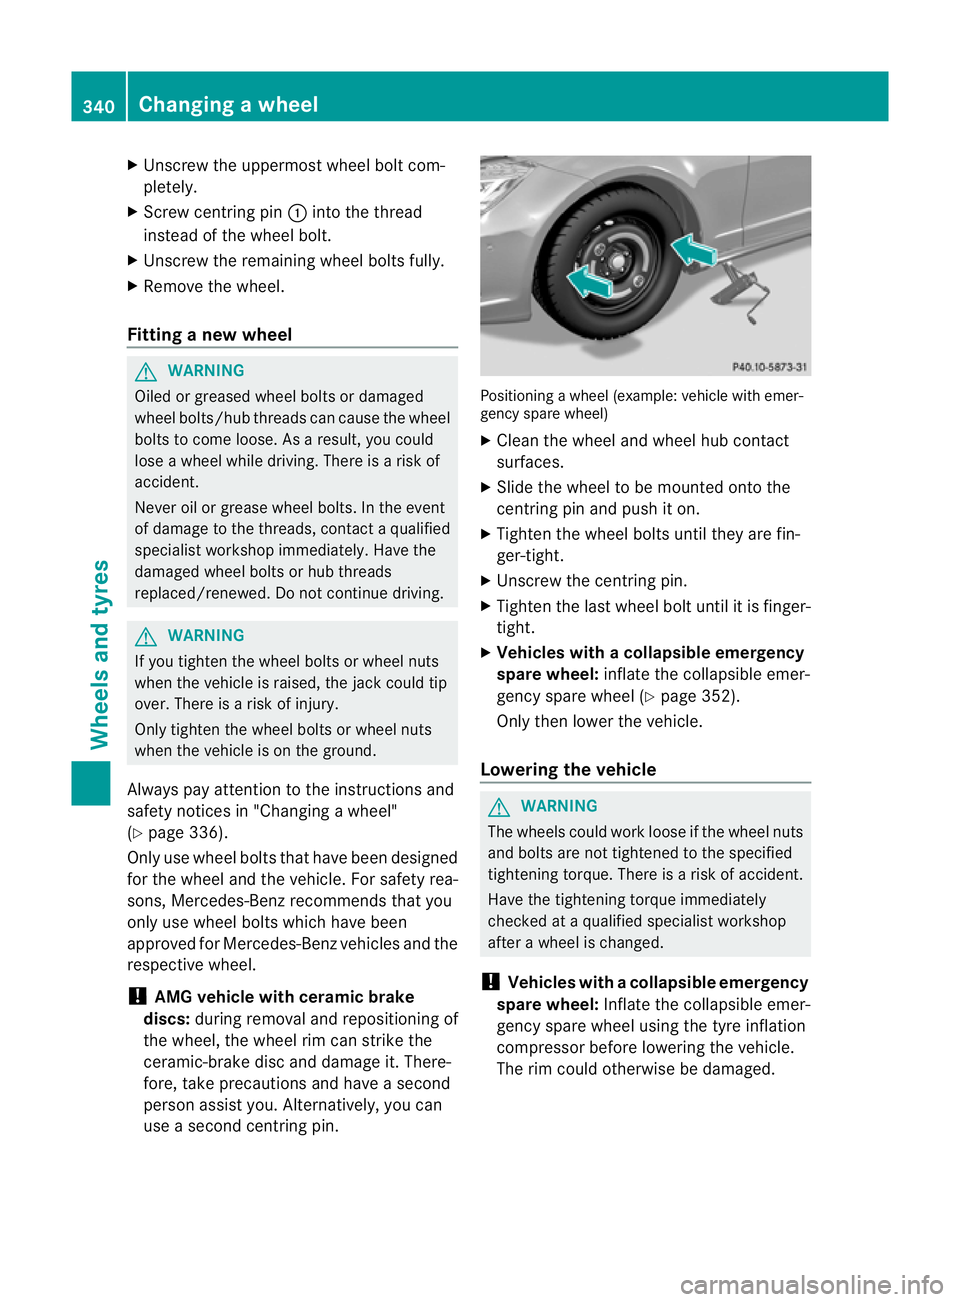
X
Unscrew the uppermost wheel bolt com-
pletely.
X Screw centring pin :into the thread
instead of the wheel bolt.
X Unscrew the remaining wheel bolts fully.
X Remove the wheel.
Fitting anew wheel G
WARNING
Oiled or greased wheel bolt sordamaged
wheel bolts/hub threads can cause th ewheel
bolt stoc omeloose .Asa result, you could
lose awheel while driving. There is arisk of
accident.
Never oil or grease wheel bolts. In the event
of damage to the threads, contact aqualified
specialist workshop immediately.H ave the
damage dwheel bolt sorhub threads
replaced/renewed. Do no tcontinue driving. G
WARNING
If you tighten the wheel bolts or wheel nuts
when the vehicle is raised, the jack could tip
over. There is arisk of injury.
Only tighten the wheel bolts or wheel nuts
when the vehicle is on the ground.
Always pay attention to the instructions and
safety notices in "Changing awheel"
(Y page 336).
Only use wheel bolts that have been designed
for the wheel and the vehicle. For safety rea-
sons, Mercedes-Benz recommends that you
only use wheel bolts which have been
approved for Mercedes-Benz vehicles and the
respective wheel.
! AMG vehicle with ceramic brake
discs: during removal and repositionin gof
the wheel, the wheel rim can striket he
ceramic-brake disc and damage it. There-
fore, take precautions and have asecond
person assist you. Alternatively, you can
use asecond centring pin. Positioning
awheel (example: vehicle with emer-
gency spare wheel)
X Clean the wheel and wheel hub contact
surfaces.
X Slide the wheel to be mounted ontot he
centring pin and push it on.
X Tighten the wheel bolts until they are fin-
ger-tight.
X Unscrew the centring pin.
X Tighten the last wheel bolt until it is finger-
tight.
X Vehicles with acollapsible emergency
spare wheel: inflate thecollapsible emer-
gency spare wheel (Y page 352).
Only then lower th evehicle.
Lowering th evehicle G
WARNING
The wheels could work loose if th ewheel nuts
and bolt sare not tightene dtothe specified
tightening torque. There is arisk of accident.
Have the tightening torque immediately
checked at aqualified specialist workshop
after awheel is changed.
! Vehicles with acollapsible emergency
spare wheel: Inflatethe collapsible emer-
gency spare wheel usin gthe tyreinflation
compressor before lowering th evehicle.
The rim could otherwise be damaged. 340
Changing
awheelWheels and tyres
Page 344 of 373
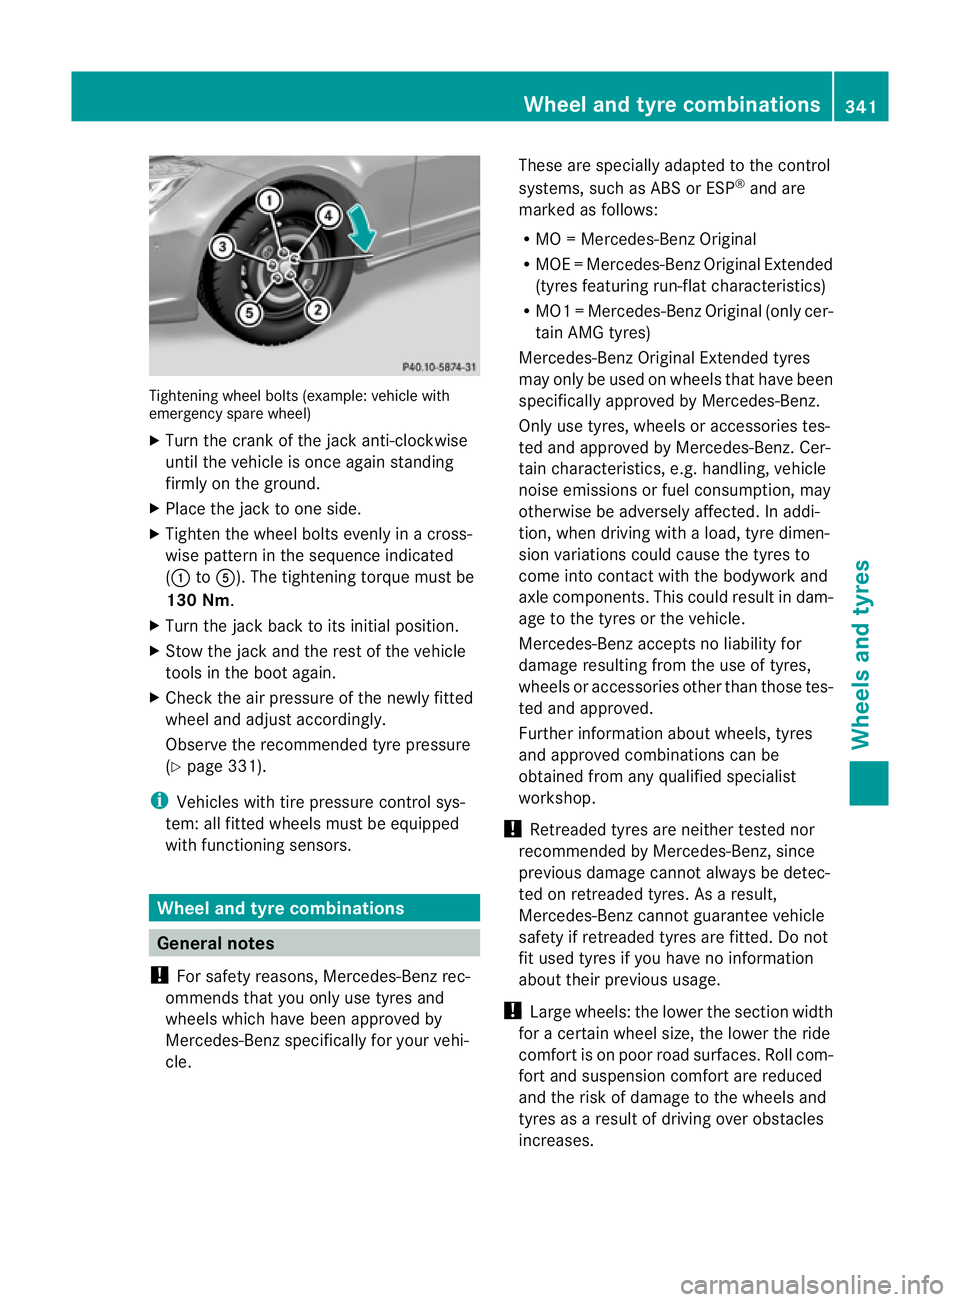
Tightenin
gwheel bolts (example: vehicle with
emergenc yspare wheel)
X Turn the crank of the jack anti-clockwise
until the vehicle is once again standing
firmly on the ground.
X Place the jack to one side.
X Tighten the wheel bolts evenly in across-
wise pattern in the sequence indicated
(: toA). The tightening torque must be
130 Nm.
X Turn the jack back to its initial position.
X Stow the jack and the rest of the vehicle
tools in the boot again.
X Check the air pressure of the newly fitted
wheel and adjust accordingly.
Observe the recommended tyre pressure
(Y page 331).
i Vehicles with tire pressure control sys-
tem: all fitted wheels must be equipped
with functioning sensors. Wheel and tyrec
ombinations General notes
! For safety reasons, Mercedes-Benz rec-
ommends that you only use tyres and
wheels which have been approved by
Mercedes-Benz specifically for your vehi-
cle. These are specially adapted to the control
systems, such as ABS or ESP
®
and are
marked as follows:
R MO =Mercedes-BenzO riginal
R MOE =Mercedes-Benz Original Extended
(tyres featuring run-flat characteristics)
R MO1 =Mercedes-BenzO riginal (only cer-
tain AMG tyres)
Mercedes-Benz Original Extended tyres
may only be usedonw heels that have been
specifically approved by Mercedes-Benz.
Only use tyres, wheels or accessories tes-
ted and approved by Mercedes-Benz. Cer-
tain characteristics, e.g. handling, vehicle
noise emissions or fuel consumption, may
otherwise be adversely affected. In addi-
tion, when driving with aload, tyre dimen-
sion variations could cause the tyres to
come into contact with the bodywork and
axle components.T his could result in dam-
age to the tyres or the vehicle.
Mercedes-Ben zaccepts no liability for
damag eresulting from the us eoftyres,
wheel soraccessorie sothe rthan those tes-
ted and approved.
Further information about wheels, tyres
and approved combinations can be
obtained from any qualified specialist
workshop.
! Retreaded tyres are neither tested nor
recommended by Mercedes-Benz, since
previous damage cannot always be detec-
ted on retreaded tyres. As aresult,
Mercedes-Ben zcannot guarante evehicle
safety if retreade dtyres are fitted. Do not
fit used tyres if you have no information
about their previous usage.
! Large wheels :the lower the section width
for acertain wheel size, the lower the ride
comfort is on poor road surfaces. Roll com-
fort and suspension comfort are reduced
and the risk of damage to the wheels and
tyres as aresult of driving over obstacles
increases. Wheel and tyrec
ombinations
341Wheels and tyres Z