2012 MERCEDES-BENZ CLS COUPE key
[x] Cancel search: keyPage 51 of 373
PRE-SAFE
®
(preventative occupant
protection) G
WARNING
When adjusting the seat, make sure that
nobody can become trapped.
! Make sure that there are no objectsint he
footwell or behind the seats when moving
the seat back. There is arisk that the seats
and/or the objectsc ould be damaged.
PRE-SAFE ®
takes pre-emptive measures to
protect occupants in certain hazardous sit-
uations.
PRE-SAFE ®
intervenes:
R when BAS activates, e.g. in emergency
braking situations
R when BAS PLUS intervenes powerfully on
vehicles with DISTRONIC PLUS
R if, on vehicles with DISTRONIC PLUS, the
radar sensor system detectsani mminent
dange rofcollision in certain situations
R in critical driving situations, e.g. when phys-
ical limits are exceeded and the vehicle
understeers or oversteers severely
PRE-SAFE ®
takes the following measures
depending on the hazardous situation detec-
ted:
R the front seat belts are pre-tensioned.
R vehicles with the memory function: the
front-passenger seat is adjusted if it is in an
unfavourable position.
R vehicles with amulticontour seat or active
multicontour seat: the air pressure in the
side bolsters of the seat cushion and back-
rest is increased.
R if the vehicle skids, the sliding sunroof/
panorama sliding sunroof and the side win-
dows are closed so that only asmall gap
remains.
If the hazardous situation passes without
resulting in an accident ,PRE-SAFE ®
slackens
the belt pretensioning. The air pressure in the
side bolsters on the multicontour seat/active
multicontour seat is reduced again. All set- tings made by PRE-SAFE
®
can then be
reversed.
If the seat belts are not released:
X Move the backrest or seat back slightly, but
only when the vehicle is stationary.
The belt pretensioning is reduced and the
lockin gmechanism is released.
More information about seat belt adjustment,
ac onvenienc efunction integrated into PRE-
SAFE ®
,c an be found under "Seat belt adjust-
ment"( Ypage 50). Seat belts
Important safety notes G
WARNING
As eat belt which is not worn correctly, or
which has not been engaged in the seat belt
buckle correctly, cannot provide the intended
level of protection. Under certain circumstan-
ces, this could cause severe or even fatal inju-
ries in the event of an accident.
Therefore, make sure that all occupant s—in
particular, pregnan twomen —wear their seat
belts correctly at all times.
R The seat belt must fit snugly on your body
and must not be twisted.Therefore, avoid
wearing bulky clothing, e.g. awinter coat.
The shoulder section of the belt must be
routed across the centre of your shoulder
—onnoa ccount across your neck or under
your arm —and pulled tight against your
uppe rbody. The lap belt must alwaysp ass
across your lap as low down as possible, i.e.
over your hip joints—n ot across your abdo-
men. If necessary, push the seat belt
slightly downwards and adjust it by pulling
it in the direction the seat belt retracts.
R Do not route the seat belt strap over sharp
or fragile objects. Please make sure that
such object sare not on or in your clothing,
e.g. spectacles, pens or keys etc. The seat
belt strap could become damaged and tear 48
Occupant safetySafety
Page 53 of 373
automaticall
yadjust to th eupper body
(Y page 50).
X If necessary, adjust the seat belt to the
appropriate height (Y page 50).
X If necessary, pull upwards on the shoulder
section of the seat belt to tighten the belt
across your body.
For more information about releasing the seat
belt with release button ?,see "Releasing
seat belts" (Y page 50).
Seat belt adjustment The seat-belt adjustment function adjusts the
driver' sand front-passenger seat belt to the
upper body of the occupants.
The belt strap is tightened slightly when:
R you engage the belt tongue in the belt
buckle and you then turn the key to position
2in the ignition lock.
R the key is in position 2in the ignition lock
and you then engage the belt tongue in the
buckle.
The seat-belt adjustment will apply acertain
tightenin gforc eifa ny slack is detected
between the occupant and the seat belt. Do
not hold on to the seat belt tightly while it is
adjusting. You can switc hthe belt adjustment
on and off in the on-board computer
(Y page 227).
The seat-belt adjustment is an integral part of
the PRE-SAFE ®
convenience function. More
information about PRE-SAFE ®
can be found
under "PRE-SAFE ®
(preventative occupant
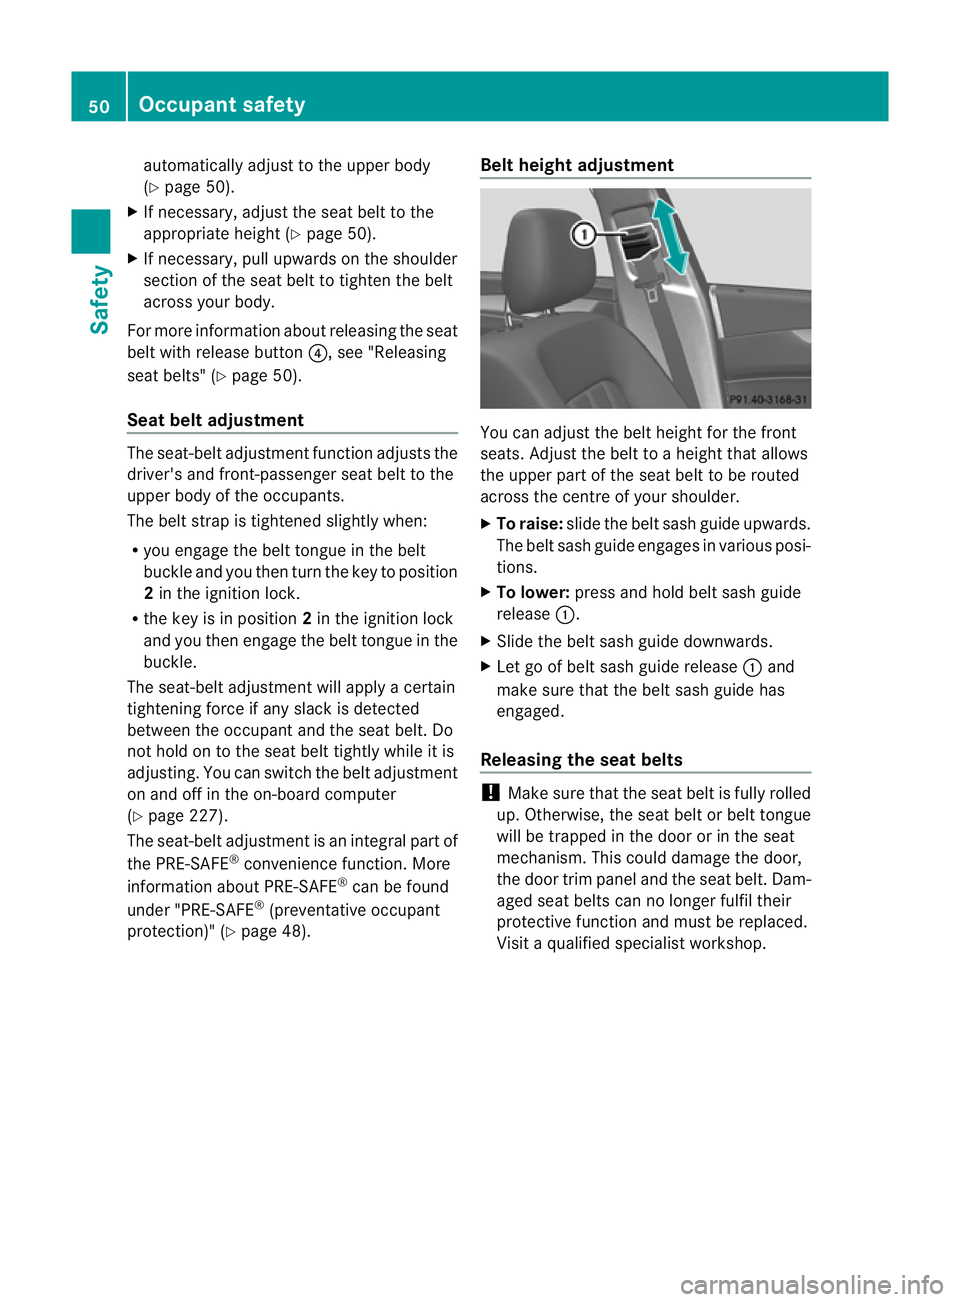
protection)" (Y page 48). Belt height adjustment You can adjust the belt height for the front
seats. Adjust the belt to
aheight that allows
the upper part of the seat belt to be routed
across the centre of your shoulder.
X To raise: slide the belt sash guide upwards.
The belt sash guide engages in various posi-
tions.
X To lower: press and hold belt sash guide
release :.
X Slide the belt sash guide downwards.
X Let go of belt sash guide release :and
make sure that the belt sash guide has
engaged.
Releasing the seat belts !
Make sure that the seat belt is fully rolled
up. Otherwise, the seat belt or belt tongue
will be trapped in the door or in the seat
mechanism. This could damage the door,
the door trim panel and the seat belt. Dam-
aged seat belts can no longer fulfil their
protective function and must be replaced.
Visit aqualified specialist workshop. 50
Occupant safetySafety
Page 56 of 373
seat, you must move the front-passenger
seat as far back as possible.
R children must never travel sitting on the lap
of another occupant. Due to the forces
which occur in the event of asudden
change of direction, heavy braking or an
accident, it wouldn ot be possible to
restrain the child. The child could be thrown
against parts of the vehicle interior and be
seriously or even fatally injured. G
WARNING
The child restraint system cannot perform its
protective function if it is not correctly fitted
to as uitable vehicle seat. The child cannot be
restrained in the event of an accident, heavy
braking or sudden changes of direction. The
child could be seriously or even fatally injured.
For this reason, when fitting achild restraint
system, observe the manufacturer's installa-
tion instructions and the correct use of the
child restraint system.
Child restraint systems should be fitted to the
rear seats. Children are generally better pro-
tected there.
The entire base of the child restraint system
must always rest on the seat cushion. There-
fore, never place objects, e.g. acushion,
under the child restraint system.
Only use child restraint systems with the orig-
inal cover designed for them. Only replace
damaged covers with genuine Mercedes-Benz
covers.
We recommend the use of child restraint sys-
tems which have been approved for
Mercedes-Benz vehicles. G
WARNING
Do not leave children unsupervised in the
vehicle, even if they are secured in achild
restraint system. They could injure them-
selves on parts of the vehicle. They could also
be seriously or even fatally injured by pro-
longed exposure to extreme heat or cold.
Do not expose the child restraint system to
direct sunlight. Parts of the child restraint sys- tem could heat up and the child could burn
herself/himself on them.
If
ac hild opens adoor, the child or other per-
sons could be injured as aresult. They could
get out and injure themselves or be injured by
ap assing vehicle.
Observe the general notes on the HOLD func-
tion, which can be found under the same key-
word. G
WARNING
Unsecured or incorrectly positioned loads
increase the risk of injury for children and all
other occupants in the event of:
R an accident
R sudden braking
R as udden change of direction
Do not transport heavy or hard objects in the
vehicle interior unless they are secured. You
will find further information under "Loading
guidelines" in the index.
If ac hild is travelling in your vehicle, secure
the child using achild restraint system which
is recommended for Mercedes-Benz vehicles.
The child restraint system must be appropri-
ate to the age, weight and size of the child.
Ideallyt he child restraint system should be
installed on asuitabler ear seat. Make sure
that the child is secured for the trip.
Mercedes-Benz recommends that you use
the listed child restraint systems
(Y page 60). You can obtain further infor-
mation aboutt he correct child restraint sys-
tem from any Mercedes-Ben zService Centre.
i It is advisabletou se Mercedes-Benzcare
product stoclean child restraint systems.
You can obtain informatio nabout this at
any Mercedes-Benz Service Centre. Children in thev
ehicle
53Safety Z
Page 58 of 373
R
only use aforward-facin gchild restraint
system on the front-passenger seat and
move the front-passenger seat to the rear-
most position.
R have the automatic child seat recognition
checked at aqualified specialist workshop.
To ensure that the automatic child seat rec-
ognition on the front-passenger seat func-
tions/communicates correctly, never place
objects, e.g. acushion, under the child
restraint system. The entire base of the child
restraint system must always rest on the seat
cushion. An incorrectly fitted child restraint
system cannot perform its intended protec-
tive function in the event of an accident, and
could lead to injuries. G
WARNING
Do not place electronic devices on the front-
passenger seat, e.g.:
R laptops, when switched on
R mobile phones
R cards with transponders, e.g. ski passes or
access cards
Signals from electronic equipment can cause
interference in the automatic child seat rec-
ognition sensor system. This can lead to a
system malfunction. This may cause the
4 PASSENGER AIRBAG OFF indicator
lamp to light up without there being achild
seat with transponders for automatic child
seat recognition fitted. The front-passenger
airbag will not then deploy during an accident.
It is also possible that the 6SRS warning
lamp lights up and/or the 4PASSENGER
AIRBAG OFF indicator lamp does not light up
briefly when you turn the key in the ignition
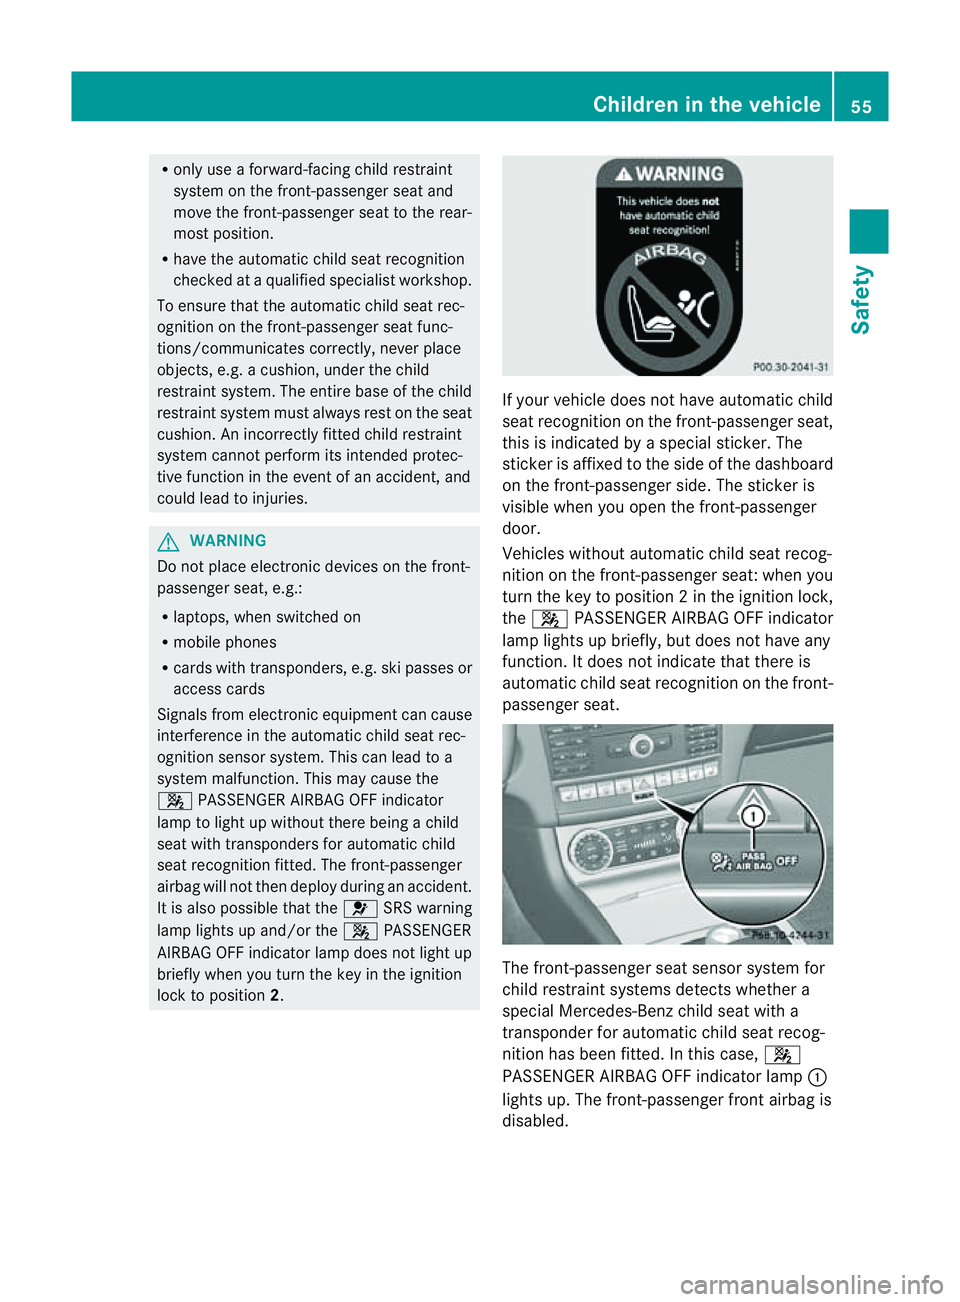
lock to position 2. If your vehicle does not have automatic child
seat recognition on the front-passenger seat,
this is indicated by
aspecial sticker. The
sticker is affixed to the side of the dashboard
on the front-passenger side. The sticker is
visible when you open the front-passenger
door.
Vehicles without automatic child seat recog-
nition on the front-passenger seat: when you
turn the key to position 2inthe ignition lock,
the 4 PASSENGER AIRBAG OFF indicator
lamp lights up briefly, but does not have any
function. It does not indicate that there is
automatic child seat recognition on the front-
passenger seat. The front-passenger seat sensor system for
child restraint systems detectsw
hether a
special Mercedes-Ben zchild seat with a
transponder for automatic child seat recog-
nition has been fitted. In this case, 4
PASSENGER AIRBAG OFF indicator lamp :
lights up. The front-passenger front airbag is
disabled. Children in the vehicle
55Safety Z
Page 61 of 373
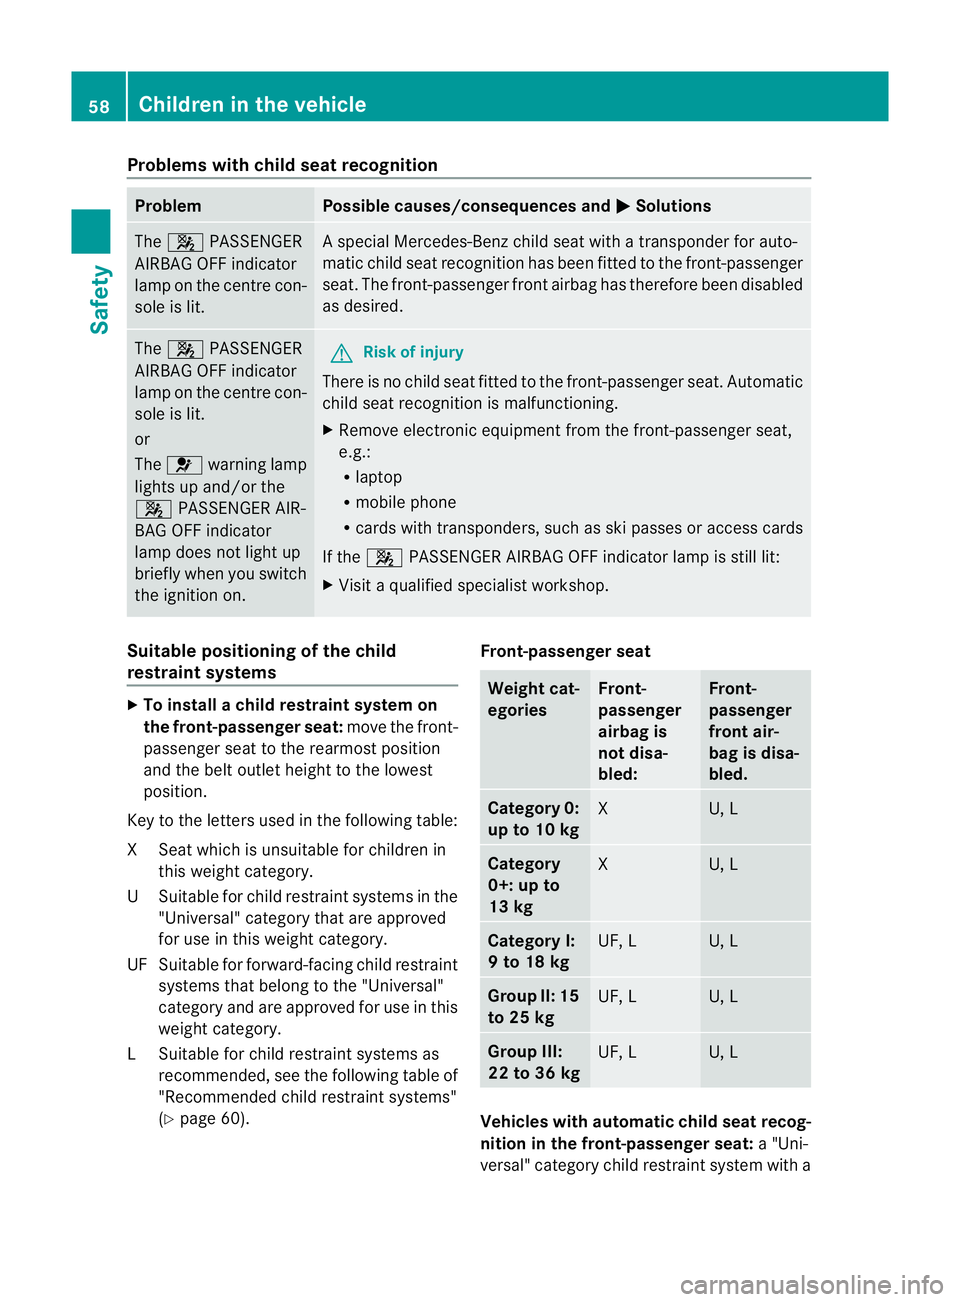
Problems with child seat recognition
Problem Possible causes/consequences and
M Solutions
The
4 PASSENGER
AIRBAGO FF indicator
lamp on the centre con-
sole is lit. As
pecial Mercedes-Benz child seat with atransponder for auto-
matic child seat recognition has been fitted to the front-passenger
seat. The front-passenger fron tairbag has therefore been disabled
as desired. The
4 PASSENGER
AIRBA GOFF indicator
lamp on the centr econ-
sole is lit.
or
The 6 warnin glamp
light supa nd/or the
4 PASSENGER AIR-
BA GO FF indicator
lamp does not light up
briefly when you switch
the ignition on. G
Risk of injury
There is no child seat fitted to the front-passenger seat .Automatic
child seat recognition is malfunctioning.
X Remove electronic equipmen tfrom the front-passenge rseat,
e.g.:
R laptop
R mobile phone
R cards with transponders ,such as ski passes or access cards
If the 4 PASSENGER AIRBA GOFF indicator lamp is still lit:
X Visit aqualified specialist workshop. Suitable positioning of the child
restraint systems
X
To install achild restraint system on
the front-passenger seat: move the front-
passenger seat to the rearmost position
and the belt outlet height to the lowest
position.
Key to the letters used in the following table:
XS eat which is unsuitable for children in
this weight category.
US uitable for child restraint systems in the
"Universal" categor ythata re approved
for use in this weigh tcategory.
UF Suitable for forward-facing child restraint systems that belon gtothe"Universal"
category and are approved for use in this
weight category.
LS uitable for child restraint systems as
recommended, see th efollowin gtable of
"Recommended child restraint systems"
(Y page 60). Front-passenger seat Weight cat-
egories Front-
passenger
airbag is
not disa-
bled: Front-
passenger
front air-
bag is disa-
bled. Categor
y0:
up to 10 kg X U, L
Category
0+: up to
13 kg
X U, L
Category I:
9to18kg
UF, L U, L
Group II:15
to 25 kg
UF, L U, L
Grou
pIII:
22 to 36 kg UF, L U, L
Vehicles with automatic child seat recog-
nition in the front-passenger seat:
a"Uni-
versal" category child restraint system with a 58
Children in thev
ehicleSafety
Page 62 of 373
transponder for automatic child seat recog-
nition must be fitted when the front-
passenge rairbag is disabled. The 4
PASSENGER AIRBA GOFF indicator lamp
must be lit.
Rea rseats Weight categories Left, right
Group 0: up to
10 kg
U, L
Category 0+: up to
13 kg
U, L
Category I:
9to
18 kg U, L
Category II: 15 to
25 kg
U, L
Group III: 22 to
36 kg
U, L
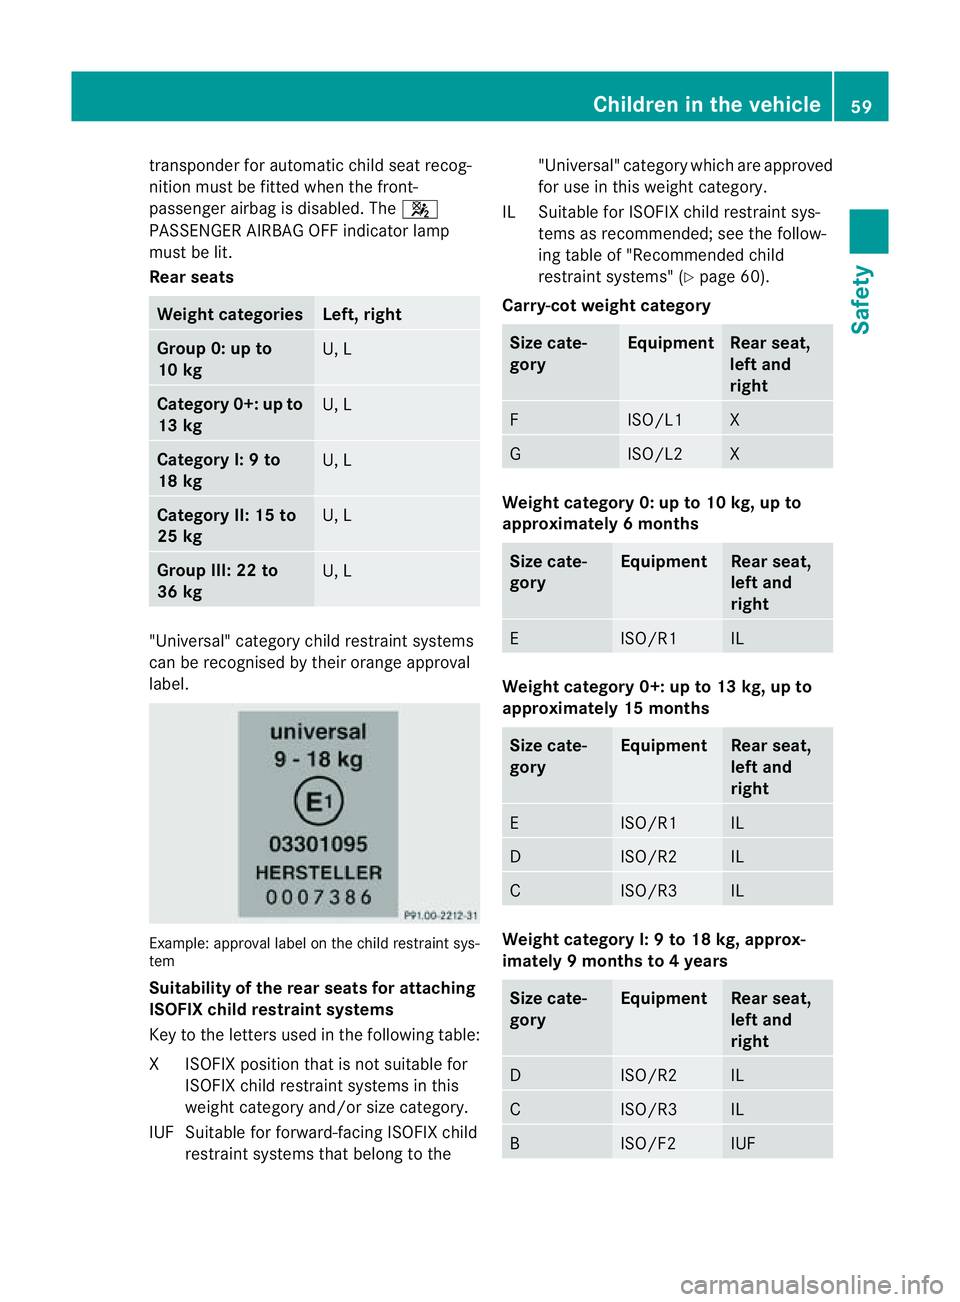
"Universal" category child restraint systems
can be recognised by their orange approval
label.
Example: approval label on the child restrain
tsys-
tem
Suitabilit yofthe re ar seat sfor attaching
ISOFIX child restraint systems
Key to th eletter sused in th efollowing table:
XI SOFIX position tha tisnot suitablef or
ISOFIX child restraint systems in this
weight category and/or size category.
IUF Suitable for forward-facing ISOFIX child restraint systems that belong to the "Universal" category which are approved
for use in this weight category.
IL Suitable for ISOFIX child restraint sys- tems as recommended; see the follow-
ing table of "Recommended child
restraint systems" (Y page 60).
Carry-cot weight category Size cate-
gory Equipment Rear seat,
left and
right
F ISO/L1 X
G ISO/L2 X
Weight category 0: up to 10 kg, up to
approximately 6months Size cate-
gory Equipment Rear seat,
left and
right
E ISO/R1 IL
Weight category 0+: up to 13 kg, up to
approximately 15 months Size cate-
gory Equipment Rear seat,
left and
right
E ISO/R1 IL
D ISO/R2 IL
C ISO/R3 IL
Weight category I:
9to18kg, approx-
imately 9months to 4years Size cate-
gory Equipment Rear seat,
left and
right
D ISO/R2 IL
C ISO/R3 IL
B ISO/F2 IUFChildren in the vehicle
59Safety Z
Page 73 of 373
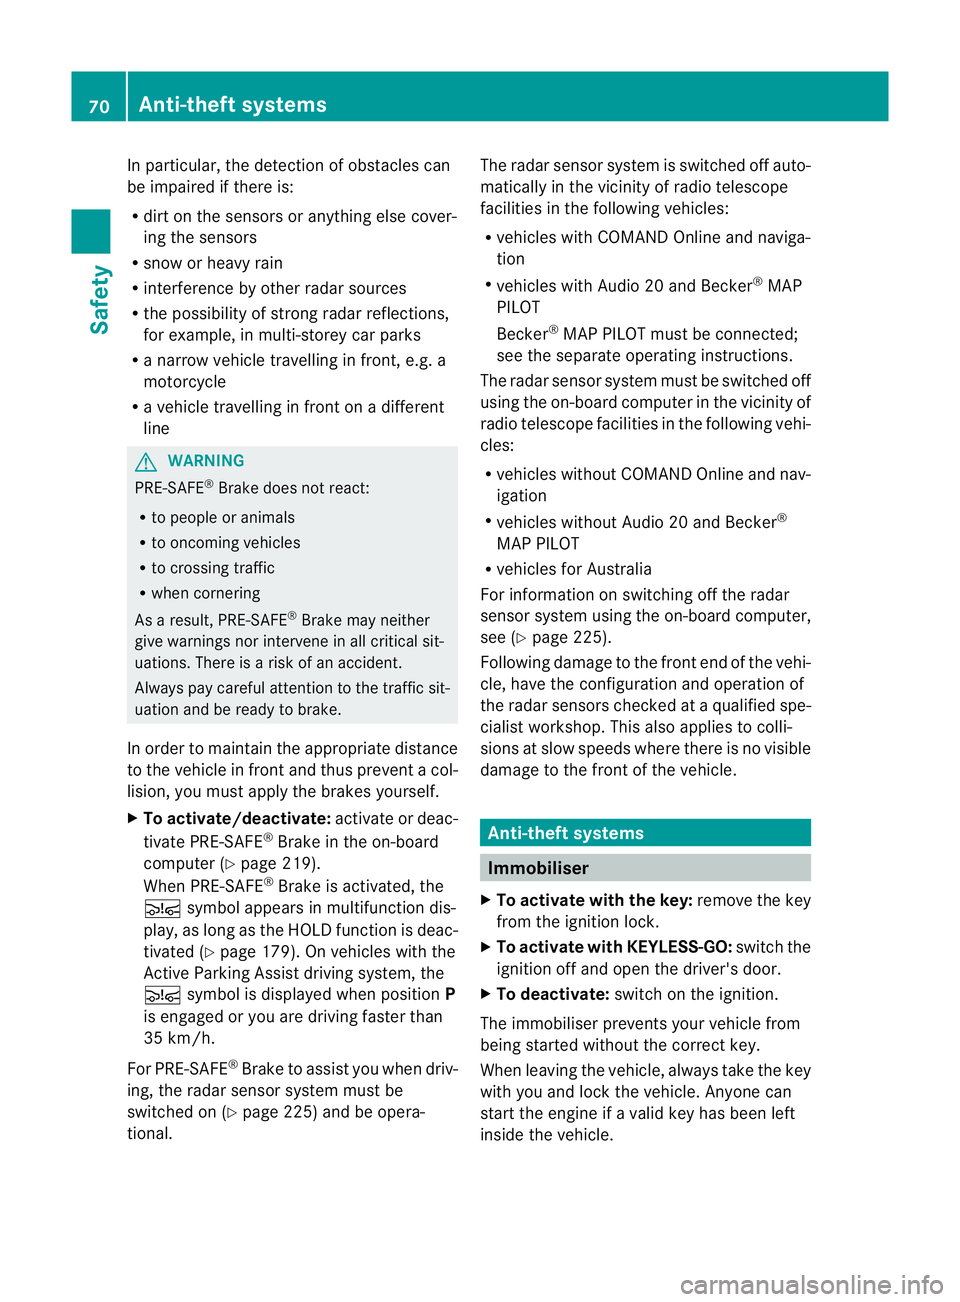
In particular, the detection of obstacle
scan
be impaired if there is:
R dirt on the sensors or anything else cover-
ing the sensors
R snow or heavy rain
R interference by other radars ources
R the possibility of strongr adar reflections,
for example, in multi-storey car parks
R an arrow vehicle travelling in front,e .g. a
motorcycle
R av ehicle travelling in front on adifferent
line G
WARNING
PRE-SAFE ®
Brake does not react:
R to people or animals
R to oncoming vehicles
R to crossin gtraffic
R when cornering
As aresult, PRE-SAFE ®
Brake may neither
give warnings nor intervene in all critical sit-
uations. There is arisk of an accident.
Always pay careful attention to the traffic sit-
uation and be ready to brake.
In order to maintain the appropriate distance
to the vehicle in front and thus prevent acol-
lision, you must apply the brakes yourself.
X To activate/deactivate: activate or deac-
tivate PRE-SAFE ®
Brake in the on-board
computer (Y page 219).
When PRE-SAFE ®
Brake is activated, the
Ä symbol appears in multifunction dis-
play, as long as the HOLD function is deac-
tivated (Y page 179). On vehicles with the
Active Parking Assist driving system, the
Ä symbol is displayed when position P
is engaged or you are driving faster than
35 km/h.
For PRE-SAFE ®
Brake to assist you when driv-
ing, the radar sensor system must be
switched on (Y page 225) and be opera-
tional. The radar sensor system is switched off auto-
matically in the vicinit
yofradio telescope
facilities in the following vehicles:
R vehicles with COMAND Online and naviga-
tion
R vehicles with Audio 20 and Becker ®
MAP
PILOT
Becker ®
MAP PILOT must be connected;
see the separate operating instructions.
The radar sensor system must be switched off
using the on-board computer in the vicinit yof
radio telescope facilities in the following vehi-
cles:
R vehicles without COMAND Online and nav-
igation
R vehicles without Audio 20 and Becker ®
MAP PILOT
R vehicles for Australia
For information on switching off the radar
sensor system using the on-board computer,
see (Y page 225).
Following damage to the front end of the vehi-
cle, have the configuration and operation of
the radar sensors checked at aqualified spe-
cialist workshop. This also applies to colli-
sions at slow speeds where there is no visible
damage to the front of the vehicle. Anti-theft systems
Immobiliser
X To activat ewith th ekey: remove th ekey
fro mt heignitio nlock.
X To activat ewith KEYLESS-GO: switch the
ignitio noff and open the driver's door.
X To deactivate: switch on the ignition.
The immobiliser prevents you rvehicle from
being started without the correct key.
When leaving the vehicle, alway stake the key
with you and lock the vehicle. Anyone can
start the engin eifavalid key has been left
inside the vehicle. 70
Anti-theft systemsSafety
Page 74 of 373
i
The immobiliser is alway sdeactivated
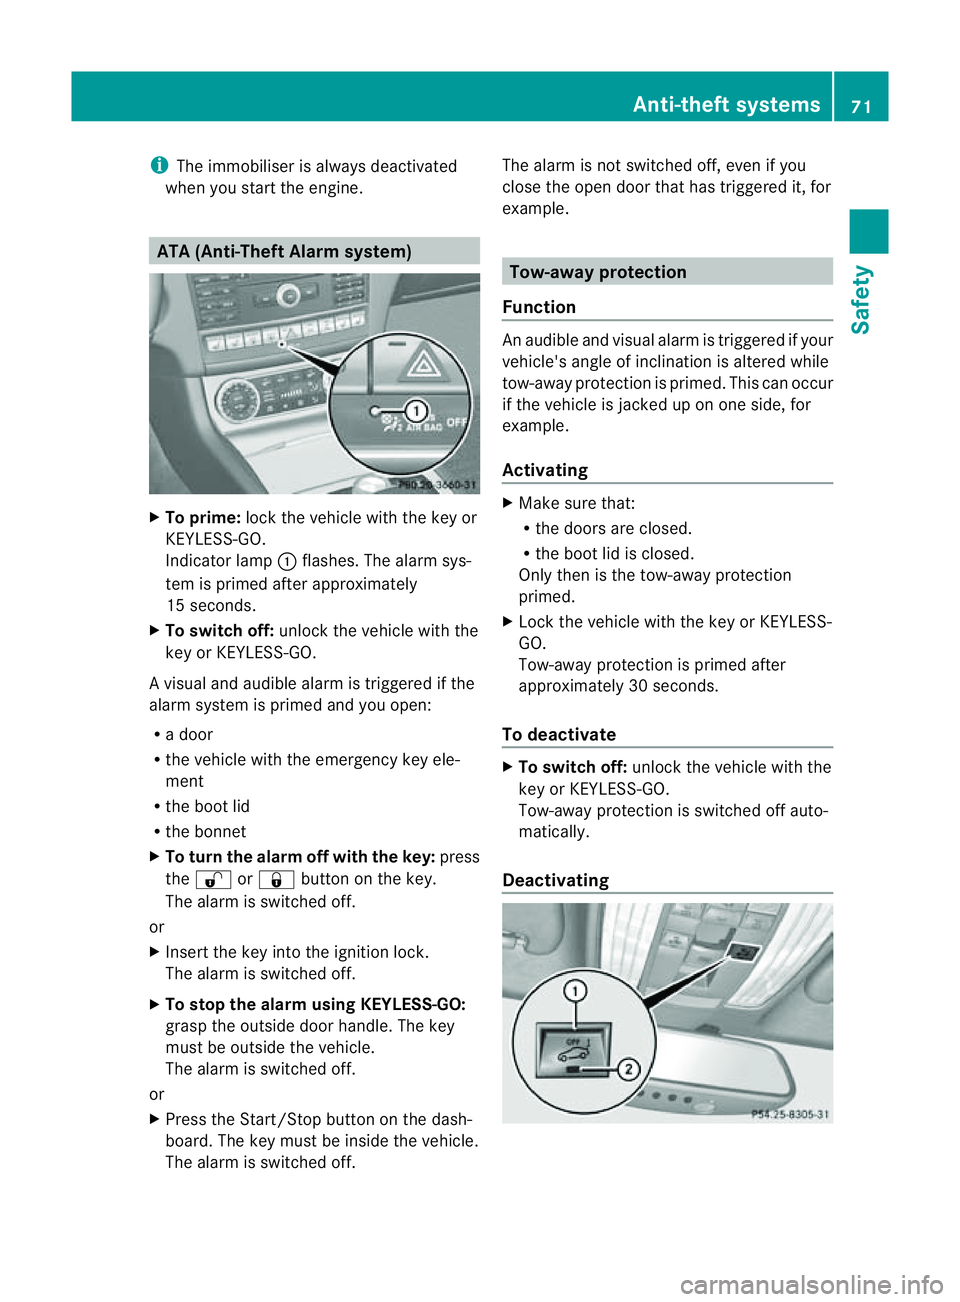
when you start the engine. ATA (Anti-Theft Alarm system)
X
To prime: lock the vehicle with the key or
KEYLESS-GO.
Indicator lamp :flashes. The alarm sys-
tem is primed after approximately
15 seconds.
X To switch off: unlock the vehicle with the
key or KEYLESS-GO.
Av isual and audible alarm is triggere difthe
alarm system is prime dand you open:
R ad oor
R the vehicle with the emergency key ele-
ment
R the boot lid
R the bonnet
X To turn th ealarmo ff with th ekey: press
the % or& button on th ekey.
The alarm is switche doff.
or
X Insert th ekey int othe ignitio nlock.
The alarm is switche doff.
X To stop th ealarm using KEYLESS-GO:
grasp th eoutside door handle. The key
must be outside th evehicle.
The alarm is switche doff.
or
X Pres sthe Start/Sto pbutton on th edash-
board. The key must be inside th evehicle.
The alarm is switche doff. The alarm is not switche
doff,e ven if you
clos ethe open door that has triggered it, for
example. Tow-away protection
Function An audible and visual alarm is triggered if your
vehicle'
sangle of inclination is altered while
tow-away protection is primed. This can occur
if th evehicle is jacked up on one side, for
example.
Activating X
Make sure that:
R
thed oor sare closed.
R theb oot lid is closed.
Only then is th etow -away protection
primed.
X Loc kthe vehicle with th ekey or KEYLESS-
GO.
Tow-away protection is primed after
approximately 30 seconds.
To deactivate X
To switch off: unlockthe vehicle with the
key or KEYLESS-GO.
Tow-away protection is switched off auto-
matically.
Deactivating Anti-theft systems
71Safety Z