2012 MERCEDES-BENZ B-CLASS tow
[x] Cancel search: towPage 265 of 340
Garage door system with a rolling code:
indicator lamp
: flashes green.
i The transmitter will transmit a signal as
long as the button is pressed. The
transmission is halted after a maximum of
ten seconds and indicator lamp : lights
up yellow. Press
button ;, = or ? again
if necessary.
Clearing the memory X
Turn the SmartKey to position 2 in the
ignition lock.
X Press buttons ; and ?.
The indicator lamp lights up yellow.
X Press and hold buttons ; and ?
until the
indicator lamp turns green.
i Make sure that you clear the memory of
the integrated garage door opener before
selling the vehicle. Compass
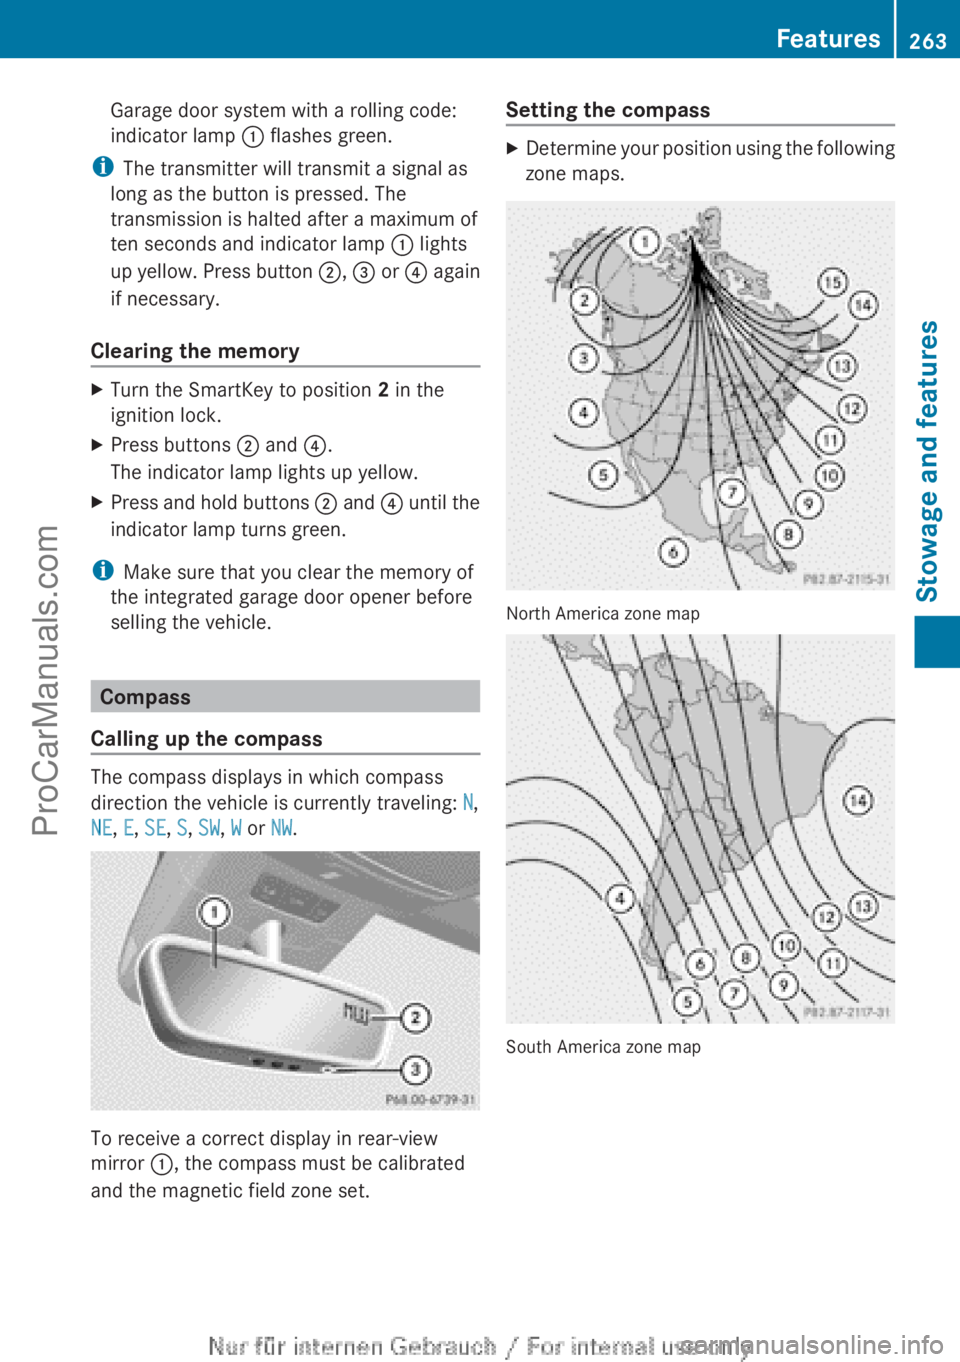
Calling up the compass The compass displays in which compass
direction the vehicle is currently traveling: N,
NE, E, SE, S, SW, W or NW.
To receive a correct display in rear-view
mirror :, the compass must be calibrated
and the magnetic field zone set. Setting the compass X
Determine your position using the following
zone maps. North America zone map
South America zone map Features
263
Stowage and features Z
ProCarManuals.com
Page 266 of 340
X
Push a round pen into opening
=(Y page 263) for approximately three
seconds.
The zone currently selected appears in
compass display ;(Y page 263).
X To select the zone: push
a round pen into
opening =(Y page 263) until the desired
zone is selected.
If, after a few seconds, the display in
compass display ;(Y page 263) changes
direction, the zone has been selected.
Calibrating the compass X
Make sure that there is sufficient space for
you to drive in a circle without impeding
traffic.
In order to calibrate the compass correctly,
do the following:
R calibrate the compass in the open and not
in the vicinity of steel structures or high-
voltage transmission lines.
R switch off electrical
consumers such as the
climate control, windshield wipers or rear
window defroster.
R close all doors and the tailgate.
X Switch on the ignition.
X Push a round pen into opening
=(Y page 263) for approximately six
seconds, until symbol C is shown in
compass display ;(Y page 263).
X Drive your vehicle in a full circle at
approximately 3 mph (5 km/h) to 6 mph
(10 km/h
).
When the calibration has successfully been
completed, the current direction is shown
in compass display ;(Y page 263).Floormat on the driver's side
G
WARNING
Objects in the driver's footwell can restrict the
pedal travel or obstruct a depressed pedal. The operating and road safety of the vehicle
is jeopardized. There is a risk of an accident.
Make sure that all objects in the vehicle are
stowed correctly, and that they cannot enter
the driver's footwell. Install the floormats
securely and as specified in order to ensure
sufficient clearance
for
the pedals. Do not use
loose floormats. X
Slide the seat backwards.
X To install: place the floormat in the
footwell.
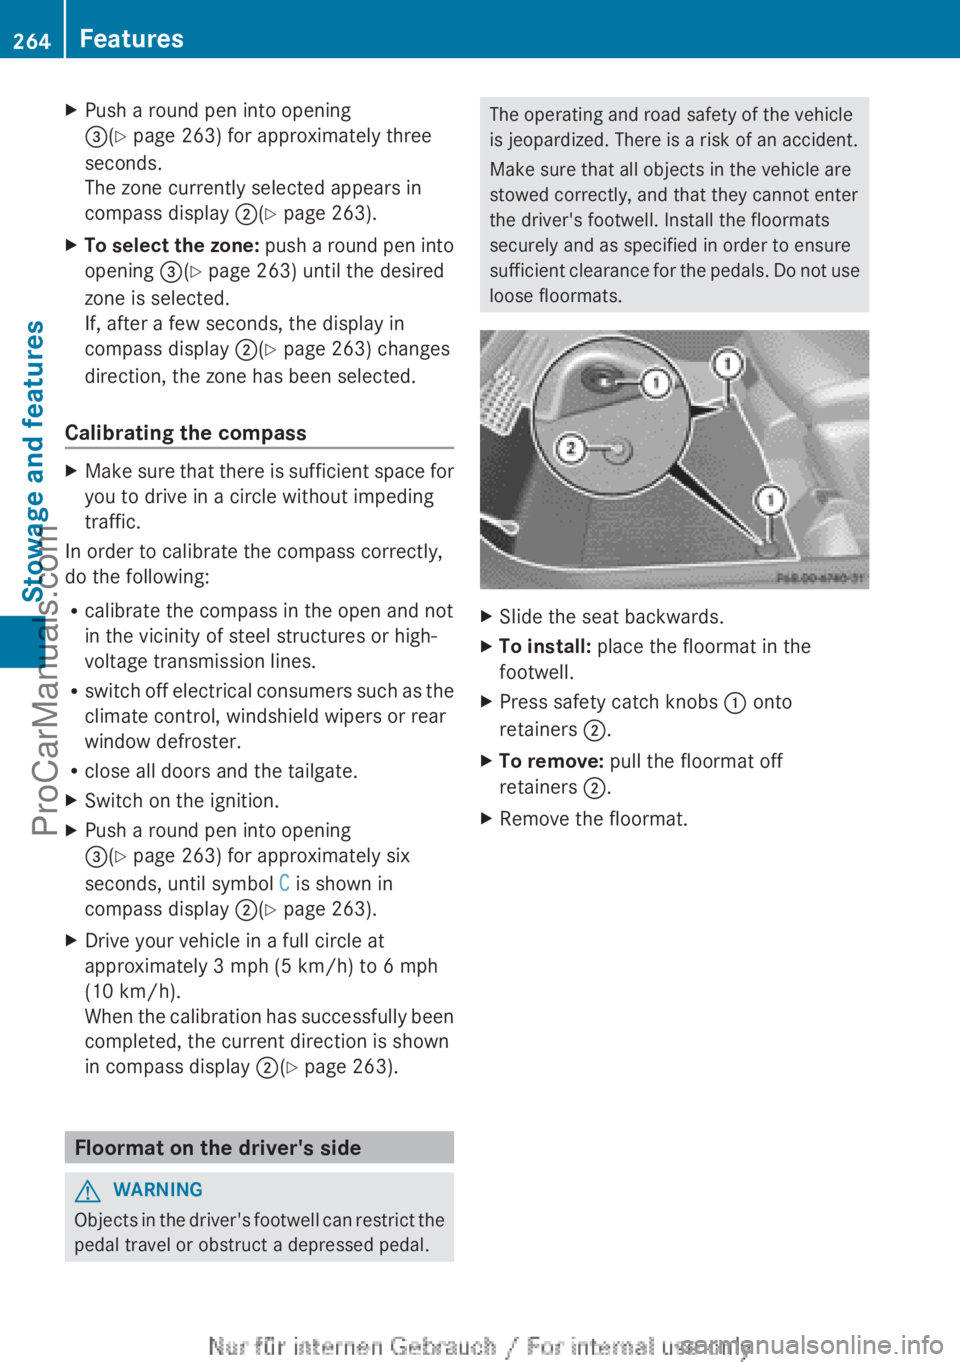
X Press safety catch knobs : onto
retainers ;.
X To remove: pull the floormat off
retainers ;.
X Remove the floormat.264
Features
Stowage and features
ProCarManuals.com
Page 273 of 340
Special service requirements
The specified
maintenance
interval takes only
the normal operation of the vehicle into
account. Under arduous operating conditions
or increased load on the vehicle,
maintenance work must be carried out more
frequently, for example:
R regular city driving with frequent
intermediate stops
R if the vehicle is primarily used to travel
short distances
R use in mountainous terrain or on poor road
surfaces
R if the engine is often left idling for long
periods
Under these or similar conditions, have, for
example, the air filter, engine oil and oil filter
replaced or changed more frequently. Under
arduous operating conditions, the tires must
be checked more often. Further information
can be obtained at a qualified specialist
workshop, e.g. an authorized Mercedes-Benz
Center.
Driving abroad
An extensive Mercedes-Benz Service network
is also available in other countries. You can
obtain further information from any
authorized Mercedes-Benz Center. Care
General notes
H
Environmental note
Dispose of empty packaging and cleaning
cloths in an environmentally responsible
manner.
! For cleaning your vehicle, do not use any
of the following:
R dry, rough or hard cloths
R abrasive cleaning agents
R solvents
R cleaning agents containing solvents Do not scrub.
Do not touch the surfaces or protective
films with hard objects, e.g. a ring or ice
scraper. You could otherwise scratch or
damage the surfaces and protective film.
! Do not park the vehicle for an extended
period straight after
cleaning it, particularly
after having cleaned the wheels with wheel
cleaner. Wheel cleaners could cause
increased corrosion of the brake discs and
brake pads/linings. For this reason, you
should drive for a few minutes after
cleaning. Braking heats the brake discs and
the brake pads/linings, thus drying them.
The vehicle can then be parked.
Regular care of your vehicle is a condition for
retaining the quality in the long term.
Use care products and cleaning agents
recommended and approved by Mercedes-
Benz. Exterior care
Automatic car wash G
WARNING
Braking efficiency is reduced after washing
the vehicle. There is a risk of an accident.
After the vehicle has been washed, brake
carefully while paying attention to the traffic
conditions until full
braking power is restored.
! If DISTRONIC PLUS or the HOLD function
is activated, the vehicle brakes
automatically in certain situations. To
prevent damage to the vehicle, deactivate
DISTRONIC PLUS and the HOLD function in
the following or other similar situations:
R when towing the vehicle
R in the car wash
! Never clean your vehicle in a Touchless
Automatic Car Wash as these use special
cleaning agents. These cleaning agents can
damage the paintwork or plastic parts. Care
271
Maintenance and care Z
ProCarManuals.com
Page 274 of 340
!
Make sure that the automatic
transmission is in
position N when washing
your vehicle in a tow-through car wash. The
vehicle could be damaged if the
transmission is in another position.
! Make sure that:
R the side windows and the sliding sunroof
are fully closed.
R the ventilation/heating is switched off
(the OFF button has been pressed/the
airflow control is set to position 0).
R the windshield wiper switch is in position
0.
Otherwise, the vehicle might be damaged.
You can wash the vehicle in an automatic car
wash from the very start.
If the vehicle is very dirty, pre-wash it before
cleaning it in an automatic car wash.
After using an automatic car wash, wipe off
wax from the windshield and the wiper
blades. This will prevent smears and reduce
wiping noises caused by residue on the
windshield.
Washing by hand In some countries, washing by hand is only
allowed at wash bays that are specially
designed for this purpose. Observe the legal
requirements in all countries concerned.
X
Do not use hot water and do not wash the
vehicle in direct sunlight.
X Use a soft sponge to clean.
X Use a mild cleaning agent, such as a car
shampoo approved by Mercedes-Benz.
X Thoroughly hose down the vehicle with a
gentle jet of water.
X Do not point the water jet directly towards
the air inlet.
X Use plenty of water and rinse out the
sponge frequently. X
Rinse the vehicle with clean water and dry
thoroughly with a chamois.
X Do not let the cleaning agent dry on the
paintwork.
When using the vehicle in winter, remove all
traces of road salt deposits carefully and as
soon as possible.
Power washers G
WARNING
The water jet from a circular jet nozzle (dirt
blasters) can cause
invisible exterior damage
to the tires or chassis components.
Components damaged in this way may fail
unexpectedly. There is a risk of an accident.
Do not use power washers with circular jet
nozzles to clean the vehicle. Have damaged
tires or chassis components replaced
immediately.
! Always maintain a distance of at least
11.8 in (30 cm) between the vehicle and the
power washer nozzle. Information about
the correct distance is available from the
equipment manufacturer.
Move the power washer nozzle around
when cleaning your vehicle.
Do not aim directly at any of the following:
R tires
R door gaps, roof gaps, joints, etc.
R electrical components
R battery
R connectors
R lights
R seals
R trim
R ventilation slots
Damaged seals or electrical components
can lead to leaks or failures. 272
Care
Maintenance and care
ProCarManuals.com
Page 281 of 340
Useful information ............................
280
Where will I find...? ........................... 280
Flat tire .............................................. 281
Battery (vehicle) ................................ 285
Jump-starting .................................... 289
Towing and tow-starting .................. 291
Fuses .................................................. 294 279Breakdown assistance
ProCarManuals.com
Page 282 of 340
Useful information
i This Operator's Manual describes all
models and all standard and optional
equipment of your vehicle available at the
time of publication of the Operator's
Manual. Country-specific differences are
possible. Please note
that your vehicle may
not be equipped with all features
described. This also applies to safety-
related systems and functions.
i Read the information on qualified
specialist workshops: ( Y page 24).Where will I find...?
First-aid kit
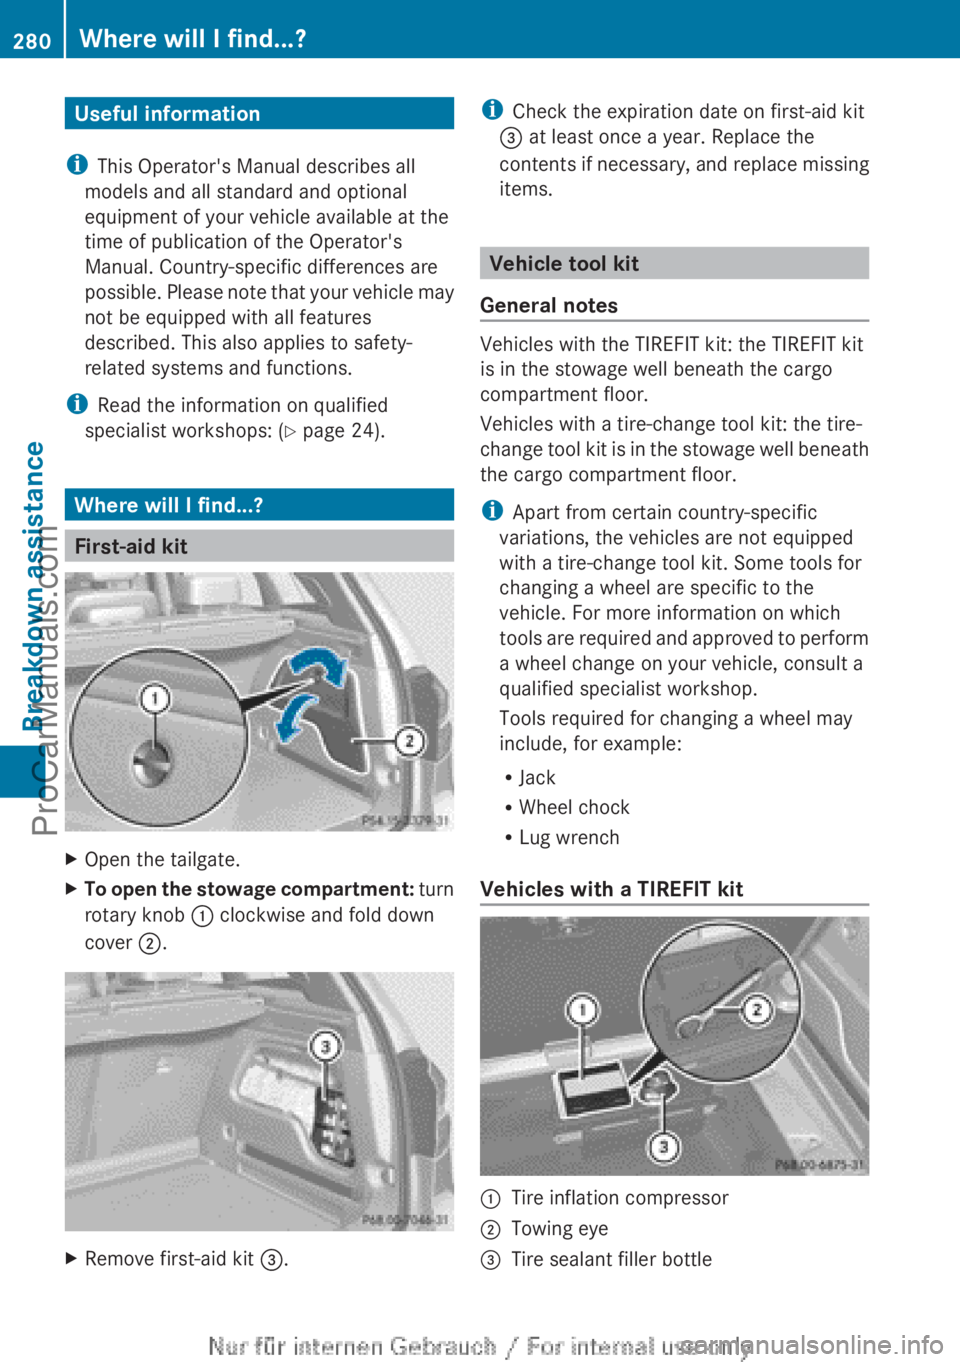
X
Open the tailgate.
X To open the stowage compartment: turn
rotary knob :
clockwise and fold down
cover ;. X
Remove first-aid kit =. i
Check the expiration date on first-aid kit
= at least once a year. Replace the
contents if necessary,
and replace missing
items. Vehicle tool kit
General notes Vehicles with the TIREFIT kit: the TIREFIT kit
is in the stowage well beneath the cargo
compartment floor.
Vehicles with a tire-change tool kit: the tire-
change
tool
kit
is in the stowage well beneath
the cargo compartment floor.
i Apart from certain country-specific
variations, the vehicles are not equipped
with a tire-change tool kit. Some tools for
changing a wheel are specific to the
vehicle. For more information on which
tools are required and approved to perform
a wheel change on your vehicle, consult a
qualified specialist workshop.
Tools required for changing a wheel may
include, for example:
R Jack
R Wheel chock
R Lug wrench
Vehicles with a TIREFIT kit :
Tire inflation compressor
; Towing eye
= Tire sealant filler bottle280
Where will I find...?
Breakdown assistance
ProCarManuals.com
Page 283 of 340

X
Open the tailgate.
X Lift the cargo compartment floor up
(Y page 246).
i Towing eye ; is located under tire
inflation compressor :.
Vehicles with a tire-change tool kit X
Open the tailgate.
X Lift the cargo compartment floor up
(Y page 246).
X Remove the tire-change tool kit.
The tire-change tool kit contains:
R Jack
R Lug wrench
R One pair of gloves
R Folding wheel chock Flat tire
Preparing the vehicle
Your vehicle may be equipped with:
R MOExtended tires (tires with run-flat
properties) ( Y page 281)
Vehicle preparation is not necessary on
vehicles with MOExtended tires.
R a TIREFIT kit (Y page 280)
Information on changing/mounting a wheel
(Y page 319).
X Stop the vehicle on solid, non-slippery and
level ground, as far away as possible from
traffic.
X Switch on the hazard warning lamps.
X Secure the vehicle against rolling away
(Y page 149).
X If possible, bring the front wheels into the
straight-ahead position.
X Switch off the engine.
X Remove the SmartKey from the ignition
lock. X
All occupants must get out of the vehicle.
Make sure that
they are not endangered as
they do so.
X Make sure that no one is near the danger
area while a wheel is being changed.
Anyone who is not directly assisting in the
wheel change should, for example, stand
behind the barrier.
X Get out of the vehicle. Pay attention to
traffic conditions when doing so.
X Close the driver's door.
i Vehicles equipped with
MOExtended tires
are not equipped with a TIREFIT kit at the
factory. It is therefore recommended that
you additionally equip your vehicle with a
TIREFIT kit if you mount tires that do not
feature run-flat properties, e.g. winter tires.
A TIREFIT kit can be obtained from a
qualified specialist workshop. MOExtended tires (tires with run-flat
properties)
General notes With MOExtended tires (tires with run flat
characteristics), you can continue to drive
your vehicle even if there is a total loss of
pressure in one or more tires. The affected
tire must
not
show any clearly visible damage.
You can recognize MOExtended tires by the
MOExtended marking which appears on the
sidewall of the tire. You will find this marking
next to the tire size designation, the load-
bearing capacity and the speed index
(Y page 313).
MOExtended tires may only be used in
conjunction with an active tire pressure loss
warning system.
If the pressure loss warning message
appears in the multifunction display:
R Observe the instructions in the display
messages ( Y page 219).
R Check the tire for damage.
R If driving on, observe the following notes. Flat tire
281
Breakdown assistance
ProCarManuals.com
Page 285 of 340
If you come into contact with the tire sealant,
observe the following:
R
Rinse off the tire sealant from your skin
immediately with water.
R If the tire sealant comes into contact with
your eyes, immediately rinse them
thoroughly with clean water.
R If tire sealant is swallowed, immediately
rinse your mouth out thoroughly and drink
plenty of water. Do not induce vomiting,
and seek medical attention immediately.
R Immediately change out of clothing which
has come into contact with tire sealant.
R If an allergic
reaction occurs, seek medical
attention immediately.
Using the TIREFIT kit TIREFIT is a tire sealant.
You can use TIREFIT to seal punctures of up
to 0.16
in
(4 mm), particularly those in the tire
tread. You can use TIREFIT at outside
temperatures down to Ò4 ‡ (Ò20 †). TIREFIT sticker, 2-part
X
Do not remove any foreign objects which
have penetrated the tire, e.g. screws or
nails.
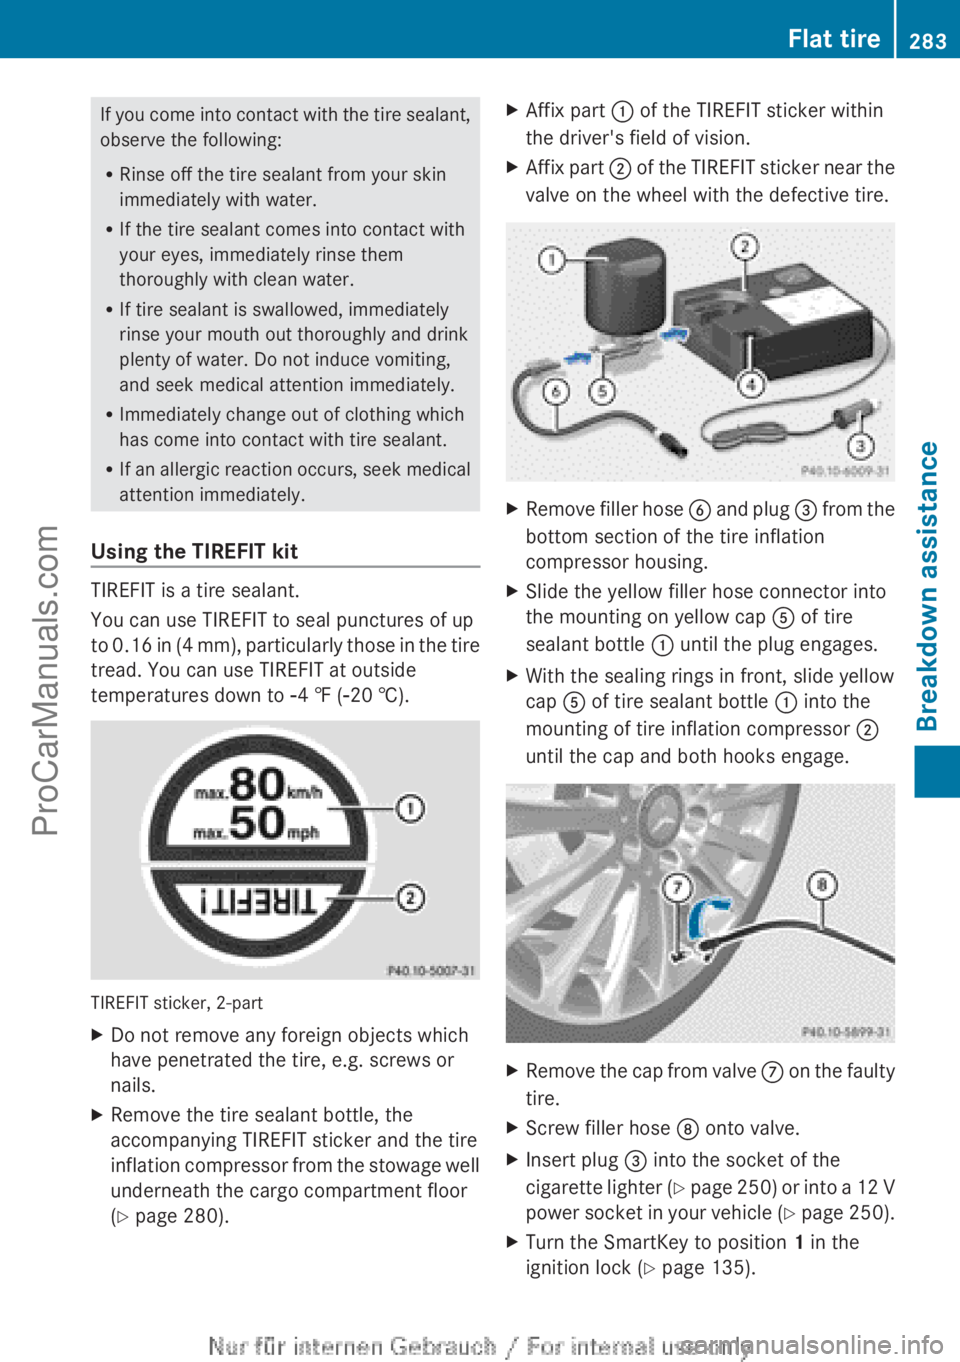
X Remove the tire sealant bottle, the
accompanying TIREFIT sticker and the tire
inflation compressor
from
the stowage well
underneath the cargo compartment floor
(Y page 280). X
Affix part : of the TIREFIT sticker within
the driver's field of vision.
X Affix part ; of
the
TIREFIT sticker near the
valve on the wheel with the defective tire. X
Remove filler hose B and plug =
from the
bottom section of the tire inflation
compressor housing.
X Slide the yellow filler hose connector into
the mounting on yellow cap A of tire
sealant bottle : until the plug engages.
X With the sealing rings in front, slide yellow
cap A of tire sealant bottle : into the
mounting of tire inflation compressor ;
until the cap and both hooks engage. X
Remove the cap from valve C on the
faulty
tire.
X Screw filler hose D onto valve.
X Insert plug = into the socket of the
cigarette lighter (
Y page 250) or into a 12 V
power socket in your vehicle (Y page 250).
X Turn the SmartKey to position 1 in the
ignition lock (Y page 135). Flat tire
283
Breakdown assistance Z
ProCarManuals.com