2012 MERCEDES-BENZ B-CLASS tow
[x] Cancel search: towPage 179 of 340

General notes
Rear view camera
: is in the trunk lid handle.
The rear view camera extends, when it is
activated.
The rear view camera is an optical parking and
maneuvering aid. It uses guide lines to show
the area behind your vehicle in the Audio/
COMAND display.
The area behind the vehicle is displayed as a
mirror image, as in the rear view mirror.
i The text of messages shown in the
COMAND display depends on the language
setting. The following are examples of rear
view camera messages in the COMAND
display.
Activating/deactivating the rear view
camera X
To activate: make sure
that the SmartKey
is in position 2 in the ignition lock.
X Make sure that in the audio system/
COMAND, the "Activation by R gear"
function is selected; see the separate
operating instructions for the audio
system/COMAND.
X Engage reverse gear.
Guide lines are used to show the area
behind the vehicle in the Audio/COMAND
display. To deactivate:
the rear view camera is
deactivated if you:
R select transmission position P (vehicles
with automatic transmission)
R drive forward ten meters
R shift the transmission from R to another
position (after 15 seconds)
R drive forwards at a speed of over 5 mph
(10km/h)
Displays in
the Audio/COMAND display The rear view camera may show a distorted
view of obstacles, show them incorrectly or
not at
all.
The rear view camera does not show
objects in the following positions:
R very close to the rear bumper
R under the rear bumper
R in the area immediately above the tailgate
handle
! Objects not at ground level may appear to
be further away than they actually are, e.g.:
R the bumper of a parked vehicle
R the drawbar of a trailer
R the ball coupling of a trailer tow hitch
R the rear section of an HGV
R a slanted post
Use the guidelines only for orientation.
Approach objects no further than the
bottom-most guideline. Driving systems
177
Driving and parking Z
ProCarManuals.com
Page 193 of 340

i
When you reset the values in the "ECO
display", the values in the trip computer
"From start" are likewise reset. When you
reset the values
in the trip computer "From
start", the values in the "ECO display" are
likewise reset. Navigation system menu
Displaying navigation instructions X
Switch on Audio 20 with Becker ®
MAP
PILOT or COMAND (see the separate
operating instructions).
X Press the = or ; button on the
steering wheel to select the Navi menu.
In the Navi menu, the multifunction display
shows navigation instructions. For more
information, see the separate operating
instructions.
Route guidance not active :
Direction of travel
; Current road
Route guidance active No change of direction announced
:
Distance to the destination
; Distance to the next change of direction =
Current road
? "Follow the road's course" symbol
Change of direction announced without a
lane recommendation :
Road into which the change of direction
leads
; Distance to change of direction and visual
distance display
= Symbol for change of direction
When a change of direction is announced, you
will see
symbol =
for the change of direction
and distance graphic ;. The distance
indicator shortens towards the top of the
display as you approach the point of the
announced change of direction.
Change of direction announced with a
lane recommendation :
Road into which the change of direction
leads
; Distance to change of direction and visual
distance display
= Lane recommendation
? New lane during a change of direction
A Uninterrupted lane
B Symbol for change of direction
On multilane roads, the system can display
lane recommendation
=
for the next change
of direction. During the change of direction,
additional lanes may be displayed. Menus and submenus
191
On-board computer and displays Z
ProCarManuals.com
Page 207 of 340

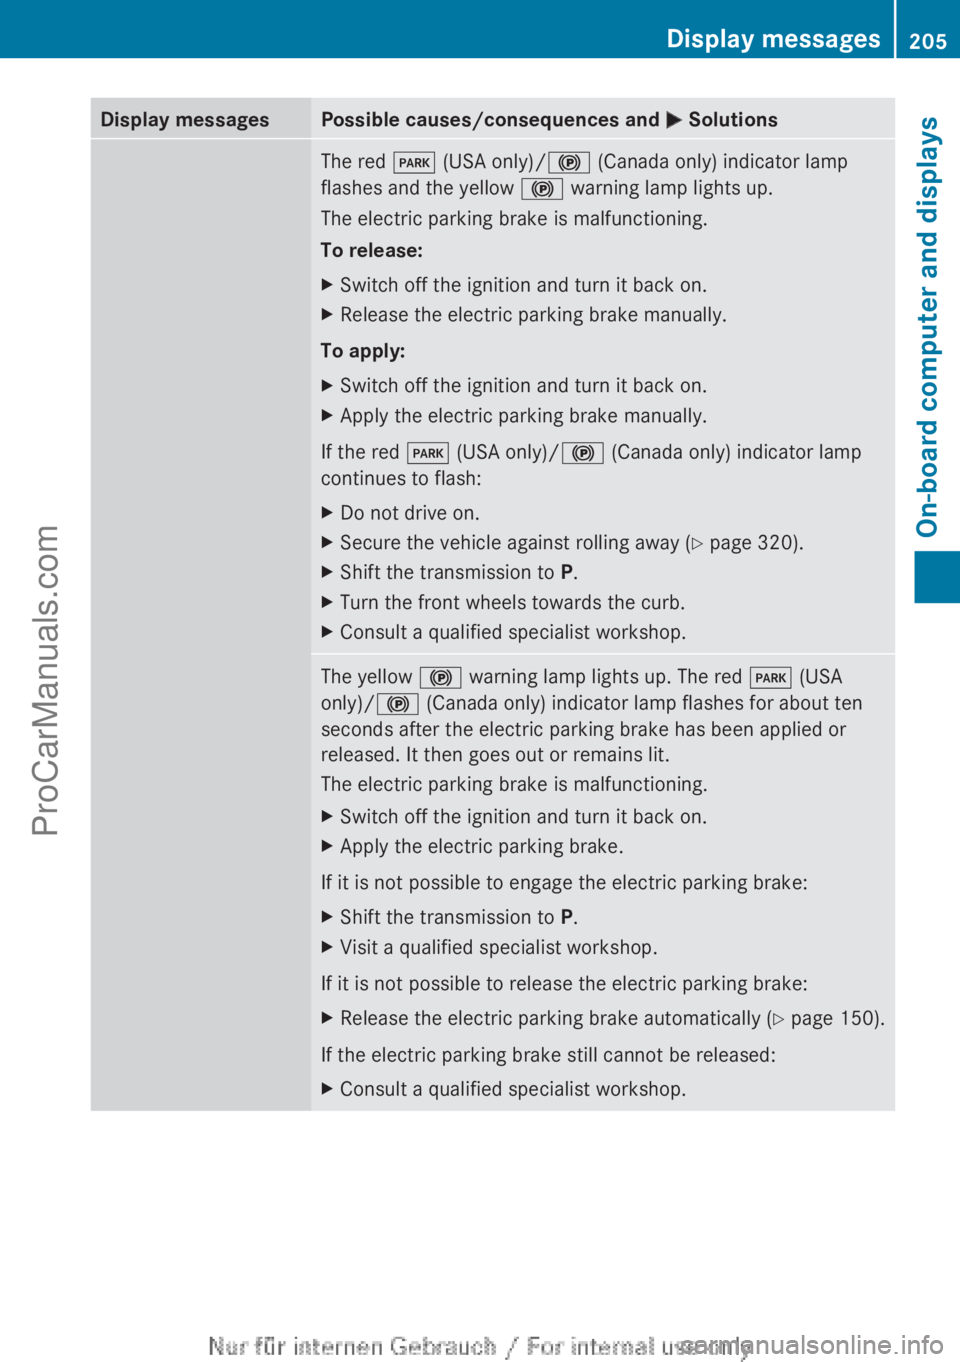
Display messages Possible causes/consequences and
M SolutionsThe red
F (USA only)/! (Canada only) indicator lamp
flashes and the yellow ! warning lamp lights up.
The electric parking brake is malfunctioning.
To release:
X Switch off the ignition and turn it back on.
X Release the electric parking brake manually.
To apply:
X Switch off the ignition and turn it back on.
X Apply the electric parking brake manually.
If the red F (USA only)/! (Canada only) indicator lamp
continues to flash:
X Do not drive on.
X Secure the vehicle against rolling away ( Y page 320).
X Shift the transmission to P.
X Turn the front wheels towards the curb.
X Consult a qualified specialist workshop. The yellow
! warning lamp lights up. The red F (USA
only)/! (Canada only) indicator lamp flashes for about ten
seconds after the electric parking brake has been applied or
released. It then goes out or remains lit.
The electric parking brake is malfunctioning.
X Switch off the ignition and turn it back on.
X Apply the electric parking brake.
If it is not possible to engage the electric parking brake:
X Shift the transmission to P.
X Visit a qualified specialist workshop.
If it is not possible to release the electric parking brake:
X Release the electric parking brake automatically ( Y page 150).
If the electric parking brake still cannot be released:
X Consult a qualified specialist workshop. Display messages
205On-board computer and displays Z
ProCarManuals.com
Page 226 of 340

Warning and indicator lamps in the instrument cluster
Seat belts
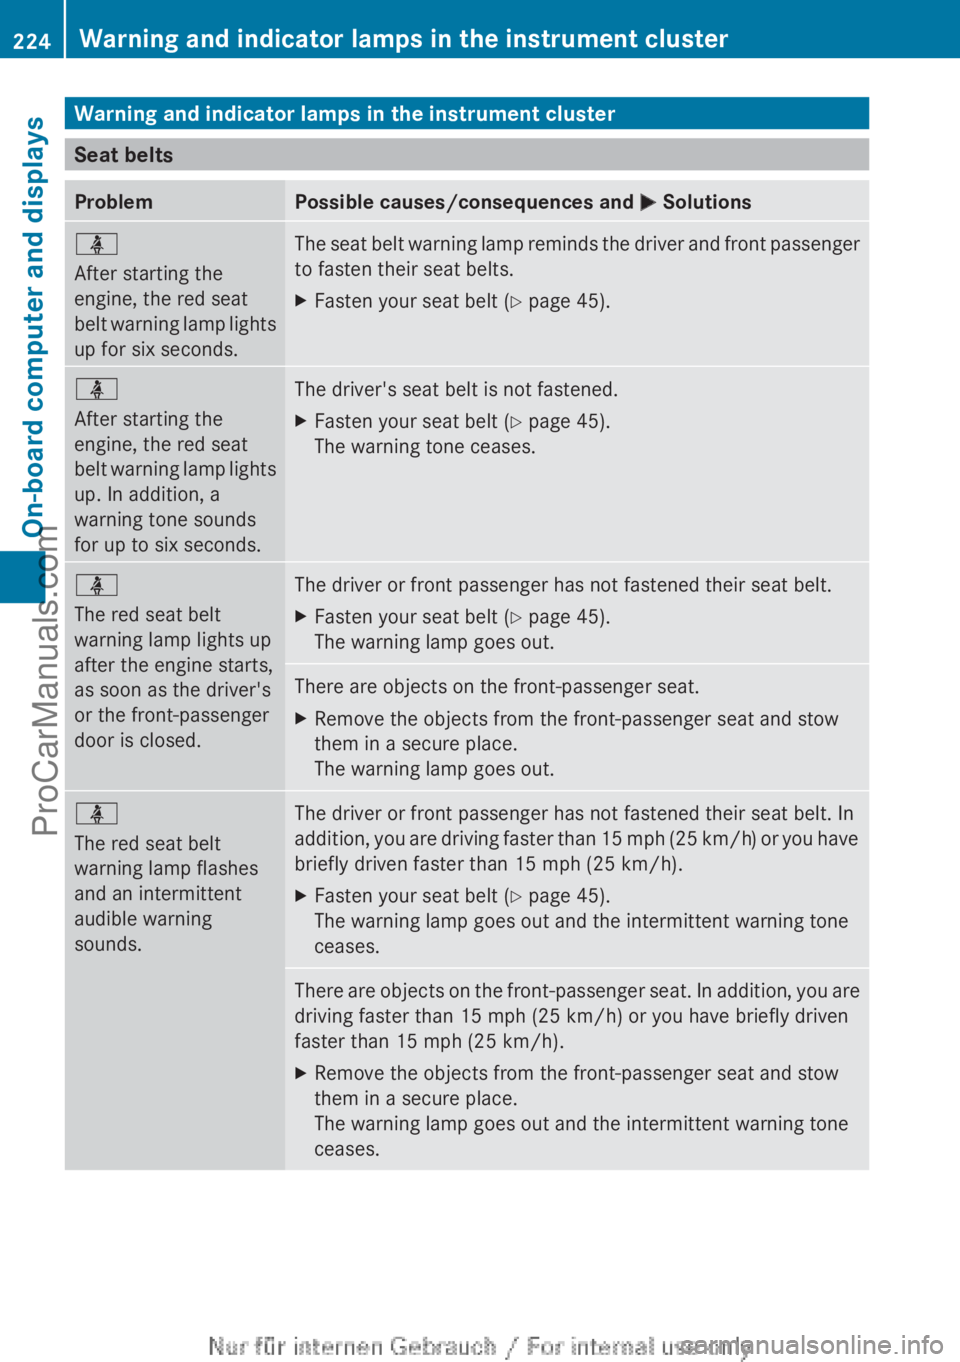
Problem Possible causes/consequences and
M Solutionsü
After starting the
engine, the red seat
belt warning
lamp
lights
up for six seconds. The seat belt warning lamp reminds the driver and front passenger
to fasten their seat belts.
X
Fasten your seat belt ( Y page 45).ü
After starting the
engine, the red seat
belt warning
lamp
lights
up. In addition, a
warning tone sounds
for up to six seconds. The driver's seat belt is not fastened.
X
Fasten your seat belt ( Y page 45).
The warning tone ceases. ü
The red seat belt
warning lamp lights up
after the engine starts,
as soon as the driver's
or the front-passenger
door is closed.
The driver or front passenger has not fastened their seat belt.
X
Fasten your seat belt ( Y page 45).
The warning lamp goes out. There are objects on the front-passenger seat.
X
Remove the objects from the front-passenger seat and stow
them in a secure place.
The warning lamp goes out. ü
The red seat belt
warning lamp flashes
and an intermittent
audible warning
sounds.
The driver or front passenger has not fastened their seat belt. In
addition,
you are
driving faster than 15 mph (25 km/h) or you have
briefly driven faster than 15 mph (25 km/h).
X Fasten your seat belt ( Y page 45).
The warning lamp goes out and the intermittent warning tone
ceases. There are objects on the front-passenger seat. In addition, you are
driving faster than 15 mph (25 km/h
) or you have briefly driven
faster than 15 mph (25 km/h ).
X Remove the objects from the front-passenger seat and stow
them in a secure place.
The warning lamp goes out and the intermittent warning tone
ceases.224
Warning and indicator lamps in the instrument cluster
On-board computer and displays
ProCarManuals.com
Page 237 of 340

Useful information ............................
236
Loading guidelines ............................236
Stowage areas .................................. 237
Features ............................................. 247 235Stowage and features
ProCarManuals.com
Page 238 of 340

Useful information
i This Operator's Manual describes all
models and all standard and optional
equipment of your vehicle available at the
time of publication of the Operator's
Manual. Country-specific differences are
possible. Please note
that your vehicle may
not be equipped with all features
described. This also applies to safety-
related systems and functions.
i Read the information on qualified
specialist workshops: ( Y page 24).Loading guidelines
G
WARNING
If objects, luggage or loads are not secured or
not secured sufficiently, they could slip, tip
over or be
flung around and thereby hit vehicle
occupants. There is a risk of injury,
particularly in the event of sudden braking or
a sudden change in direction.
Always store objects so that they cannot be
flung around. Secure objects, luggage or
loads against slipping or tipping before the
journey. G
WARNING
Combustion engines emit poisonous exhaust
gases such as
carbon monoxide. If the tailgate
is open when the engine is running,
particularly if the vehicle is moving, exhaust
fumes could enter the passenger
compartment. There is a risk of poisoning.
Turn off the engine before opening the
tailgate. Never drive with the tailgate open.
The handling characteristics of a laden
vehicle are dependent on the distribution of
the load within the vehicle. For this reason,
you should observe the following notes when
transporting a load:
R Never exceed the maximum permissible
gross vehicle weight or the gross axle weight rating of the vehicle (including
occupants). The
values
are specified on the
vehicle identification plate on the B-pillar of
the driver's door.
R The cargo compartment is the preferred
place to carry objects.
R Position heavy loads as far forwards as
possible and as low down in the cargo
compartment as possible.
R The load must not protrude above the
upper edge of the seat backrests.
R Always place the load against the rear or
front seat backrests. Make sure that the
seat backrests are securely locked into
place.
R Always place the load behind unoccupied
seats if possible.
R Use the cargo tie down rings and the parcel
nets to transport loads and luggage.
R Use cargo tie-down rings and fastening
materials appropriate for the weight and
size of the load.
R Hook in the cargo net when loading.
R The maximum load capacity of the stowage
well under the cargo compartment floor is
55 lbs (25 kg).
R Secure the load with sufficiently strong and
wear-resistant tie-downs. pad sharp edges
for protection.
! Do not position the load on one part of the
folding cargo compartment floor only. The
maximum load capacity of the folding cargo
compartment floor is 220 lbs (100 kg).
Distribute the weight evenly to avoid
damaging the cargo compartment floor.
Place a solid board under the load if
necessary. Please note that the load on the
cargo compartment floor will be increased
when the load is lashed down. 236
Loading guidelines
Stowage and features
ProCarManuals.com
Page 239 of 340

Stowage areas
Stowage space
Important safety notes G
WARNING
If objects in the passenger compartment are
stowed incorrectly, they can slide or be
thrown around and hit vehicle occupants.
There is a risk of injury, particularly in the
event of sudden braking or a sudden change
in direction.
R Always stow objects
so that they cannot be
thrown around in such situations.
R Always make sure that objects do not
protrude from stowage spaces, parcel nets
or stowage nets.
R Close the lockable stowage spaces while
driving.
R Stow and secure objects that are heavy,
hard, pointy, sharp-edged, fragile or too
large in the cargo compartment.
Observe the loading guidelines (Y page 236).
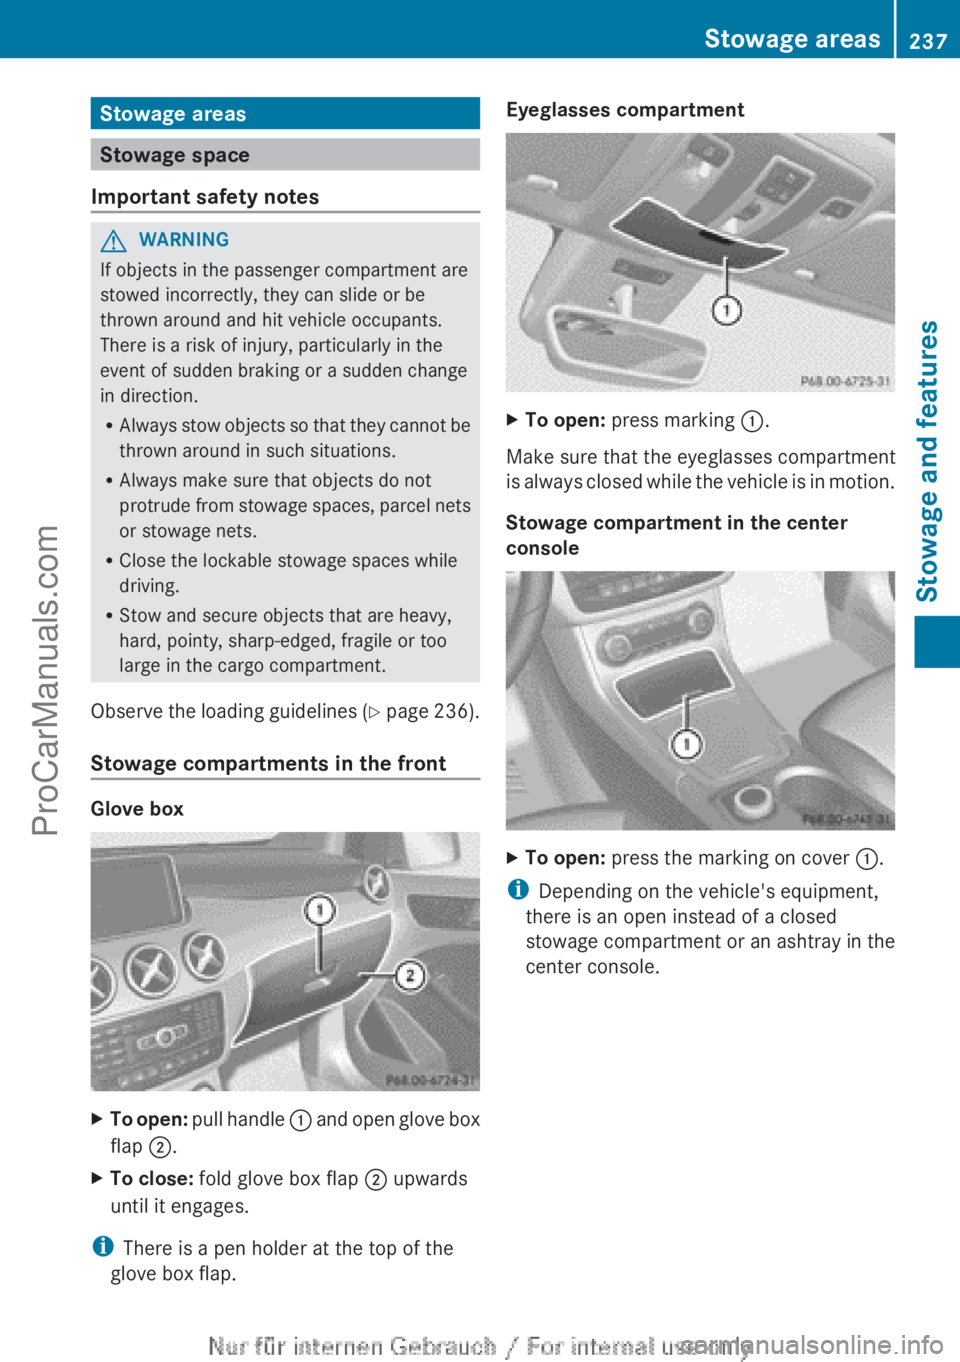
Stowage compartments in the front Glove box
X
To open: pull handle :
and open glove box
flap ;.
X To close: fold glove box flap ; upwards
until it engages.
i There is a pen holder at the top of the
glove box flap. Eyeglasses compartment
X
To open: press marking :.
Make sure that the eyeglasses compartment
is always closed
while the vehicle is in motion.
Stowage compartment in the center
console X
To open: press the marking on cover :.
i Depending on the vehicle's equipment,
there is an open instead of a closed
stowage compartment or
an ashtray in the
center console. Stowage areas
237
Stowage and features Z
ProCarManuals.com
Page 240 of 340

Stowage compartment in front of the
armrest (vehicles with automatic
transmission)
X
To open: press the marking on cover :.
i You can remove
the non-slip mat and the
insert for cleaning. When removing the
insert you will have to overcome some
slight resistance.
Stowage compartment under the armrest X
To open: on vehicles with moveable
armrests, make sure that the armrest is in
the rearmost position.
X Press button : and fold the armrest up.
i Depending on the vehicle's equipment, a
USB connection and
an AUX IN connection
or a Media Interface are installed in the
stowage compartment. A Media Interface
is a universal interface for mobile audio
equipment, e.g. for an iPod ®
or MP3 player
(see the separate COMAND Operating
Instructions). Stowage compartment under the driver's
seat and front-passenger seat G
WARNING
If you exceed the maximum load for the
stowage compartment, the cover may not be
able to restrain the items. Items may be
thrown out of the stowage compartment and
hit vehicle occupants.
There is a risk of injury,
particularly in the event of sudden braking or
a sudden change in direction.
Never exceed the maximum permissible load
for the stowage compartment. Stow and
secure heavy objects in the cargo
compartment.
The maximum permissible load of the
stowage compartment is 2.6 lbs (1.5 kg). X
To open: pull handle : up and fold
cover ; forwards.
Stowage space in the rear Stowage compartment in the rear center
console238
Stowage areas
Stowage and features
ProCarManuals.com