2012 Lexus LFA display
[x] Cancel search: displayPage 6 of 420

TABLE OF CONTENTSIndex
4
4-3. Do-it-yourself maintenanceDo-it-yourself service precautions .................................. 247
Hood................................................. 250
Positioning a floor jack............... 253
Engine compartment.................. 256
Adding washer fluid .................... 264
Battery .............................................. 265
Tires ................................................... 270
Tire inflation pressure ................. 277
Wheels............................................... 281
Air conditioning filter ................. 283
Wireless remote control battery ........................................... 285
Checking and replacing fuses ................................................ 287
Light bulbs ....................................... 299 5-1. Essential information
Emergency flashers.................... 302
If your vehicle needs to be towed ...................................... 303
If you think something is wrong ............................................ 308
Fuel pump shut off system ....... 309
Event data recorder ..................... 310
5-2. Steps to take in an emergency
If a warning light turns on or a warning buzzer
sounds... ......................................... 312
If a warning message is displayed ....................................... 322
If you have a flat tire..................... 332
If the engine will not start .......... 343
If you lose your keys/ wireless remote control
transmitter .................................... 344
If the parking brake cannot be released .................................. 345
If the vehicle battery is discharged .................................. 348
If your vehicle ov erheats ............ 351
If the vehicle becomes stuck................................................ 354
If your vehicle has to be stopped in an
emergency .................................. 355
5When trouble arises
Page 25 of 420

23
1-2. Opening, closing and locking the doors
1
Before driving
■Conditions affecting operation
In the following situations, the wireless remote control may not operate properly:
●Near a TV tower, electric power plant, broadcasting station, airport or other
facility that generates strong radio waves or electrical noise, an audio or other
radio wave emitting device or a large display
●When carrying a portable radio, cellular phone, cordless phone or other wire-
less communication device
●When multiple wireless remote controls are in the vicinity
●When the wireless remote control is in contact with, or is covered by certain
metallic objects
●When another wireless remote control (that emits radio waves) is being used
nearby
■When riding in an aircraft
When bringing a wireless remote control function onto an aircraft, make sure you
do not press any buttons on the wireless remote control while inside the aircraft
cabin. If you are carrying the wireless remote control in your bag etc, ensure that
the buttons are not likely to be pressed accidentally. Pressing a button may cause
the wireless remote control to emit radio waves that could interfere with the opera-
tion of the aircraft.
■Customization that can be conf igured at your Lexus dealer
Settings (e.g. door unlocking function and door lock buzzer sound) can be
changed. (Customizable features P. 383)
Page 90 of 420

88
2-1.Driving procedures
Driving the vehicle
The following procedures should be observed to ensure safe driving:
■Starting the engine
P. 9 8
■ Driving
With the brake pedal depressed, select 1st gear. ( P. 1 0 2 )
Check that “D1” or “1” is displayed on the gear indicator.
Release the parking brake. ( P. 113)
Gradually release the brake pedal and gently depress the accel-
erator pedal to accelerate the vehicle.
■ Stopping
Depress the brake pedal.
If necessary, set the parking brake.
If the vehicle is to be stopped for an extended period of time, select
Neutral. ( P. 1 0 3 )
■Parking the vehicle
Depress the brake pedal.
Set the parking brake. ( P. 113)
Select 1st gear or Reverse. ( P. 1 0 2 )
Check that “D1”, “1” or “R” is displayed on the gear indicator.
Turn the ignition switch to the “LOCK” position to stop the
engine.
Check that “D1” or “R” is no long er displayed on the gear indicator.
Lock the door, making sure that you have the key on your person.
STEP1
STEP2
STEP3
STEP1
STEP2
STEP1
STEP2
STEP3
STEP4
STEP5
Page 92 of 420

90
2-1. Driving procedures
■Engine speed restrictions
The following restrictions exist for engine protection:
●The engine speed is limited to 7400 rpm if the total mileage shown on the
odometer is less than 310 miles (500 km).
●The engine speed is limited when the engine is not sufficiently warmed-up, such
as immediately after the engine is started or during the engine warm-up period.
The variable red zone shows the maximum engine speed currently available.
( P. 1 1 9 )
●The engine speed is limited to 4400 rpm for approximately 8 minutes when the
engine is started with the coolant temperature at 5 F (-15 C) or lower.
●The engine speed may be limited when either the coolant temperature gauge
or oil temperature gauge is flashing.
■Idling with five cylinders
To improve fuel consumption, the engine may idle at a reduced speed using five cyl-
inders on one side of the engine whil e stopped or immediately before stopping
when 1st gear is selected in AUTO driving mode. During this time, “5 cylinders
idling” will be displayed on the meter an d vibration or a change in engine sound
may occur. This is normal and does not indicate a malfunction.
■ASG (Automated Sequential Gearbox) operating sounds
P. 1 1 0
■Braking sound
●As the LFA uses CCM (Carbon Ceramic Material) brake discs with high-fric-
tion pads, it may be possible to hear the sound of the brakes operating (such as
a rubbing or squealing sound). This is normal and does not indicate a malfunc-
tion.
●The sound of a motor operating may be heard after the engine is stopped. This
does not indicate a malfunction.
■Driving in the rain
●Drive carefully when it is raining, because visibility will be reduced, the windows
may become fogged-up, and the road will be slippery.
●Drive carefully when it starts to rain, because the road surface will be especially
slippery.
●Refrain from driving at high speeds on wet surfaces such as on an expressway in
the rain, as the LFA is fitted with wide-t read tires that may increase the risk of
hydroplaning.
Page 94 of 420

92
2-1. Driving procedures
CAUTION
●Do not adjust the positions of the steering wheel, the seat, or the inside or outside
rear view mirrors while driving.
Doing so may result in a loss of vehicle control that can cause accidents, resulting
in death or serious injury.
●Always check that all occupants’ arms, heads and other body parts are not out-
side the vehicle, as this may result in death or serious injury.
■When driving on slippery road surfaces
●Sudden braking, acceleration and steer ing may cause tire slippage and reduce
your ability to control the vehi cle, resulting in an accident.
●Sudden changes in engine speed, such as engine braking caused by up-shifting
and down-shifting, may cause the vehicle to skid, resulting in an accident.
●After driving through a pudd le, lightly depress the brake pedal to make sure that
the brakes are functioning properly. Wet brake pads may prevent the brakes from
functioning properly. If the brakes on on ly one side are wet and not functioning
properly, steering control may be af fected, resulting in an accident.
■When operating the paddle shift switches/reverse selector switch
Do not operate the paddle shift switches or reverse selector switch with the accel-
erator pedal depressed and Neutral selected.
Doing so may lead to unexpected rapid acceleration of the vehicle that may cause
an accident and result in death or serious injury.
■If a brake pad wear warning message is displayed
Have your Lexus dealer check and replac e the brake pads as soon as possible.
The disc damage can result if the pads are not replaced when needed.
Moderate levels of the brake pad and disc wear allow enhanced braking power. As
a result, the discs may wear more quickly than conventional brake discs. Therefore,
when replacing the brake pads, Lexus recommends that you also have the thick-
ness of the discs measured.
It is dangerous to drive the vehicle when the wear limits of the brake pads and/or
those of the brake discs are exceeded.
Page 100 of 420

98
2-1. Driving procedures
Ignition switch
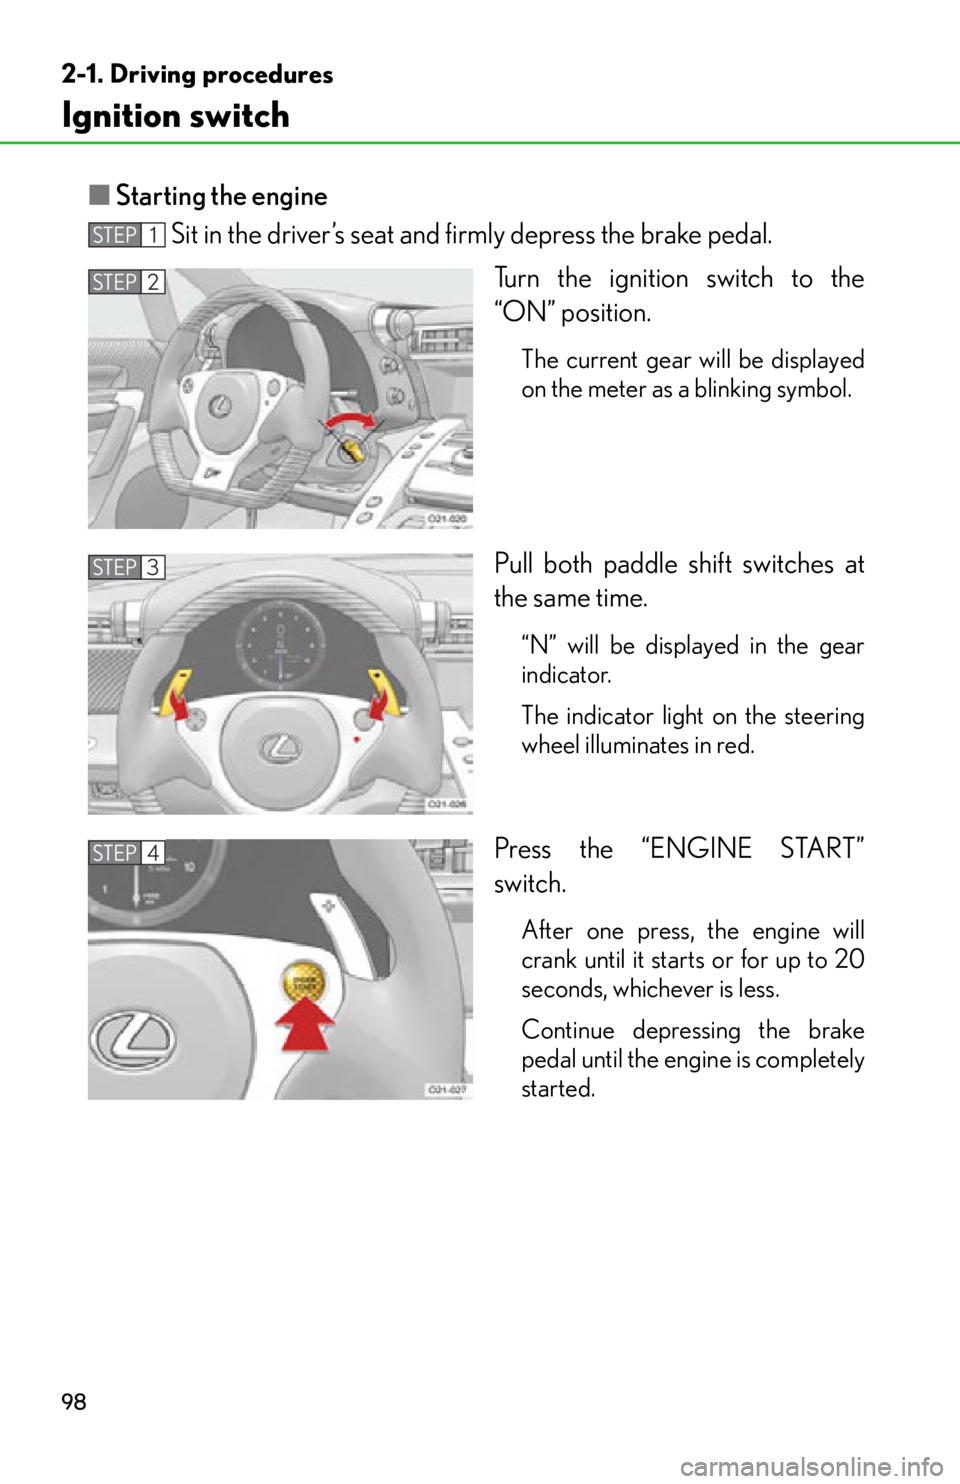
■Starting the engine
Sit in the driver’s seat and firmly depress the brake pedal.
Turn the ignition switch to the
“ON” position.
The current gear will be displayed
on the meter as a blinking symbol.
Pull both paddle shift switches at
the same time.
“N” will be displayed in the gear
indicator.
The indicator light on the steering
wheel illuminates in red.
Press the “ENGINE START”
switch.
After one press, the engine will
crank until it starts or for up to 20
seconds, whichever is less.
Continue depressing the brake
pedal until the engine is completely
started.
STEP1
STEP2
STEP3
STEP4
Page 102 of 420

100
2-1. Driving procedures
■If the engine does not start
●Repeat the procedure again. If the engine does not start after a few tries, the
“ENGINE START” switch may be malfunctioning. Have the vehicle inspected
by your Lexus dealer.
●Check to make sure that the brake pedal is firmly depressed and that “N” is dis-
played in the gear indicator. (If the brake pedal is not depressed or “N” is not
displayed, the engine will not start.)
●The engine immobilizer system may not have been deactivated. ( P. 5 3 )
●In order to protect the engine, the engine may not start when the engine coolant
temperature or the engine oil temperature is below -13 F (-25C). In that case,
a buzzer will sound and “Temp low Engine cannot be started” will be shown on
the meter. ( P. 3 2 7 )
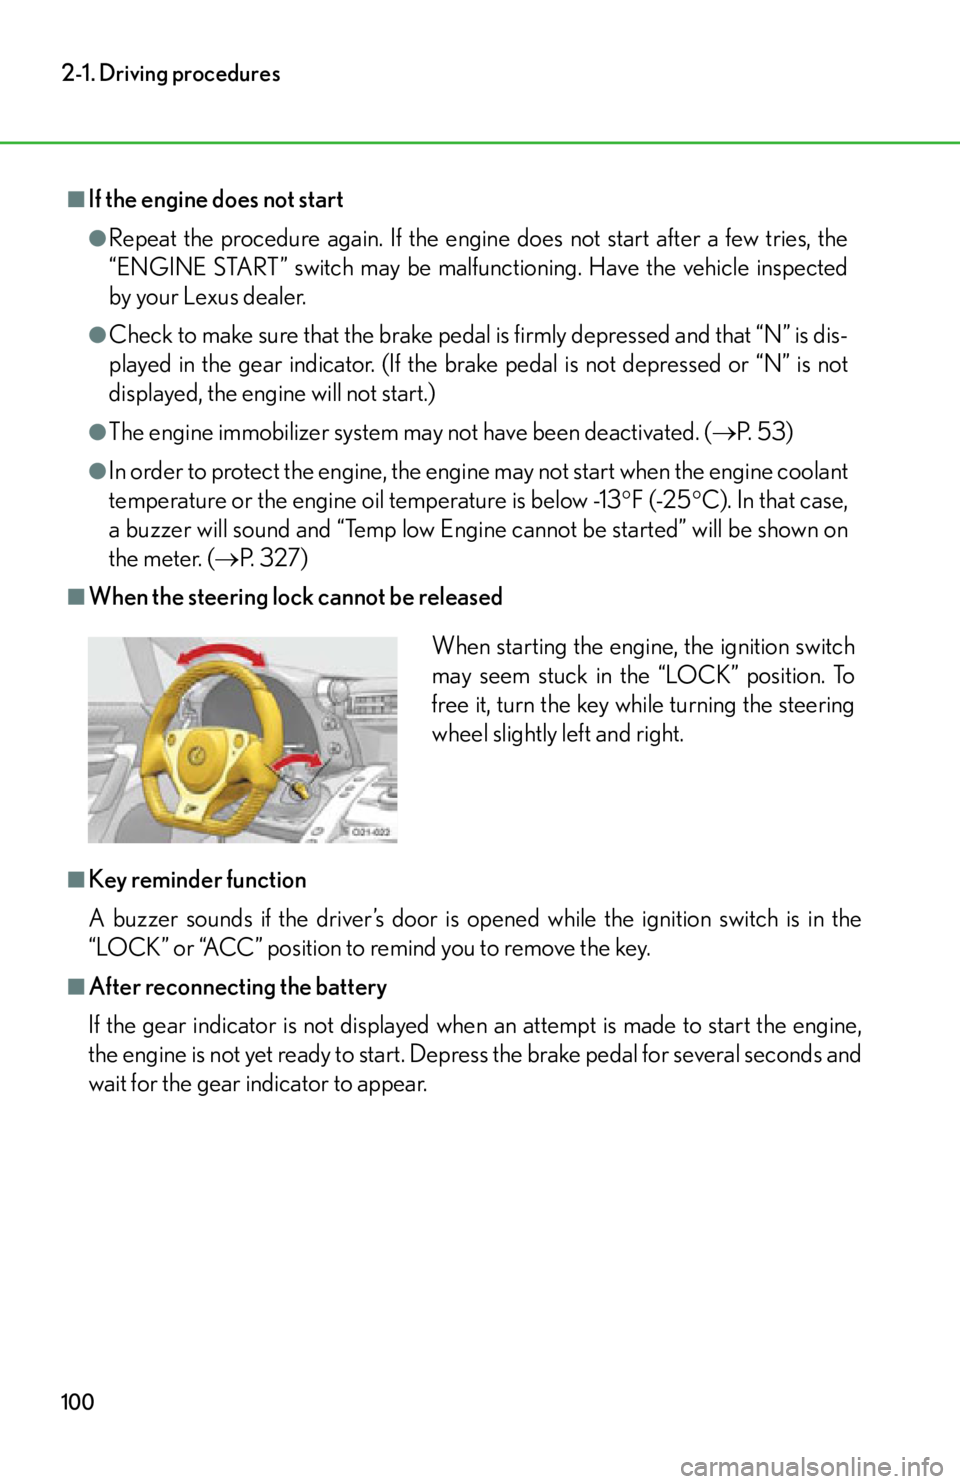
■When the steering lock cannot be released
■Key reminder function
A buzzer sounds if the driver’s door is opened while the ignition switch is in the
“LOCK” or “ACC” position to remind you to remove the key.
■After reconnecting the battery
If the gear indicator is not displayed when an attempt is made to start the engine,
the engine is not yet ready to start. Depr ess the brake pedal for several seconds and
wait for the gear indicator to appear.
When starting the engine, the ignition switch
may seem stuck in the “LOCK” position. To
free it, turn the key while turning the steering
wheel slightly left and right.
Page 105 of 420

103
2-1. Driving procedures
2
When driving
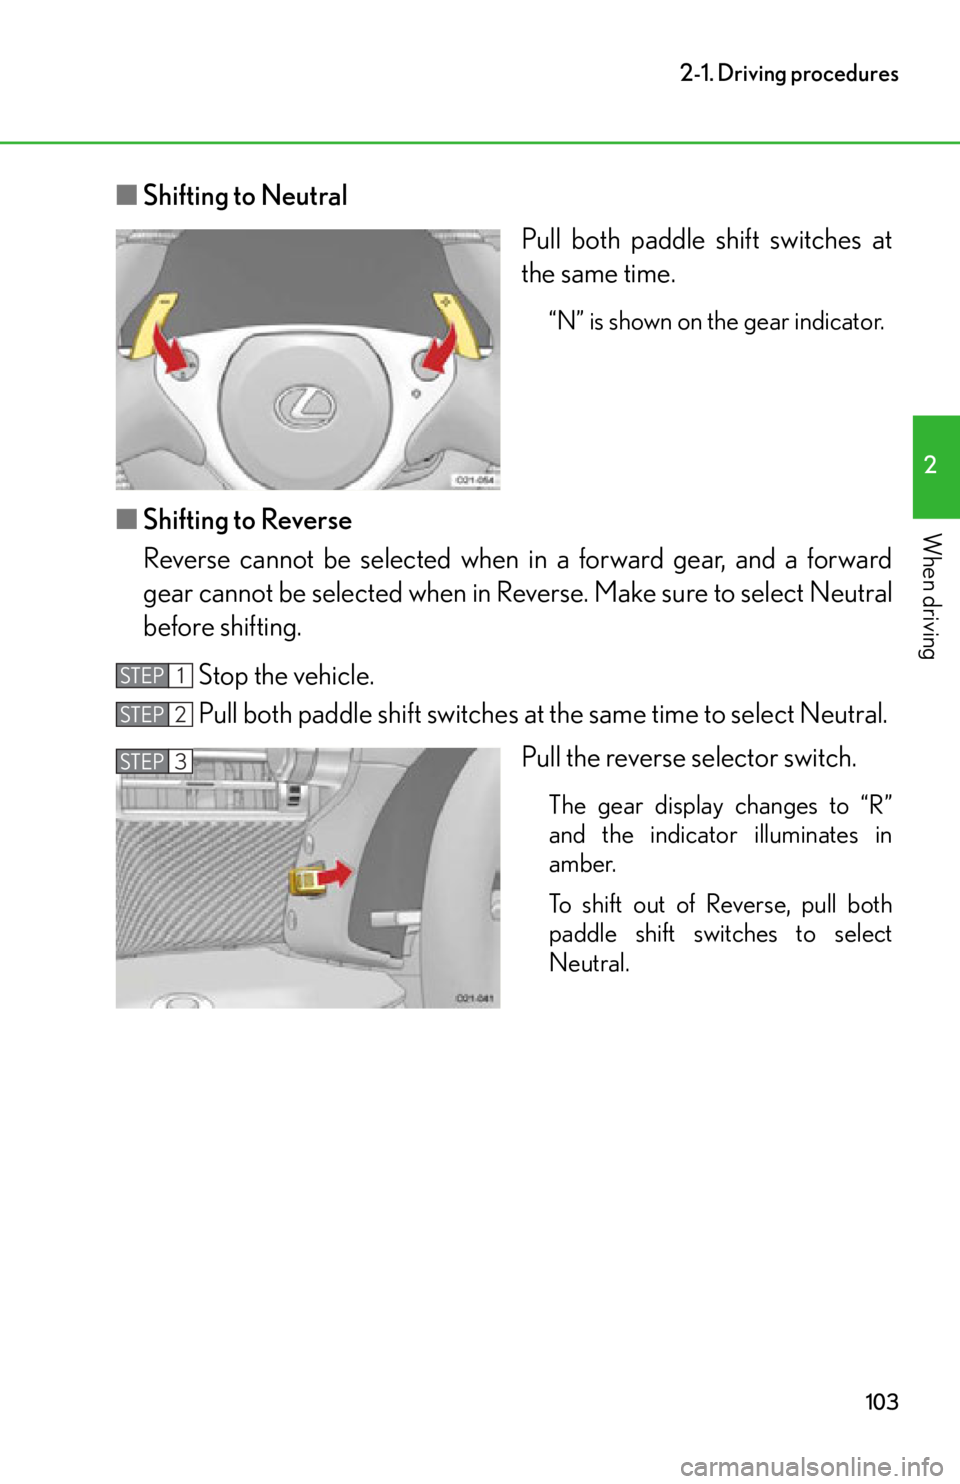
■Shifting to Neutral
Pull both paddle shift switches at
the same time.
“N” is shown on the gear indicator.
■Shifting to Reverse
Reverse cannot be selected when in a forward gear, and a forward
gear cannot be selected when in Reve rse. Make sure to select Neutral
before shifting.
Stop the vehicle.
Pull both paddle shift switches at the same time to select Neutral.
Pull the reverse selector switch.
The gear display changes to “R”
and the indicator illuminates in
amber.
To shift out of Reverse, pull both
paddle shift switches to select
Neutral.
STEP1
STEP2
STEP3