2012 Lancia Thema change time
[x] Cancel search: change timePage 72 of 316

BLIND SPOT
MONITORING (for
versions/markets, where
provided)
The Blind Spot Monitoring (BSM)
system uses two radar-based sensors,
located inside the rear bumper fascia,
to detect highway licensable vehicles
(automobiles, trucks, motorcycles,
etc.) that enter the blind spot zones
from the rear/front/side of the ve-
hicle.
When the vehicle is started, the BSM
warning light will momentarily illu-
minate in both outside rear view mir-
rors to let the driver know that the
system is operational. The BSM sys-
tem sensors operate when the vehicleis in any forward gear or REVERSE
and enters stand by mode when the
vehicle is in PARK.
The BSM detection zone covers ap-
proximately one lane on both sides of
the vehicle 3.35 m. The zone starts at
the outside rear view mirror and ex-
tends approximately 6 m to the rear of
the vehicle. The BSM system monitors
the detection zones on both sides of
the vehicle when the vehicle speed
reaches approximately 10 km/h or
higher and will alert the driver of ve-
hicles in these areas.
NOTE:
The BSM system does NOT alert
the driver about rapidly ap- proaching vehicles that are out-
side the detection zones.
The BSM system detection zone DOES NOT change if your ve-
hicle is towing a trailer. There-
fore, visually verify the adjacent
lane is clear for both your ve-
hicle and trailer before making
a lane change. If the trailer or
other object (i.e., bicycle, sports
equipment) extends beyond the
side of your vehicle, this may re-
sult in the BSM warning light
remaining illuminated the en-
tire time the vehicle is in a for-
ward gear.
The area on the rear fascia where the
radar sensors are located must remain
free of snow, ice, and dirt/road con-
tamination so that the BSM system
can function properly. Do not block
the area of the rear fascia where the
radar sensors are located with foreign
objects (bumper stickers, bicycle
racks, etc.).
Rear Detection Zones
BSM Warning Light
66
Page 82 of 316

A maximum of 1000 entries perphone will be downloaded and up-
dated every time a phone is con-
nected to the Uconnect™ Phone.
Depending on the maximum num- ber of entries downloaded, there
may be a short delay before the
latest downloaded names can be
used. Until then, if available, the
previously downloaded phonebook
is available for use.
Only the phonebook of the cur- rently connected mobile phone is
accessible.
This downloaded phonebook can- not be edited or deleted on the
Uconnect™ Phone. These can only
be edited on the mobile phone. The
changes are transferred and up-
dated to Uconnect™ Phone on the
next phone connection.
Managing Your Favorite
Phonebook
There are three ways you can add an
entry to your Favorite Phonebook.
1. During an active call of a number
to make a favorite, touch and hold a favorite button on the top of the
phone main screen.
2. After loading the mobile phone-
book, select phonebook from the
Phone main screen, then select the
appropriate number. Touch the + next
to the selected number to display the
options pop-up. In the pop-up select
“Add to Favorites”.
NOTE:
If the Favorites list is full, you will
be asked to remove an existing fa-
vorite.
3. From the Phone main screen, se-
lect phonebook. From the phonebook
screen, select the “Favorites” soft-key
and then select the + soft-key located
to the right of the phonebook record.
Select an empty entry and touch the +
on that selected entry. When the Op-tions pop-up appears, touch “Add
from Mobile”. You will then be asked
which contact and number to choose
from your mobile phonebook. When
complete the new favorite will be
shown.
To Remove A Favorite
To remove a Favorite, select phone-
book from the Phone main screen.
Next select Favorites on the left side of the screen and then touch the +
Options soft-key.
Touch the + next to the Favorite you would like to remove.76
Page 94 of 316

GENERAL INFORMATION
This device complies with Part 15 of
the FCC rules and RSS 210 of Indus-
try Canada. Operation is subject to
the following conditions:
Changes or modifications not ex-pressly approved by the party re-
sponsible for compliance could void
the user's authority to operate the
equipment.
This device may not cause harmful interference.
This device must accept any inter- ference received, including interfer-
ence that may cause undesired op-
eration.
VOICE COMMAND
Uconnect Touch™ 8.4/8.4
Nav The Uconnect™ Voice
Command system allows
you to control your AM, FM
radio, satellite radio, disc
player, SD Card or USB/iPod. NOTE:
Take care to speak into the Voice
Command system as calmly and
normally as possible. The ability
of the Voice Command system to
recognize user voice commands
may be negatively affected by
rapid speaking or a raised voice
level.
WARNING!
Any voice commanded system
should be used only in safe driving
conditions following local laws. All
attention should be kept on the
roadway ahead. Failure to do so may
result in a collision cau sing serious
injury or death.
When you press the Uconnect™ Voice
Command
button, you will hear
a beep. The beep is your signal to give
a command.
If no command is spoken the system
will say one of two responses:
I didn't understand
I didn't get that, etc., If a command is not spoken a second
time, the system will respond with an
error and give some direction as what
can be said based on the context you
are in. After three consecutive failures
of a spoken command the VR session
with end.
Pressing the Uconnect™ Voice Com-
mand
button while the system
is speaking is known as “barging in.”
The system will be interrupted, and
after the beep, you can say a com-
mand. This will become helpful once
you start to learn the options.
NOTE:
At any time, you can say the words
“Cancel” or “Help”.
These commands are universal and
can be used from any menu. All other
commands can be used depending
upon the active application.
When using this system, you should
speak clearly and at a normal speak-
ing volume.
The system will best recognize your
speech if the windows are closed, and
the heater/air conditioning fan is set
to low.
88
Page 95 of 316

At any point, if the system does not
recognize one of your commands, you
will be prompted to repeat it.
To hear available commands, press
the Uconnect™ Voice Command
button and say “Help”. You will
hear available commands for the
screen displayed.
Natural Speech
Natural speech allows the user to
speak commands in phrases or com-
plete sentences. The system filters out
certain non-word utterances and
sounds such as “ah” and “eh”. The
system handles fill-in words such as “I
would like to”.
The system handles multiple inputs in
the same phrase or sentence such as
“make a phone call” and “to Kelly
Smith”. For multiple inputs in the
same phrase or sentence, the system
identifies the topic or context and pro-
vides the associated follow-up prompt
such as “Who do you want to call?” in the case where a phone call was re-
quested but the specific name was not
recognized.
The system utilizes continuous dialog;
when the system requires more infor-
mation from the user it will ask a
question to which the user can re-
spond without pressing the
Uconnect™ Voice Command
button.
Uconnect™ Voice
Commands
The Uconnect™ Voice Command sys-
tem understands two types of com-
mands. Universal commands are
available at all times. Local com-
mands are available if the supported
radio mode is active.
Start a dialogue by pressing the
Uconnect™ Voice Commandbutton.
Changing the Volume
1. Start a dialogue by pressing the
Voice Command
button.2. Say a command (e.g., “Help”).
3. Use the ON/OFF VOLUME rotary
knob to adjust the volume to a com-
fortable level while the Voice Com-
mand system is speaking. Please note
the volume setting for Voice Com-
mand is different than the audio sys-
tem.
Starting Voice Recognition (VR)
Session in Radio/Player Modes
In this mode, you can say the follow-
ing commands:
NOTE:
The commands can be said on any
screen when a call is not active
after pushing the Uconnect™
Voice Command
button.
Disc
To switch to the disc mode, say
“Change source to Disc”. This com-
mand can be given in any mode or
screen:
“Track” (#) (to change the track)
89
Page 104 of 316

Front Heated Seat Operations —
Uconnect Touch™ 8.4 and 8.4
Nav:
Press the “Controls” soft-key located
on the bottom of the Uconnect
Touch™ display.Press the “Driver” or “Pas-
senger” seat soft-key once
to select HI-level heating.
Press the soft-key a second
time to select LO-level heating. Press
the soft-key a third time to shut the
heating elements OFF. NOTE:
Once a heat setting is selected, heat
will be felt within two to five min-
utes.
When the HI-level setting is selected,
the heater will provide a boosted heat
level during the first four minutes of
operation. Then, the heat output will
drop to the normal HI-level. If the
HI-level setting is selected, the system
will automatically switch to LO-level
after a maximum of 60 minutes of
continuous operation. At that time,
the display will change from HI to LO,
indicating the change. The LO-level
setting will turn OFF automatically
after a maximum of 45 minutes.Rear Heated Seats
On some models, the two outboard
seats are equipped with heated seats.
The heated seat switches for these
seats are located on the rear of the
center console. There are two heated
seat switches that allow the rear pas-
sengers to operate the seats indepen-
dently.
You can choose from HI, LO or OFF
heat settings. Amber indicator lights
in each switch indicate the level of
heat in use. Two indicator lights will
illuminate for HI, one for LO and
none for OFF.
Press the switch once to se-
lect HI-level heating. Press
the switch a second time to
select LO-level heating.
Press the switch a third time to shut
the heating elements OFF.
NOTE:
Once a heat setting is selected, heat will be felt within two to
five minutes.
The engine must be running for the heated seats to operate.
Controls Soft-Key
Heated Seats Soft-Keys
98
Page 105 of 316

When the HI-level setting is selected,
the heater will provide a boosted heat
level during the first four minutes of
operation. Then, the heat output will
drop to the normal HI-level. If the
HI-level setting is selected, the system
will automatically switch to LO-level
after a maximum of 60 minutes of
continuous operation. At that time,
the number of illuminated LEDs
changes from two to one, indicating
the change. The LO-level setting will
turn OFF automatically after a maxi-
mum of 45 minutes.
VENTILATED SEATS (for
versions/markets, where
provided)
On some models, both the driver and
passenger seats are ventilated. Lo-
cated in the seat cushion and seatback
are small fans that draw air from the
seat surface through fine perforations
in the seat cover to help keep the
driver and front passenger cooler in
higher ambient temperatures.
The ventilated seats can be operated
using the Uconnect Touch™ System.Front Ventilated Seat Operation
— Uconnect Touch™ 8.4/8.4 Nav:
Press the “Controls” soft-key located
on the bottom of the Uconnect
Touch™ display.
Press the “Driver” or “Passenger”
seat soft-key once to select HI-level
ventilation. Press the soft-key a sec-
ond time to select LO-level ventila-
tion. Press the soft-key a third time to
shut off the seat ventilation.
Press the “Driver” or “Passenger”
seat soft-key once to select HI-level
ventilation. Press the soft-key a sec-
ond time to select LO-level ventila-
tion. Press the soft-key a third time to
shut off the seat ventilation.
NOTE:
The engine must be running for the
ventilated seats to operate.
HEAD RESTRAINTS
Head restraints are designed to reduce
the risk of injury by restricting head
movement in the event of a rear im-
pact. Head restraints should be ad-
justed so that the top of the head
restraint is located above the top of
your ear.
Controls Soft-Key
Ventilated Seats Soft-Keys
99
Page 113 of 316

LIGHTS-ON REMINDER
If the headlights or parking lights are
on after the ignition is placed in the
OFF position, a chime will sound to
alert the driver when the driver's door
is opened.
FOG LIGHTSThe fog light switch is built
into the headlight switch.
To activate the fog lights,
turn the headlamp switch to
the park lamp or headlamp position.
Press the headlight switch once for
front fog lights, press the switch a
second time for front and rear fog
lights. Pressing the switch a third time
will deactivate the rear fog lights, and
a fourth time will deactivate the front
fog lights. Turning the headlight
switch off will also deactivate the fog
lights.
An indicator light in the instrument
cluster illuminates when the fog lights
are turned on.
NOTE:
The front fog lights will activate
automatically when turning on the
position lights or the low beam headlights if previously deacti-
vated by turning the headlight
switch off. The rear fog lights will
only turn on by operating the
switch as previously described.
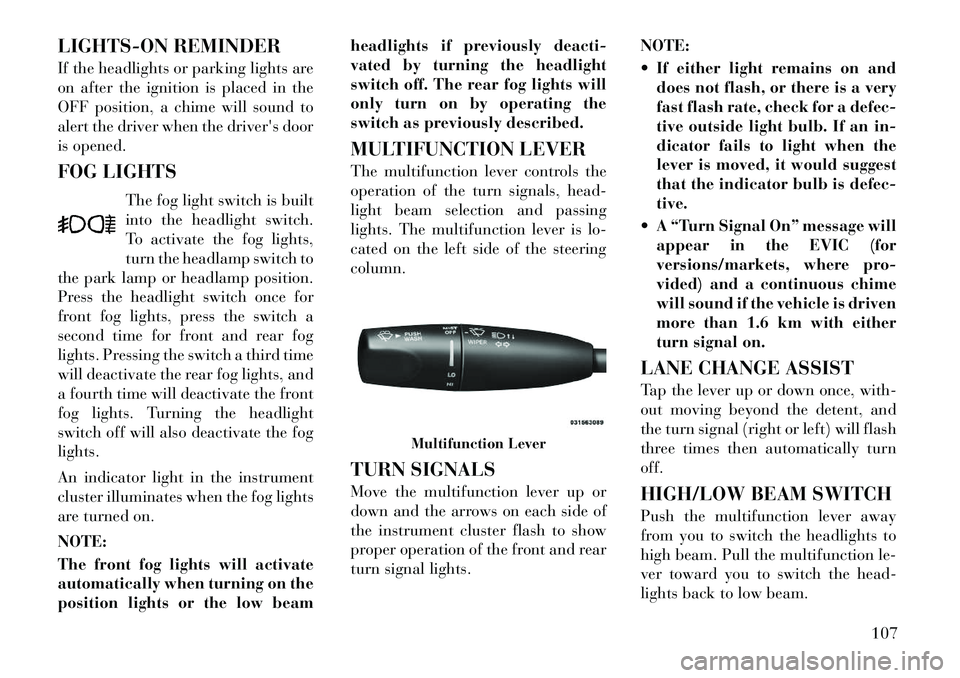
MULTIFUNCTION LEVER
The multifunction lever controls the
operation of the turn signals, head-
light beam selection and passing
lights. The multifunction lever is lo-
cated on the left side of the steering
column.
TURN SIGNALS
Move the multifunction lever up or
down and the arrows on each side of
the instrument cluster flash to show
proper operation of the front and rear
turn signal lights.
NOTE:
If either light remains on and
does not flash, or there is a very
fast flash rate, check for a defec-
tive outside light bulb. If an in-
dicator fails to light when the
lever is moved, it would suggest
that the indicator bulb is defec-
tive.
A “Turn Signal On” message will appear in the EVIC (for
versions/markets, where pro-
vided) and a continuous chime
will sound if the vehicle is driven
more than 1.6 km with either
turn signal on.
LANE CHANGE ASSIST
Tap the lever up or down once, with-
out moving beyond the detent, and
the turn signal (right or left) will flash
three times then automatically turn
off.
HIGH/LOW BEAM SWITCH
Push the multifunction lever away
from you to switch the headlights to
high beam. Pull the multifunction le-
ver toward you to switch the head-
lights back to low beam.
Multifunction Lever
107
Page 128 of 316

SETTING THE
FOLLOWING DISTANCE IN
ACC
The specified following distance for
ACC can be set by varying the dis-
tance setting between 3 (long), 2 (me-
dium), and 1 (short). Using this dis-
tance setting and the vehicle speed,
ACC calculates and sets the distance
to the vehicle ahead. This distance
setting displays in the EVIC.To change the distance setting, press
the Distance button and release. Each
time the button is pressed, the dis-
tance setting adjusts between 3
(long), 2 (medium), and 1 (short).
If there is no vehicle ahead, the vehicle
will maintain the set speed. If a slower
moving vehicle is detected in the same
lane, the EVIC displays the “Sensed
Vehicle Indicator” icon, and the sys-
tem adjusts vehicle speed automati-
cally to maintain the distance setting,
regardless of the set speed.
The vehicle will then maintain the set
distance until:
The vehicle ahead accelerates to a
speed above the set speed.
The vehicle ahead moves out of your lane or view of the sensor. The vehicle ahead slows to a speed
below 24 km/h and the system au-
tomatically disengages itself.
The distance setting is changed.
The system disengages. (Refer to the information on ACC Activa-
tion).
The maximum braking applied by
ACC is limited; however, the driver
can always apply the brakes manu-
ally, if necessary.
NOTE:
The brake lights will illuminate
whenever the ACC system applies
the brakes.
A Proximity Warning will alert the
driver if ACC predicts that its maxi-
mum braking level is not sufficient to
maintain the set distance. If this oc-
curs, a visual alert “BRAKE” will
flash in the EVIC and a chime will
sound while ACC continues to apply
its maximum braking capacity. When
this occurs, you should immediately
apply the brakes as needed to main-
tain a safe distance from the vehicle
ahead.
Distance Set 3 (long)Distance Set 2 (medium)
Distance Set 1 (short)
122