2012 Lancia Thema change time
[x] Cancel search: change timePage 133 of 316

To change modes, press the MODE
button when the system is in either the
OFF, READY, or SET position.
“Cruise Ready” will be displayed if
the system was in ACC READY or
ACC SET position. “Cruise Off” will
be displayed if the system was in the
ACC OFF position. To switch back to
Adaptive Cruise Control mode, press
the MODE button a second time.WARNING!
In the normal Cruise Control mode,
the system will not react to vehicles
ahead. In addition, the proximity
warning does not activate and no
alarm will sound even if you are too
close to the vehicle ahead since nei-
ther the presence of the vehicle
ahead nor the vehicle-to-vehicle dis-
tance is detected. Be sure to main-
tain a safe distance between your
vehicle and the vehicle ahead. Al-
ways be aware which mode is se-
lected.To Set A Desired Speed
When the vehicle reaches the speed
desired, press the SET
-button and
release. The EVIC will display the set
speed.
NOTE:
You must observe the display when
setting or changing speed, not the
speedometer.
To Vary The Speed Setting
There are two ways to change the set
speed:
Use the accelerator pedal to adjust the vehicle to the desired speed and
press the SET -button.
Tap the RES +or SET -button to
increase or decrease the set speed in
1 km/h increments respectively.
Hold the RES +or SET -button for
10 km/h increments.
To Cancel
The system will disable normal Cruise
Control without erasing the memory
if: You softly tap or depress the brake
pedal.
You press the CANCEL button.
The Electronic Stability Control/ Traction Control System (ESC/
TCS) activates.
To Resume
Press the RES +button and then re-
move your foot from the accelerator
pedal. The EVIC will display the last
set speed.
To Turn Off
The system will turn off and erase the
set speed in memory if:
You push and release the ON/OFF
button.
You turn off the ignition.
You switch off ESC.
If the Cruise Control system is turned
off and reactivated, the system will
return to the last driver setting (ACC
or Normal Cruise Control).
127
Page 151 of 316

WARNING!(Continued)
To help protect against personal
injury, passengers should not be
seated in the rear cargo area. The
rear cargo space is intended for
load carrying purposes only, not
for passengers, who should sit in
seats and use seat belts.WARNING!
The weight and position of cargo
and passengers can change the ve-
hicle center of gravity and vehicle
handling. To avoid loss of control
resulting in personal injury, follow
these guidelines for loading your ve-
hicle:
Always place cargo evenly on the
cargo floor. Put heavier objects as
low and as far forward as possible.
Place as much cargo as possible in
front of the rear axle. Too much
weight or improperly placed
weight over or behind the rear
axle can cause the rear of the ve-
hicle to sway.
(Continued)
WARNING!(Continued)
Do not pile luggage or cargo
higher than the top of the seat-
back. This could impair visibility
or become a dangerous projectile
in a sudden stop or collision.
CARGO AREA FEATURES
TRUNK MAT (for
versions/markets, where
provided)
A trunk mat covers the bottom of the
cargo area. The trunk mat is used to
protect the interior of the trunk from
mud, snow, and debris.
GROCERY BAG HOOKS
The rear cargo area is equipped with
grocery bag hooks, located on either
side of the rear cargo area. REAR WINDOW
FEATURES
REAR WINDOW
DEFROSTER
The rear window defroster
button is located on the climate
control. Press this button to
turn on the rear window defroster and
the heated outside mirrors (for
versions/markets, where provided).
An indicator in the button will illumi-
nate when the rear window defroster
is on. The rear window defroster au-
tomatically turns off after approxi-
mately 10 minutes. For an additional
five minutes of operation, press the
button a second time.
Grocery Bag Hooks
145
Page 170 of 316
Transmission TemperatureWarning Telltale This telltale indicates that
the transmission fluid tem-
perature is running hot.
This may occur with severe
usage, such as trailer towing. If this
telltale turns on, safely pull over and
stop the vehicle. Then, shift the trans-
mission into PARK and run the engine
at idle or faster until the light turns
off.CAUTION!
Continuous driving with the Trans-
mission Temperature Warning Tell-
tale illuminated will eventually
cause severe transmission damage or
transmission failure.WARNING!
If the Transmission Temperature
Warning Telltale is illuminated and
you continue operating the vehicle,
in some circumstances you could
cause the fluid to boil over, come in
contact with hot engine or exhaust
components and cause a fire. Electric Power Steering
Malfunction This telltale is on when the
Electric Power Steering is
not operating and needs
service.
OIL CHANGE DUE
Your vehicle is equipped with an en-
gine oil change indicator system. The
“Oil Change Due” message will flash
in the EVIC display for approxi-
mately 10 seconds after a single chime
has sounded to indicate the next
scheduled oil change interval. The en-
gine oil change indicator system is
duty cycle based, which means the
engine oil change interval may fluctu-
ate dependent upon your personal
driving style.
Unless reset, this message will con-
tinue to display each time you cycle
the ignition to the ON/RUN position.
To turn off the message temporarily,
press and release the BACK button.
To reset the oil change indicator sys-
tem please refer to a Lancia Dealer-
ship. DIESEL PARTICULATE
FILTER (DPF) MESSAGES
Exhaust System — Regeneration
Required Now. Under conditions of
exclusive short duration and low
speed driving and low speed driv-
ing cycles, the engine and exhaust
after-treatment system may never
reach the conditions required to re-
move the trapped PM. If this occurs
the “Exhaust System Regeneration
Required Now” message will be
displayed on the EVIC. By driving
your vehicle at highway speeds for
as little as 30 minutes, you can rem-
edy the condition in the particulate
filter system by allowing the
trapped PM to be removed to re-
store the system to normal operat-
ing condition.
Exhaust Service Require — See Dealer Now. The engine will be de-
rated to prevent permanent dam-
age to the after-treatment system. If
this condition occurs, it is necessary
to have your vehicle serviced by
your local authorized dealer.164
Page 172 of 316
tive Cruise Control) or "Cruise" is
highlighted in the EVIC. Status of the
ACC or Cruise is displayed in the
menu line also. Press and release the
SELECT (right arrow) button to dis-
play the following information:
For versions/markets, where pro-vided with ACC, one of several
messages will be displayed giving a
dynamic update of the status of the
feature as the driver changes fea-
ture status or following conditions
change. If ACC is active and a
warning or other feature is in the
EVIC main display, the ACC status
will be displayed in place of the
EVIC odometer line.
For vehicles with Cruise, one of sev- eral messages will be displayed giv-
ing a dynamic update of the status
of the feature as the driver changes
feature status or conditions change.
If Cruise is active and a warning or
other feature is in the EVIC main
display, the Cruise status will be
displayed in place of the EVIC
odometer line. Press and release the BACK button to
return to the main menu.
VEHICLE SPEED
Press and release the UP or DOWN
button until "Vehicle Speed" is high-
lighted in the EVIC. Press the SELECT
button to view a digital display of the
current speed in km/h or mph. Press-
ing the SELECT button a second time
will toggle the unit of measure between
km/h or mph. Press the BACK button
to return to the main menu.NOTE:
Changing the unit of measure in
the Vehicle Speed menu will not
change the unit of measure in the
EVIC.
TRIP INFO
Press and release the UP or DOWN
button until "Trip Info" is highlighted
in the EVIC. Press and release the
SELECT button to display the follow-
ing three trip features in the next
screen:
Trip A
Trip B
Elapsed Time Press the UP/DOWN buttons to cycle
through all the Trip Computer func-
tions or press the BACK button to
return to the main menu.
The Trip Functions mode displays the
following information:
Trip A
Shows the total distance traveled for
Trip A since the last reset.
Trip B
Shows the total distance traveled for
Trip B since the last reset.
Elapsed Time
Shows the total elapsed time of travel
since the last reset. Elapsed time will
increment when the ignition is in the
ON or START position.
Resetting A Trip Info Function
To Reset any of the three Trip Info
functions, select the function you
want to reset using the UP or DOWN
buttons. Push the SELECT button
until the feature displays zero.
TIRE BAR
Press and release the UP or DOWN
button until “Tire BAR” is high-
lighted in the EVIC. Press and release
166
Page 173 of 316
the SELECT button and one of the
following will be displayed:
If tire pressure is OK for all tires avehicle ICON is displayed with tire
pressure values in each corner of
the ICON.
If one or more tires have low pres- sure, "Tire Pressure LOW" is dis-
played with the vehicle ICON and
the tire pressure values in each cor-
ner of the ICON.
If the Tire Pressure system requires service, "Service Tire Pressure Sys-
tem" is displayed.
Tire pressure is an information only
function and cannot be reset. Press
and release the BACK button to re-
turn to the main menu.
VEHICLE INFO
(CUSTOMER
INFORMATION FEATURES)
Press and release the UP or DOWN
button until "Vehicle Info" is high-
lighted in the EVIC. Press and release
the SELECT button and Coolant
Temp will be displayed. Press the UP or DOWN button to scroll through the
following information displays.
Coolant Temp
Displays the actual coolant tempera-
ture.
Oil Pressure (for versions/
markets, where provided)
Displays the actual oil pressure.
Trans Temperature
Displays the actual transmission tem-
perature.
Engine Hours
Displays the number of hours of en-
gine operation.
MESSAGES #
Select from Main Menu using the UP
or DOWN buttons. This feature shows
the number of stored warning mes-
sages (in the # place holder). Pressing
the SELECT button will allow you to
see what the stored messages are.
Pressing the BACK button takes you
back to the Main Menu.
TURN MENU OFF
Select from Main Menu using the
DOWN button. Pressing the SELECT
button blanks the menu display. Pressing any one of the four steering
wheel buttons brings the menu back.
Uconnect Touch™
SETTINGS
The Uconnect Touch™ system uses a
combination of soft and hard keys
located on the center of the instru-
ment panel that allows you to access
and change the customer program-
mable features.
HARD-KEYS
Hard-Keys are located below the
Uconnect Touch™ system in the cen-
ter of the instrument panel. In addi-
tion, there is a Scroll/Enter control
knob located on the right side of the
Climate Controls in the center of the
instrument panel. Turn the control
knob to scroll through menus and
change settings (i.e., 30, 60, 90),
press the center of the control knob
one or more times to select or change a
setting (i.e., ON, OFF).
SOFT-KEYS
Soft-Keys are accessible on the
Uconnect Touch™ display.
167
Page 174 of 316
CUSTOMER
PROGRAMMABLE
FEATURES — Uconnect
Touch™ SYSTEM 8.4
SETTINGS
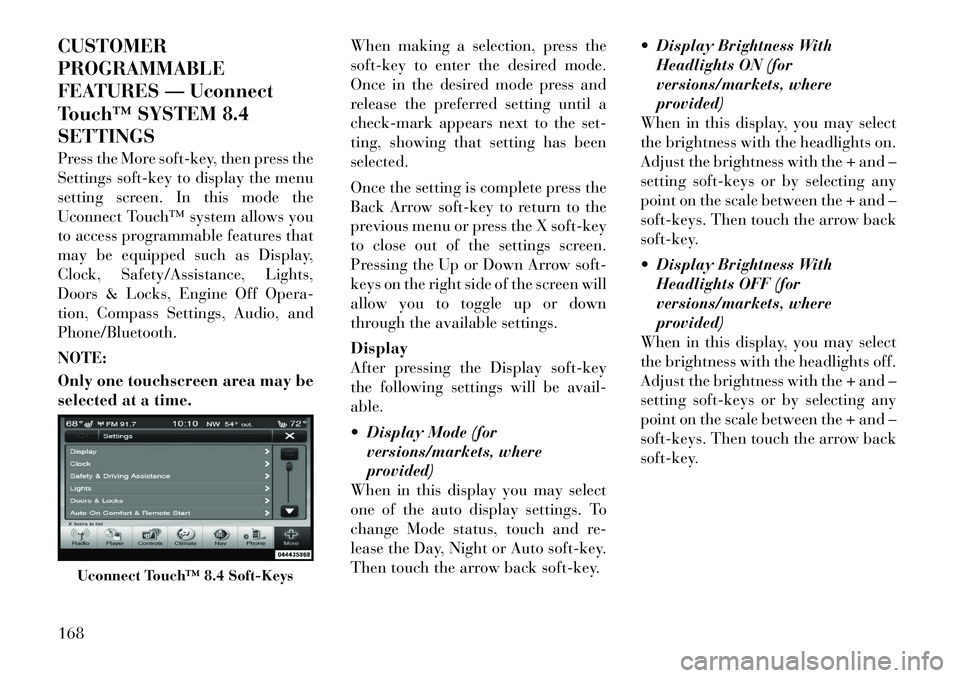
Press the More soft-key, then press the
Settings soft-key to display the menu
setting screen. In this mode the
Uconnect Touch™ system allows you
to access programmable features that
may be equipped such as Display,
Clock, Safety/Assistance, Lights,
Doors & Locks, Engine Off Opera-
tion, Compass Settings, Audio, and
Phone/Bluetooth.
NOTE:
Only one touchscreen area may be
selected at a time.When making a selection, press the
soft-key to enter the desired mode.
Once in the desired mode press and
release the preferred setting until a
check-mark appears next to the set-
ting, showing that setting has been
selected.
Once the setting is complete press the
Back Arrow soft-key to return to the
previous menu or press the X soft-key
to close out of the settings screen.
Pressing the Up or Down Arrow soft-
keys on the right side of the screen will
allow you to toggle up or down
through the available settings.
Display
After pressing the Display soft-key
the following settings will be avail-
able.
Display Mode (for
versions/markets, where
provided)
When in this display you may select
one of the auto display settings. To
change Mode status, touch and re-
lease the Day, Night or Auto soft-key.
Then touch the arrow back soft-key. Display Brightness With
Headlights ON (for
versions/markets, where
provided)
When in this display, you may select
the brightness with the headlights on.
Adjust the brightness with the + and –
setting soft-keys or by selecting any
point on the scale between the + and –
soft-keys. Then touch the arrow back
soft-key.
Display Brightness With Headlights OFF (for
versions/markets, where
provided)
When in this display, you may select
the brightness with the headlights off.
Adjust the brightness with the + and –
setting soft-keys or by selecting any
point on the scale between the + and –
soft-keys. Then touch the arrow back
soft-key.
Uconnect Touch™ 8.4 Soft-Keys
168
Page 176 of 316
Clock
After pressing the Clock soft-key the
following settings will be available.
Sync Time With GPS (forversions/markets, where
provided)
When in this display, you may auto-
matically have the radio set the time.
To change the Sync Time setting
touch the Sync with GPS Time soft-
key until a check-mark appears next
to the setting, showing that setting has
been selected. Touch the back arrow
soft-key to return to the previous
menu.
Set Time Hours (for versions/markets, where
provided)
When in this display, you may adjust
the hours. The Sync with GPS Time
soft-key must be unchecked. To make
your selection touch the + or - soft-
keys to adjust the hours up or down.
Touch the back arrow soft-key to re-
turn to the previous menu or touch the
X soft-key to close out of the settings
screen. Set Time Minutes (for
versions/markets, where
provided)
When in this display, you may adjust
the minutes. The Sync with GPS Time
soft-key must be unchecked. To make
your selection touch the + or - soft-
keys to adjust the minutes up or
down. Touch the back arrow soft-key
to return to the previous menu or
touch the X soft-key to close out of the
settings screen.
Time Format (for versions/ markets, where provided)
When in this display, you may select
the time format display setting. Touch
the Time Format soft-key until a
check-mark appears next to the 12hrs
or 24hrs setting, showing that setting
has been selected. Touch the back ar-
row soft-key to return to the previous
menu. Show Time In Status Bar (for
versions/markets, where
provided)
When in this display, you may turn on
or shut off the digital clock in the
status bar. To change the Show Time
Status setting touch the Show Time in
Status Bar soft-key until a check-
mark appears next to setting, showing
that setting has been selected. Touch
the back arrow soft-key to return to
the previous menu.
Safety / Assistance
After pressing the Safety / Assistance
soft-key the following settings will be
available.
Front Collision Sensitivity (for versions/markets, where
provided)
The Front Collision Warning (FCW)
feature can be can be set to Far, set to
Near or turned Off. The default status
of FCW is the Far setting. This means
the system will warn you of a possible
collision with the vehicle in front of
you when you are farther away. This
gives you the most reaction time. To
change the setting for more dynamic
driving, select the Near setting. This
170
Page 178 of 316
ParkView® Backup Camera (forversions/markets, where
provided)
Your vehicle may be equipped with
the ParkView® Rear Back Up Cam-
era that allows you to see an on-screen
image of the rear surroundings of
your vehicle whenever the shift lever
is put into REVERSE. The image will
be displayed on the radio touchscreen
display along with a caution note to
“check entire surroundings” across
the top of the screen. After five sec-
onds, this note will disappear. The
ParkView® camera is located on the
rear of the vehicle above the rear Li-
cense plate. To make your selection,
touch the ParkView® Backup Cam-
era soft-key, until a check-mark ap-
pears next to setting, showing that
setting has been selected. Touch the
back arrow soft-key to return to the
previous menu. Rain Sensing Auto Wipers (for
versions/markets, where
provided)
When this feature is selected, the sys-
tem will automatically activate the
windshield wipers if it senses moisture
on the windshield. To make your se-
lection, touch the Rain Sensing soft-
key, until a check-mark appears next
to setting, showing that setting has
been selected. Touch the back arrow
soft-key to return to the previous
menu.
Hill Start Assist (for
versions/markets, where
provided)
When this feature is selected, the Hill
Start Assist (HSA) system is active.
Refer to “Electronic Brake Control
System” in “Starting And Operating”
for system function and operating in-
formation. To make your selection,
touch the Hill Start Assist soft-key,
until a check-mark appears next to
setting, showing that setting has been
selected. Touch the back arrow soft-
key to return to the previous menu. Lights
After pressing the Lights soft-key the
following settings will be available.
Headlight Off Delay (for
versions/markets, where
provided)
When this feature is selected, the
driver can choose to have the head-
lights remain on for 0, 30, 60, or
90 seconds when exiting the vehicle.
To change the Headlight Off Delay
status touch the 0, 30, 60 or 90 soft-
key. Then touch the arrow back soft-
key.
Headlight Illumination On Approach (for versions/markets,
where provided)
When this feature is selected, the
headlights will activate and remain on
for 0, 30, 60, or 90 seconds when the
doors are unlocked with the Remote
Keyless Entry (RKE) transmitter. To
change the Illuminated Approach sta-
tus, touch the + or - soft-key to select
your desired time interval. Touch the
back arrow soft-key to return to the
previous menu.
172