Page 8 of 429

(seat belts, SRS, and child protection)
(main controls)
(indicators, gauges, multi-inf ormation display, dashboard, and steering column)
(fuel, vehicle break-in,")
(f luid capacities and tire pressures)
(seat belts, SRS, and child protection)
(main controls)
(indicators, gauges, multi-inf ormation display, dashboard, and steering column)
(fuel, vehicle break-in, and cargo loading)
(
)
(engine and transmission operation) (minder, f luid checking, minor services, and vehicle storage)
(f lat tire, jump starting, overheating, and f uses)
(vehicle specif ications, tires, and emissions controls)
(warranty and contact inf ormation)
(how to order)
climate control, audio, steering wheel, security, cruise control, HomeLink, and other convenience items
Contents
................................................................................................................................................
Index .I
..................................................
Service Inf ormation Summary . last page
............................................................
Driver and Passenger Saf ety .5
...............................................................................................
Your Vehicle at a Glance .3
.......
Instruments and Controls .59
.......................................................................
Bef ore Driving .247
..............
Features .145
.........................................................................................
Driving .269
.................................................
Maintenance .313
........................................
T aking Care of the Unexpected .361
..............................................
T echnical Inf ormation .387
..................
Warranty and Customer Relations (U.S. and Canada only) . 405
..................................................................................
A uthorized Manuals (U.S. only) .409INDEX
1
Note: All page numbers referenced in this document are hyperlinked.
2012 Pilot Online Reference Owner's Manual
Page 24 of 429

CONT INUED
This could cause
very serious injuries in a crash.
See page f or additional
inf ormation about your seat belts
and how to take care of them.
The front seats have adjustable seat
belt anchors. To adjust the height of
an anchor, squeeze the two release
buttons, and slide the anchor up or
down as needed (it has f our
positions). After all occupants have adjusted
their seats and head restraints, and
put on their seat belts, it is very
important that they continue to sit
upright, well back in their seats, with
their feet on the floor, until the
vehicle is safely parked and the
engine is of f .
Using a seat
belt that is not working properly can
result in serious injury or death.
Have your dealer check the belt as
soon as possible. Sitting improperly can increase the
chance of injury during a crash. For
example, if an occupant slouches,
lies down, turns sideways, sits
forward, leans forward or sideways,
or puts one or both f eet up, the
chance of injury during a crash is
greatly increased.
If a seat belt does not seem to work
properly, it may not protect the
occupant in a crash.
20
Protecting A dults and Teens
Never place t he shoulder port ion of alap/shoulder belt under your arm or behind your back.
No one should sit in a seat with aninoperat ive seat belt .Maintain a Proper Sitting
Position
6.
Driver and Passenger Saf ety
17
RELEASE
BUTTONS
Table of ContentsMain Menu
Page 70 of 429
If this indicator comes on when the
engine is running, the battery is not
being charged. For more inf ormation,
see page .
The engine can be severely damaged
if this indicator f lashes or stays on
when the engine is running. For
more inf ormation, see page .
For more inf ormation, see page .
You will also see a ‘‘CHECK
EMISSION SYSTEM
Page 73 of 429
This indicator normally comes on f or
a f ew seconds when you turn the
ignition switch to the ON (II)
position, and when the ignition
switch is turned to the START (III)
position. If it comes on at any other
time, there is a problem with the
ABS. If this happens, have your
vehicle checked at a dealer. With the
indicator on, your vehicle still has
normal braking ability but no anti-
lock brakes. For more inf ormation,
see page .This indicator comes on f or a f ew
seconds when you turn the ignition
switch to the ON (II) position. It will
go of f if you have inserted a properly
coded ignition key. If it is not a
properly coded key, the indicator will
blink and the engine will not start
(see page ).
This indicator also blinks several
times when you turn the ignition
switch f rom the ON (II) position to
the ACCESSORY (I) or LOCK (0)
position.
You will also see a ‘‘CHECK ABS
SYSTEM
Page 254 of 429
Bef ore you begin driving your
vehicle, you should know what
gasoline to use and how to check the
levels of important f luids. You also
need to know how to properly store
luggage or packages. The
inf ormation in this section will help
you. If you plan to add any
accessories to your vehicle, please
read the information in this section
first..............................
Break-in Period . 248
.................
Fuel Recommendation . 248
.........
Service Station Procedures . 250
....................................
Ref ueling . 250
Opening and Closing the
.......................................
Hood . 254
...................................
Oil Check . 255
.............
Engine Coolant Check . 255
...............................
Fuel Economy . 256
...
Accessories and Modif ications . 259
.............................
Carrying Cargo . 261
Bef ore Driving
Bef ore Driving
247
Main MenuINDEX
Page 262 of 429
Wait a f ew minutes af ter turning the
engine of f bef ore you check the oil.Remove the dipstick (orange loop).
Wipe of f the dipstick with a clean
cloth or paper towel.
Insert the dipstick all the way back
into its hole. Remove the dipstick again, and
check the level. It should be
between the upper and lower
marks.
If it is near or below the lower mark,
see on page . Look at the coolant level in the
radiator reserve tank. Make sure it is
between the MAX and MIN lines. If
it is below the MIN line, see
on page f or
inf ormation on adding the proper
coolant.
Refer to
on page f or inf ormation
about checking other items on your
vehicle.
1. 2. 3.
4.
328 331
325
A dding Engine Oil Engine Coolant Check
Oil Check
A dding
Engine Coolant
Owner
Page 265 of 429
�µ�µ
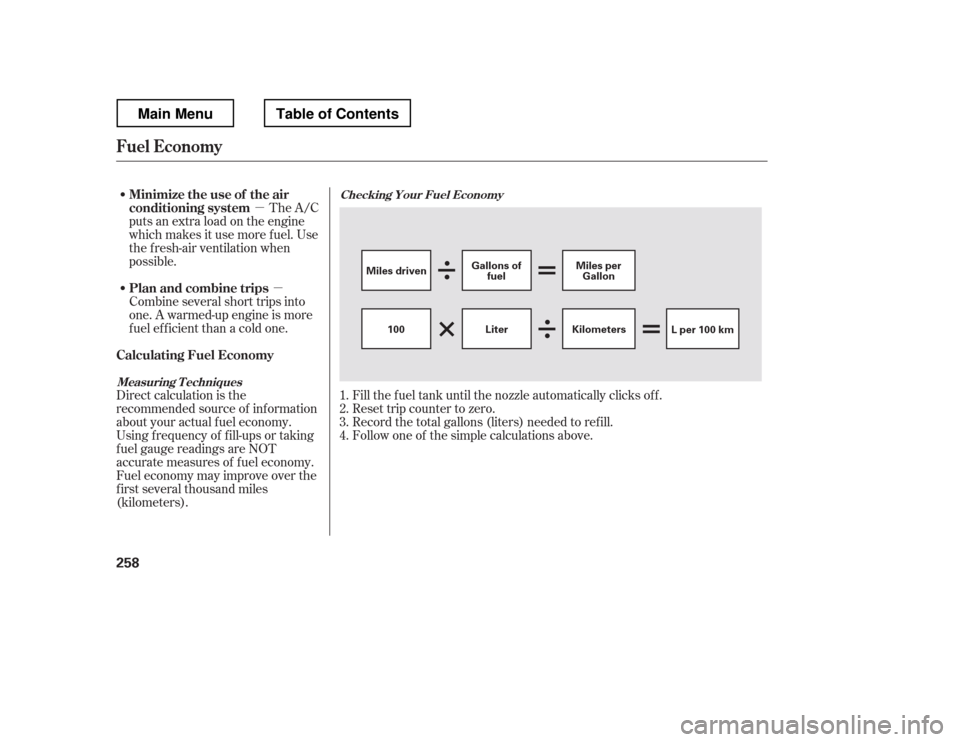
Fill the f uel tank until the nozzle automatically clicks of f .
Reset trip counter to zero.
Record the total gallons (liters) needed to ref ill.
Follow one of the simple calculations above.
The A/C
puts an extra load on the engine
which makes it use more f uel. Use
the f resh-air ventilation when
possible.
Combine several short trips into
one. A warmed-up engine is more
f uel ef f icient than a cold one.
Direct calculation is the
recommended source of inf ormation
about your actual f uel economy.
Using f requency of f ill-ups or taking
f uel gauge readings are NOT
accurate measures of f uel economy.
Fuel economy may improve over the
f irst several thousand miles
(kilometers). 1.2.3.4.
Checking Your Fuel Economy
Measuring T echniques
Fuel Economy
Minimize the use of the air
conditioning system
Plan and combine trips
Calculating Fuel Economy
258
Miles driven Gallons of
fuel Miles per
Gallon
100 KilometersL per 100 km
Liter
Main MenuTable of Contents
Page 278 of 429

Youshoulddothefollowingchecks
and adjustments bef ore you drive
your vehicle.Make sure all windows, mirrors,
and outside lights are clean and
unobstructed. Remove f rost, snow,
or ice.
Check that the hood is f ully closed.
Check that the tailgate is f ully
closed when it is not used as an
extended pickup bed.
Visually check the tires. If a tire
looks low, use a gauge to check its
pressure.
Check that any items you may be
carrying are stored properly or
f astened down securely. Check the adjustment of the
inside and outside mirrors (see
page ).
Check the steering wheel
adjustment (see page ).
Make sure the doors and In-Bed
Trunk are securely closed and
locked.
Fasten your seat belt. Check that
your passengers have f astened
their seat belts (see page ).
Check the seat adjustment (see
pages and ). When you start the engine, check
the gauges and indicators in the
instrument panel, and the
messages on the inf ormation
display or multi-inf ormation
display (depending on the model)(
s e e pag es,,, an d
).
1. 2. 3. 4.5. 6. 8.
7. 9.
10. 11.
121 133
99
16
61 76 77
119 89
Preparing to Drive
Driving
271
Main MenuTable of Contents


position, and when the ignition
switch is turned to the START (III)
position. If it comes on at a")

.
Wipe of f the dipstick with a clean
cloth or paper towel.
Insert the dipstick all th")