Page 338 of 429

If the reserve tank is completely
empty, you should also check the
coolant level in the radiator.
If Honda antif reeze/coolant is not
available, you may use another
major-brand non-silicate coolant as a
temporaryreplacement.Makesureit
is a high-quality coolant
recommended f or aluminum engines.
Continued use of any non-Honda
coolant can result in corrosion,
causing the cooling system to
malf unction or f ail. Have the cooling
system f lushed and ref illed with
Honda antif reeze/coolant as soon as
possible.
If the coolant level in the reserve
tank is at or below the MIN line, add
coolant to bring it up to the MAX line.
Inspect the cooling system f or leaks. Always use Honda Long-lif e Anti-
f reeze/Coolant Type 2. This coolant
is pre-mixed with 50 percent
antif reeze and 50 percent distilled
water. Never add straight antif reeze
or plain water.
CONT INUED
A dding Engine Coolant
Engine Coolant
Maint enance
331
RESERVE TANK
MIN MAX
Removing the radiator cap
while the engine is hot can
cause the coolant to spray out,
seriously scalding you.
Always let the engine and
radiator cool down before
removing the radiator cap.
Main MenuTable of Contents
Page 340 of 429
CONT INUED
Check the f luid level with the engine
at normal operating temperature.Park the vehicle on level ground.
Start the engine, let it run until the
radiator f an comes on, then shut
of f the engine. For accurate
results, wait about 60 seconds (but
no longer than 90 seconds) bef ore
doing step 2. Remove the dipstick (yellow loop)
f rom the transmission, and wipe it
with a clean cloth.
The transmission should be drained
and ref illed with new f luid when this
service is shown on the inf ormation
display or multi-inf ormation display
(depending on the model). 1.
2.
Windshield Washers, A ut omat ic T ransmission Fluid
Automatic Transmission Fluid
Maint enance
333
DIPSTICK
Do not use engine antif reeze or a
vinegar/water solution in the
windshield washer reservoir. Antif reeze
can damage your vehicle’s paint, while
a vinegar/water solution can damage
the windshield washer pump. Use only
commercially-available windshield
washer f luid.
Main MenuTable of Contents
Page 341 of 429

Insert the dipstick all the way back
in the transmission.
If you are not sure how to add f luid,
contact your dealer.
If the level is below the lower
mark, remove the f ill plug, then
add the f luid into the f ill hole to
bring it to the level between the
upper and lower marks on the
dipstick.
Pour the f luid slowly and caref ully so
you do not spill any. Clean up any
spill immediately; it could damage
components in the engine
compartment.
Insert the dipstick all the way into
the transmission securely as
shown in the illustration.
Remove the dipstick and check
the f luid level. It should be
between the upper and lower
marks. Always use Honda ATF DW-1
(automatic transmission f luid).
6.
5.
3. 4.
Automatic Transmission Fluid
334
DIPSTICK UPPER MARKLOWER MARK
Use only Honda ATF DW-1 (automatic
transmission f luid). Do not mix with
other transmission f luids.
Using transmission f luid other than
Honda ATF DW-1 may cause
deterioration in transmission operation
and durability, and could result in
damage to the transmission.
Damage resulting f rom the use of
transmission f luid other than Honda
ATF DW-1 is not covered by the Honda
new vehicle warranty.
Main MenuTable of Contents
Page 343 of 429

Pour the f luid slowly and caref ully so
you do not spill any. Clean up any
spill immediately; it could damage
components in the engine
compartment.
A low power steering f luid level can
indicate a leak in the system. Check
the f luid level f requently, and have
the system inspected as soon as
possible.
Always use Honda Power Steering
Fluid. You may use another power
steering f luid as an emergency
replacement, but have the power
steering system f lushed and ref illed
with Honda PSF as soon as possible.
If you are not sure how to add f luid,
contact your dealer.
Remove the cover, then check the
level on the side of the reservoir
when the engine is cold.
The f luid should be between the
UPPER LEVEL and LOWER LEVEL.
If not, add power steering f luid to the
UPPER LEVEL mark, and put the
cover back in place.
Power Steering Fluid
336
LOWER LEVEL
COVER
UPPER LEVEL
T urning the steering wheel to f ull lef t
or right lock and holding it there can
damage the power steering pump.
Main MenuTable of Contents
Page 379 of 429
Are you using the proper starting
procedure? Ref er toon page .
There may be an electrical
problem, such as no power to the
f uel pump. Check all the f uses
(see page ).
If youfindnothingwrong,youwill
need a qualif ied technician to f ind
the problem. See on page . Although this seems like a simple
procedure, you should take several
precautions.
You cannot start your vehicle by
pushing or pulling it.
Do you have f uel? Check the f uel
gauge; the low f uel indicator may
not be working.
Turn of f all electrical accessories:
heater, A/C, climate control, audio
system, lights, etc. Put the
transmission in Park, and set the
parking brake.
Open the hood, and check the
physical condition of the battery.
In very cold weather, check the
condition of the electrolyte. If it
seems slushy or f rozen, do not try
jump starting until it thaws.
1. 2.
272
385
380 Starting the
Engine
Emergency
Towing Jump Starting
If the Engine Won
Page 380 of 429
�µ
�´ �´ If the booster battery is in another
vehicle, have an assistant start
that vehicle and run it at a fast idle.
Start the vehicle. If the starter
motor still operates slowly, check
that the jumper cables have good
metal-to-metal contact.
Keep the ends of the jumper cables
away from each other and any metal
on the vehicle until everything is
disconnected. Otherwise, you may
cause an electrical short.
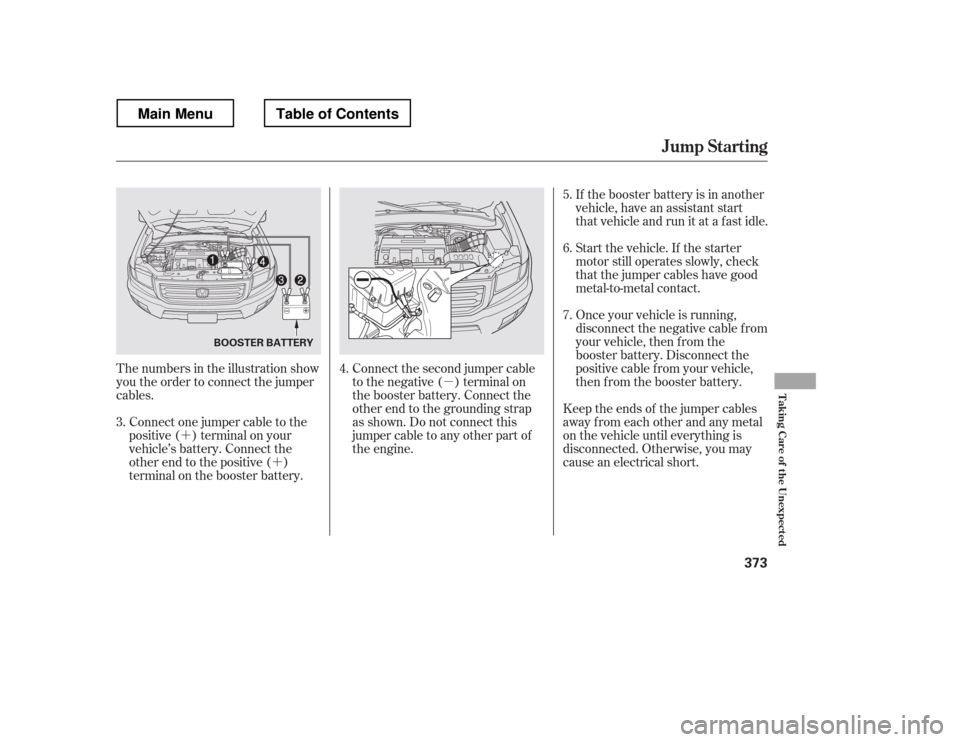
Connect the second jumper cable
to the negative ( ) terminal on
the booster battery. Connect the
other end to the grounding strap
as shown. Do not connect this
jumper cable to any other part of
the engine.
Connect one jumper cable to the
positive ( ) terminal on your
vehicle
Page 382 of 429

If the temperature gauge stays at
the red mark, turn of f the engine.
Look f or any obvious coolant leaks,
such as a split radiator hose.
Everything is still extremely hot,
so use caution. If you f ind a leak, it
must be repaired bef ore you
continue driving (seeon page ).
Put the radiator cap back on
tightly. Run the engine, and check
the temperature gauge. If it goes
back to the red mark, the engine
needs repair (seeon page ).
If the temperature stays normal,
check the coolant level in the
radiator reserve tank. If it has
gone down, add coolant to the
MAX mark. Put the cap back on
tightly.
If you do not f ind an obvious leak,
check the coolant level in the
radiator reserve tank. Add coolant
if the level is below the MIN mark.
If there was no coolant in the
reserve tank, you may need to add
coolant to the radiator. Let the
engine cool down until the pointer
reaches the middle of the tempera-
ture gauge, or lower, bef ore check-
ing the radiator.
Using gloves or a large heavy
cloth, turn the radiator cap
counterclockwise, without pushing
down, to the f irst stop. Af ter the
pressure releases, push down on
the cap, and turn it until it comes
off.Start the engine, and set the
temperature to maximum heat
(climate control to AUTO at
‘‘
Page 383 of 429
Saf ely pull of f the road, and shut
of f the engine. Turn on the hazard
warning indicators.
Let the vehicle sit f or a minute.
Open the hood, and check the oil
level (see page ). An engine
very low on oil can lose pressure
during cornering and other driving
maneuvers.
If necessary, add oil to bring the
level back to the full mark on the
dipstick (see page ).
Start the engine, and watch the oil
pressure indicator. If it does not go
out within 10 seconds, turn of f the
engine. There is a mechanical
problem that needs to be repaired
bef ore you can continue driving
(see on page).
This indicator should never come on
when the engine is running. If it
starts f lashing or stays on, the oil
pressure has dropped very low or
lost pressure. Serious engine
damage is possible, and you should
take immediate action.
If the charging system indicator
comes on brightly when the engine
is running, the battery is not being
charged.
You will also see a ‘‘CHECK
CHARGING SYSTEM

.
If youfindnothingwrong,youwil")
. An engine
very lo")