Page 11 of 429

�Î�Î�Î
�Î
�Î
�Î
�Î �Î
�Î
�Î �Î
�Î �Û
�Ý
�Π����ΠOnly on vehicles equipped with navigation system. Ref er to the navigati
on system manual.
To use the horn, press the center pad of the steering wheel.
If equipped
On models with navigation system.
On models without navigation system.
1:2:3:4:5:
Your Vehicle at a Glance
4
Vehicle with navigation system is shown. (P.31)
REMOTE AUDIO CONTROLS
HEADLIGHT CONTROL DIAL
STEERING WHEEL
ADJUSTMENTSEAT HEATERSPASSENGER AIRBAG OFF
INDICATOR
SEL/RESET BUTTON
INFO ( ) BUTTON
SELECT BUTTON
INTERIOR LIGHT CONTROL
SWITCH
CRUISE CONTROLS
HAZARD WARNING BUTTON
MULTI-CONTROL LEVER
(WINDSHIELD WIPERS/
WASHERS/TURN SIGNALS/
HEADLIGHT HIGH BEAMS)
(P.94)
(P.95) MOONROOF SWITCH
(P.131)
FOG LIGHTS
BED LIGHT SWITCH (P.99)
(P.126)
(P.99)
(P.76)
(P.76)
(P.76)
(P.76)
TRIP/RESET BUTTON
(P.76)
(P.97) INFO ( ) BUTTON
(P.203) (P.210)
INSTRUMENT PANEL
BRIGHTNESS
(P.98)
VTM-4 LOCK
SHIFT LEVER
VOICE CONTROL BUTTONS HORN
(P.144)
(P.221) (P.142)
(P.273)
(P.278)
BLUETOOTH
HANDSFREELINK
SYSTEM VOICE
CONTROL BUTTONS
VEHICLE STABILITY ASSIST (VSA)
OFF SWITCH
(P.294) 2
24
4
5
2
2 5
4
3 1
4
Main Menu
Page 100 of 429

�Î�Î �Î
�Î
�Î
�Î
�Î �Î
�Î
�Î �Î
�Î �Û �Ý
�Î �Î�Î�Î�Î
Only on vehicles equipped with navigation system. Ref er to the navigati
on system manual.
To use the horn, press the center pad of the steering wheel.
If equipped
On models with navigation system.
On models without navigation system.
1:2:3:4:5:
Controls Near the Steering Wheel
Inst rument s and Cont rols
93
MOONROOF SWITCH
REMOTE AUDIO CONTROLS HEADLIGHT CONTROL DIAL
STEERING WHEEL
ADJUSTMENTSEL/RESET BUTTON
INFO ( ) BUTTON
SELECT BUTTON
TRIP/RESET BUTTON
Vehicle with navigation system is shown. CRUISE CONTROLS
HAZARD WARNING BUTTON
MULTI-CONTROL LEVER
(WINDSHIELD WIPERS/
WASHERS/TURN SIGNALS/
HEADLIGHT HIGH BEAMS)
(P.131)
(P.94)(P.95)
FOG LIGHTS (P.99)
(P.76)
(P.76)
(P.76)
(P.76)
(P.76)
(P.203)
(P.221)
INSTRUMENT PANEL
BRIGHTNESS (P.98)
SHIFT LEVER
VTM-4 LOCK
BED LIGHT SWITCH (P.144)
(P.97)
(P.210)
(P.142)
SEAT HEATERS
INTERIOR LIGHT CONTROL
SWITCH
(P.126)
HORN
(P.99)
VOICE CONTROL BUTTONS INFO ( ) BUTTON
(P.273)
(P.278)
BLUETOOTH
HANDSFREELINK
SYSTEM VOICE CONTROL
BUTTONS
VEHICLE STABILITY ASSIST (VSA)
OFF SWITCH
(P.294)2
2 4
4
5
5
2 2
1
3 4
4
Main MenuTable of Contents
Page 101 of 429
�µ
�µ
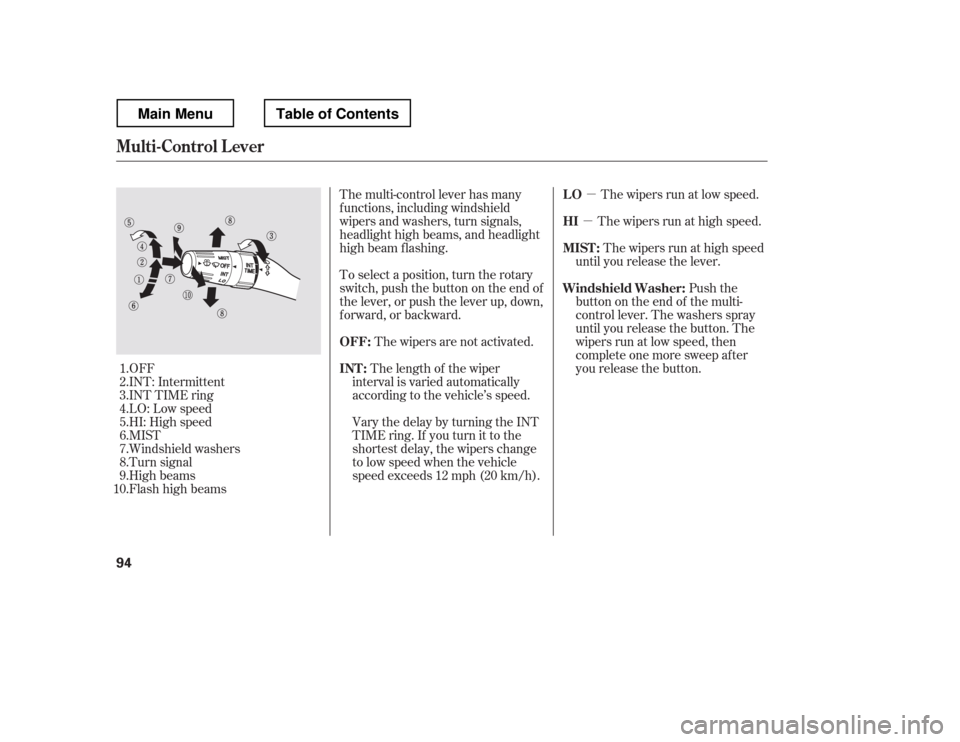
OFF
INT: Intermittent
INT TIME ring
LO: Low speed
HI: High speedMIST
Windshield washers
Turn signal
High beams
Flashhighbeams The multi-control lever has many
f unctions, including windshield
wipers and washers, turn signals,
headlight high beams, and headlight
high beam f lashing.
To select a position, turn the rotary
switch,pushthebuttonontheendof
the lever, or push the lever up, down,
f orward, or backward.
The wipers are not activated. The wipers run at low speed.
The wipers run at high speed.
The length of the wiper
interval is varied automatically
according to the vehicle
Page 102 of 429

�µ�µ
OFF
Parking and indicator lights
Headlights
Push down on the
multi-control lever to signal a lef t
turn and up to signal a right turn. To
signal a lane change, push lightly on
the lever and hold it. The lever will
return to center when you release it
or complete a turn.
To turn on the high
beams, push the multi-control lever
f orward until you hear a click. The
blue high beam indicator will come
on (see page ). Pull the lever back
to return to the low beams.
To f lash the high beams, pull the
lever back lightly, then release it.
The high beams will stay on as long
as you hold the lever back.
Your vehicle has heating wires at the
bottom of the windshield to help
heat the wiper blades and the
windshield. If the outside
temperature is near f reezing, the
heater turns on automatically when
you turn the ignition switch to the
ON (II) position. The heater turns
of f automatically when the outside
temperature is above f reezing.
This f unction helps to increase wiper
perf ormance when the wiper arms
sit in the parked position in snowy or
icy conditions.
1.2.3.
67
CONT INUED
Headlight Control Dial
Turn Signal
High BeamsAutomatic Heated Wiper Zone
Multi-Control L ever, Headlights
Inst rument s and Cont rols
95
Main MenuTable of Contents
Page 106 of 429

Push the lever up to lock the
steering wheel in position.
Make sure you have securely
locked the steering wheel in place
by trying to move it up and down.
Make any steering wheel adjustment
bef ore you start driving.
Move the steering wheel so it
points toward your chest, not
toward your f ace. Make sure you
can see the instrument panel
gauges and indicators.
Push the lever on the lef t side of
the steering column all the way
down.
Pushthebuttontoturnonthe
hazard warning lights (f our-way
flashers). This causes all four
outside turn signals and both turn
indicators in the instrument panel to
f lash. Use the hazard warning lights
if you need to park in a dangerous
area near heavy traffic, or if your
vehicle is disabled. 3. 4.
1. 2.
Steering Wheel A djustment
Hazard Warning Button
Hazard Warning Button, Steering Wheel A djustment
Inst rument s and Cont rols
99
Adjusting the steering wheel
position while driving may
cause you to lose control of the
vehicle and be seriously injured
inacrash.
Adjust the steering wheel only
when the vehicle is stopped.
Main MenuTable of Contents
Page 168 of 429

�µ
�µ
�µ
�µ�µ
�µ
You can use any of f ive methods to
f ind radio stations on the selected
band: tune, seek, scan, the preset
bars, and auto select.
Use the TUNE bar to tune
the radio to a desired f requency.
Press the side of the bar to tune
to a higher f requency, and press the side to tune to a lower
f requency.
The scan f unction samples
all stations with strong signals on the
selected band. To activate it, press
the SCAN button, then release it.
You will see SCAN in the display.
When the system finds a strong signal, it will stop and play that
station f or about 10 seconds.
The ignition switch must be in the
ACCESSORY (I) or ON (II) position.
Turn the system on by pushing the
PWR button or the AM/FM button.
Adjust the volume by turning the
volume knob.
Pushing the AUDIO button will also
turn on the system (see page ).
The band and f requency that the
radio was last tuned to are displayed.
To change bands, press the AM/FM
button. On the FM band, ST will be
displayed if the station is
broadcasting in stereo. Stereo
reproduction in AM is not available.
On the AM band, AM noise
reduction turns on automatically. The SEEK f unction
searches up and down f rom the
current f requency to f ind a station
with a strong signal. To activate it,
press the or side of the
SEEK/SKIP bar, then release it. If you do nothing, the system will
scan f or the next strong station and
play it f or 10 seconds. When it plays
a station that you want to listen to,
press the SCAN button again.
Each side of the bars (1
6) can store one f requency on AM
and two f requencies on FM.
Usethetune,seek,orscan
function to tune the radio to a
desired station.
Select the desired band, AM or
FM. FM1 and FM2 let you store
six stations each.
Pick a preset number (1 6), then
press and hold it until you hear a
beep.
Repeat steps 1 through 3 to store a
total of six stations on AM and
twelve stations on FM.
1. 2.3. 4.
163
CONT INUED
On models with navigation system
T o Play the A M/FM Radio T o Select a Station
TUNE
SCAN
SEEK
Preset
Playing the AM/FM Radio
Features
161
Main MenuTable of Contents
Page 309 of 429

�´
Trailer lights and equipment must
comply with f ederal, state, province/
territory, and local regulations.
Check trailer light requirements f or
the areas where you plan to tow, and
use only equipment designed f or
your vehicle.Ref er to the above illustration f or
wiring inf ormation.
We recommend that you have your
dealer install a Honda wiring harness
and converter. This harness has
been designed f or your vehicle.
Your vehicle is equipped with a
trailer lighting connector.
Your vehicle is equipped with a
connector to install an optional trailer
lighting connector that mates with
your vehicle. You can get this
optional connector f rom your dealer. Since lighting and wiring vary with
trailer type and brand, you should
also have a qualif ied mechanic install
a suitable connector between the
vehicle and the trailer.Except RT and U.S. Sport models
On RT and U.S. Sport models
Trailer Lights
Towing a Trailer
302
TAILLIGHTS
(GREEN/BLACK) ELECTRIC BRAKE
(BROWN/WHITE)
RIGHT TURN SIGNAL
AND BRAKE LIGHTS
(GREEN/RED) GROUND
(BLACK)
B CHARGE
(GREEN)
LEFT TURN SIGNAL
AND BRAKE LIGHTS
(GREEN/RED)
BACK-UP LIGHTS
(BLUE)
Main MenuTable of Contents
Page 348 of 429
Remove the socket by turning it
one-quarter turn counterclockwise.
Remove the burned-out bulb by
pulling it straight out of the socket.
Drop open the tailgate.
Remove the two bolts, and remove
the rear light assembly f rom the
rear pillar.
Determine which of the three
bulbs is burned out: brake/
taillight, turn signal/hazard light,
or back-up light.
Install the new bulb into the hole
and turn it one-quarter turn
clockwise to lock it in place.
Push the electrical connector back
onto the bulb. Make sure it is on
all the way.
Turn on the lights to test the new bulb.
Reinstall the inner f ender. Make
sure it is installed under the edge
of the f ront bumper.
Reinstall the holding clip, and push
in its head, then install the bolts
and tighten them securely.
1. 2. 3. 4. 5.
5. 6. 7. 8. 9.
CONT INUED
Replacing Rear Bulbs
Lights
Maint enance
341
BULB
SOCKET
Main MenuTable of Contents