Page 210 of 429

�´
�µ �´�µ
�Û�Ý
Three controls f or the audio system
are mounted in the steering wheel
hub. These let you control basic
f unctions without removing your
hand f rom the wheel. If you are listening to the radio, use
the CH button to change stations.
Each time you press the top ( ) of
the button, the system goes to the
next preset station on the band you
are listening to. Press the bottom
( ) to go back to the previous
station.
To search up and down f rom the
current f requency and f ind a station
with a strong signal, press the top
( ) or bottom ( ) of the button for
1 second.
The VOL button adjusts the volume
up ( ) or down ( ). Press the top
or bottom of the button, hold it until
the desired volume is reached, then
release it.
The MODE button changes the
mode. Pressing the button
repeatedly selects FM1, FM2, AM,
XM1, XM2 (if equipped), CD (if a
disc is loaded), or AUX-Audio.
CONT INUED
On RTS, RTL, Touring, and Sport
models
Remote Audio Controls
Features
203
MODE BUTTON
CH BUTTON
VOL BUTTON
Main MenuTable of Contents
Page 211 of 429
 of the CH button. Press the
bottom ( ) to return")
�´�µ �´
�µ
�´
�µ �´
�µ
�´ �µ
If you are playing a disc, the system
skips to the beginning of the next
track each time you press the top
( ) of the CH button. Press the
bottom ( ) to return to the
beginning of the current track. Press
it again to return to the previous
track. You will see the disc and track
numbers in the upper display.
To go to the next disc, press the top
( ) of the button for 1 second.
Press the bottom ( ) f or 1 second
to go back to the previous disc.
When you play an MP3/WMA disc,
press the top ( ) of the button for 1
second to go to the next folder. Press
the bottom ( ) for 1 second to go
back to the previous folder. If you are listening to XM Radio, use
the CH button to change channels.
Each time you press the top ( ) of
the button, the system goes to the
next preset channel. Press the
bottom( )togobacktothe
previous preset channel.
To go to the next channel of the
category you are listening to, press
the top ( ) of the button for 1
second. Press the bottom ( ) f or 1
second to go back to the previous
channel.
On models without navigation system
Remote Audio Controls
204
Main MenuTable of Contents
Page 213 of 429
If you make a mistake entering the
code, do not start over; complete the
f ive-digit sequence, then enter the
correct code. You have ten tries to
enter the correct code. If you are
unsuccessful in ten attempts, you
must then leave the system on for
one hour bef ore trying again.
The system will retain your AM and
FM presets even if power is
disconnected.We recommend that you register the
security code at Owner Link (owners.
honda.com). If you lose the Anti-
thef t Identif ication Card bef ore
registering the code at Owner Link,
you must obtain the code f rom your
dealer or
. To do this, you will need the
audio system
Page 214 of 429
Press and hold the H (Preset 1) side
of the bar until the hour advances to
the desired time. Press and hold the
M (Preset 2) side of the bar until the
minutes advance to the desired time.
To set the time, press the CLOCK
button until you hear a beep. The
displayed time begins to blink.
If your vehicle
Page 215 of 429
If equipped
The security system helps to protect
your vehicle and valuables f rom thef t.
The horn sounds and a combination
of headlights, parking lights, license
plate lights, and taillights f lashes if
someone attempts to break into your
vehicle or remove the audio unit.
This alarm continues for two
minutes, then the system resets. To
deactivate the system before the two
minutes have elapsed, unlock the
driver
Page 265 of 429
�µ�µ
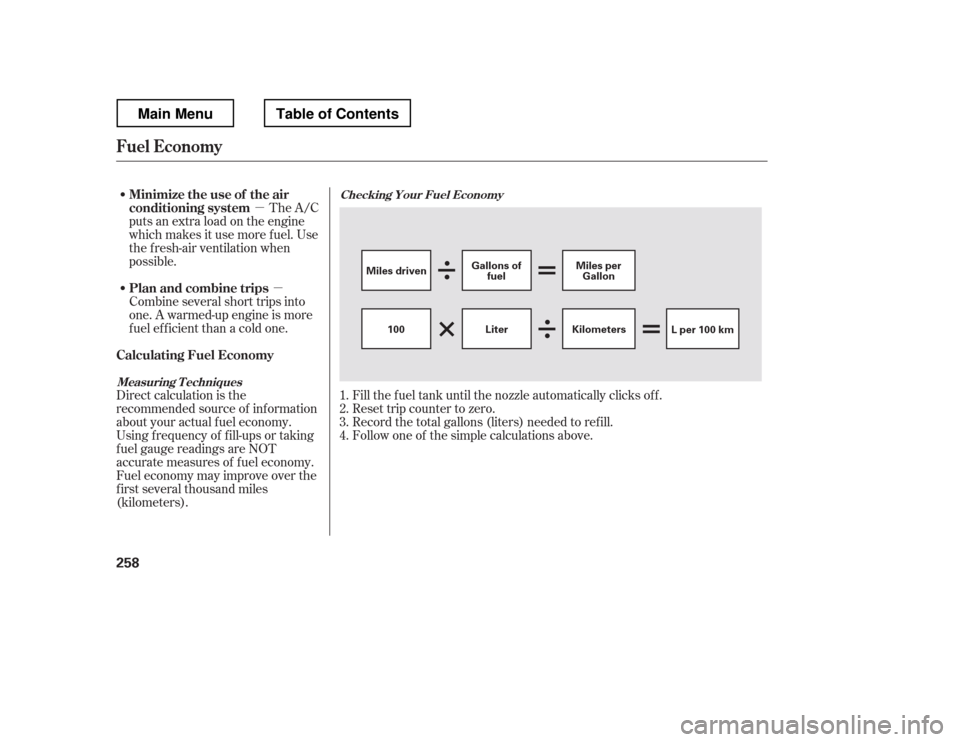
Fill the f uel tank until the nozzle automatically clicks of f .
Reset trip counter to zero.
Record the total gallons (liters) needed to ref ill.
Follow one of the simple calculations above.
The A/C
puts an extra load on the engine
which makes it use more f uel. Use
the f resh-air ventilation when
possible.
Combine several short trips into
one. A warmed-up engine is more
f uel ef f icient than a cold one.
Direct calculation is the
recommended source of inf ormation
about your actual f uel economy.
Using f requency of f ill-ups or taking
f uel gauge readings are NOT
accurate measures of f uel economy.
Fuel economy may improve over the
f irst several thousand miles
(kilometers). 1.2.3.4.
Checking Your Fuel Economy
Measuring T echniques
Fuel Economy
Minimize the use of the air
conditioning system
Plan and combine trips
Calculating Fuel Economy
258
Miles driven Gallons of
fuel Miles per
Gallon
100 KilometersL per 100 km
Liter
Main MenuTable of Contents
Page 292 of 429
CONT INUED
To see the inf lation pressures of all
f our tires, press the SEL/RESET
button. The display changes as
shown above.Each tire pressure is shown in PSI
(U.S. models) or in kPa (Canadian
models).
Each tire has its own pressure
sensor. If the air pressure of a tire
becomes signif icantly low, the
sensor in that tire immediately sends
a signal that causes the low tire
pressure/TPMS indicator in the
instrument panel to come on. If this
happens, you will see which tire is
losing pressure on the multi-
inf ormation display along with a
‘‘CHECK TIRE PRESSURE
Page 300 of 429
When VSA is off, the VSA OFF
indicator comes on as a reminder.
When VSA activates, you will see the
VSA system indicator blink.
If this indicator comes on while
driving, pull to the side of the road
when it is saf e, and turn of f the
engine. Reset the system by
restarting the engine. If the VSA
system indicator stays on or comes
back on while driving, have the VSA
system inspected by your dealer.The main f unction of the
VSA system is generally known as
Electronic Stability Control (ESC).
The system also includes a traction
control f unction. If the low tire pressure/TPMS
indicator comes on, see page .
Or, if the multi-inf ormation display
shows a ‘‘CHECK TPMS
SYSTEM

 side
of the bar until the hour advances to
the desired time. Press and hold the
M (Preset 2) side of the bar until the
minutes advance to the desired time.
To set the")

 or in kPa (Canadian
mode")
