Page 9 of 36
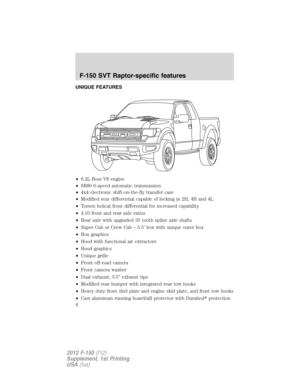
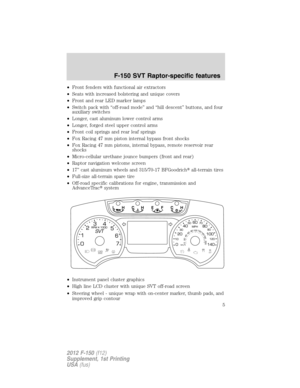
DRIVETRAIN
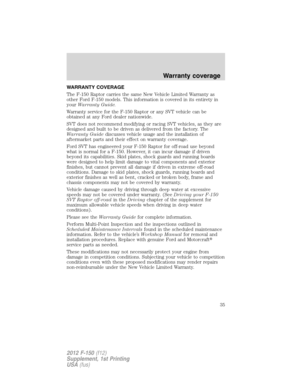
Rear axleModified rear axle for track width, 4.10 ratio
DriveshaftAluminum with hardened yoke
Gear ratiosGear Ratio
1st 4.17
2nd 2.34
3rd 1.52
4th 1.14
5th 0.87
6th 0.69
Reverse 3.40
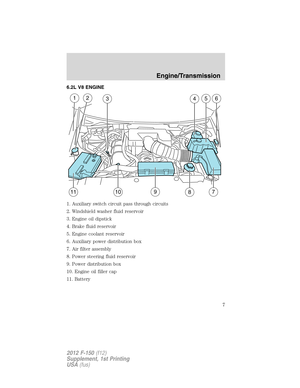
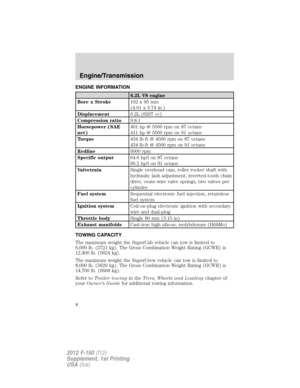
Engine/Transmission
9
2012 F-150(f12)
Supplement, 1st Printing
USA(fus)
Page 10 of 36

OFF-ROAD MODE
Off-road mode allows you to change the operating characteristics of the
following features to allow for better off-road performance:
•Transmission shifting and response
•Electronic locking differential
•AdvanceTrac�(ABS, RSC, Traction Control)
Enabling off-road mode
With the vehicle traveling less than
5 mph (8 km/h) and your foot off of
the accelerator pedal, press this
button to turn on off-road mode. A
chime will sound and a message will
display indicating that off-road mode
is active. If any of the conditions are
not met, the message center will
display the appropriate messages to guide the driver through the proper
operating procedures. SeeMessage centerin yourOwner’s Guidefor
more information.
Press the button again to turn it off.
WARNING:Off-road mode is specifically calibrated for off-road
driving conditions and should never be used on pavement.
With this mode enabled, the operating characteristics of the following
features will be altered:
•Transmission shifting and response–Transmission upshifts are
delayed and occur less frequently. This ensures the best possible
vehicle response and acceleration if the driver needs to briefly lift off
of the throttle to negotiate an obstacle or corner.
•Electronic locking differential (ELD)–If engaged, the ELD will
remain locked until the operator manually disengages it with the
control knob, or disengages off-road mode and exceeds the standard
ELD speed thresholds. Refer toElectronic locking differentialin the
Drivingchapter of yourOwner’s Guidefor more information.
•AdvanceTrac�–When off-road mode is engaged, the AdvanceTrac�
settings are altered for optimized off-road performance.
•Tow/haul mode –If tow/haul mode is active, it will be disabled. Also,
you cannot select tow/haul mode when off-road mode is on. As the
SVT Raptor is primarily a performance vehicle, off-road mode takes
priority over tow/haul mode.
Driving
10
2012 F-150(f12)
Supplement, 1st Printing
USA(fus)
Page 11 of 36

AdvanceTrac�modes
The AdvanceTrac�system, when used with off-road mode, provides the
SVT Raptor with alternative AdvanceTrac�calibrations which improve
off-road performance.
With off-road mode on, the following changes to AdvanceTrac�will
occur:
•Pressing the stability control off button once–This places the
vehicle in the off-road sport mode with the ESC, TCS and ABS active.
TCS and ESC are altered to allow for more tire spin and vehicle slip. It
also puts the ABS in a unique off-road mode calibration. RSC is
disabled in this mode.
Note:Operating the vehicle in this mode does not guarantee that the
vehicle will not become stuck in sand, snow or mud, etc. It is the
driver’s responsibility to assess off-road situations and determine if the
terrain is passable.
•Pressing and holding the stability control off button–This places
the vehicle in the off-road sport mode with the ESC, RSC, and TCS
disabled. While in 4X4 Hi and Lo, the steering efforts will seem slightly
higher due to the addition of the Torsen Helical front differential.
Driving
11
2012 F-150(f12)
Supplement, 1st Printing
USA(fus)
Page 12 of 36

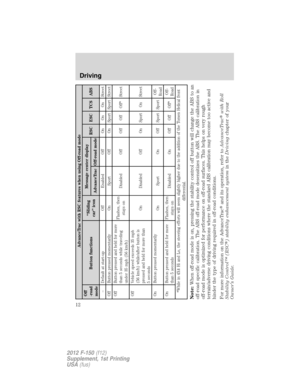
AdvanceTrac with RSC features when using Off-road mode
Off
-road
modeButton functions“Sliding
car” iconMessage center display
RSC ESC TCS ABS
AdvanceTrac Off-road mode
– Default at start-up Off Enabled Off On On On Street
Off Button pressed momentarily On Sport Off On Sport Sport Street
Off Button pressed and held for more
than 5 seconds while traveling
under 35 mph (56 km/h)Flashes, then
stays onDisabled Off Off Off Off* Street
Off Vehicle speed exceeds 35 mph
(56 km/h) while/after button is
pressed and held for more than
5 secondsOn Disabled Off On Sport On Street
On Button pressed momentarily
On Sport On Off Sport SportOff-
Road
On Button pressed and held for more
than 5 secondsFlashes, then
stays onDisabled On Off Off Off*Off-
Road
*While in 4X4 Hi and Lo, the steering efforts will seem slightly higher due to the addition of the Torsen Helical front
differential.
Note:When off-road mode is on, pressing the stability control off button will change the ABS to an
off-road specific calibration. The ABS off-road mode desensitizes the ABS. The ABS calibration in
off-road mode is optimized for performance on off-road surfaces. This helps on very rough
terrain/adverse driving conditions where the standard ABS calibration may become too active and
hinder the type of driving required in off-road conditions.
For more information on the AdvanceTrac�and its operation, refer toAdvanceTrac�with Roll
Stability Control™ (RSC�) stability enhancement systemin theDrivingchapter of your
Owner’s Guide.
Driving
12
2012 F-150(f12)
Supplement, 1st Printing
USA(fus)
Page 13 of 36

Hill descent mode
Hill descent allows the driver to set and maintain vehicle speed while
descending steep grades regardless of surface conditions. Refer to
Message centerin theInstrument Clusterchapter of yourOwner’s
Guidefor hill-descent related messages.
Hill descent control can maintain vehicle speeds on downhill grades
between 2 and 20 mph (3 and 32 km/h). Between 20 and 40 mph (32
and 64 km/h), the system remains enabled, but descent speed cannot be
set or maintained. If vehicle speed is above 40 mph (64 km/h), the
system is disabled. After this point, vehicle speed must drop below
40 mph (64 km/h), and the hill descent control button must be pressed
again to engage the feature.
WARNING:Hill descent mode does not provide hill hold at zero
mph (0 km/h). When stopped, the parking brake must be applied
and/or the vehicle must be placed in P (Park) or it may roll away.
Hill descent control requires a cooling down interval after a period of
sustained use. The amount of time that the feature can remain active
before cooling varies with conditions. The system will provide a warning
in the message center and a chime will sound when the system is about
to disengage for cooling. At this time, manually apply the brakes as
needed to maintain descent speed.
Enabling hill descent control and setting the descent speed
1. Press and release the hill descent
button located on the floor console.
A light on the button will illuminate
and a one second chime will sound
when this feature is activated.
2. To increase descent speed, press the accelerator pedal until the
desired speed is reached.
3. To decrease descent speed, press the brake pedal until the desired
speed is reached.
Whether accelerating or decelerating, once the desired descent speed is
reached, remove your feet from the pedals and the chosen vehicle speed
will be maintained.
SeeMessage centerin theInstrument Clusterchapter of yourOwner’s
Guidefor hill descent mode messages.
Driving
13
2012 F-150(f12)
Supplement, 1st Printing
USA(fus)
Page 14 of 36

Upfitter controls
The auxiliary switch board on the
center console makes aftermarket
customization easier, with four
prewired switches attached to the
power distribution box for electrical
accessories.
These switches are labeled AUX 1,
AUX 2, AUX 3 and AUX 4. They will
only operate while the ignition is in the on position, whether the engine
is running or not. It is, however, recommended that the engine remain
running to maintain battery charge when using the switches for extended
duration or higher current draws. When switched on by the operator
they provide 10 amps, 15 amps or 30 amps of electrical battery power
for a variety of uses.
The switches control relays and fuses that are located under the hood in
the auxiliary power distribution box. Refer to theRoadside Emergencies
chapter of your Owner’s Guide for information on fuse and relay
locations. See your authorized dealer for service.
There will also be one power lead for each switch found as a blunt-cut
and sealed wire located to the right of the glove box door and just above
the passenger side kick panel.
Additional pass through circuits that run through the dash panel to
under the hood are located in the same location.
The relays are coded as follows:
Switch Circuit number Wire color Fuse
AUX 1 CAC05 Yellow 30A
AUX 2 CAC06 Green with
Brown Trace30A
AUX 3 CAC07 Violet with
Green Trace15A
AUX 4 CAC08 Brown 10 A
FRONT OFF-ROAD CAMERA SYSTEM (IF EQUIPPED)
The front view camera is designed to be used as an aid in off-road
conditions, such as rock-climbing, slow-speed maneuvering, and cresting
hills when the front view may otherwise be obstructed through the
windshield. This feature adds front imaging off-road assistance to the
driver at vehicle speeds less than 15 mph (25 km/h).
Driving
14
2012 F-150(f12)
Supplement, 1st Printing
USA(fus)
Page 15 of 36

Note:The Front camera must be enabled in theinstrument cluster
under truck apps to operate. Off-road mode along with the electronic
locking differential or 4L must be activated in order for the front camera
system to function.
The front camera system is located
on the front grille. It provides a
video image of the area in front of
the vehicle. which appears on the
navigation system screen.
To use the front off-road camera system
With the off-road mode on and the electronic locking differential or 4L
activated, you can now enable the front camera system. SeeOff-road
modein theDrivingchapter of this supplement andElectronic locking
differential (ELD)in theDrivingchapter of your owner’s guide to
activate these systems. Place the gearshift lever into D (Drive) to see the
image on the screen. The area displayed on the screen may vary
according to the vehicle orientation and road conditions.
Note:TheFront Off-Road Camera Systemis a convenience feature and
is not a substitute for your front windshield. Always be aware of the
environment around you.
The front off-road video camera includes the following features that will
assist the driver at speeds less than 15 mph (25 km/h).
Note:Traveling above 15 mph (25 km/hr) while the camera is active will
cause the camera to shut off, it will not turn back on until the vehicle
goes below 13 mph (21 km/hr).
Driving
15
2012 F-150(f12)
Supplement, 1st Printing
USA(fus)
Page 16 of 36
 Front bumper
•(2) Red zone
•(3) Yellow zone
•(4) Green zone
•(5) Active guidelines (will appear
in blue)
Active and fixed guidelines
The active guidelines show the path of intended forw")
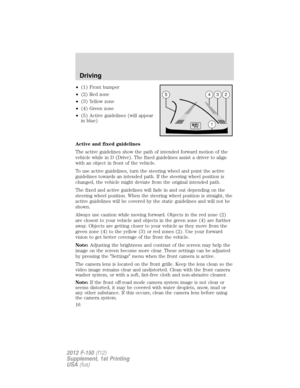
•(1) Front bumper
•(2) Red zone
•(3) Yellow zone
•(4) Green zone
•(5) Active guidelines (will appear
in blue)
Active and fixed guidelines
The active guidelines show the path of intended forward motion of the
vehicle while in D (Drive). The fixed guidelines assist a driver to align
with an object in front of the vehicle.
To use active guidelines, turn the steering wheel and point the active
guidelines towards an intended path. If the steering wheel position is
changed, the vehicle might deviate from the original intended path.
The fixed and active guidelines will fade in and out depending on the
steering wheel position. When the steering wheel position is straight, the
active guidelines will be covered by the static guidelines and will not be
shown.
Always use caution while moving forward. Objects in the red zone (2)
are closest to your vehicle and objects in the green zone (4) are further
away. Objects are getting closer to your vehicle as they move from the
green zone (4) to the yellow (3) or red zones (2). Use your forward
vision to get better coverage of the front the vehicle.
Note:Adjusting the brightness and contrast of the screen may help the
image on the screen become more clear. These settings can be adjusted
by pressing the�Settings�menu when the front camera is active.
The camera lens is located on the front grille. Keep the lens clean so the
video image remains clear and undistorted. Clean with the front camera
washer system, or with a soft, lint-free cloth and non-abrasive cleaner.
Note:If the front off-road mode camera system image is not clear or
seems distorted, it may be covered with water droplets, snow, mud or
any other substance. If this occurs, clean the camera lens before using
the camera system.
Driving
16
2012 F-150(f12)
Supplement, 1st Printing
USA(fus)