Page 341 of 396
339
10
1
2
3a
3b
1
2
3
4
CONFIGURATION
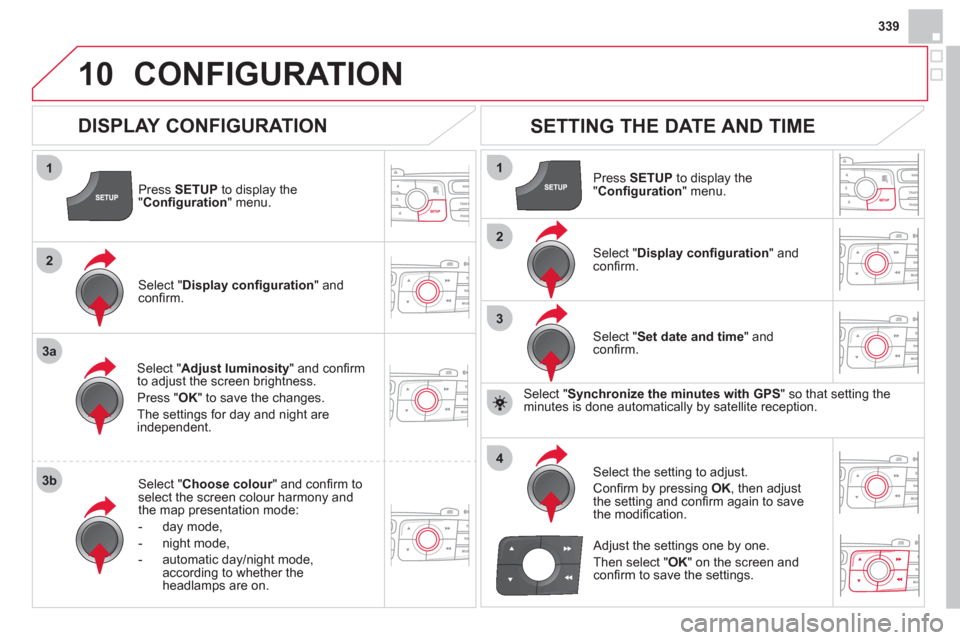
Press SETUP
to display the"Confi guration " menu.
Select " Adjust luminosity" and confi rm
to adjust the screen brightness.
Pr
ess "OK" to save the changes.
The settin
gs for day and night areindependent.
Select " Choose colour" and confi rm torselect the screen colour harmony and
the map presentation mode:
-
day mode,
- n
ight mode,
- automatic day
/night mode,
according to whether the headlamps are on.
SETTING THE DATE AND TIME
Select "Set date and time
" and confi rm.
Select the settin
g to adjust.
Confi rm by pressing OK, then adjust
the setting and confi rm again to save
the modifi cation.
Select " Display confi guration" andconfi rm.
Press SETUPto display the
" Confi guration" menu.
Select "Display confi guration
" andconfi rm.
Adjust the settings one by one.
Th
en select " OK
" on the screen and confi rm to save the settings.
DISPLAY CONFIGURATION
Select " Synchronize the minutes with GPS" so that setting theminutes is done automatically by satellite reception.
Page 344 of 396
11SCREEN MENU MAP
2
3
3
1
4
2
2
1
4
4
2
2
1
1
1
2
1
1
2
2
2
2
2
2
2
3
3
2
2
2
1
Random on all media
Re
petition
Audio settings (same as RADIO)
Activate/Deactivate AUX input
"MEDIA" MENU
Following media source
Eject USB support
Read mode
Normal
Random All passengers
Le-Ri balance
Fr-Re balance
Auto. Volume
Update radio list
Bass
Treble
Loudness
Distribution
Driver
Night mode
Auto Day/Night
Ad
just luminosity
Set date and time
"SETUP" MENU
Display configuration
Choose colour
Harmon
y
Cartography
Day mode
Voice synthesis
Guidance instructions volume
Select male voice/Select female voice
Page 346 of 396
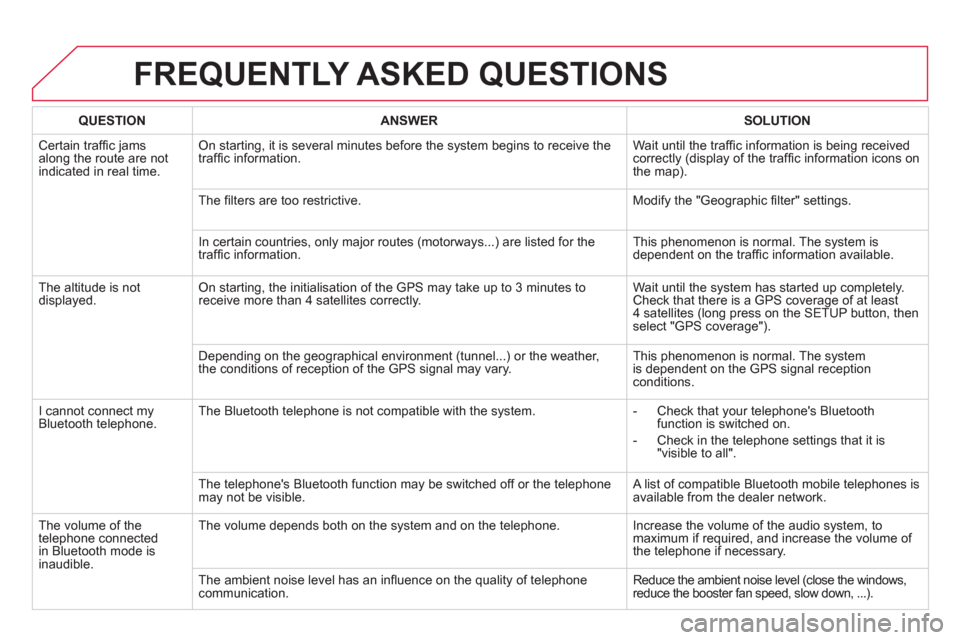
FREQUENTLY ASKED QUESTIONS
QUESTIONANSWERSOLUTION
Certain traffi c jams
along the route are not
indicated in real time.
On starting, it is several minutes before the system begins to receive the
traffi c information. Wait until the traffi c information is being received correctly (display of the traffi c information icons on
the map).
Th
e fi lters are too restrictive. Modify the "Geographic fi lter" settings.
In certain countries, onl
y major routes (motorways...) are listed for the
traffi c information. This phenomenon is normal. The system is
dependent on the traffi c information available.
Th
e altitude is not displayed. On starting, the initialisation of the GPS may take up to 3 minutes toreceive more than 4 satellites correctly. Wait until the system has started up completely.
Check that there is a GPS coverage of at least
4 satellites (long press on the SETUP button, then select "GPS coverage").
Dependin
g on the geographical environment (tunnel...) or the weather,
the conditions of reception of the GPS signal may vary. This phenomenon is normal. The system
is dependent on the GPS signal receptionconditions.
I cannot connect myBluetooth telephone.The Bluetooth telephone is not compatible with the system.
- Check that your telephone's Bluetoothfunction is switched on.
-
Check in the telephone settings that it is "visible to all".
The telephone's Bluetooth
function may be switched off or the telephone
may not be visible. A list of compatible Bluetooth mobile telephones is available from the dealer network.
Th
e volume of thetelephone connected
in Bluetooth mode isinaudible. The volume depends both on the s
ystem and on the telephone. Increase the volume of the audio system, tomaximum if required, and increase the volume of
the telephone if necessary.
The ambient noise level has an infl uence on the qualit
y of telephone communication. Reduce the ambient noise level (close the windows, reduce the booster fan speed, slow down, ...).
Page 352 of 396
01 FIRST STEPS
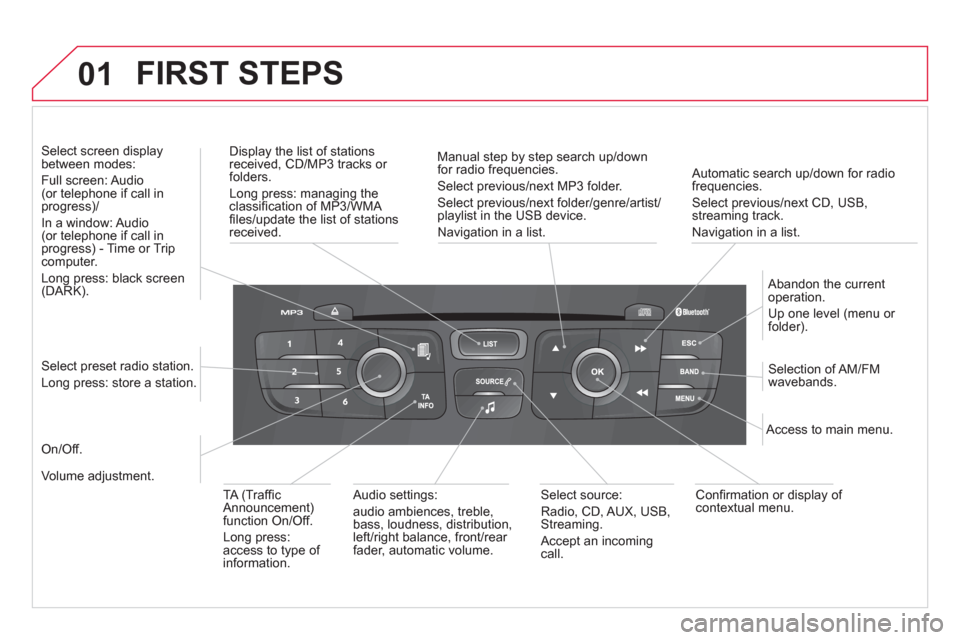
Automatic search up/down for radiofrequencies.
Select previous/next CD, USB,streaming track.
Navi
gation in a list.
Displa
y the list of stationsreceived, CD/MP3 tracks or folders.
Lon
g press: managing the classifi cation of MP3/WMA fi les/update the list of stationsreceived.
Abandon the current
operation.
Up one level (menu or folder).
On/Off.
Selection of AM/FM wavebands.Select preset radio station.
Long press: store a station.
Select screen display between modes:
Full screen: Audio(or telephone if call in
progress)/
In a window: Audio (or telephone if call in
progress) - Time or Tripcomputer.
Long press: black screen (DARK).
Audio settings:
audio ambiences, treble,
bass, loudness, distribution,
le
ft/right balance, front/rear fader, automatic volume.
Access to main menu.
TA
(Traffi cAnnouncement) function On/Off.
Lon
g press:
access to type of
information.
Select source:
Radio, CD, AUX, USB,Streaming.
Accept an incomin
gcall.
Confi rmation or display of contextual menu.
Manual step b
y step search up/downfor radio frequencies.
Select previous/next MP3 folder.
Select previous/next folder/genre/artist/playlist in the USB device.
Navigation in a list.
Volume ad
justment.
Page 374 of 396
5
63
4
07
2
1
CONFIGURATION
SETTING THE DATE AND TIME
Select the setting to be modifi ed.Confi rm by pressing OK
, then make
the change and confi rm again to save the modifi cation.
Using the arrows, select "Displayconfi guration
" and confi rm.
Press MENU.
Using the arrows, select "Personalisation-confi guration"and confi rm.
SCREEN C
Using the arrows, select "
Date and
time adjustment" and confi rm.
Ad
just the settings one by one,confi rming by pressing the OKbutton. Next select the "
OK " tab on
the screen then confi rm to exit from
the " Date and time adjustment"menu.
Page 376 of 396
08SCREEN MENU MAP
Personalisation-
configuration
Defi ne the vehicle parameters
Access to the vehicle
Plip action
Driving position setting
Unlocking boot only
Driving assistance
Parking brake automatic
Rear wipe in reverse gear
S
peeds memorised
Vehicle lighting
Directional headlamps
Daytime lights
Interior lighting
Follow-me-home headlamps
Welcome li
ghting
Choice of language
Displa
y confi guration
Choice of unit
s
Date and time adjustment
Display parameters
Brightness
Choice of sounds
Bluetooth connection
Connections management
Search for a device
1
2
3
3
3
2
3
3
3
2
3
3
2
3
3
1
1
2
2
2
2
1
1
1
Page 380 of 396
QUESTIONANSWER SOLUTION
A telephone connects
automatically,
disconnecting another
telephone. Automatic connection overrides manual connection. Modify the telephone settings to remove automatic connection.
The Apple ®
player is®
not recognised whenconnecting to the USB port.
The Apple ®player is of a generation that is not compatible with the USB. Connect the Apple ®player to the AUX Jack socket using a suitable cable (not supplied).
Th
e hard disk or deviceis not recognised whenconnecting to the USBport. Some hard disks and devices need a power suppl
y greater than is
provided by the audio system. Connect the device to the 230 V socket, the 12 V socket or an external power supply.
Caution
:
ensure that the device does not transmit
a voltage greater than 5 V (risk of destruction of
the system).
When streamin
g, the sound cuts momentarily. Some telephones prioritise connection of the "hands-free" profi le. Delete the "hands-free" connection profi le toimprove streaming.
In "Random all" pla
y,not all of the tracks areplayed.In "Random all" pla
y, the system can only take into account up to 999
tracks.
With the en
gine off, the
audio system switches off after a few minutes of use. When the en
gine is switched off, the audio system operating timedepends on the battery charge.
The switch-o
ff is normal: the audio system switches to economy mode and switches off to prevent discharging the vehicle's battery. Start the vehicle's en
gine to increase the batterycharge.
The messa
ge "the audio system is overheated"
appears on the display. In order to protect the installation if the surroundin
g temperature is too
high, the audio system switches to an automatic thermal protection mode leading to a reduction of the volume or stopping of the playing of the CD. Switch the audio s
ystem off for a few minutes to
allow the system to cool.
Page 386 of 396
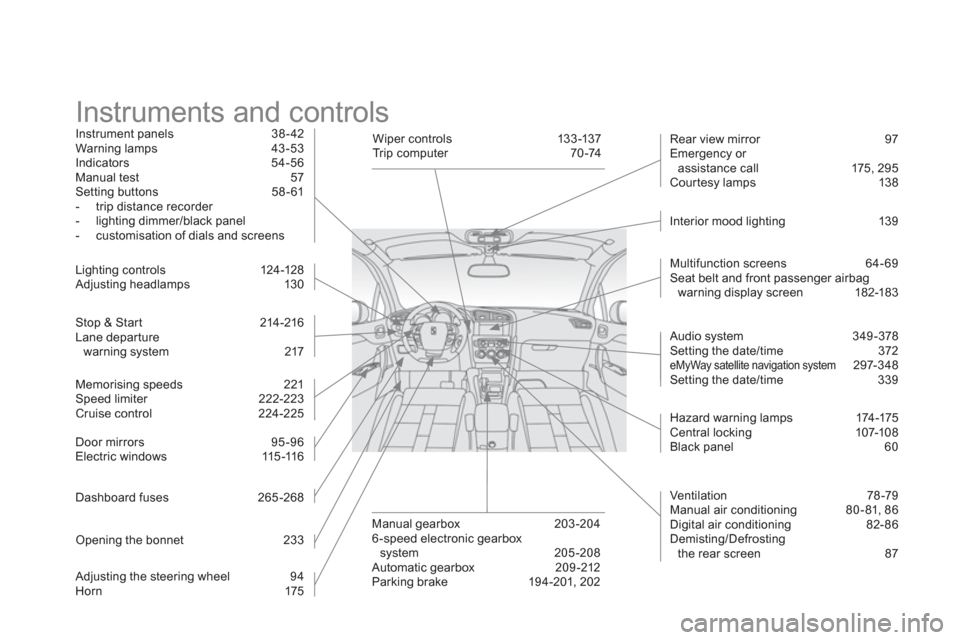
Instruments and controls Instrument panels 38 - 42
Warning lamps 43 -53
Indicators 54-56 Manual test 57 Setting buttons 58 - 61
- trip distance recorder
- lighting dimmer/black panel
- customisation of dials and screens
Stop & Star t 214 -216 Lane departure
warning system 217 Li
ghting controls 124-128
Adjusting headlamps 130
Door mirrors
95-96
Electric windows 115-11 6
Dashboard fuses 2
65-268
Openin
g the bonnet 233
Adjusting the steering wheel 94
Horn 175 Multi
function screens 64- 69 Seat belt and front passenger airbagwarning display screen 182-183
Manual gearbox 203 -204
6 -speed electronic gearbox
system 205-208
Automatic gearbox 209 -212
Parking brake 194-201, 202 Rear view mirror 97
Emergency or
assistance call 175, 295
Cour tesy lamps 138
W iper c ontrols 13 3 -137
Tr i p c o m p u t e r 7 0 -74
Ventilation 7
8-79
Manual air conditioning 80-81, 86
Digital air conditioning 82-86
Demisting/Defrosting
the rear screen 87
Audio s
ystem 349-378 Setting the date/time 372 eMyWay satellite navigation system 297-348 Setting the date/time 339 Interior mood li
ghting 13 9
Hazard warnin
g lamps 174-175 Central locking 107-108
Black panel 60 Memorisin
g speeds 221 Speed limiter 222-223 Cruise control 224-225