2012 CITROEN C6 DAG Handbook (in English)
-
 1
1 -
 2
2 -
 3
3 -
 4
4 -
 5
5 -
 6
6 -
 7
7 -
 8
8 -
 9
9 -
 10
10 -
 11
11 -
 12
12 -
 13
13 -
 14
14 -
 15
15 -
 16
16 -
 17
17 -
 18
18 -
 19
19 -
 20
20 -
 21
21 -
 22
22 -
 23
23 -
 24
24 -
 25
25 -
 26
26 -
 27
27 -
 28
28 -
 29
29 -
 30
30 -
 31
31 -
 32
32 -
 33
33 -
 34
34 -
 35
35 -
 36
36 -
 37
37 -
 38
38 -
 39
39 -
 40
40 -
 41
41 -
 42
42 -
 43
43 -
 44
44 -
 45
45 -
 46
46 -
 47
47 -
 48
48 -
 49
49 -
 50
50 -
 51
51 -
 52
52 -
 53
53 -
 54
54 -
 55
55 -
 56
56 -
 57
57 -
 58
58 -
 59
59 -
 60
60 -
 61
61 -
 62
62 -
 63
63 -
 64
64 -
 65
65 -
 66
66 -
 67
67 -
 68
68 -
 69
69 -
 70
70 -
 71
71 -
 72
72 -
 73
73 -
 74
74 -
 75
75 -
 76
76 -
 77
77 -
 78
78 -
 79
79 -
 80
80 -
 81
81 -
 82
82 -
 83
83 -
 84
84 -
 85
85 -
 86
86 -
 87
87 -
 88
88 -
 89
89 -
 90
90 -
 91
91 -
 92
92 -
 93
93 -
 94
94 -
 95
95 -
 96
96 -
 97
97 -
 98
98 -
 99
99 -
 100
100 -
 101
101 -
 102
102 -
 103
103 -
 104
104 -
 105
105 -
 106
106 -
 107
107 -
 108
108 -
 109
109 -
 110
110 -
 111
111 -
 112
112 -
 113
113 -
 114
114 -
 115
115 -
 116
116 -
 117
117 -
 118
118 -
 119
119 -
 120
120 -
 121
121 -
 122
122 -
 123
123 -
 124
124 -
 125
125 -
 126
126 -
 127
127 -
 128
128 -
 129
129 -
 130
130 -
 131
131 -
 132
132 -
 133
133 -
 134
134 -
 135
135 -
 136
136 -
 137
137 -
 138
138 -
 139
139 -
 140
140 -
 141
141 -
 142
142 -
 143
143 -
 144
144 -
 145
145 -
 146
146 -
 147
147 -
 148
148 -
 149
149 -
 150
150 -
 151
151 -
 152
152 -
 153
153 -
 154
154 -
 155
155 -
 156
156 -
 157
157 -
 158
158 -
 159
159 -
 160
160 -
 161
161 -
 162
162 -
 163
163 -
 164
164 -
 165
165 -
 166
166 -
 167
167 -
 168
168 -
 169
169 -
 170
170 -
 171
171 -
 172
172 -
 173
173 -
 174
174 -
 175
175 -
 176
176 -
 177
177 -
 178
178 -
 179
179 -
 180
180 -
 181
181 -
 182
182 -
 183
183 -
 184
184 -
 185
185 -
 186
186 -
 187
187 -
 188
188 -
 189
189 -
 190
190 -
 191
191 -
 192
192 -
 193
193 -
 194
194 -
 195
195 -
 196
196 -
 197
197 -
 198
198 -
 199
199 -
 200
200 -
 201
201 -
 202
202 -
 203
203 -
 204
204 -
 205
205 -
 206
206 -
 207
207 -
 208
208 -
 209
209 -
 210
210 -
 211
211 -
 212
212 -
 213
213 -
 214
214 -
 215
215
 7.19
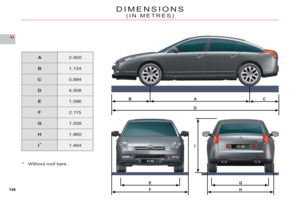
22
33
11
55
66
44
COPY CD TO JUKEBOX
OK
STOP COPY
COMPLETE CD
Select COPY CD TO JUKEBOX andpress the dial to confi rm.
Select COMPLETE CD to copy the entire CD and press the dial toconfi rm.")
 7.20
66
77
55
2
33
44
11
RENAME
JUKEBOX
JUKEBOX MANAGEMENT
Press the MENU button.
Select AUDIO FUNCTIONS and press the dial to confi rm.
Select the JUKEBOX function and press the dial to confi rm.")
 7.21
88
2
33
11
DELETE
OKJUKEBOX
Press the SOURCE button severaltimes in succession and select the JUKEBOX function.
Press the LIST button.
Turn the dial to select the fi les.
Press the ESC button")
 7.22
11
22
11
33
22
Press the MENU button then select the CONFIGURATION function, then SOUNDS, then ACTIVATE AUXILIARY SOURCE to activatethe audio equipment auxiliary input.
Connect the portable e")
 7.23
11
22
33
44
55
66
77
ACTIVATE VIDEO MODE
VIDEO PARAMETERS
You can connect video equipment (camcorder, digital camera, DVD player...) to the three audio/videosockets, located in the glove box.
T")
 7.24
11
22
33
11
22
06INTERNAL TELEPHONE
ENTERING THE PIN CODE
Open the slot by pressing the buttonusing the tip of a pen.
Install the SIM card in the holder and then insert it in theslot.
To remov")
 7.25
33
22
11
44
06
The services offered by the telephone depend on the network, the SIM card and the compatibility of the Bluetooth equipment used. Refer to your telephones manual and your operato")
 7.26
06
only.
Once the telephone has been connected, the system cansynchronise the address book and the call list. Repeat step 2 thenselect PHONE BOOK SYNCHRONISAT ION MODE. Select the synchronisati")