Page 161 of 216
7.11
03
11
22
33
44
55
66
77
44
Press the MENU button.
Turn the dial and select the MAP function.
Press the dial to confi rm the selection.
Turn the dial and selectthe MAP DETAILS function.Permits selection of the services which can be seen on the map(hotels, restaurants, hazardous areas...).
ACTIONS ON THE MAP
MAP DETAILS
GPS
Press the dial to confi rm the selection.
Turn the dial and select the orientation of your choice.
Select OK and press the dial toconfi rm.
Repeat steps 1 to 3 then turn the dial and select the MAP ORIENTATIONfunction.
MAP ORIENTATION
MAP ORIENTATION
3D VIEW
OK
NORTH DIRECTION
VEHICLE DIRECTION
For improved visibility, beyond the scale of 6 miles (10 km), the mapautomatically switches to North Orientation.
Page 162 of 216
7.12
11
22
33
44
55
66
77
03
Press the MENU button.
Press the dial to confi rm the selection.
Turn the dial and select the MAP function.
Turn the dial and select the MAP IN WINDOW or FULL SCREEN MAP tab.
Select OK
and press the dial to confi rm.
Press the dial to confi rm the selection.
Turn the dial and select the DISPLAY MAP function.
DISPLAYING THE MAP IN A WINDOW OR
IN FULL SCREEN MODE
GPS
DISPLAY MAP
FULL SCREEN MAP
OK
MAP IN WINDOW
Page 163 of 216
Page 164 of 216
7.14
11
22
33
44
55
9
88
77
66
03
ADDING A STAGE
During guidance, press the MENUbutton.
Turn the dial and select the NAV IGAT ION GUIDANCE function.
Press the dial to confi rm the selection.
Turn the dial and select theJOURNEY LEGS AND ROUTE function.
JOURNEY LEGS AND ROUTE
Select OK and press the dial toconfi rm the order of the stages.
When the new address has beenentered, select OK and press the dial to confi rm.
Enter for example a new address.
Select the ADD A STAGE function(9 stages maximum) and press the dial to confi rm.
Press the dial to confi rm the selection. Select STRICT (the stage must be completed in order to continue to the next destination) or PROXIMITY then press the dial to confi rm.
ENTER AN ADDRESS
ADD A STA GE
GPS
Page 165 of 216
7.15
55
66
77
11
22
33
44
04
ACTIVATING THE FILTER ON THE ROUTE
We recommend a fi lter on the route and a fi lter around the vehicle of:- 3 miles (5 km) or 6 miles (10 km) for a region with heavy traffi c, - 12 miles (20 km) for a region with a normal level of traffi c,- 60 miles (100 km) for long journeys (motorway).
Press the MENU button.
Turn the dial and select the TRAFFIC INFORMATION function.
Press the dial to confi rm the selection.
FILTER TRAFFIC INFORMATION
Turn the dial and select the FILTER TRAFFIC INFORMATION function.
TRAFFIC INFORMATION
Press the dial to confi rmthe selection.
Select the GEOGRAPHIC FILTER function and press the dial to confi rm.
Turn the dial and select KEEP ALL MESSAGES or KEEP MESSAGES. In this case, select the fi lter of your choice.
Select OK and press the dial toconfi rm.
GEOGRAPHIC FILTER
AROUND THE VEHICLE
ON THE ROUTE
OK
Page 166 of 216
7.16
11
22
33
44
66
55
77
04
Press the MENU button.
READ MESSAGES
NEW MESSAGE DISPLAY
OK
CONFIGURING THE TMC MESSAGE
ANNOUNCEMENTS
We recommend that you do not tick the NEW MESSAGE DISPLAY tab for regions with heavy traffi c.
Turn the dial and select the TRAFFICINFORMATION function.
Press the dial to confi rm the selection.
Turn the dial and select the CONFIGURE MESSAGE ANNOUNCEMENT function.
Select the READ MESSAGES tab.
The Traffi c Information Messages will be read by the voice synthesiser.
Select the NEW MESSAGE DISPLAY tab.
The traffi c information messages are extended to the fi lters selected(geographic...) and can also bedisplayed when guidance is not active.
CONFIGURE MESSAGE ANNOUNCEMENT
TRAFFIC INFORMATION
Select OK and press the dial toconfi rm.
Page 167 of 216

7.17
11
22
33
44
11
22
33
44
05AUDIO/VIDEO
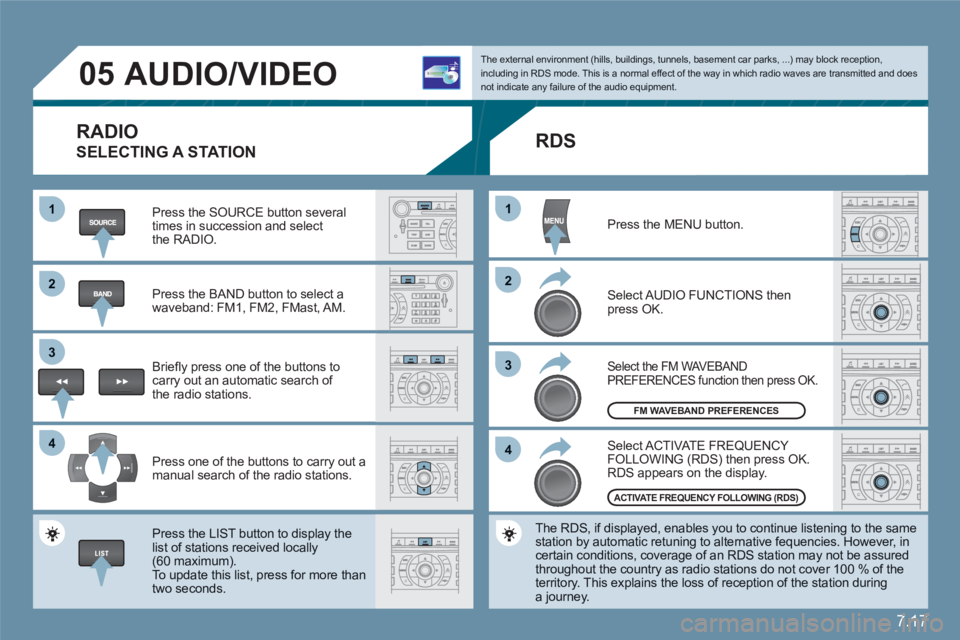
RADIO
SELECTING A STATION
Press the SOURCE button several times in succession and select the RADIO.
Press the BAND button to select awaveband: FM1, FM2, FMast, AM.
Briefl y press one of the buttons to carry out an automatic search of the radio stations.
Press one of the buttons to carry out a manual search of the radio stations.
Press the LIST button to display the list of stations received locally(60 maximum).
To update this list, press for more than two seconds.
The external environment (hills, buildings, tunnels, basement car parks, ...) may block reception,including in RDS mode. This is a normal effect of the way in which radio waves are transmitted and does not indicate any failure of the audio equipment.
RDS
Select ACTIVATE FREQUENCY FOLLOWING (RDS) then press OK. RDS appears on the display.
Select the FM WAVEBANDPREFERENCES function then press OK.
Select AUDIO FUNCTIONS then press OK.
Press the MENU button.
The RDS, if displayed, enables you to continue listening to the samestation by automatic retuning to alternative fequencies. However, in certain conditions, coverage of an RDS station may not be assuredthroughout the country as radio stations do not cover 100 % of the territory. This explains the loss of reception of the station duringa journey.
FM WAVEBAND PREFERENCES
ACTIVATE FREQUENCY FOLLOWING (RDS)
Page 168 of 216

7.18
1
22
05AUDIO/VIDEO
INFORMATION AND ADVICE
The MP3 format, an abbreviation of MPEG 1.2 & 2.5 Audio Layer 3,is an audio compression standard which permits the recording of several tens of music fi les on a single disc.
In order to be able to play a recorded CDR/DVDR or CDRW/DVDRW, when recording it is preferable to select standardsISO 9660 level 1.2 or Joliet. If the disc is recorded in another format, it may not be played correctly.It is recommended that the same recording standard is always used for an individual disc, with as low a speed as possible (4x maximum)for optimum sound quality. In the particular case of a multi-session CD, the Joliet standard isrecommended.
The audio equipment will only play audio fi les with the extension ".mp3" with a sampling rate of 22.05 KHz or 44.1 KHz. No other type of fi le (.wma, .mp4, .m3u...) can be played.
It is advisable to restrict fi le names to 20 characters without usingspecial characters (e.g.: " " ? ; ù) to avoid any playing or displayingproblems.
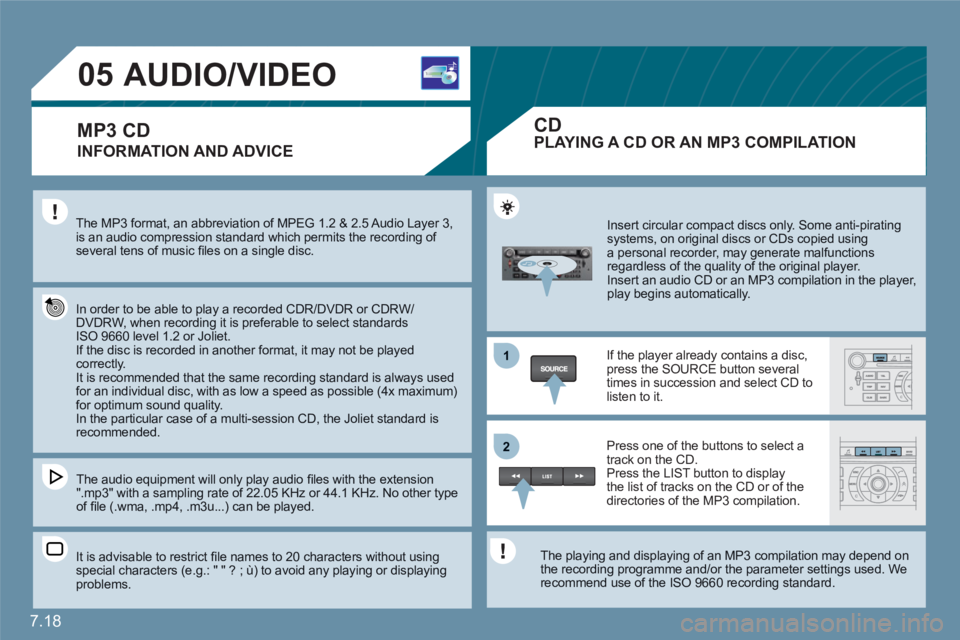
Insert circular compact discs only. Some anti-piratingsystems, on original discs or CDs copied usinga personal recorder, may generate malfunctionsregardless of the quality of the original player.
Insert an audio CD or an MP3 compilation in the player, play begins automatically.
If the player already contains a disc,press the SOURCE button several times in succession and select CD tolisten to it.
Press one of the buttons to select atrack on the CD. Press the LIST button to display the list of tracks on the CD or of thedirectories of the MP3 compilation.
The playing and displaying of an MP3 compilation may depend on the recording programme and/or the parameter settings used. We recommend use of the ISO 9660 recording standard.
MP3 CDPLAYING A CD OR AN MP3 COMPILATION
CD