2012 CHEVROLET MALIBU battery
[x] Cancel search: batteryPage 33 of 398
Black plate (3,1)Chevrolet Malibu Owner Manual - 2012
Keys, Doors, and Windows 2-3
.Check the transmitter's battery.
See“Battery Replacement” later
in this section.
.If the transmitter is still not
working correctly, see your
dealer or a qualified technician
for service.
Remote Keyless Entry
(RKE) System Operation
The Remote Keyless Entry (RKE)
transmitter functions work up to
60 m (195 feet) away from the
vehicle.
Keep in mind that other conditions,
such as those previously stated, can
impact the performance of the
transmitter.
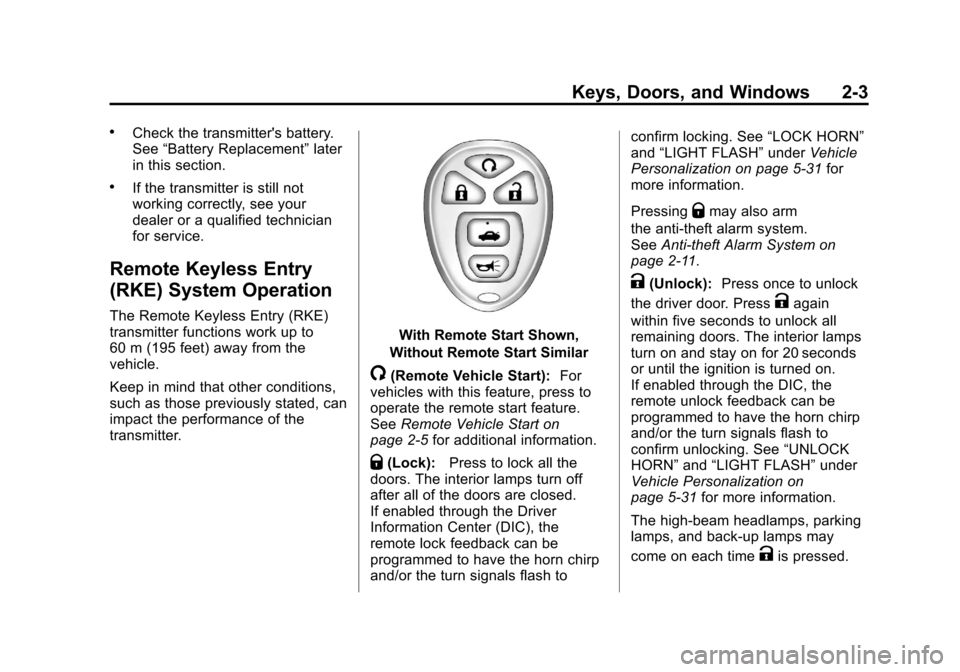
With Remote Start Shown,
Without Remote Start Similar
/(Remote Vehicle Start): For
vehicles with this feature, press to
operate the remote start feature.
See Remote Vehicle Start on
page 2‑5 for additional information.
Q(Lock):Press to lock all the
doors. The interior lamps turn off
after all of the doors are closed.
If enabled through the Driver
Information Center (DIC), the
remote lock feedback can be
programmed to have the horn chirp
and/or the turn signals flash to confirm locking. See
“LOCK HORN”
and “LIGHT FLASH” underVehicle
Personalization on page 5‑31 for
more information.
Pressing
Qmay also arm
the anti-theft alarm system.
See Anti-theft Alarm System on
page 2‑11.
K(Unlock): Press once to unlock
the driver door. Press
Kagain
within five seconds to unlock all
remaining doors. The interior lamps
turn on and stay on for 20 seconds
or until the ignition is turned on.
If enabled through the DIC, the
remote unlock feedback can be
programmed to have the horn chirp
and/or the turn signals flash to
confirm unlocking. See “UNLOCK
HORN” and“LIGHT FLASH” under
Vehicle Personalization on
page 5‑31 for more information.
The high‐beam headlamps, parking
lamps, and back‐up lamps may
come on each time
Kis pressed.
Page 34 of 398
Black plate (4,1)Chevrolet Malibu Owner Manual - 2012
2-4 Keys, Doors, and Windows
See“EXT (Exterior) LIGHTS” under
Vehicle Personalization on
page 5‑31 for additional information.
Pressing
Kon the RKE transmitter
disarms the anti-theft alarm system.
See Anti-theft Alarm System on
page 2‑11.
V(Remote Trunk Release):
Press and hold for about
one second to unlock the trunk.
The trunk can be opened with the
transmitter when the vehicle speed
is less than 3 km/h (2 mph) or when
the ignition is off.
L(Vehicle Locator/Panic
Alarm): Press and release to
locate the vehicle. The horn sounds
three times and the headlamps and
turn signals flash three times.
Press and hold
Lfor more than
two seconds to initiate the panic
alarm. The horn sounds and the
headlamps and turn signals flash for
30 seconds. Press
Lagain to
cancel the panic alarm.
Programming Transmitters to
the Vehicle
Only RKE transmitters programmed
to the vehicle will work. If a
transmitter is lost or stolen, a
replacement can be purchased and
programmed through your dealer.
When the replacement transmitter is
programmed to the vehicle, all
remaining transmitters must also be
programmed. Any lost or stolen
transmitters no longer work once the
new transmitter is programmed.
Each vehicle can have up to four
transmitters programmed to it.
Battery Replacement
Replace the battery if the KEY FOB
BATT (Battery) LOW message
displays in the DIC. See “KEY FOB
BATT (Battery) LOW” underKey
and Lock Messages on page 5‑28
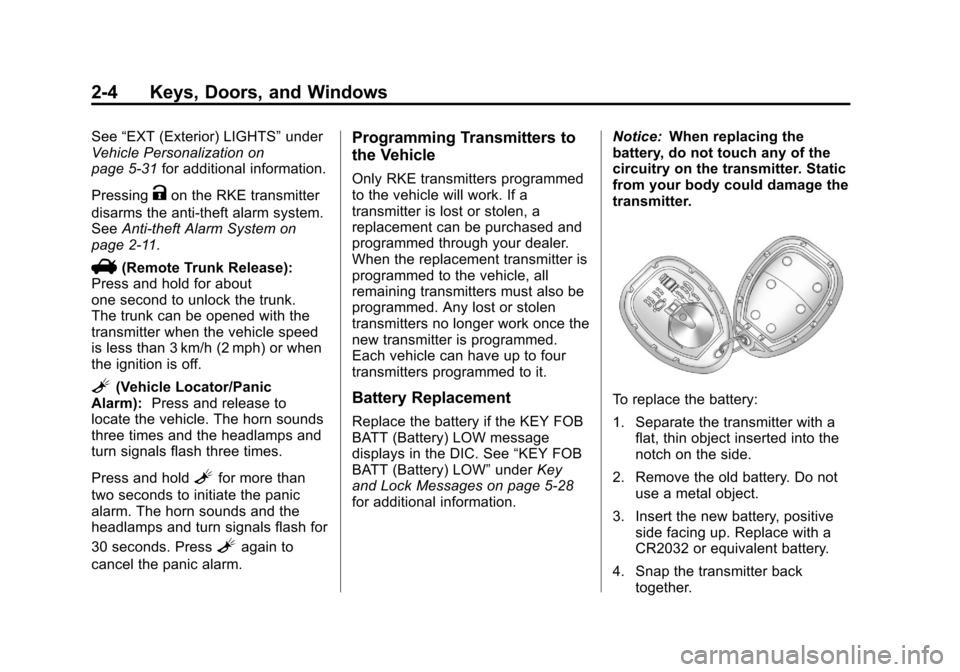
for additional information. Notice:
When replacing the
battery, do not touch any of the
circuitry on the transmitter. Static
from your body could damage the
transmitter.
To replace the battery:
1. Separate the transmitter with a flat, thin object inserted into the
notch on the side.
2. Remove the old battery. Do not use a metal object.
3. Insert the new battery, positive side facing up. Replace with a
CR2032 or equivalent battery.
4. Snap the transmitter back together.
Page 46 of 398
Black plate (16,1)Chevrolet Malibu Owner Manual - 2012
2-16 Keys, Doors, and Windows
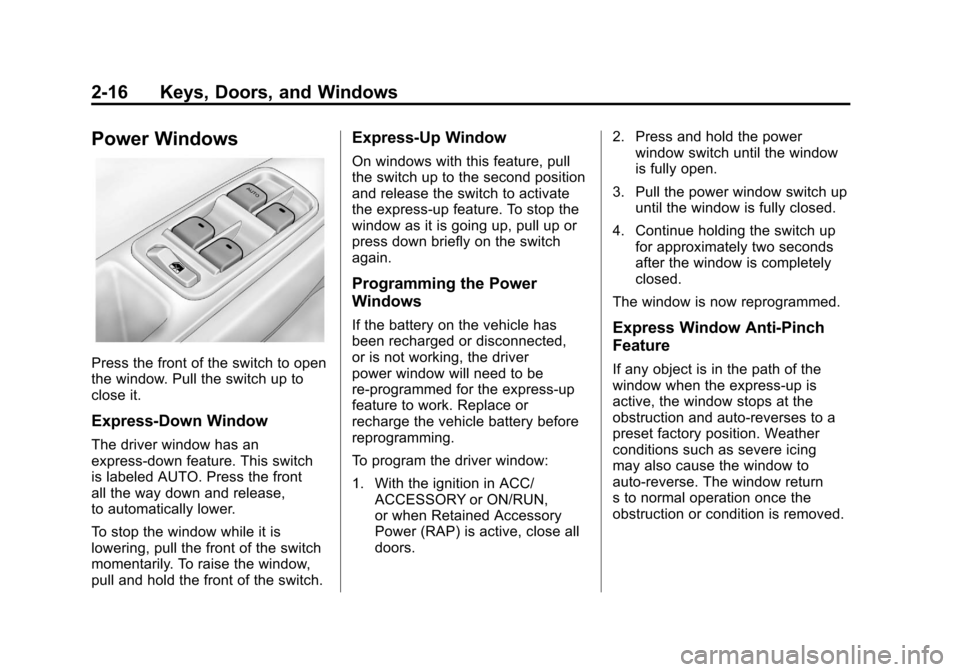
Power Windows
Press the front of the switch to open
the window. Pull the switch up to
close it.
Express-Down Window
The driver window has an
express-down feature. This switch
is labeled AUTO. Press the front
all the way down and release,
to automatically lower.
To stop the window while it is
lowering, pull the front of the switch
momentarily. To raise the window,
pull and hold the front of the switch.
Express-Up Window
On windows with this feature, pull
the switch up to the second position
and release the switch to activate
the express-up feature. To stop the
window as it is going up, pull up or
press down briefly on the switch
again.
Programming the Power
Windows
If the battery on the vehicle has
been recharged or disconnected,
or is not working, the driver
power window will need to be
re-programmed for the express-up
feature to work. Replace or
recharge the vehicle battery before
reprogramming.
To program the driver window:
1. With the ignition in ACC/ACCESSORY or ON/RUN,
or when Retained Accessory
Power (RAP) is active, close all
doors. 2. Press and hold the power
window switch until the window
is fully open.
3. Pull the power window switch up until the window is fully closed.
4. Continue holding the switch up for approximately two seconds
after the window is completely
closed.
The window is now reprogrammed.Express Window Anti-Pinch
Feature
If any object is in the path of the
window when the express‐up is
active, the window stops at the
obstruction and auto‐reverses to a
preset factory position. Weather
conditions such as severe icing
may also cause the window to
auto‐reverse. The window return
s to normal operation once the
obstruction or condition is removed.
Page 78 of 398
Black plate (30,1)Chevrolet Malibu Owner Manual - 2012
3-30 Seats and Restraints
Additional Factors Affecting
System Operation
Safety belts help keep the
passenger in position on the seat
during vehicle maneuvers and
braking, which helps the passenger
sensing system maintain the
passenger airbag status. See
“Safety Belts”and“Child Restraints”
in the Index for additional
information about the importance of
proper restraint use.
A thick layer of additional material,
such as a blanket or cushion,
or aftermarket equipment such as
seat covers, seat heaters, and seat
massagers can affect how well the
passenger sensing system
operates. We recommend that you
not use seat covers or other
aftermarket equipment except when
approved by GM for your specific
vehicle. See Adding Equipment to
the Airbag-Equipped Vehicle on
page 3‑31 for more information
about modifications that can affect
how the system operates.
{WARNING
Stowing of articles under the
passenger seat or between the
passenger seat cushion and
seatback may interfere with the
proper operation of the passenger
sensing system.
Servicing the
Airbag-Equipped Vehicle
Airbags affect how the vehicle
should be serviced. There are parts
of the airbag system in several
places around the vehicle. Your
dealer and the service manual have
information about servicing the
vehicle and the airbag system.
To purchase a service manual,
see Service Publications Ordering
Information on page 13‑18.
{WARNING
For up to 10 seconds after the
vehicle is turned off and the
battery is disconnected, an airbag
can still inflate during improper
service. You can be injured if you
are close to an airbag when it
inflates. Avoid yellow connectors.
They are probably part of the
airbag system. Be sure to follow
proper service procedures, and
make sure the person performing
work for you is qualified to do so.
Page 113 of 398

Black plate (7,1)Chevrolet Malibu Owner Manual - 2012
Instruments and Controls 5-7
The date does not automatically
display. To see the date press
H
while the radio is on. The date
with display times out after a
few seconds and goes back to the
normal radio and time display.
To change the time default setting
from 12 hour to 24 hour or to
change the date default setting from
month/day/year to day/month/year:
1. Press the
Hbutton and then
the softkey located below the
forward arrow label. Once the
time 12H and 24H, and the date
MM/DD/YYYY (month, day,
and year) and DD/MM/YYYY
(day, month, and year) displays.
2. Press the softkey located below the desired option.
3. Press the
Hbutton again to
apply the selected default, or let
the screen time out.
Power Outlets
Accessory power outlets can be
used to plug in electrical equipment,
such as a cell phone or MP3 player.
There are two accessory power
outlets. One accessory power outlet
is located inside the storage bin
below the climate controls and the
other outlet is on the rear of the
center storage console.
Remove the cover to access
and replace when not in use.
The accessory power outlet is
operational at all times.
{WARNING
Power is always supplied to the
outlets. Do not leave electrical
equipment plugged in when the
vehicle is not in use because the
vehicle could catch fire and cause
injury or death. Notice:
Leaving electrical
equipment plugged in for an
extended period of time while
the vehicle is off will drain the
battery. Always unplug electrical
equipment when not in use and
do not plug in equipment that
exceeds the maximum 20 ampere
rating.
Certain electrical accessories
may not be compatible with the
accessory power outlet and could
overload vehicle or adapter fuses.
If a problem is experienced,
see your dealer.
When adding electrical equipment,
be sure to follow the proper
installation instructions included
with the equipment. See Add-On
Electrical Equipment on page 9‑48.
Notice: Hanging heavy
equipment from the power
outlet can cause damage not
covered by the vehicle warranty.
The power outlets are designed
for accessory power plugs only,
such as cell phone charge cords.
Page 124 of 398
Black plate (18,1)Chevrolet Malibu Owner Manual - 2012
5-18 Instruments and Controls
Emissions Inspection and
Maintenance Programs
Some local governments may have
programs to inspect the on-vehicle
emission control equipment.
For the inspection, the emission
system test equipment is connected
to the vehicle’s Data Link
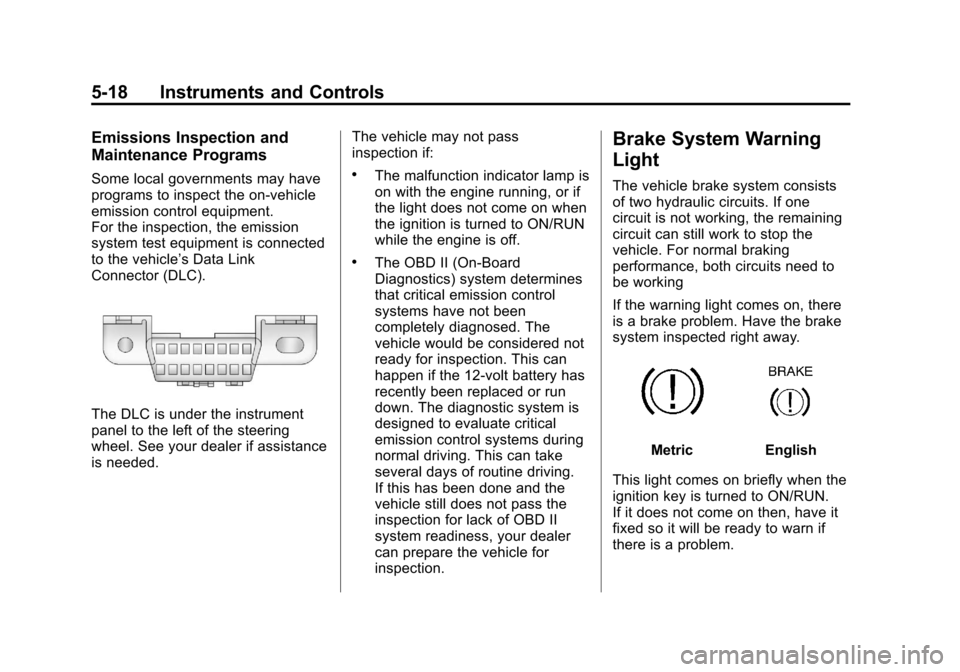
Connector (DLC).
The DLC is under the instrument
panel to the left of the steering
wheel. See your dealer if assistance
is needed.The vehicle may not pass
inspection if:
.The malfunction indicator lamp is
on with the engine running, or if
the light does not come on when
the ignition is turned to ON/RUN
while the engine is off.
.The OBD II (On-Board
Diagnostics) system determines
that critical emission control
systems have not been
completely diagnosed. The
vehicle would be considered not
ready for inspection. This can
happen if the 12-volt battery has
recently been replaced or run
down. The diagnostic system is
designed to evaluate critical
emission control systems during
normal driving. This can take
several days of routine driving.
If this has been done and the
vehicle still does not pass the
inspection for lack of OBD II
system readiness, your dealer
can prepare the vehicle for
inspection.
Brake System Warning
Light
The vehicle brake system consists
of two hydraulic circuits. If one
circuit is not working, the remaining
circuit can still work to stop the
vehicle. For normal braking
performance, both circuits need to
be working
If the warning light comes on, there
is a brake problem. Have the brake
system inspected right away.
MetricEnglish
This light comes on briefly when the
ignition key is turned to ON/RUN.
If it does not come on then, have it
fixed so it will be ready to warn if
there is a problem.
Page 134 of 398
Black plate (28,1)Chevrolet Malibu Owner Manual - 2012
5-28 Instruments and Controls
Fuel System Messages
CHECK GAS CAP
This message displays if the fuel
cap has not been fully tightened.
Recheck the fuel cap to make sure
that it is on properly. A few driving
trips with the cap properly installed
should turn the message off.
LOW FUEL
This message displays when your
vehicle is low on fuel. Refill the fuel
tank as soon as possible. SeeFuel
Gauge on page 5‑12, Fuel on
page 9‑36, and Filling the Tank on
page 9‑40 for more information.
Key and Lock Messages
KEY FOB BATT (Battery) LOW
This message displays if the
Remote Keyless Entry (RKE)
transmitter battery is low. Replace
the battery in the transmitter.
See“Battery Replacement” under
Remote Keyless Entry (RKE)
System Operation on page 2‑3.
Lamp Messages
AUTO (Automatic)
LIGHTS OFF
This message displays if the
automatic headlamp system is
disabled with the headlamp switch.
See Automatic Headlamp System
on page 6‑3 for more information.
AUTO (Automatic) LIGHTS ON
This message displays if the
automatic headlamp system is
enabled with the headlamp switch.
SeeAutomatic Headlamp System
on page 6‑3 for more information.
Ride Control System
Messages
ESC (Electronic Stability
Control) ACTIVE
If your vehicle has Electronic
Stability Control (ESC), this
message displays and the ESC/TCS
light on the instrument panel cluster
flashes when ESC is assisting you with directional control of the
vehicle. You may feel or hear the
system working and see this
message displayed in the DIC.
Slippery road conditions may exist
when this message is displayed,
so adjust your driving accordingly.
This message may stay on for a
few seconds after ESC stops
assisting you with directional
control of the vehicle. This is normal
when the system is operating.
See
Electronic Stability Control
(ESC) on page 9‑32 andElectronic
Stability Control (ESC)/Traction
Control System (TCS) Indicator/
Warning Light on page 5‑20 for
more information.
ESC (Electronic Stability
Control) OFF
If your vehicle has Electronic
Stability Control (ESC), this
message displays and the ESC/TCS
light on the instrument panel cluster
comes on solid when ESC is turned
off. Adjust your driving accordingly.
Page 137 of 398
Black plate (31,1)Chevrolet Malibu Owner Manual - 2012
Instruments and Controls 5-31
Vehicle Reminder
Messages
ICE POSSIBLE
This message displays when the
outside air temperature is cold
enough to create icy road
conditions. Adjust your driving
accordingly.
Washer Fluid Messages
LOW WASHER FLUID
This message displays when the
vehicle's windshield washer fluid is
low. Fill the windshield washer fluid
reservoir to the proper level as soon
as possible. SeeWasher Fluid on
page 10‑23.
Vehicle
Personalization
Your vehicle has personalization
capabilities that allow you to
program certain features to a
preferred setting. All of the features
listed may not be available on your
vehicle. Only the features available
will be displayed on the DIC.
The default settings for the features
were set when your vehicle left the
factory, but may have been changed
from their default state since
that time.
To change feature settings, use the
following procedure:
Entering Personalization Menu
1. Turn the ignition on while the
vehicle is stopped.
To avoid excessive drain on the
battery, it is recommended that
the headlamps are turned off. 2. Press and hold the information
and reset buttons at the
same time for one second,
then release to enter the
personalization menu.
If the vehicle speed is greater
than 3 km/h (2 mph), only the
UNITS menu will be accessible.
3. Press the information button to scroll through the available
personalization menu modes.
Press the reset button to scroll
through the available settings for
each mode.
If you do not make a selection
within ten seconds, the display
will go back to the previous
information displayed.