2012 CHEVROLET MALIBU center console
[x] Cancel search: center consolePage 26 of 398
Black plate (20,1)Chevrolet Malibu Owner Manual - 2012
1-20 In Brief
Power Outlets
Accessory power outlets can be
used to plug in electrical equipment,
such as a cell phone or MP3 player.
There are two accessory power
outlets. One accessory power outlet
is located inside the storage bin
below the climate controls and the
other outlet is on the rear of the
center storage console.
Remove the cover to access and
replace when not in use.
SeePower Outlets on page 5‑7.
Performance and
Maintenance
Traction Control
System (TCS)
The traction control system limits
wheel spin. The system turns on
automatically every time the vehicle
is started.
.To turn off traction control,
press and release
ton the
center console.
4illuminates
and the appropriate DIC
message is displayed. See Ride
Control System Messages on
page 5‑28.
.Press and release the button
again to turn on traction control.
For more information, see Traction
Control System (TCS) on
page 9‑30.
Electronic Stability
Control (ESC)
The Electronic Stability Control
system assists with directional
control of the vehicle in difficult
driving conditions. The system turns
on automatically every time the
vehicle is started.
.To turn off both traction control
and Electronic Stability Control,
press and hold
tuntil4andg
illuminate and the appropriate
DIC messages are displayed.
See Ride Control System
Messages on page 5‑28.
.Press and release the button
again to turn on both systems.
For more information, see
Electronic Stability Control (ESC) on
page 9‑32.
Page 103 of 398
Black plate (1,1)Chevrolet Malibu Owner Manual - 2012
Storage 4-1
Storage
Storage Compartments
Instrument Panel Storage . . . . . 4-1
Glove Box . . . . . . . . . . . . . . . . . . . . 4-1
Cupholders . . . . . . . . . . . . . . . . . . . 4-1
Front Storage . . . . . . . . . . . . . . . . . 4-2
Center Console Storage . . . . . . 4-3
Additional Storage Features
Convenience Net . . . . . . . . . . . . . 4-3
Storage
Compartments
Instrument Panel Storage
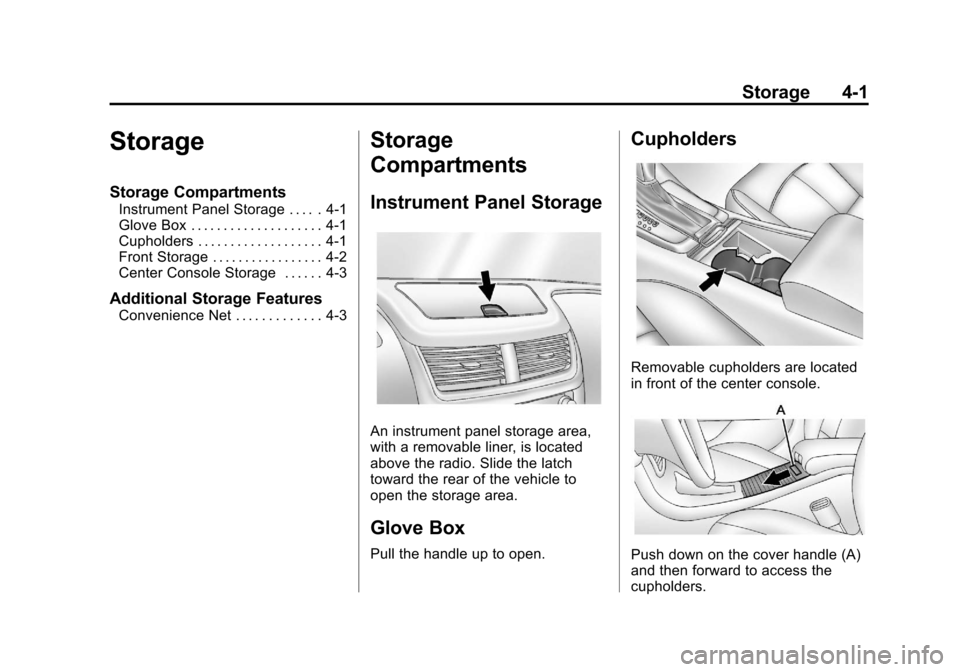
An instrument panel storage area,
with a removable liner, is located
above the radio. Slide the latch
toward the rear of the vehicle to
open the storage area.
Glove Box
Pull the handle up to open.
Cupholders
Removable cupholders are located
in front of the center console.
Push down on the cover handle (A)
and then forward to access the
cupholders.
Page 104 of 398
Black plate (2,1)Chevrolet Malibu Owner Manual - 2012
4-2 Storage
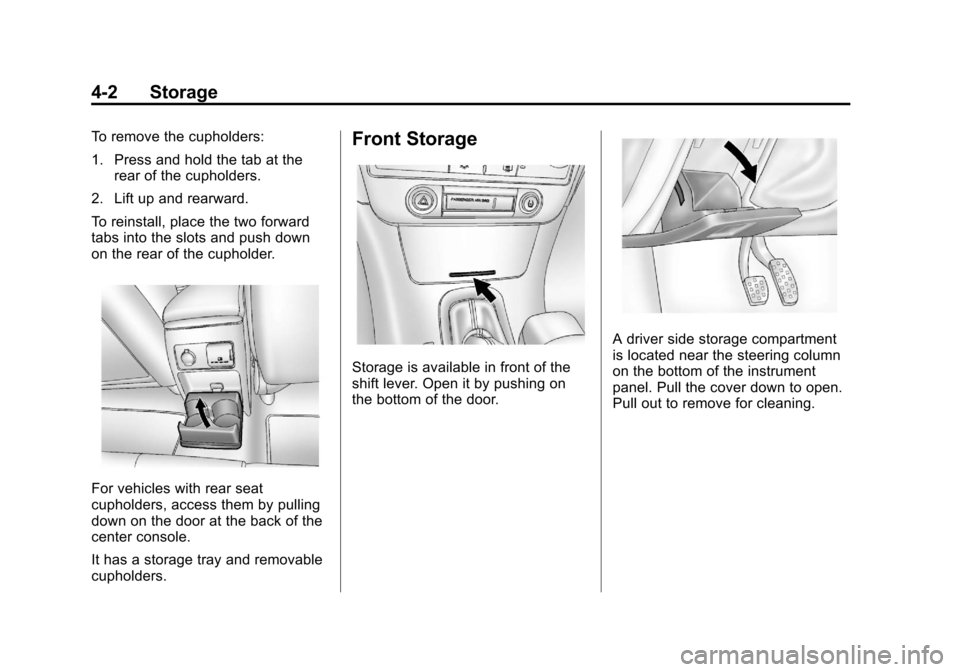
To remove the cupholders:
1. Press and hold the tab at therear of the cupholders.
2. Lift up and rearward.
To reinstall, place the two forward
tabs into the slots and push down
on the rear of the cupholder.
For vehicles with rear seat
cupholders, access them by pulling
down on the door at the back of the
center console.
It has a storage tray and removable
cupholders.
Front Storage
Storage is available in front of the
shift lever. Open it by pushing on
the bottom of the door.
A driver side storage compartment
is located near the steering column
on the bottom of the instrument
panel. Pull the cover down to open.
Pull out to remove for cleaning.
Page 105 of 398
Black plate (3,1)Chevrolet Malibu Owner Manual - 2012
Storage 4-3
Center Console Storage
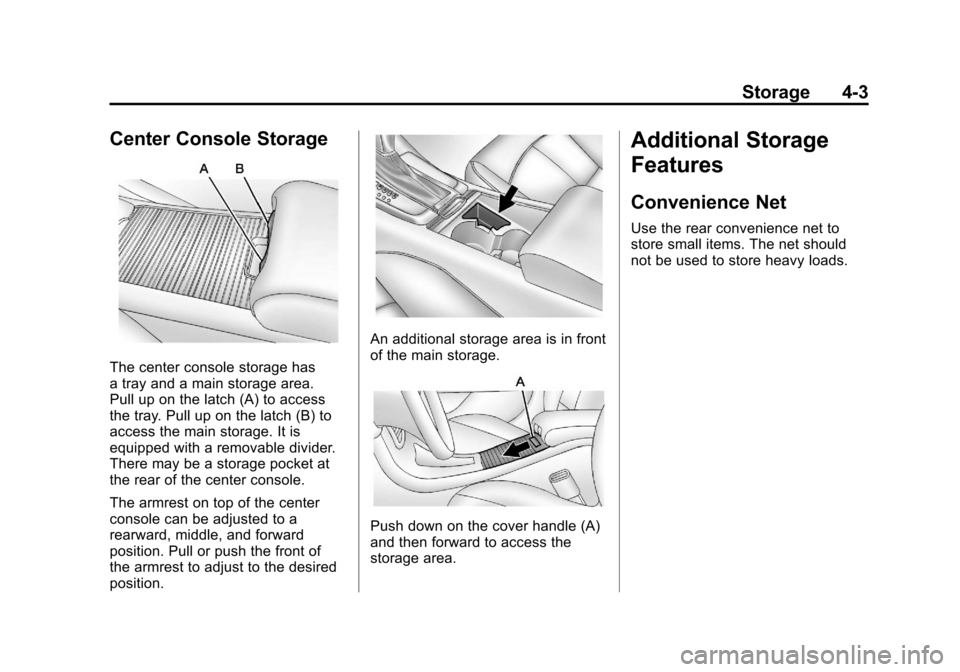
The center console storage has
a tray and a main storage area.
Pull up on the latch (A) to access
the tray. Pull up on the latch (B) to
access the main storage. It is
equipped with a removable divider.
There may be a storage pocket at
the rear of the center console.
The armrest on top of the center
console can be adjusted to a
rearward, middle, and forward
position. Pull or push the front of
the armrest to adjust to the desired
position.
An additional storage area is in front
of the main storage.
Push down on the cover handle (A)
and then forward to access the
storage area.
Additional Storage
Features
Convenience Net
Use the rear convenience net to
store small items. The net should
not be used to store heavy loads.
Page 113 of 398

Black plate (7,1)Chevrolet Malibu Owner Manual - 2012
Instruments and Controls 5-7
The date does not automatically
display. To see the date press
H
while the radio is on. The date
with display times out after a
few seconds and goes back to the
normal radio and time display.
To change the time default setting
from 12 hour to 24 hour or to
change the date default setting from
month/day/year to day/month/year:
1. Press the
Hbutton and then
the softkey located below the
forward arrow label. Once the
time 12H and 24H, and the date
MM/DD/YYYY (month, day,
and year) and DD/MM/YYYY
(day, month, and year) displays.
2. Press the softkey located below the desired option.
3. Press the
Hbutton again to
apply the selected default, or let
the screen time out.
Power Outlets
Accessory power outlets can be
used to plug in electrical equipment,
such as a cell phone or MP3 player.
There are two accessory power
outlets. One accessory power outlet
is located inside the storage bin
below the climate controls and the
other outlet is on the rear of the
center storage console.
Remove the cover to access
and replace when not in use.
The accessory power outlet is
operational at all times.
{WARNING
Power is always supplied to the
outlets. Do not leave electrical
equipment plugged in when the
vehicle is not in use because the
vehicle could catch fire and cause
injury or death. Notice:
Leaving electrical
equipment plugged in for an
extended period of time while
the vehicle is off will drain the
battery. Always unplug electrical
equipment when not in use and
do not plug in equipment that
exceeds the maximum 20 ampere
rating.
Certain electrical accessories
may not be compatible with the
accessory power outlet and could
overload vehicle or adapter fuses.
If a problem is experienced,
see your dealer.
When adding electrical equipment,
be sure to follow the proper
installation instructions included
with the equipment. See Add-On
Electrical Equipment on page 9‑48.
Notice: Hanging heavy
equipment from the power
outlet can cause damage not
covered by the vehicle warranty.
The power outlets are designed
for accessory power plugs only,
such as cell phone charge cords.
Page 114 of 398

Black plate (8,1)Chevrolet Malibu Owner Manual - 2012
5-8 Instruments and Controls
Power Outlet 110 Volt
Alternating Current
The vehicle may have a power
outlet that can be used to plug in
electrical equipment that uses a
maximum limit of 150 watts.
The power outlet is located on the
rear of the center console.An indicator light on the outlet
comes on when in use. The ignition
must be in ON/RUN and equipment
requiring less than 150 watts is
plugged into the outlet, and no
system fault is detected.
If you try to connect equipment
using more than 150 watts or a
system fault is detected, a
protection circuit shuts off the power
supply and the indicator light turns
off. To reset the circuit, unplug the
item and plug it back in or turn the
Remote Accessory Power (RAP) off
and then back on. See
Retained
Accessory Power (RAP) on
page 9‑21. The power restarts when
equipment that operates within the
limit is plugged into the outlet and a
system fault is not detected. The power outlet is not designed for
and may not work properly if the
following are plugged in:
.Equipment with high initial
peak wattage such as:
compressor-driven refrigerators
and electric power tools.
.Other equipment requiring
an extremely stable
power supply such as:
microcomputer-controlled
electric blankets, touch sensor
lamps, etc.
Page 222 of 398
Black plate (30,1)Chevrolet Malibu Owner Manual - 2012
9-30 Driving and Operating
Ride Control Systems
Traction Control
System (TCS)
The vehicle may have a Traction
Control System (TCS) that limits
wheel spin. This is especially
useful in slippery road conditions.
The system operates only if it
senses that the front wheels are
spinning too much or are beginning
to lose traction. When this happens,
the system works the front brakes
and reduces engine power by
closing the throttle and managing
engine spark to limit wheel spin.
This light will flash when the traction
control system is limiting wheel spin.The system may be heard or felt
while it is working, but this is
normal.
If the vehicle is in cruise control
when TCS begins to limit wheel
spin, the cruise control will
automatically disengage. The cruise
control may be re-engaged when
road conditions allow. See
Cruise
Control on page 9‑33.
When this light is on solid and
either the SERVICE TRACTION or
TRACTION OFF message is
displayed, the system will not limit
wheel spin.
Adjust your driving accordingly.
See Ride Control System Messages
on page 5‑28 for more information. The Traction Control System is
automatically enabled whenever the
vehicle is started. To limit wheel
spin, especially in slippery road
conditions, always leave the system
enabled. TCS can be turned off if
needed.
It is recommended to leave the
system on for normal driving
conditions, but it may be necessary
to turn the system off if the vehicle
is stuck in sand, mud, ice or snow,
and you want to
“rock”the vehicle to
attempt to free it. It may also be
necessary to turn off the system
when driving in extreme off-road
conditions where high wheel spin is
required. See If the Vehicle Is Stuck
on page 9‑10.
To turn the system off or on, press
and release this button located on
the center console.
Page 388 of 398

Black plate (2,1)Chevrolet Malibu Owner Manual - 2012
i-2 INDEX
B
Battery . . . . . . . . . . . . . . . . . . . . . . . 10-26Jump Starting . . . . . . . . . . . . . . . 10-83
Load Management . . . . . . . . . . . . . 6-6
Power Protection . . . . . . . . . . . . . . 6-7
Blade Replacement, Wiper . . . . . . . . . . . . . . . . . . . . . . . 10-29
Bluetooth . . . . . . . . . . . . . . . . . . . . . . 7-25
Brake System Warning Light . . . . . . . . . . . . . . . . . . . . . . . . . 5-18
Brakes . . . . . . . . . . . . . . . . . . . . . . . . 10-24
Antilock . . . . . . . . . . . . . . . . . . . . . . . 9-28
Assist . . . . . . . . . . . . . . . . . . . . . . . . . 9-29
Fluid . . . . . . . . . . . . . . . . . . . . . . . . 10-25
Parking . . . . . . . . . . . . . . . . . . . . . . . 9-29
System Messages . . . . . . . . . . . . 5-27
Braking . . . . . . . . . . . . . . . . . . . . . . . . . 9-3
Break-In, New Vehicle . . . . . . . . . 9-16
Bulb Replacement . . . . . . . . . . . . 10-33 Back-up Lamps . . . . . . . . . . . . . 10-32
Fog Lamps . . . . . . . . . . . . . . . . . . . . 6-5
Halogen Bulbs . . . . . . . . . . . . . . 10-30
Headlamp Aiming . . . . . . . . . . . 10-30 Bulb Replacement (cont.)
Headlamps . . . . . . . . . . . . . . . . . 10-30
License Plate Lamps . . . . . . . 10-33
Taillamps, Turn Signal,
and Stoplamps . . . . . . . . . . . . 10-30
Buying New Tires . . . . . . . . . . . . . 10-60
C
Calibration . . . . . . . . . . . . . . . . . . . . . . 5-5
California Fuel Requirements . . . . . . . . . . . 9-37
Perchlorate Materials
Requirements . . . . . . . . . . . . . . . 10-3
Warning . . . . . . . . . . . . . . . . . . . . . . 10-3
Canadian Vehicle Owners . . . . . . . . iii
Capacities and Specifications . . . . . . . . . . . . . . . . 12-2
Carbon Monoxide Engine Exhaust . . . . . . . . . . . . . . . 9-23
Trunk . . . . . . . . . . . . . . . . . . . . . . . . . . 2-9
Winter Driving . . . . . . . . . . . . . . . . . 9-8
Cautions, Danger, and Warnings . . . . . . . . . . . . . . . . . . . . . . . . iv
CD Player . . . . . . . . . . . . . . . . . . . . . 7-15 Center Console Storage . . . . . . . . 4-3
Chains, Tire . . . . . . . . . . . . . . . . . . 10-64
Charging System Light . . . . . . . . 5-16
Check
Engine Light . . . . . . . . . . . . . . . . . . 5-16
IgnitionTransmission Lock . . . . . . . . 10-28
Child Restraints Infants and YoungChildren . . . . . . . . . . . . . . . . . . . . . 3-35
Lower Anchors and
Tethers for Children . . . . . . . . . 3-42
Older Children . . . . . . . . . . . . . . . . 3-33
Securing . . . . . . . . . . . . . . . . 3-49, 3-51
Systems . . . . . . . . . . . . . . . . . . . . . . 3-37
Cleaning
Exterior Care . . . . . . . . . . . . . . . 10-90
Interior Care . . . . . . . . . . . . . . . . 10-93
Climate Control Systems . . . . . . . 8-1 Air Conditioning . . . . . . . . . . . . . . . 8-1
Automatic . . . . . . . . . . . . . . . . . . . . . . 8-5
Heating . . . . . . . . . . . . . . . . . . . . . . . . 8-1
Clock . . . . . . . . . . . . . . . . . . . . . . . . . . . 5-6
Cluster, Instrument . . . . . . . . . . . . 5-10