2012 CHEVROLET MALIBU change time
[x] Cancel search: change timePage 23 of 398
Black plate (17,1)Chevrolet Malibu Owner Manual - 2012
In Brief 1-17
Storing a Favorite Station
Depending on which radio the
vehicle has, radio stations are
stored as either favorites or presets.
For radios with a FAV button, a
maximum of 36 stations can be
stored as favorites using the six
softkeys located below the radio
station frequency tabs and by using
the radio FAV button. Press FAV
to go through up to six pages of
favorites, each having six favorite
stations available per page.
Each page of favorites can contain
any combination of AM, FM,
or XM™stations.
For radios without a FAV button,
up to 18 stations (six FM1, six FM2,
and six AM), can be programmed
on the six numbered buttons.
See Operation on page 7‑2.
Setting the Clock
To set the time and date for the
Radio with CD (MP3) and USB port
or Radio with a Single CD (MP3)
player:
1. Turn the ignition key to
ACC/ACCESSORY or ON/RUN.
2. Press
Oto turn the radio on.
3. Press
Hand the HR, MIN, MM,
DD, YYYY (hour, minute, month,
day, and year) displays.
4. Press the softkey located below any one of the tabs that you
want to change.
5. Increase or decrease the time or date by turning
fclockwise or
counterclockwise.
For detailed instructions on setting
the clock for your specific audio
system, see Clock on page 5‑6.
Satellite Radio
XM is a satellite radio service based
in the 48 contiguous United States
and 10 Canadian provinces.
XM satellite radio has a wide
variety of programming and
commercial-free music, coast to
coast, and in digital-quality sound.
A fee is required to receive the
XM service.
For more information, refer to:
.www.xmradio.com or call
1-800-929-2100 (U.S.)
.www.xmradio.ca or call
1-877-438-9677 (Canada)
See Satellite Radio on page 7‑9.
Page 28 of 398

Black plate (22,1)Chevrolet Malibu Owner Manual - 2012
1-22 In Brief
Engine Oil Life System
The engine oil life system calculates
engine oil life based on vehicle use
and displays the“Change Oil Soon”
DIC message when it is necessary
to change the engine oil and filter.
The oil life system should be reset
to 100% only following an oil
change.
Resetting the Oil Life System
1. Turn the ignition to ON/RUN, with the engine off.
2. Press and hold the DIC INFO and reset buttons, on the left
side of the steering wheel,
at the same time to enter the
personalization menu. The “Oil
Life Reset” message displays.
3. Press and hold the reset button until the DIC display shows
“Acknowledged.”
4. Turn the key to LOCK/OFF.
See Engine Oil Life System on
page 10‑12.
Fuel E85 (85% Ethanol)
Vehicles that have a FlexFuel badge
and a yellow fuel cap can use either
unleaded gasoline or ethanol fuel
containing up to 85% ethanol (E85).
See Fuel E85 (85% Ethanol) on
page 9‑39. For all other vehicles,
use only the unleaded gasoline
described under Recommended
Fuel on page 9‑36.
Driving for Better Fuel
Economy
Driving habits can affect fuel
mileage. Here are some driving tips
to get the best fuel economy
possible.
.Avoid fast starts and accelerate
smoothly.
.Brake gradually and avoid
abrupt stops.
.Avoid idling the engine for long
periods of time.
.When road and weather
conditions are appropriate,
use cruise control.
.Always follow posted speed
limits or drive more slowly when
conditions require.
.Keep vehicle tires properly
inflated.
.Combine several trips into a
single trip.
.Replace the vehicle's tires with
the same TPC Spec number
molded into the tire's sidewall
near the size.
.Follow recommended scheduled
maintenance.
Page 55 of 398
Black plate (7,1)Chevrolet Malibu Owner Manual - 2012
Seats and Restraints 3-7
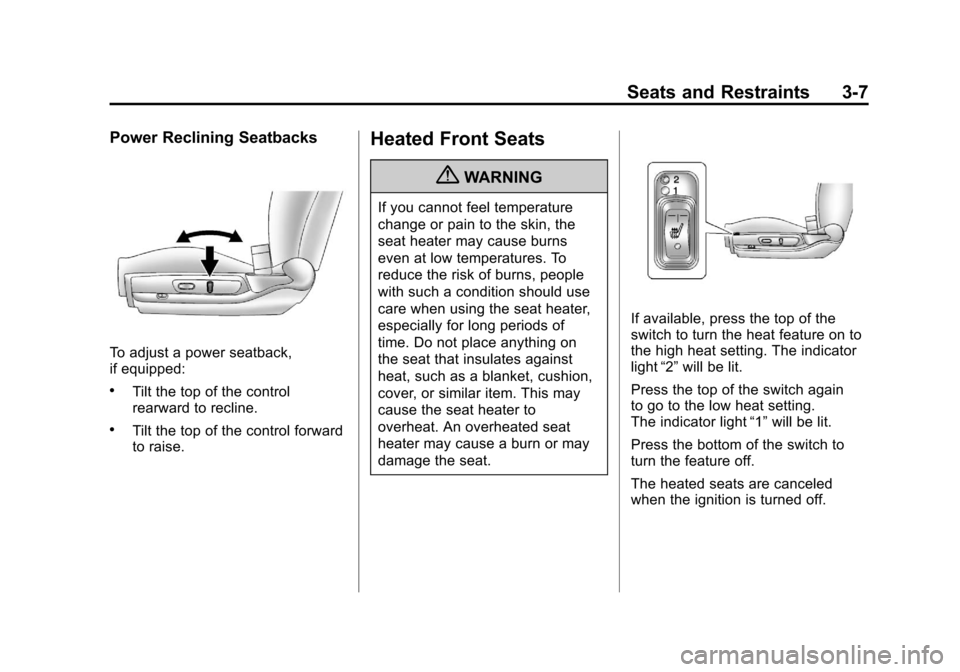
Power Reclining Seatbacks
To adjust a power seatback,
if equipped:
.Tilt the top of the control
rearward to recline.
.Tilt the top of the control forward
to raise.
Heated Front Seats
{WARNING
If you cannot feel temperature
change or pain to the skin, the
seat heater may cause burns
even at low temperatures. To
reduce the risk of burns, people
with such a condition should use
care when using the seat heater,
especially for long periods of
time. Do not place anything on
the seat that insulates against
heat, such as a blanket, cushion,
cover, or similar item. This may
cause the seat heater to
overheat. An overheated seat
heater may cause a burn or may
damage the seat.
If available, press the top of the
switch to turn the heat feature on to
the high heat setting. The indicator
light“2”will be lit.
Press the top of the switch again
to go to the low heat setting.
The indicator light “1”will be lit.
Press the bottom of the switch to
turn the feature off.
The heated seats are canceled
when the ignition is turned off.
Page 83 of 398
Black plate (35,1)Chevrolet Malibu Owner Manual - 2012
Seats and Restraints 3-35
Infants and Young
Children
Everyone in a vehicle needs
protection! This includes infants and
all other children. Neither the
distance traveled nor the age and
size of the traveler changes the
need, for everyone, to use safety
restraints. In fact, the law in every
state in the United States and in
every Canadian province says
children up to some age must be
restrained while in a vehicle.
{WARNING
Children can be seriously injured
or strangled if a shoulder belt is
wrapped around their neck and
the safety belt continues to
tighten. Never leave children
unattended in a vehicle and never
allow children to play with the
safety belts.Airbags plus lap‐shoulder belts offer
protection for adults and older
children, but not for young children
and infants. Neither the vehicle's
safety belt system nor its airbag
system is designed for them. Every
time infants and young children ride
in vehicles, they should have the
protection provided by appropriate
child restraints.
Children who are not restrained
properly can strike other people,
or can be thrown out of the vehicle.
{WARNING
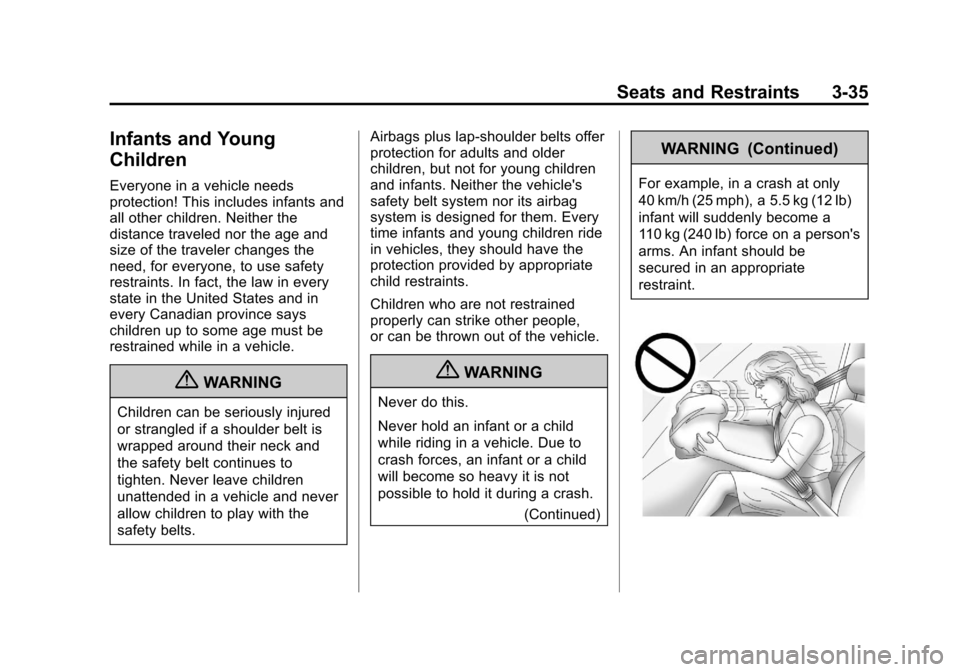
Never do this.
Never hold an infant or a child
while riding in a vehicle. Due to
crash forces, an infant or a child
will become so heavy it is not
possible to hold it during a crash.
(Continued)
WARNING (Continued)
For example, in a crash at only
40 km/h (25 mph), a 5.5 kg (12 lb)
infant will suddenly become a
110 kg (240 lb) force on a person's
arms. An infant should be
secured in an appropriate
restraint.
Page 112 of 398
Black plate (6,1)Chevrolet Malibu Owner Manual - 2012
5-6 Instruments and Controls
Clock
Without Date Display
AM/FM Base Radio with a
Single CD Player
To set the time:
1. Turn the ignition key toACC/ACCESSORY or ON/RUN.
Press the
Oknob to turn the
radio on.
2. Press the
Hbutton until the hour
begins flashing on the display.
Press the
Hbutton a second
time and the minute begins
flashing on the display.
3. While either the hour or the minute numbers are flashing,
turn the
fknob to increase or
decrease the time.
4. Press the
Hbutton again until
the clock display stops flashing
to set the currently displayed
time; otherwise, the flashing
stops after five seconds and
the current time displayed is
automatically set. To change the time default setting
from 12 hour to 24 hour, press
the
Hbutton until 12H or 24H is
displayed. Once 12H or 24H is
displayed, turn the
fknob to the
desired option to select the setting.
Press the
Hbutton again to apply
the setting, or let the screen
time out.
With Date Display
Radio with CD (MP3) and
USB Port, and Radio with
Single CD (MP3) Player
To set the time and date:
1. Turn the ignition key to ACC/ACCESSORY or ON/RUN.
Press the
Oknob to turn the
radio on.
2. Press the
Hbutton and the HR,
MIN, MM, DD, YYYY (hour,
minute, month, day, and year)
displays. 3. Press the softkey located below
any one of the tabs that you
want to change.
4. To increase the time or date do one of the following:
.Press the softkey located
below the selected tab.
.Press the¨SEEK, or
\FWD button.
.Turn thefknob clockwise.
5. To decrease the time or date do one of the following:
.Press the©SEEK or
sREV button.
.Turn thefknob
counterclockwise.
Page 113 of 398

Black plate (7,1)Chevrolet Malibu Owner Manual - 2012
Instruments and Controls 5-7
The date does not automatically
display. To see the date press
H
while the radio is on. The date
with display times out after a
few seconds and goes back to the
normal radio and time display.
To change the time default setting
from 12 hour to 24 hour or to
change the date default setting from
month/day/year to day/month/year:
1. Press the
Hbutton and then
the softkey located below the
forward arrow label. Once the
time 12H and 24H, and the date
MM/DD/YYYY (month, day,
and year) and DD/MM/YYYY
(day, month, and year) displays.
2. Press the softkey located below the desired option.
3. Press the
Hbutton again to
apply the selected default, or let
the screen time out.
Power Outlets
Accessory power outlets can be
used to plug in electrical equipment,
such as a cell phone or MP3 player.
There are two accessory power
outlets. One accessory power outlet
is located inside the storage bin
below the climate controls and the
other outlet is on the rear of the
center storage console.
Remove the cover to access
and replace when not in use.
The accessory power outlet is
operational at all times.
{WARNING
Power is always supplied to the
outlets. Do not leave electrical
equipment plugged in when the
vehicle is not in use because the
vehicle could catch fire and cause
injury or death. Notice:
Leaving electrical
equipment plugged in for an
extended period of time while
the vehicle is off will drain the
battery. Always unplug electrical
equipment when not in use and
do not plug in equipment that
exceeds the maximum 20 ampere
rating.
Certain electrical accessories
may not be compatible with the
accessory power outlet and could
overload vehicle or adapter fuses.
If a problem is experienced,
see your dealer.
When adding electrical equipment,
be sure to follow the proper
installation instructions included
with the equipment. See Add-On
Electrical Equipment on page 9‑48.
Notice: Hanging heavy
equipment from the power
outlet can cause damage not
covered by the vehicle warranty.
The power outlets are designed
for accessory power plugs only,
such as cell phone charge cords.
Page 131 of 398
Black plate (25,1)Chevrolet Malibu Owner Manual - 2012
Instruments and Controls 5-25
To change the DIC display to
English or metric units, see“UNITS”
under Vehicle Personalization on
page 5‑31.
Trip Odometer
Press the information button until
the outside air temperature along
with A or B displays. These modes
show the current distance traveled
since the last reset for each trip
odometer in either kilometers (km)
or miles (mi). Both odometers can
be used at the same time.
To reset the trip odometer to zero,
press and hold the reset button for a
few seconds while the desired trip
odometer is displayed.
FUEL RANGE
Press the information button until
FUEL RANGE displays. This mode
shows the remaining distance you
can drive without refueling in either
kilometers (km) or miles (mi). It is
based on fuel economy and the fuel
remaining in the tank. When the fuel level is low, FUEL
RANGE LOW displays.
The fuel economy data used to
determine fuel range is an average
of recent driving conditions. As your
driving conditions change, this data
is gradually updated. The FUEL
RANGE mode cannot be reset.
MPG (L/100 KM) AVG (Average)
Press the information button until
MPG (L/100 KM) AVG displays.
This mode shows how many liters
per 100 kilometers (L/100 km) or
miles per gallon (mpg) your vehicle
is getting based on current and past
driving conditions.
To reset the average fuel economy,
press and hold the reset button
while MPG (L/100 KM) AVG is
displayed. Average fuel economy is
then calculated starting from that
point. If the average fuel economy is
not reset, it is continually updated
each time you drive.
MPG (L/100 KM) INST
(Instantaneous)
Press the information button until
MPG (L/100 KM) INST displays.
This mode shows the current fuel
economy at a particular moment
and changes frequently as driving
conditions change. This mode
shows the instantaneous fuel
economy in liters per 100 kilometers
(L/100 km) or miles per gallon
(mpg). Unlike average fuel
economy, this screen cannot be
reset.
AV (Average) SPEED
Press the information button until
AV SPEED displays. This mode
shows the vehicle's average speed
in kilometers per hour (km/h) or
miles per hour (mph).
To reset the average vehicle speed,
press and hold the reset button
while AV SPEED is displayed.
Page 132 of 398
Black plate (26,1)Chevrolet Malibu Owner Manual - 2012
5-26 Instruments and Controls
OIL LIFE
Press the information button until
OIL LIFE displays. The engine oil
life system shows an estimate of the
oil's remaining useful life. It shows
100% when the system is reset
after an oil change. It alerts you to
change the oil on a schedule
consistent with your driving
conditions.
In addition to the engine oil life
system monitoring the oil life,
additional maintenance is
recommended in the Maintenance
Schedule in this manual. See
Engine Oil on page 10‑10and
Maintenance Schedule on
page 11‑2.
Always reset the engine oil life
system after an oil change. See
“How to Reset the Engine Oil Life
System” underEngine Oil Life
System on page 10‑12. Tire Pressure
On vehicles with the Tire Pressure
Monitor System (TPMS), the
pressure for each tire can be viewed
in the DIC. The tire pressure is
shown in either kilopascals (kPa)
or pounds per square inch (psi).
Press the information button until
LF ## PSI (kPa) ## RF displays
for the front tires. Press the
information button again until
LR ## PSI (kPa) ## RR displays
for the rear tires.
If a low tire pressure condition is
detected by the system while
driving, a message advising you to
add air will appear in the display.
See
Tire Pressure on page 10‑50
and Tire Messages on page 5‑30
for more information.Vehicle Messages
The following messages appear if
there is a problem detected in one
of your vehicle's systems.
A message clears when the
vehicle's condition is no longer
present. To acknowledge a
message and clear it from the
display, press and hold any of the
DIC buttons. If the condition is still
present, the warning message
comes back on the next time the
vehicle is turned off and back on.
With most messages, a warning
chime sounds when the message
displays. Your vehicle may have
other warning messages.