2012 CHEVROLET MALIBU display
[x] Cancel search: displayPage 1 of 398

Black plate (1,1)Chevrolet Malibu Owner Manual - 2012
2012 Chevrolet Malibu Owner ManualM
In Brief. . . . . . . . . . . . . . . . . . . . . . . . 1-1
Instrument Panel . . . . . . . . . . . . . . 1-2
Initial Drive Information . . . . . . . . 1-4
Vehicle Features . . . . . . . . . . . . . 1-16
Performance and Maintenance . . . . . . . . . . . . . . . . 1-20
Keys, Doors, and Windows . . . . . . . . . . . . . . . . . . . . 2-1
Keys and Locks . . . . . . . . . . . . . . . 2-2
Doors . . . . . . . . . . . . . . . . . . . . . . . . . . 2-9
Vehicle Security . . . . . . . . . . . . . . 2-11
Exterior Mirrors . . . . . . . . . . . . . . . 2-13
Interior Mirrors . . . . . . . . . . . . . . . . 2-14
Windows . . . . . . . . . . . . . . . . . . . . . 2-15
Roof . . . . . . . . . . . . . . . . . . . . . . . . . . 2-18
Seats and Restraints . . . . . . . . . 3-1
Head Restraints . . . . . . . . . . . . . . . 3-2
Front Seats . . . . . . . . . . . . . . . . . . . . 3-3
Rear Seats . . . . . . . . . . . . . . . . . . . . 3-8 Safety Belts . . . . . . . . . . . . . . . . . . . . 3-9
Airbag System . . . . . . . . . . . . . . . . 3-19
Child Restraints . . . . . . . . . . . . . . 3-33
Storage . . . . . . . . . . . . . . . . . . . . . . . 4-1
Storage Compartments . . . . . . . . 4-1
Additional Storage Features . . . . . . . . . . . . . . . . . . . . . 4-3
Instruments and Controls . . . . 5-1
Controls . . . . . . . . . . . . . . . . . . . . . . . 5-2
Warning Lights, Gauges, and Indicators . . . . . . . . . . . . . . . . . . . . 5-9
Information Displays . . . . . . . . . . 5-24
Vehicle Messages . . . . . . . . . . . . 5-26
Vehicle Personalization . . . . . . . 5-31
Lighting . . . . . . . . . . . . . . . . . . . . . . . 6-1
Exterior Lighting . . . . . . . . . . . . . . . 6-1
Interior Lighting . . . . . . . . . . . . . . . . 6-5
Lighting Features . . . . . . . . . . . . . . 6-6 Infotainment System
. . . . . . . . . 7-1
Introduction . . . . . . . . . . . . . . . . . . . . 7-1
Radio . . . . . . . . . . . . . . . . . . . . . . . . . . 7-6
Audio Players . . . . . . . . . . . . . . . . 7-15
Phone . . . . . . . . . . . . . . . . . . . . . . . . 7-25
Climate Controls . . . . . . . . . . . . . 8-1
Climate Control Systems . . . . . . 8-1
Air Vents . . . . . . . . . . . . . . . . . . . . . . . 8-9
Driving and Operating . . . . . . . . 9-1
Driving Information . . . . . . . . . . . . . 9-2
Starting and Operating . . . . . . . 9-16
Engine Exhaust . . . . . . . . . . . . . . 9-23
Automatic Transmission . . . . . . 9-24
Brakes . . . . . . . . . . . . . . . . . . . . . . . 9-28
Ride Control Systems . . . . . . . . 9-30
Cruise Control . . . . . . . . . . . . . . . . 9-33
Fuel . . . . . . . . . . . . . . . . . . . . . . . . . . 9-36
Towing . . . . . . . . . . . . . . . . . . . . . . . 9-42
Conversions and Add-Ons . . . 9-48
Page 21 of 398
Black plate (15,1)Chevrolet Malibu Owner Manual - 2012
In Brief 1-15
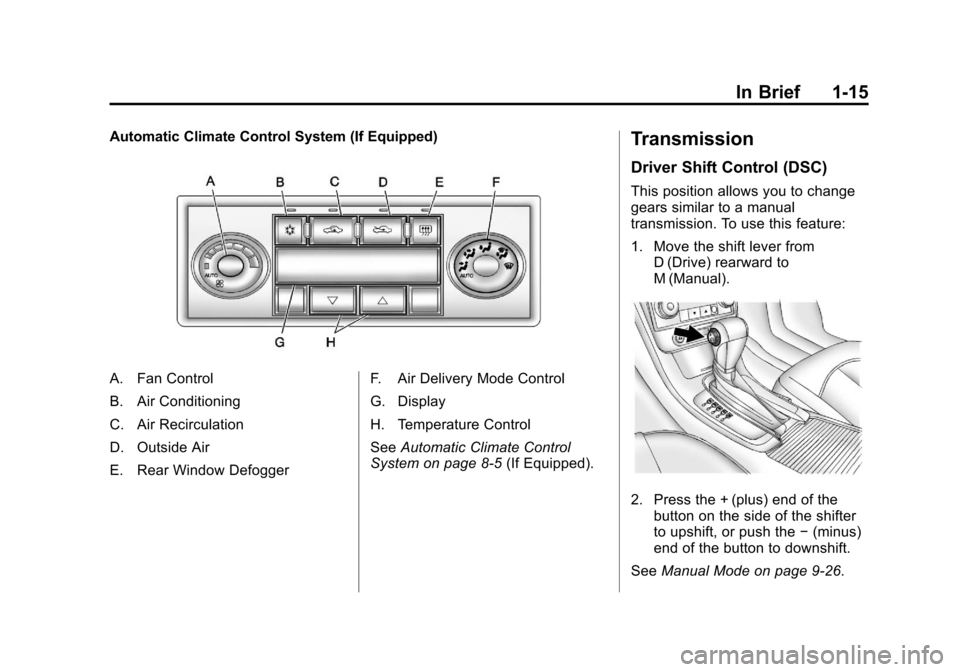
Automatic Climate Control System (If Equipped)
A. Fan Control
B. Air Conditioning
C. Air Recirculation
D. Outside Air
E. Rear Window DefoggerF. Air Delivery Mode Control
G. Display
H. Temperature Control
See
Automatic Climate Control
System on page 8‑5 (If Equipped).
Transmission
Driver Shift Control (DSC)
This position allows you to change
gears similar to a manual
transmission. To use this feature:
1. Move the shift lever from
D (Drive) rearward to
M (Manual).
2. Press the + (plus) end of thebutton on the side of the shifter
to upshift, or push the −(minus)
end of the button to downshift.
See Manual Mode on page 9‑26.
Page 22 of 398
Black plate (16,1)Chevrolet Malibu Owner Manual - 2012
1-16 In Brief
Vehicle Features
Radio(s)
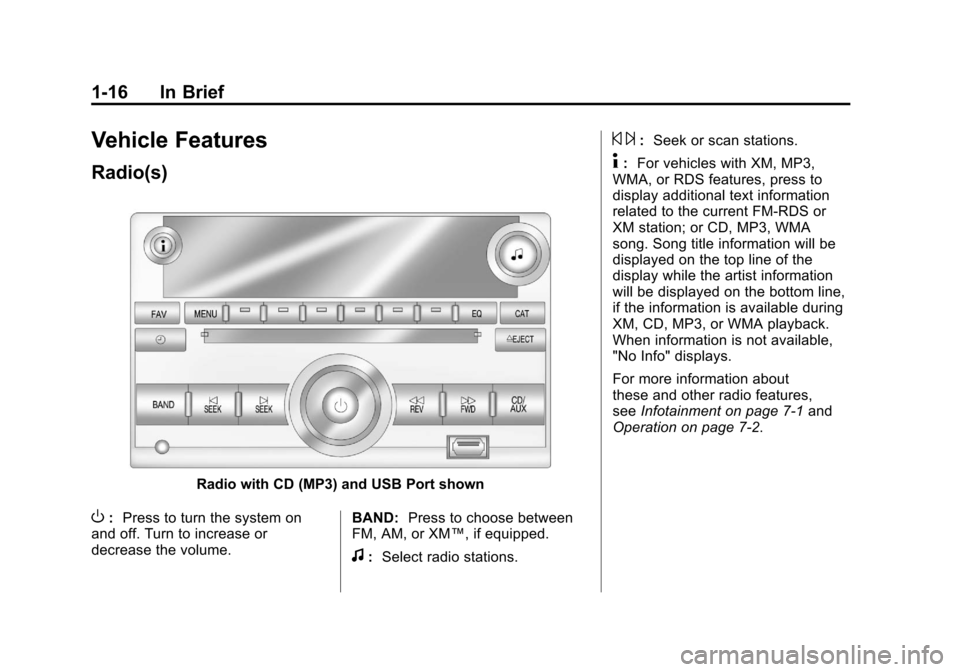
Radio with CD (MP3) and USB Port shown
O:Press to turn the system on
and off. Turn to increase or
decrease the volume. BAND:
Press to choose between
FM, AM, or XM™, if equipped.
f: Select radio stations.
© ¨:Seek or scan stations.
4: For vehicles with XM, MP3,
WMA, or RDS features, press to
display additional text information
related to the current FM-RDS or
XM station; or CD, MP3, WMA
song. Song title information will be
displayed on the top line of the
display while the artist information
will be displayed on the bottom line,
if the information is available during
XM, CD, MP3, or WMA playback.
When information is not available,
"No Info" displays.
For more information about
these and other radio features,
see Infotainment on page 7‑1 and
Operation on page 7‑2.
Page 23 of 398
Black plate (17,1)Chevrolet Malibu Owner Manual - 2012
In Brief 1-17
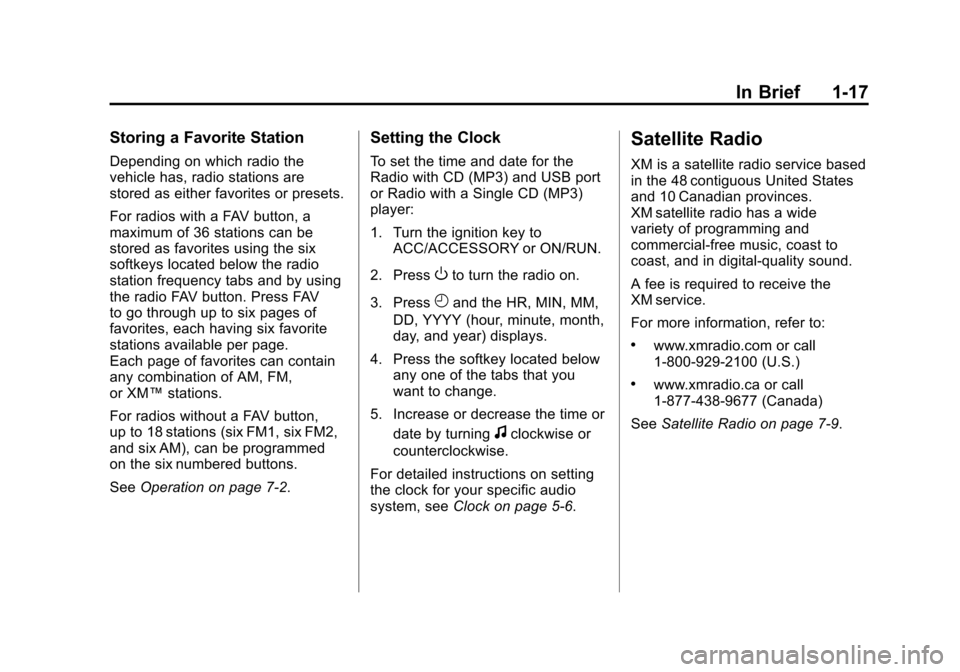
Storing a Favorite Station
Depending on which radio the
vehicle has, radio stations are
stored as either favorites or presets.
For radios with a FAV button, a
maximum of 36 stations can be
stored as favorites using the six
softkeys located below the radio
station frequency tabs and by using
the radio FAV button. Press FAV
to go through up to six pages of
favorites, each having six favorite
stations available per page.
Each page of favorites can contain
any combination of AM, FM,
or XM™stations.
For radios without a FAV button,
up to 18 stations (six FM1, six FM2,
and six AM), can be programmed
on the six numbered buttons.
See Operation on page 7‑2.
Setting the Clock
To set the time and date for the
Radio with CD (MP3) and USB port
or Radio with a Single CD (MP3)
player:
1. Turn the ignition key to
ACC/ACCESSORY or ON/RUN.
2. Press
Oto turn the radio on.
3. Press
Hand the HR, MIN, MM,
DD, YYYY (hour, minute, month,
day, and year) displays.
4. Press the softkey located below any one of the tabs that you
want to change.
5. Increase or decrease the time or date by turning
fclockwise or
counterclockwise.
For detailed instructions on setting
the clock for your specific audio
system, see Clock on page 5‑6.
Satellite Radio
XM is a satellite radio service based
in the 48 contiguous United States
and 10 Canadian provinces.
XM satellite radio has a wide
variety of programming and
commercial-free music, coast to
coast, and in digital-quality sound.
A fee is required to receive the
XM service.
For more information, refer to:
.www.xmradio.com or call
1-800-929-2100 (U.S.)
.www.xmradio.ca or call
1-877-438-9677 (Canada)
See Satellite Radio on page 7‑9.
Page 25 of 398
Black plate (19,1)Chevrolet Malibu Owner Manual - 2012
In Brief 1-19
Cruise Control
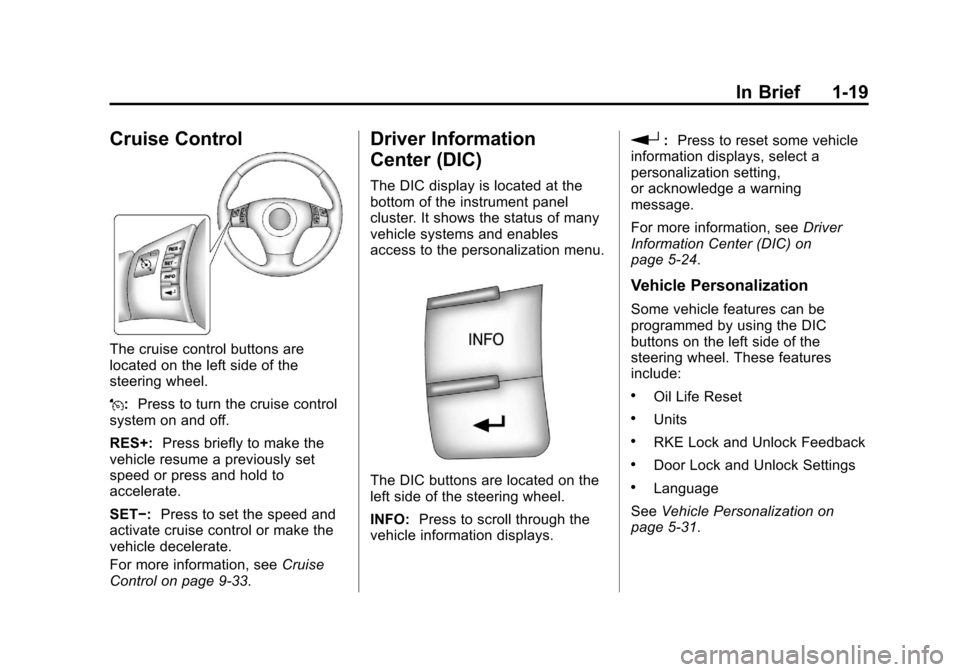
The cruise control buttons are
located on the left side of the
steering wheel.
J:Press to turn the cruise control
system on and off.
RES+: Press briefly to make the
vehicle resume a previously set
speed or press and hold to
accelerate.
SET−: Press to set the speed and
activate cruise control or make the
vehicle decelerate.
For more information, see Cruise
Control on page 9‑33.
Driver Information
Center (DIC)
The DIC display is located at the
bottom of the instrument panel
cluster. It shows the status of many
vehicle systems and enables
access to the personalization menu.
The DIC buttons are located on the
left side of the steering wheel.
INFO: Press to scroll through the
vehicle information displays.
r: Press to reset some vehicle
information displays, select a
personalization setting,
or acknowledge a warning
message.
For more information, see Driver
Information Center (DIC) on
page 5‑24.
Vehicle Personalization
Some vehicle features can be
programmed by using the DIC
buttons on the left side of the
steering wheel. These features
include:
.Oil Life Reset
.Units
.RKE Lock and Unlock Feedback
.Door Lock and Unlock Settings
.Language
See Vehicle Personalization on
page 5‑31.
Page 26 of 398
Black plate (20,1)Chevrolet Malibu Owner Manual - 2012
1-20 In Brief
Power Outlets
Accessory power outlets can be
used to plug in electrical equipment,
such as a cell phone or MP3 player.
There are two accessory power
outlets. One accessory power outlet
is located inside the storage bin
below the climate controls and the
other outlet is on the rear of the
center storage console.
Remove the cover to access and
replace when not in use.
SeePower Outlets on page 5‑7.
Performance and
Maintenance
Traction Control
System (TCS)
The traction control system limits
wheel spin. The system turns on
automatically every time the vehicle
is started.
.To turn off traction control,
press and release
ton the
center console.
4illuminates
and the appropriate DIC
message is displayed. See Ride
Control System Messages on
page 5‑28.
.Press and release the button
again to turn on traction control.
For more information, see Traction
Control System (TCS) on
page 9‑30.
Electronic Stability
Control (ESC)
The Electronic Stability Control
system assists with directional
control of the vehicle in difficult
driving conditions. The system turns
on automatically every time the
vehicle is started.
.To turn off both traction control
and Electronic Stability Control,
press and hold
tuntil4andg
illuminate and the appropriate
DIC messages are displayed.
See Ride Control System
Messages on page 5‑28.
.Press and release the button
again to turn on both systems.
For more information, see
Electronic Stability Control (ESC) on
page 9‑32.
Page 28 of 398

Black plate (22,1)Chevrolet Malibu Owner Manual - 2012
1-22 In Brief
Engine Oil Life System
The engine oil life system calculates
engine oil life based on vehicle use
and displays the“Change Oil Soon”
DIC message when it is necessary
to change the engine oil and filter.
The oil life system should be reset
to 100% only following an oil
change.
Resetting the Oil Life System
1. Turn the ignition to ON/RUN, with the engine off.
2. Press and hold the DIC INFO and reset buttons, on the left
side of the steering wheel,
at the same time to enter the
personalization menu. The “Oil
Life Reset” message displays.
3. Press and hold the reset button until the DIC display shows
“Acknowledged.”
4. Turn the key to LOCK/OFF.
See Engine Oil Life System on
page 10‑12.
Fuel E85 (85% Ethanol)
Vehicles that have a FlexFuel badge
and a yellow fuel cap can use either
unleaded gasoline or ethanol fuel
containing up to 85% ethanol (E85).
See Fuel E85 (85% Ethanol) on
page 9‑39. For all other vehicles,
use only the unleaded gasoline
described under Recommended
Fuel on page 9‑36.
Driving for Better Fuel
Economy
Driving habits can affect fuel
mileage. Here are some driving tips
to get the best fuel economy
possible.
.Avoid fast starts and accelerate
smoothly.
.Brake gradually and avoid
abrupt stops.
.Avoid idling the engine for long
periods of time.
.When road and weather
conditions are appropriate,
use cruise control.
.Always follow posted speed
limits or drive more slowly when
conditions require.
.Keep vehicle tires properly
inflated.
.Combine several trips into a
single trip.
.Replace the vehicle's tires with
the same TPC Spec number
molded into the tire's sidewall
near the size.
.Follow recommended scheduled
maintenance.
Page 34 of 398
Black plate (4,1)Chevrolet Malibu Owner Manual - 2012
2-4 Keys, Doors, and Windows
See“EXT (Exterior) LIGHTS” under
Vehicle Personalization on
page 5‑31 for additional information.
Pressing
Kon the RKE transmitter
disarms the anti-theft alarm system.
See Anti-theft Alarm System on
page 2‑11.
V(Remote Trunk Release):
Press and hold for about
one second to unlock the trunk.
The trunk can be opened with the
transmitter when the vehicle speed
is less than 3 km/h (2 mph) or when
the ignition is off.
L(Vehicle Locator/Panic
Alarm): Press and release to
locate the vehicle. The horn sounds
three times and the headlamps and
turn signals flash three times.
Press and hold
Lfor more than
two seconds to initiate the panic
alarm. The horn sounds and the
headlamps and turn signals flash for
30 seconds. Press
Lagain to
cancel the panic alarm.
Programming Transmitters to
the Vehicle
Only RKE transmitters programmed
to the vehicle will work. If a
transmitter is lost or stolen, a
replacement can be purchased and
programmed through your dealer.
When the replacement transmitter is
programmed to the vehicle, all
remaining transmitters must also be
programmed. Any lost or stolen
transmitters no longer work once the
new transmitter is programmed.
Each vehicle can have up to four
transmitters programmed to it.
Battery Replacement
Replace the battery if the KEY FOB
BATT (Battery) LOW message
displays in the DIC. See “KEY FOB
BATT (Battery) LOW” underKey
and Lock Messages on page 5‑28
for additional information. Notice:
When replacing the
battery, do not touch any of the
circuitry on the transmitter. Static
from your body could damage the
transmitter.
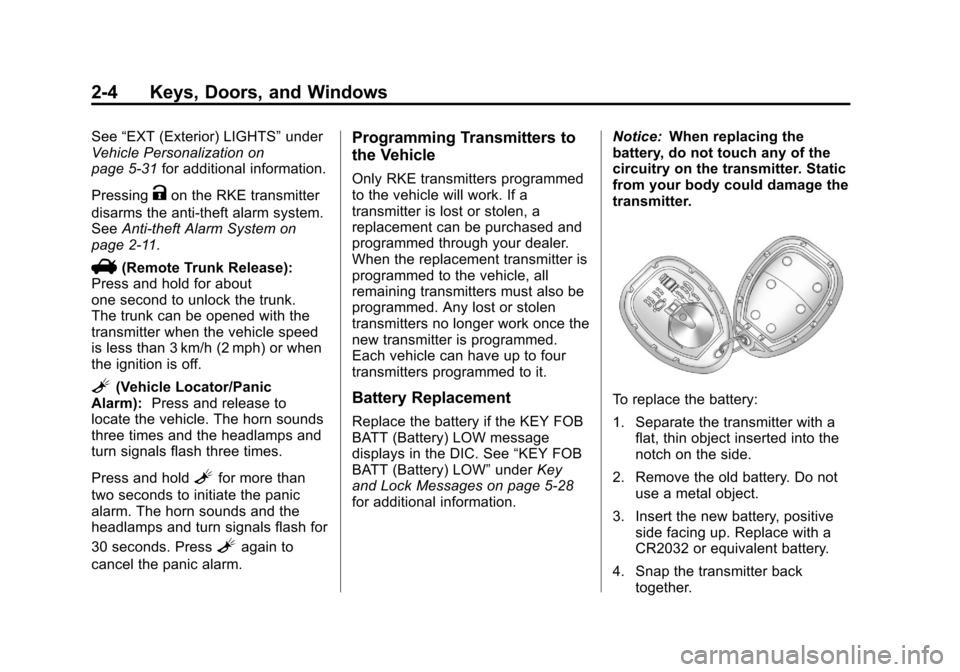
To replace the battery:
1. Separate the transmitter with a flat, thin object inserted into the
notch on the side.
2. Remove the old battery. Do not use a metal object.
3. Insert the new battery, positive side facing up. Replace with a
CR2032 or equivalent battery.
4. Snap the transmitter back together.