2012 BMW X5M cargo
[x] Cancel search: cargoPage 28 of 317

Opening and closing
Remote control/key
Buttons on the remote control
1
Unlocking
2 Locking
3 Opening tailgate
General information
The vehicle is supplied with two remote controls
with keys.
Each remote control contains a rechargeable
battery that is automatically recharged when it
is in the ignition lock while the car is being driven.
Use each remote control at least twice a year for
longer road trips in order to maintain the batter‐
ies' charge status.
In vehicles equipped with Comfort Access*, the
remote control contains a replaceable battery,
refer to page 39.
The settings called up and implemented when
the vehicle is unlocked depend on which remote
control is used to unlock the vehicle, refer to
Personal Profile.
In addition, information about service require‐
ments is stored in the remote control, Service
data in the remote control, refer to page 268.Integrated key Press button 1 and pull out the key.
The integrated key fits the following locks:
▷
Driver's door, refer to page 32.
▷ Cargo floor cover in cargo area, refer to
page 137.
New remote controls
You can obtain new remote controls from your
service center.
Loss of the remote controls
Lost remote controls can be blocked by your
service center.
Personal Profile
The concept
You can set several of your vehicle's functions
to suit your personal needs and preferences.
▷ The settings are automatically saved in the
profile
currently activated in the remote con‐
trol.
▷ The remote control used is detected when
the
vehicle is unlocked and the stored profile
is called up.
▷ Your personal settings will be recognized
and called up again even if the vehicle has
been
used in the meantime by someone else
with another remote control.
Seite 28
28 Online Edition for Part no. 01 40 2 606 735 - 03 11 500
Opening and closing
Page 31 of 317

Press the button on the remote control for at
least 3 seconds.
To switch off the alarm: press any button.
Unlocking tailgate Press the button on the remote control for
approx. 1 second and release.
The tailgate will open slightly, regardless of
whether it was previously locked or unlocked.
With automatic tailgate operation
*: the tailgate
opens automatically.
The tailgate pivots back and up when it opens.
Ensure that adequate clearance is available be‐
fore opening.
To avoid locking yourself out of the vehicle, do
not place the remote control into the cargo area.
The tailgate is locked again as soon as it is
pushed closed.
Before and after each trip, check that the tailgate
has not been inadvertently unlocked.
Provide edge protection
Sharp or angular objects can hit the rear
window while driving and damage the heating
wires of the rear window. Provide edge protec‐
tion.◀
Confirmation signals from the vehicle
1. "Settings"
2. "Door locks"
3. "Flash when lock/unlock" Retrieving the seat, mirror, and
steering wheel settings
*
The driver's seat, exterior mirror, and steering
wheel positions* selected last are stored for the
currently used remote control.
When the vehicle is being unlocked, these po‐
sitions are automatically retrieved if the setting
is activated.
Pinch hazard when moving back the seat
If this function is used, first make sure that
the footwell behind the driver's seat is empty.
Failure to do so could cause injury to persons or
damage to objects behind the seat as a result of
a rearward movement of the seat.◀
The adjustment procedure is interrupted:
▷ When a seat position switch is pressed.
▷ When a button of the seat and mirror mem‐
ory is pressed.
Selecting automatic activation
1. "Settings"
2. "Door locks"
3. "Last seat position auto." Malfunctions
Local
radio waves may interfere with the remote
control.
In this case, unlock and lock the car at the door
lock with the integrated key.
If the car can no longer be locked with a remote
control, the battery in the remote control is dis‐
charged. Use the remote control during an ex‐
tended drive in order to recharge the battery,
refer to page 28. The remote control for Comfort Seite 31
31Online Edition for Part no. 01 40 2 606 735 - 03 11 500
Reference Mobility Communication Entertainment Navigation Driving tips
Controls At a glance
Page 34 of 317

Provide edge protection
Sharp or angular objects can hit the rear
window while driving and damage the heating
wires of the rear window. Provide edge protec‐
tion.◀
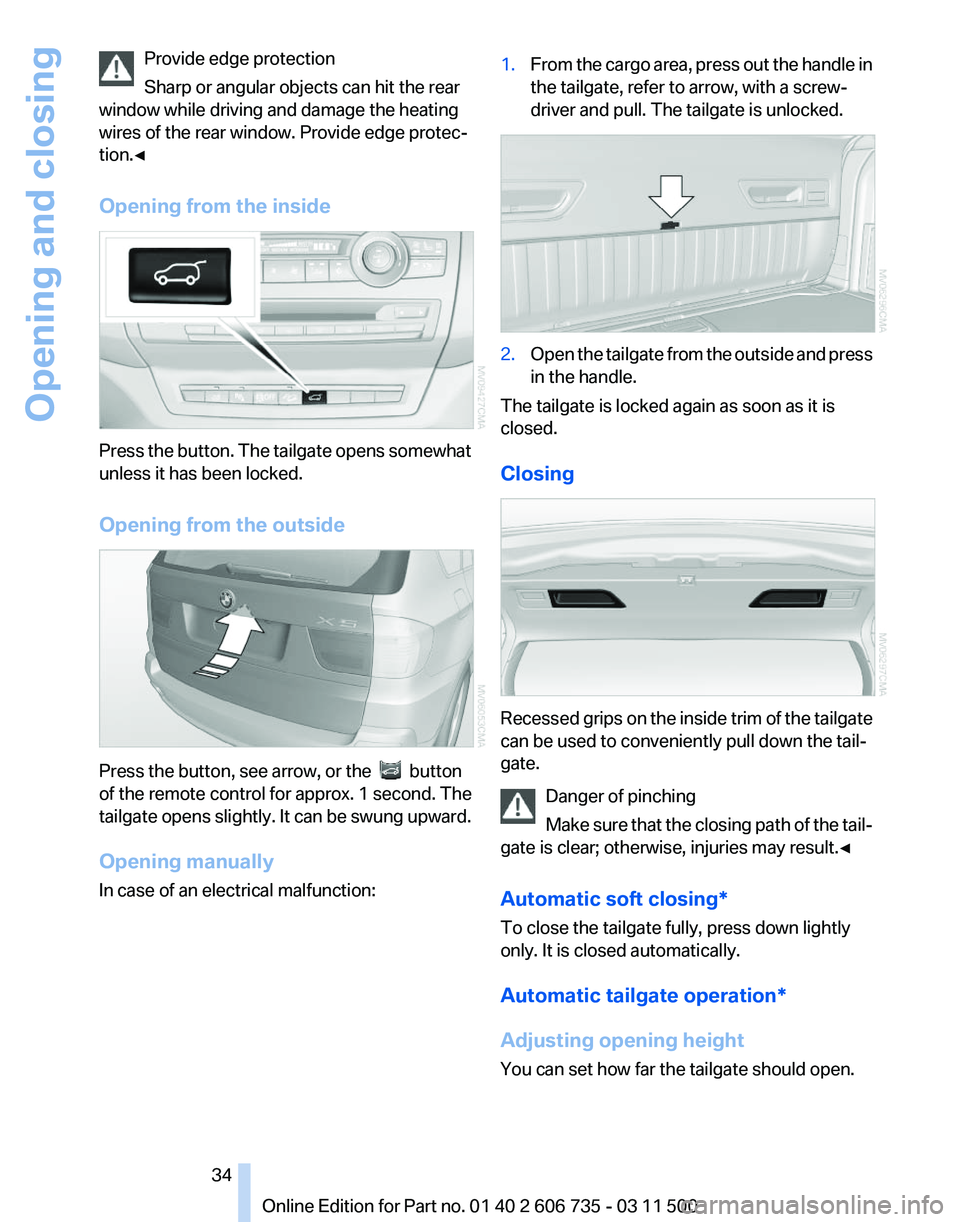
Opening from the inside Press the button. The tailgate opens somewhat
unless it has been locked.
Opening from the outside
Press the button, see arrow, or the button
of the remote control for approx. 1 second. The
tailgate
opens slightly. It can be swung upward.
Opening manually
In case of an electrical malfunction: 1.
From the cargo area, press out the handle in
the tailgate, refer to arrow, with a screw‐
driver and pull. The tailgate is unlocked. 2.
Open the tailgate from the outside and press
in the handle.
The tailgate is locked again as soon as it is
closed.
Closing Recessed grips on the inside trim of the tailgate
can be used to conveniently pull down the tail‐
gate.
Danger of pinching
Make
sure that the closing path of the tail‐
gate is clear; otherwise, injuries may result.◀
Automatic soft closing*
To close the tailgate fully, press down lightly
only. It is closed automatically.
Automatic tailgate operation*
Adjusting opening height
You can set how far the tailgate should open. Seite 34
34 Online Edition for Part no. 01 40 2 606 735 - 03 11 500
Opening and closing
Page 38 of 317

Unlocking
Fully grasp a door handle, arrow 1.
This corresponds to pressing the
button.
Locking Touch the area on the door handle, arrow 2, with
your finger for approx. 1 second.
This corresponds to pressing the
but‐
ton.
To save battery power, ensure that the ignition
and all electronic systems and/or power con‐
sumers are switched off before locking the ve‐
hicle.
If
a remote control is detected within the vehicle,
the vehicle does not lock or is unlocked again.
Convenient closing
Press the area, arrow 2, with your finger and
hold.
In addition, the windows and the glass sunroof*/
panoramic glass sunroof* close.
Monitor the closing process
Watch during the closing process to be
sure that no one is injured. Removing the hand
from the door handle immediately stops the
closing process.◀ Unlocking the tailgate separately
Press the button on the exterior of the tailgate.
This corresponds to pressing the
button.
If a remote control accidentally left in the cargo
area is detected in the locked vehicle, the tail‐
gate opens again.
The hazard warning flashers flash and a signal*
sounds.
Ignition on
Pressing the Start/Stop button switches the ig‐
nition on.
When
doing so, do not depress the brake pedal,
otherwise the engine will start.
Starting the engine
The engine can be started or the ignition can be
switched on when a remote control is inside the
vehicle. It is not necessary to insert a remote
control into the ignition lock, refer to page 61.
As long as no remote control is detected in the
vehicle, it is only possible to restart the engine
within approx. 10 seconds after it is switched off
if no door has been opened.
Switching off the engine
▷ Remote control not in ignition lock:
After
switching off the engine, the transmis‐
sion is automatically switched into transmis‐
sion position P.
▷ Remote control in ignition lock:
If transmission position N is engaged, the
transmission remains in this position after
the engine is switched off.
Malfunction
Comfort Access may not function properly if it
experiences
interference from local radio waves,
e.g., mobile phones.
If this occurs, open or close the vehicle using the
buttons on the remote control or use the
integrated key in the door lock.
To start the engine afterward, insert the remote
control into the ignition switch.
Seite 38
38 Online Edition for Part no. 01 40 2 606 735 - 03 11 500
Opening and closing
Page 48 of 317

page
132, and, if necessary, slide the 2nd row
seats slightly forward.
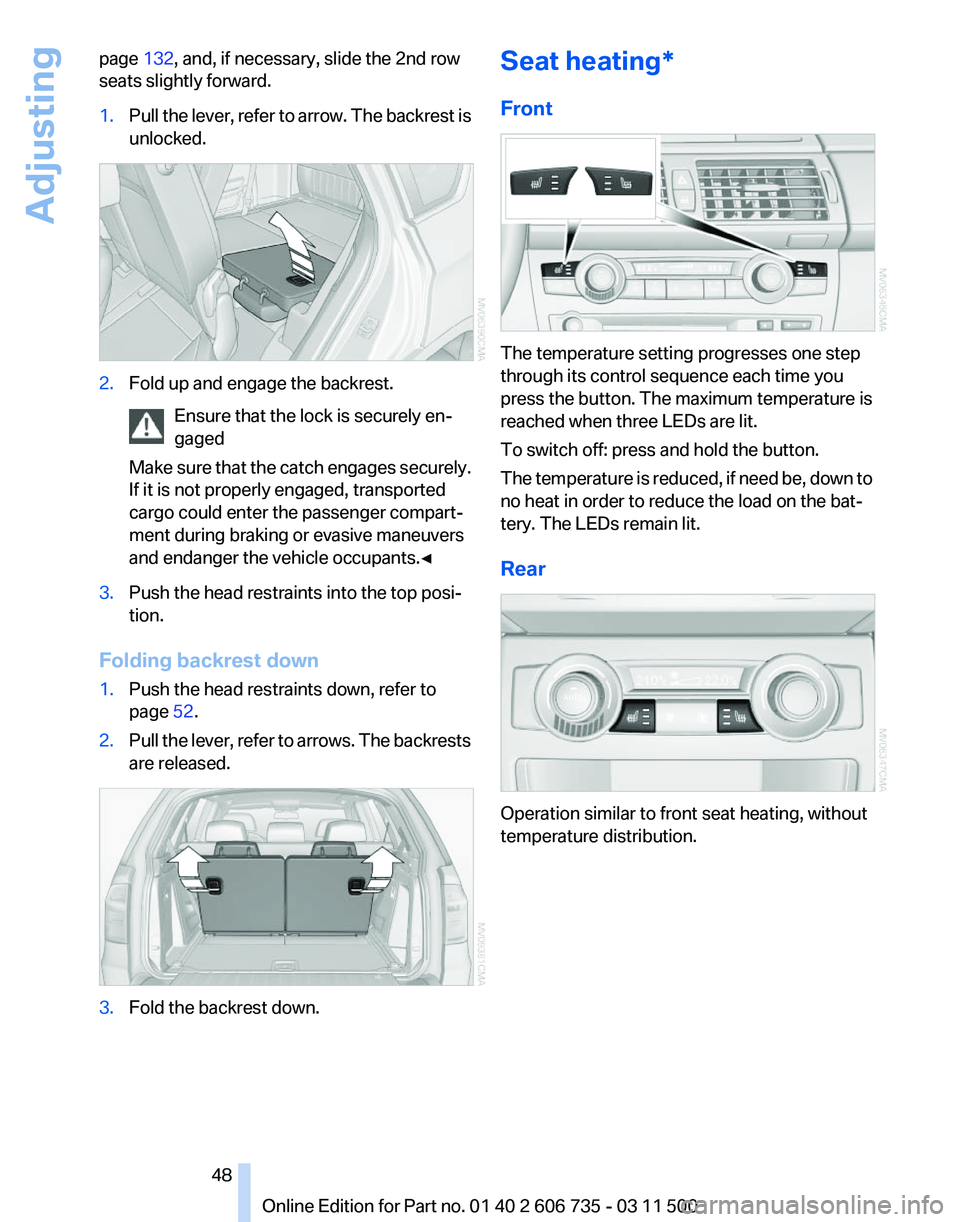
1. Pull the lever, refer to arrow. The backrest is
unlocked. 2.
Fold up and engage the backrest.
Ensure that the lock is securely en‐
gaged
Make
sure that the catch engages securely.
If it is not properly engaged, transported
cargo could enter the passenger compart‐
ment during braking or evasive maneuvers
and endanger the vehicle occupants.◀ 3.
Push the head restraints into the top posi‐
tion.
Folding backrest down
1. Push the head restraints down, refer to
page 52.
2. Pull the lever, refer to arrows. The backrests
are released. 3.
Fold the backrest down. Seat heating*
Front
The temperature setting progresses one step
through its control sequence each time you
press the button. The maximum temperature is
reached when three LEDs are lit.
To switch off: press and hold the button.
The
temperature is reduced, if need be, down to
no heat in order to reduce the load on the bat‐
tery. The LEDs remain lit.
Rear Operation similar to front seat heating, without
temperature distribution.
Seite 48
48 Online Edition for Part no. 01 40 2 606 735 - 03 11 500
Adjusting
Page 58 of 317

Mounting LATCH child restraint fixing
systems
1.
Mount the child restraint fixing system; refer
to the operating instructions of the system.
2. Ensure that both LATCH anchors are prop‐
erly connected.
Child restraint fixing system with a
tether strap
Mounting points LATCH mounting eyes
Only
use the mounting eyes for the upper
LATCH retaining strap to secure child restraint
fixing systems; otherwise, the mounting eyes
could be damaged.◀
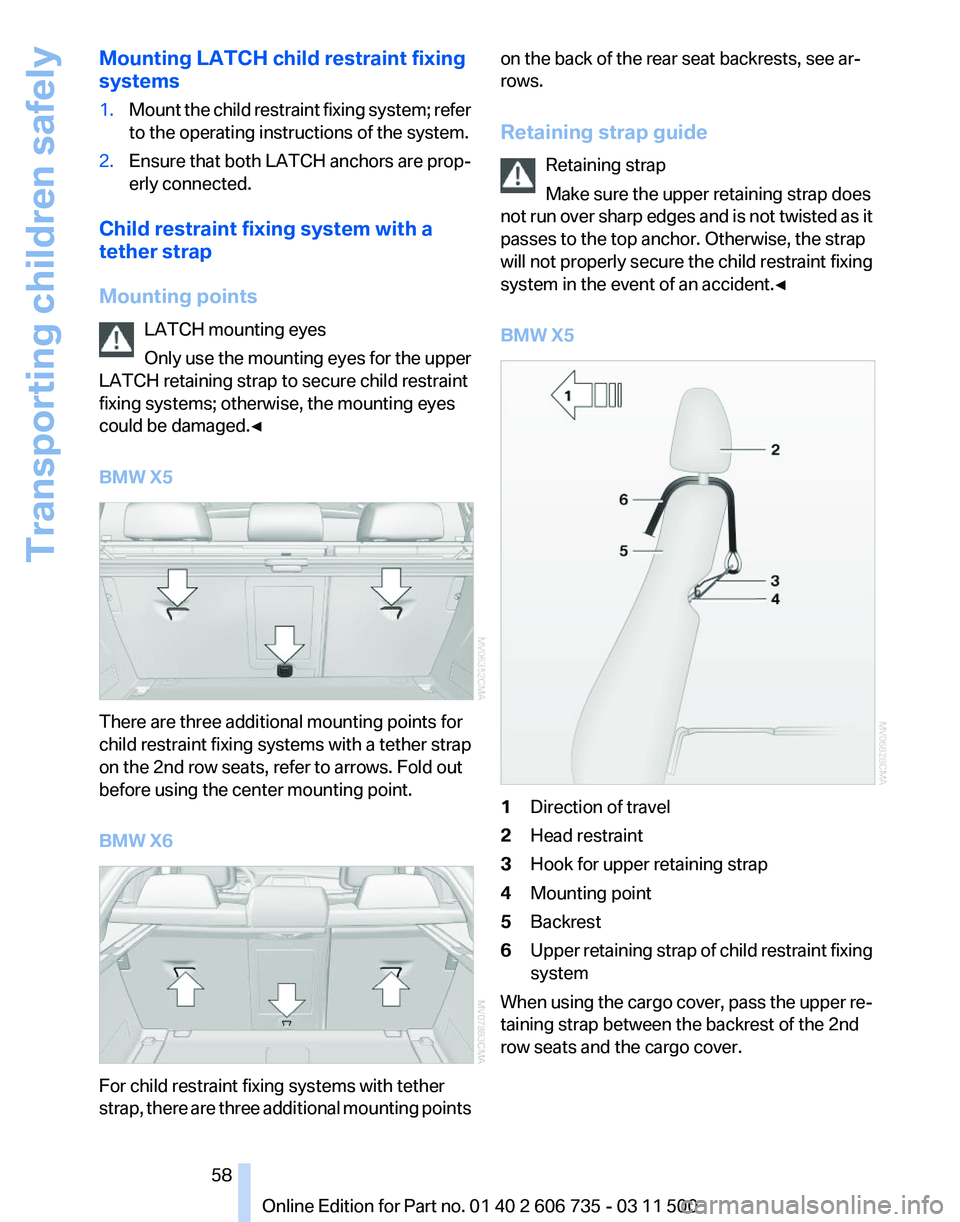
BMW X5 There are three additional mounting points for
child restraint fixing systems with a tether strap
on the 2nd row seats, refer to arrows. Fold out
before using the center mounting point.
BMW X6
For child restraint fixing systems with tether
strap,
there are three additional mounting points on the back of the rear seat backrests, see ar‐
rows.
Retaining strap guide
Retaining strap
Make sure the upper retaining strap does
not
run over sharp edges and is not twisted as it
passes to the top anchor. Otherwise, the strap
will not properly secure the child restraint fixing
system in the event of an accident.◀
BMW X5 1
Direction of travel
2 Head restraint
3 Hook for upper retaining strap
4 Mounting point
5 Backrest
6 Upper retaining strap of child restraint fixing
system
When using the cargo cover, pass the upper re‐
taining strap between the backrest of the 2nd
row seats and the cargo cover. Seite 58
58 Online Edition for Part no. 01 40 2 606 735 - 03 11 500
Transporting children safely
Page 59 of 317

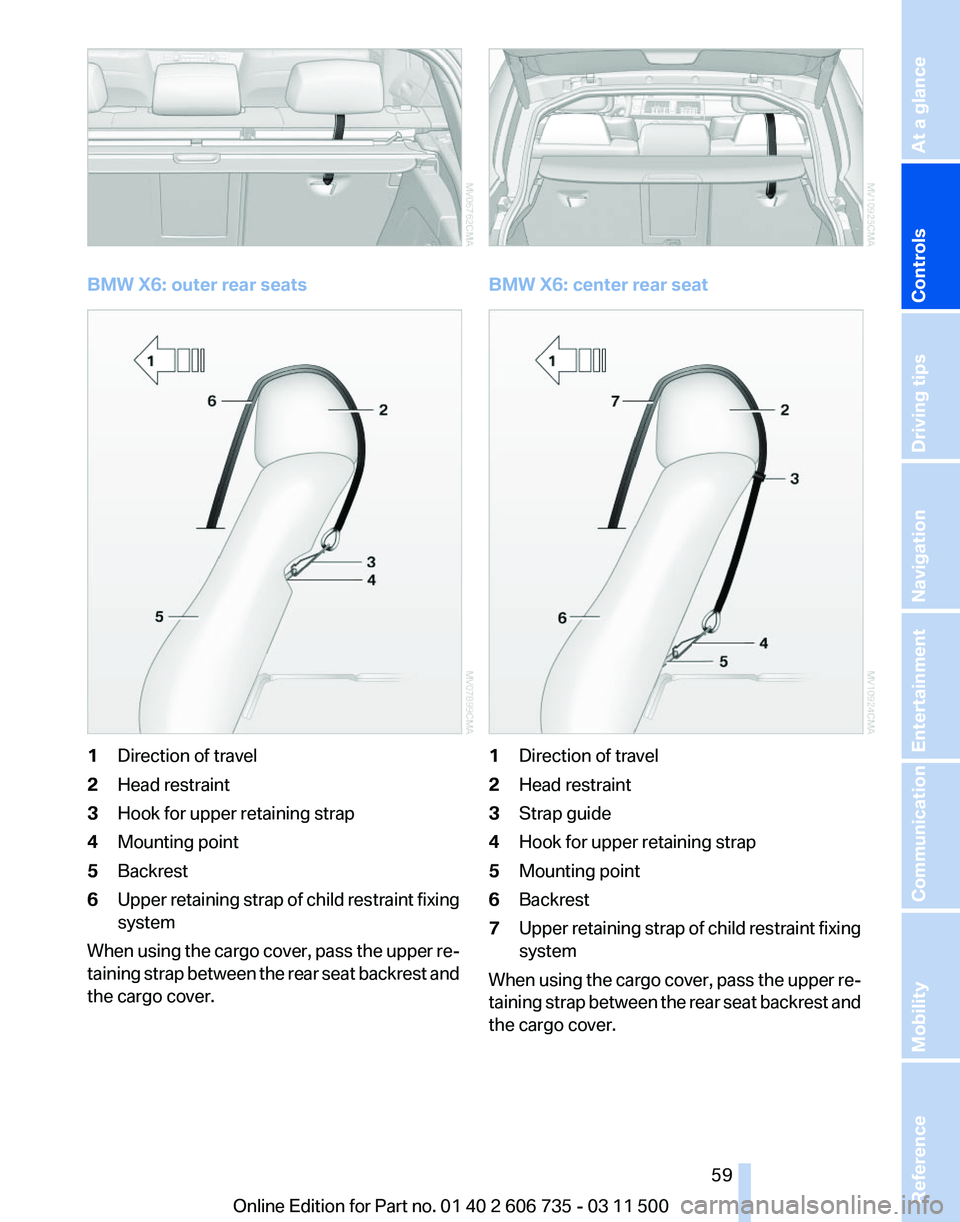
BMW X6: outer rear seats
1
Direction of travel
2 Head restraint
3 Hook for upper retaining strap
4 Mounting point
5 Backrest
6 Upper retaining strap of child restraint fixing
system
When using the cargo cover, pass the upper re‐
taining strap between the rear seat backrest and
the cargo cover. BMW X6: center rear seat
1
Direction of travel
2 Head restraint
3 Strap guide
4 Hook for upper retaining strap
5 Mounting point
6 Backrest
7 Upper retaining strap of child restraint fixing
system
When using the cargo cover, pass the upper re‐
taining
strap between the rear seat backrest and
the cargo cover.
Seite 59
59Online Edition for Part no. 01 40 2 606 735 - 03 11 500
Reference Mobility Communication Entertainment Navigation Driving tips
Controls At a glance
Page 65 of 317

Driving
Automatic
Hold is activated: the vehicle is auto‐
matically secured against rolling when it stops.
The indicator lamp lights up in green.
Indicator lamp in Canadian models.
Step on the accelerator pedal to drive off.
The brake is released automatically.
The indicator lamp goes out. Before driving into a car wash
Deactivate Automatic Hold; otherwise, the
parking brake will be set when the vehicle is sta‐
tionary and the vehicle will no longer be able to
roll.◀
Parking
The parking brake is automatically set if the en‐
gine is switched off while the vehicle is being
held by Automatic Hold.
The indicator lamp changes from green
to red.
Indicator lamp in Canadian models.
The parking brake is not set if the engine is
switched off while the vehicle is coasting to a
halt. Automatic Hold is deactivated. Take the remote control with you
Take the remote control with you when
leaving the vehicle so that children, for example,
cannot release the parking brake.◀
Malfunction
In the event of a failure or malfunction of the
parking brake, secure the vehicle against rolling
using a wheel chock, for example, when leaving
it. Releasing the parking brake manually
In the event of an electrical power loss or elec‐
trical malfunction, you can release the parking
brake manually.
Secure the vehicle against rolling
Before releasing the parking brake man‐
ually,
and whenever you park the vehicle with the
parking brake released, ensure that position P of
the automatic transmission is engaged. Note
the display in the instrument cluster.
In addition, secure the vehicle against rolling,
e.g. with a wheel chock. Otherwise there is a
danger that the vehicle could roll if parked on a
steep slope.◀
Jump-starting and towing, refer to page 282.
Unlocking
1. Open the left-hand side panel in the cargo
area.
2. Remove the first aid kit* and the warning tri‐
angle*.
Close the bracket of the warning tri‐
angle.
3. Insert the releasing tool or screwdriver, con‐
tained in the tool kit under the cargo floor
panel, refer to page 270, at the releasing
point. 4.
Firmly pull the releasing tool or screwdriver
upward against the mechanical resistance,
refer to arrow, until a considerable increase
in force is felt and the parking brake is then
clearly heard to release.
5. Stow the releasing tool or screwdriver,
warning
triangle*, and first aid kit* and close
the left side panel in the cargo area. Seite 65
65Online Edition for Part no. 01 40 2 606 735 - 03 11 500
Reference Mobility Communication Entertainment Navigation Driving tips
Controls At a glance